
Popular categories
Looking for a yarn?


Comments / Questions (103)
![]() Hanne Neshagen wrote:
Hanne Neshagen wrote:
Hei😊har dere oppskrift på denne gensern som er strikket nedenfra og opp?
11.01.2021 - 18:19DROPS Design answered:
Hei Hanne, Vi har ikke akkurat denne oppskriften nedenfra og opp. Du kan sette det kravet i søkeboksen og finne andre oppskrifter strikket på den måten. God fornøyelse!
13.01.2021 - 07:52
![]() Yvonne Vest wrote:
Yvonne Vest wrote:
Hej igen. Det gør jeg, men der mangler stadig svar på, hvorfor der står, strik til arbejdet måler 23 cm og strik videre til 23 cm? Og mål fra halskanten, det fremgår ikke om det er fra starten eller fra kanten, når den er bukket om? Mvh Yvonne
07.01.2021 - 18:21DROPS Design answered:
Hej Yvonne, på nogle at størrelserne har du et par cm tilbage inden du deler arbejdet. Det behøver du ikke i din størrelse! Du måler fra den stiplede linje som du ser nederst på halskanten i måleskitsen. God fornøjelse!
08.01.2021 - 10:35
![]() Henriette wrote:
Henriette wrote:
Hei. Sliter litt med å skjønne hva som er A.2...
06.01.2021 - 13:37DROPS Design answered:
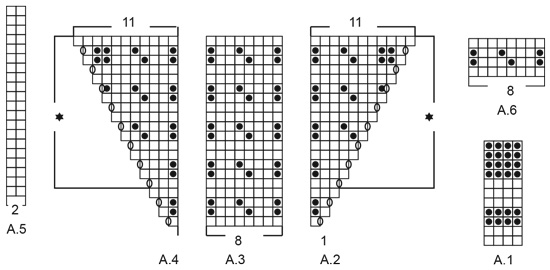
Hei Henriette, A.2 er de første maskene i diagrammet ( 1 kast og 1 rett med natur på første raden). A.2 har, med andre ord, økningene, mens A.3 er det samme hele veien. Rad 2 i A.2 er 1 rett med natur og 1 rett med mørk grå, på rad 3 er det 1 kast,1 rett med natur, 1 rett med mørk grå). God fornøyelse!
07.01.2021 - 07:51
![]() Yvonne Vest wrote:
Yvonne Vest wrote:
I opskriften står der. Når sidste udtagning er færdig, er der i L 336 m og arbejdet måler ca 23 cm fra halskanten, hvor er det? er det helt fra starten? Fortsæt mønster som før, uden udtagninger til arbejdet måler 23 cm , det er altså samme mål som før. Derudover er jeg for længst ud over de 23 cm og har lavet strikke prøve, desuden er 23 cm meget kort til en mande str L Mvh
02.01.2021 - 07:53DROPS Design answered:
Hej Yvonne, du finder alle mål til den den størrelse du har valgt, i måleskitsen nederst i opskriften. Det kan være at et nummer større passer dig bedre?
07.01.2021 - 15:38
![]() Mariia wrote:
Mariia wrote:
Beklager! Nå forstår jeg - det er bare 2 extra A3 hver gang:)
14.12.2020 - 12:45
![]() Mariia wrote:
Mariia wrote:
Hei, jeg har et spørsmål. Hvordan man "Continue this pattern onwards; i.e. the pattern repeats itself as shown in A.2/A.4". Starter jeg med den A3 for nytt eller hva de betyr? Mange takk:)
11.12.2020 - 22:24DROPS Design answered:
Mariia. Så flott at du fant det ut selv :) God Fornøyelse videre med genseren.
16.12.2020 - 13:41
![]() Carolin wrote:
Carolin wrote:
Hallo liebes Drops Team, nachdem ich A2-A3-A4-A5 einmal in der Höhe gestrickt habe, verstehe ich nicht wie ich danach weiter in der Höhe stricken soll. Wo genau nehme ich Maschen zu und wie kommt man bei 26 Zunahmen (Größe M) auf 304 M auf der Nadel? Ich bin aktuell leider etwas aufgeschmissen :(
14.11.2020 - 14:52DROPS Design answered:
Liebe Carolin, Diagramme stricken Sie wie zuvor, aber jetzt gibt es genügend Maschen zwischen A.2 und A.4 um 2 Rapporte mehr von A.3 zu stricken, dh: A.2 (= über die 3 erste M. von vorrigen A.2) A.3 6 x wiederholen (1. A.3 wird über die 8 letzten M von vorrigen A.2 und letztes A.3 wird über die ersten 8 M von vorrigen A.4 gestrickt), A.4 (3 M über die 3 letzten M von vorrigen A.4) (= Rückenteil), A.5 wie zuvor stricken und so weiterstricken, Sie nehmen 1 Maschen in jedem A.2/A.4 wie zuvor zu. Viel spaß beim stricken!
16.11.2020 - 08:07
![]() Britta wrote:
Britta wrote:
Er det muligt at få nogle mål på Reykjavik herreblusen? Jeg er i tvivl om jeg skal strikke S eller M.
06.11.2020 - 21:39DROPS Design answered:
Hej Britta, ja selvfølgelig, du finder målene på sweateren i måleskitsen nederst i opskriften. God fornøjelse!
09.11.2020 - 11:25
![]() Randi Brodersen wrote:
Randi Brodersen wrote:
Jeg strikker str XL har jeg ret i at ærmer er 20 masker og for og bagstykke er 32 masker plus de 4x2 masker der er raglang =112 masker
22.10.2020 - 22:53DROPS Design answered:
Hei Randi. Du må må også huske raglan økningene, slik at du ved første omgang på bærestykket har økt med 8 masker = 120 masker. God Fornøyelse!
26.10.2020 - 08:51
![]() Alvhild Flatjord wrote:
Alvhild Flatjord wrote:
Skal strikke Reykjavik herregensar. Kan det være feil i starten på bærestykke. Eg får ikkje mønsteret til å stemme..
03.09.2020 - 17:50DROPS Design answered:
Hej Alvhild, For at vi skal kunne hjælpe dig, behøver vi vide mere om hvad du ikke kan få til at stemme. Skriv til os hvilken størrelse du strikker, hvor du er i opskriften, og hvor mange masker du har, så skal vi se på det. Husk at markere som et spørgsmål. :)
04.11.2020 - 11:24
|
|||||||||||||
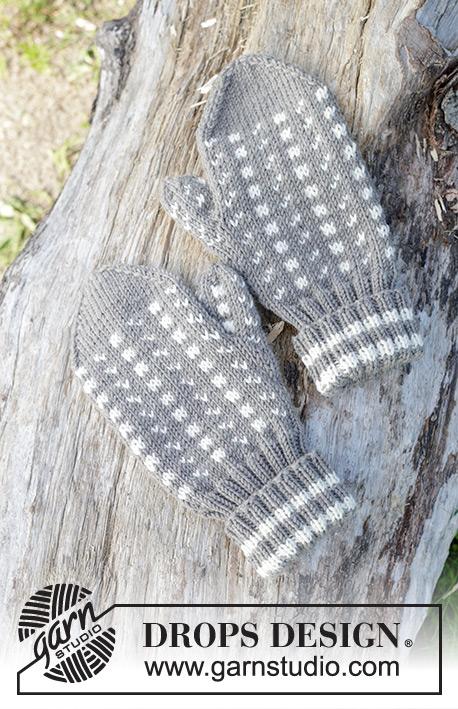
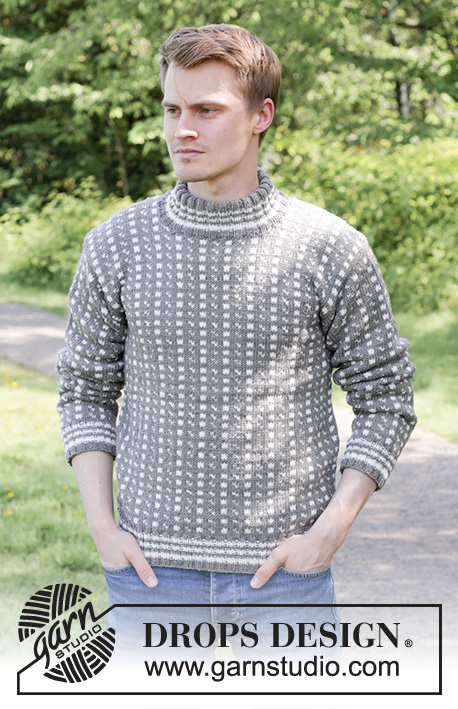
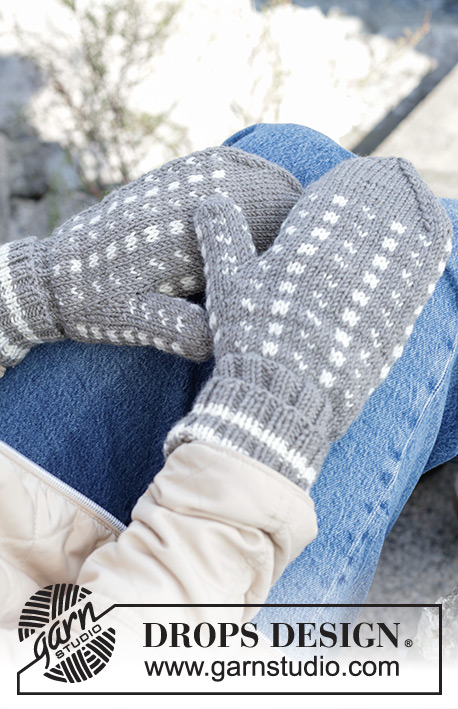
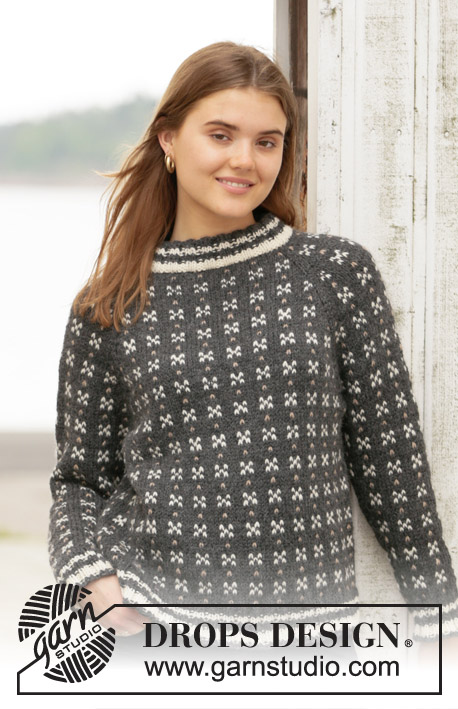
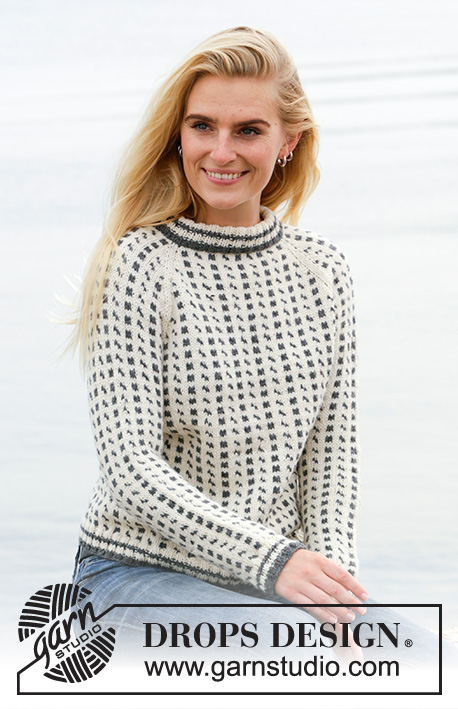
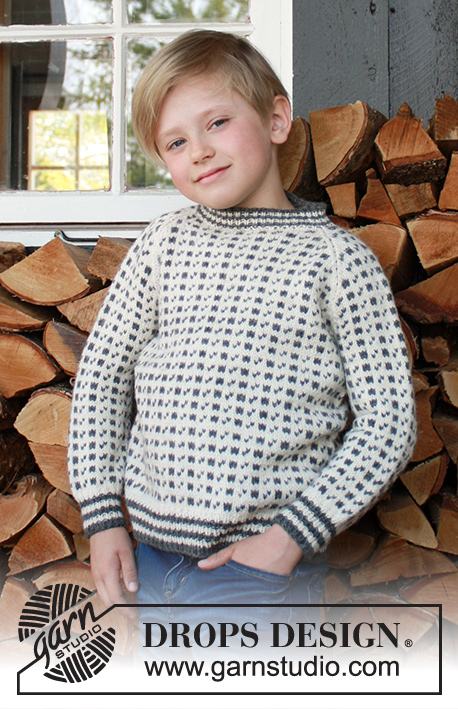
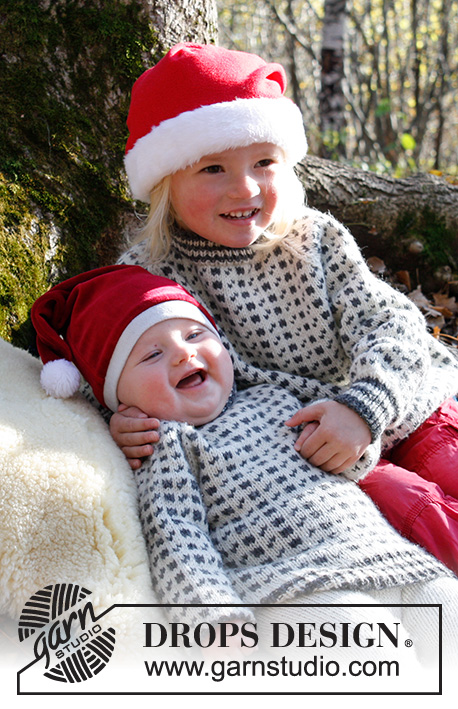
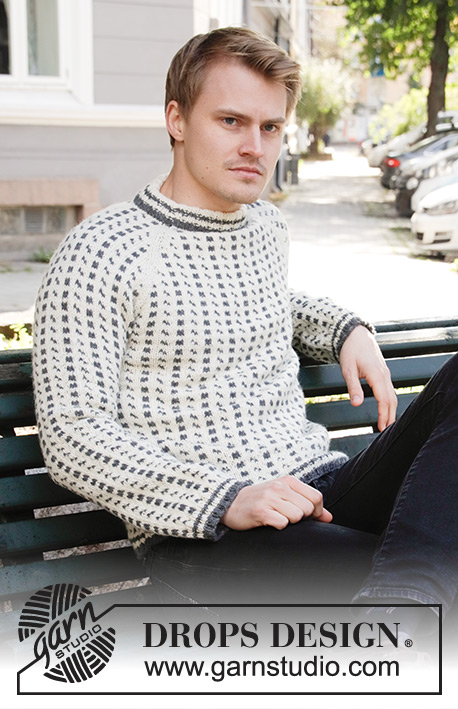
Reykjavik#reykjaviksweater |
|||||||||||||
 |
 |
||||||||||||
Knitted jumper for men with Nordic Icelandic pattern and raglan in DROPS Lima. The piece is worked top down. Sizes S - XXXL.
DROPS 208-3 |
|||||||||||||
|
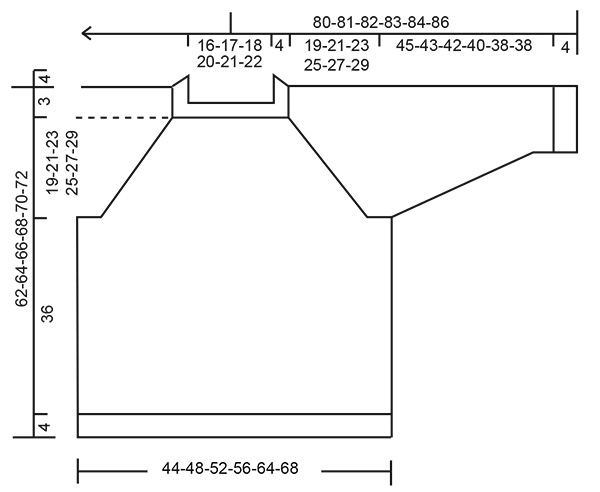
------------------------------------------------------- EXPLANATIONS FOR THE PATTERN: ------------------------------------------------------- PATTERN: See diagrams A.1 to A.6. Pattern A.1 is worked in rib. Patterns A.2 to A.6 are worked in stocking stitch. INCREASE TIP (evenly spaced): To work out how to increase evenly, count the total number of stitches on the needle (e.g. 88 stitches) and divide by the number of increases to be made (e.g. 8) = 11. In this example, increase by making 1 yarn over after each 11th stitch. On the next round knit the yarn overs twisted to avoid holes. KNITTING TIP: To avoid the knitting tension becoming tighter when working pattern with more than 1 colour it is important that the strands at the back are not tight. Use a size larger needle when working pattern if this is a problem. CASTING-OFF TIP: To avoid the cast-off edge being tight you can cast off with a ½-size larger needle; or cast off with knit over knit and purl over purl and make 1 yarn over after approx. each 4th stitch (yarn overs cast off as normal stitches). DECREASE TIP (for sleeves): Decrease 1 stitch on each side of the marker thread as follows: Work until there are 2 stitches left before the marker thread, knit 2 together with off-white (marker thread sits here), slip 1 stitch as if to knit, knit 1 with off-white and pass the slipped stitch over the knitted stitch. ------------------------------------------------------- START THE PIECE HERE: ------------------------------------------------------- JUMPER – SHORT OVERVIEW OF THE PIECE: The neck, yoke and body are worked in the round with circular needle, top down. The sleeves are worked in the round with short circular needle/double pointed needles, top down. NECK: Cast on 88-92-96-104-108-112 stitches with short circular needle size 3.5 mm and dark grey. Change to off white and knit 1 round. Work rib (= knit 2/ purl 2) for 4 cm, then work A.1 in rib. Knit 1 round with off white where you increase 8-4-0-8-20-16 stitches evenly spaced – read INCREASE TIP = 96-96-96-112-128-128 stitches. Change to circular needle size 4.5 mm and insert a marker thread at the beginning of the round. YOKE: The first round is worked as follows: Work A.2 (= 1 stitch), A.3 over the next 32-32-32-32-40-40 stitches (= 4-4-4-4-5-5 repeats of 8 stitches) and A.4 (= 1 stitch) = back piece, work A.5 (= 2 stitches) = raglan-line, A.2 (= 1 stitch), A.3 over the next 8-8-8-16-16-16 stitches (= 1-1-1-2-2-2 repeats of 8 stitches) and A.4 (= 1 stitch) = sleeve, work A.5 (= 2 stitches) = raglan-line, A.2 (= 1 stitch), A.3 over the next 32-32-32-32-40-40 stitches (= 4-4-4-4-5-5 repeats of 8 stitches) and A.4 (= 1 stitch) = front piece, work A.5 (= 2 stitches) = raglan-line, A.2 (= 1 stitch), A.3 over the next 8-8-8-16-16-16 stitches (= 1-1-1-2-2-2 repeats of 8 stitches) and A.4 (= 1 stitch) = sleeve. Finally work A.5 (= 2 stitches) = raglan-line. The first increase for raglan is now finished, and there is 104-104-104-120-136-136 stitches on the needle (there is 36-36-36-36-44-44 stitches for back and for front piece, 12-12-12-20-20-20 stitches for each sleeve and 2 stitches in each of the 4 raglan lines). Continue this pattern onwards; i.e. increase 1 stitch on the side of each A.2 and A.4 (= a total of 8 stitches increased every 2nd round). Read KNITTING TIP and REMEMBER THE KNITTING TENSION! When A.2 to A.4 have been worked 1 time in height there are 176-176-176-192-208-208 stitches on the needle. Continue this pattern onwards; i.e. the pattern repeats itself as shown in A.2/A.4. Diagram A.3 is worked 2 more times in width each time the 16 rows are repeated in height. Continue to increase like this until you have increased a total of 22-26-30-32-32-34 times in height on the side of A.2/A.4. When the last increase is finished there are 272-304-336-368-384-400 stitches on the needle and the piece measures approx. 17-20-23-25-25-26 cm from the neck. Continue with pattern as before, but without further increases, until the piece measures 19-21-23-25-27-29 cm from the neck. The next round is worked as follows, start 1-1-1-3-3-5 stitches befoe the beginning of the round: Work 80-88-96-104-112-120 stitches as before (= back piece), place the next 56-64-72-80-80-80 stitches on 1 thread for sleeve, cast on 8-8-8-8-16-16 new stitches on the needle (= in side under sleeve), work 80-88-96-104-112-120 stitches as before (= front piece), place the next 56-64-72-80-80-80 stitches on 1 thread for sleeve, cast on 8-8-8-8-16-16 new stitches on the needle (= in side under sleeve). Cut the strand. The body and sleeves are finished separately. THE PIECE IS NOW MEASURED FROM HERE! BODY: = 176-192-208-224-256-272 stitches. Insert 1 marker thread in one side of the piece, in the middle of the 8-8-8-8-16-16 stitches cast on under the sleeve. Allow the thread to follow your work onwards; it marks the beginning of the round. Work A.6 in the round (= 22-24-26-28-32-34 repeats of 8 stitches) – start on the right stitch and right round in the diagram so the pattern is repeated as before, both in width and height. Continue working until the piece measures approx. 36 cm from the division – adjust to after a complete repeat in height. Change to circular needle size 3.5 mm and knit 1 round with off white where you increase 36-36-40-44-48-52 stitches evenly spaced = 212-228-248-268-304-324 stitches. Work A.1 in rib (= knit 2/ purl 2). When A.1 is finished, cast off with knit over knit and purl over purl using dark grey – read CASTING-OFF TIP. SLEEVE: Place the 56-64-72-80-80-80 stitches from the thread on the one side of the piece on short circular needle/double pointed needles size 4.5 mm and knit up 1 stitch in each of the 8-8-8-8-16-16 stitches cast on under the sleeve = 64-72-80-88-96-96 stitches. Insert 1 marker thread in the middle of the 8-8-8-8-16-16 stitches under the sleeve and allow it to follow your work onwards; it will be used when decreasing mid under sleeve. Start the round at the marker thread and work A.6 in the round (= 8-9-10-11-12-12 repeats of 8 stitches) – start on the right stitch and right round in the diagram so the pattern is repeated as before both in width and height, but the first and last stitch on the round are always worked with off white (to give neat decreases under the sleeve). When the piece measures 7-5-4-3-2-2,5 cm from the division, decrease 2 stitches mid under the sleeve – read DECREASE TIP. Decrease like this every 7-5-4-3-2-2.5 cm a total of 6-8-10-12-16-14 times = 52-56-60-64-64-68 stitches left on needle. Continue working until the sleeve measures approx. 45-43-42-40-38-38 cm from the division (NOTE: Shorter measurements in larger sizes due to wider neck and longer yoke) – adjust to after a complete repeat in height. Change to double pointed needles size 3.5 mm and knit 1 round with off-white. Work A.1 in rib (= knit 2/ purl 2). When A.1 is finished, cast off with dark grey – read CASTING-OFF TIP. Work the other sleeve in the same way. ASSEMBLY: Fold the neck double towards the wrong side. Sew the cast-on edge down with dark grey – sew with small, neat stitches on the inside of the jumper (make sure the stitches do not show on the outside and that the seam is not tight). |
|||||||||||||
Diagram explanations |
|||||||||||||
|
|||||||||||||
 |
|||||||||||||
 |
|||||||||||||
Have you finished this pattern?Tag your pictures with #dropspattern #reykjaviksweater or submit them to the #dropsfan gallery. Do you need help with this pattern?You'll find 29 tutorial videos, a Comments/Questions area and more by visiting the pattern on garnstudio.com. © 1982-2026 DROPS Design A/S. We reserve all rights. This document, including all its sub-sections, has copyrights. Read more about what you can do with our patterns at the bottom of each pattern on our site. |
|||||||||||||


With over 40 years in knitting and crochet design, DROPS Design offers one of the most extensive collections of free patterns on the internet - translated to 17 languages. As of today we count 324 catalogues and 12290 patterns translated into English (UK/cm). 12290
We work hard to bring you the best knitting and crochet have to offer, inspiration and advice as well as great quality yarns at incredible prices! Would you like to use our patterns for other than personal use? You can read what you are allowed to do in the Copyright text at the bottom of all our patterns. Happy crafting!
Post a comment to pattern DROPS 208-3
We would love to hear what you have to say about this pattern!
If you want to leave a question, please make sure you select the correct category in the form below, to speed up the answering process. Required fields are marked *.