DROPS Lima
DROPS Lima
65% Wool, 35% Alpaca
from 2.40 £ /50g
Get the yarn to make this pattern from 26.40£.

The yarn cost is calculated from the pattern’s smallest size and the yarn’s cheapest product type. Looking for an even better price? You might find it on the DROPS Deals!

DROPS SS24

Reykjavik

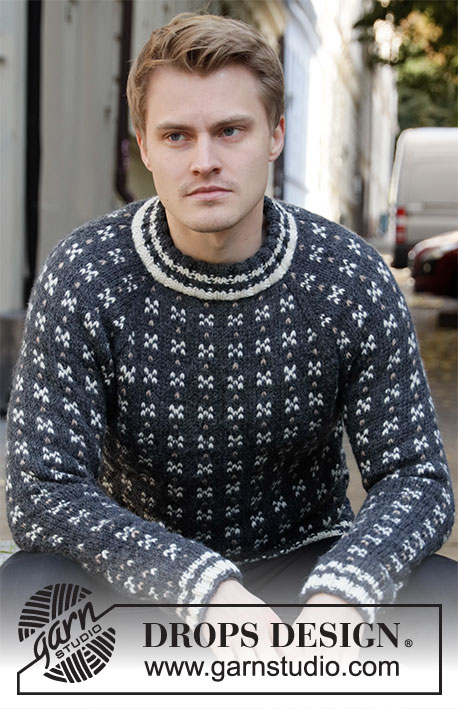
Knitted jumper for men with Nordic Icelandic pattern and raglan in DROPS Lima. The piece is worked top down. Sizes S - XXXL.

DROPS 208-3
DROPS Design: Pattern no li-114
Yarn group B
-------------------------------------------------------

SIZES:
S - M - L - XL - XXL - XXXL

MATERIALS:
DROPS LIMA from Garnstudio (belongs to yarn group B)
400-400-450-450-550-550 g colour 0100, off white
150-150-200-200-200-250 g colour 0519, dark grey

KNITTING TENSION:
20 stitches in width and 26 rows in height with stocking stitch = 10 x 10 cm.

NEEDLES:
DROPS DOUBLE POINTED NEEDLES SIZE 4.5 MM.
DROPS CIRCULAR NEEDLE SIZE 4.5 MM: Length 40 cm and 80 cm for stocking stitch.
DROPS DOUBLE POINTED NEEDLES SIZE 3.5 MM.
DROPS CIRCULAR NEEDLE SIZE 3.5 MM: Length 40 cm and 80 cm for rib.
Needle size is only a guide. If you get too many stitches on 10 cm, change to a larger needle size. If you get too few stitches on 10 cm, change to a smaller needle size.

-------------------------------------------------------

Alternative Yarn – See how to change yarns here
Yarn Groups A to F – Use the same pattern and change the yarn here
Yarn usage using an alternative yarn – Use our yarn converter here

-------------------------------------------------------

DROPS Lima
DROPS Lima
65% Wool, 35% Alpaca
from 2.40 £ /50g
Get the yarn to make this pattern from 26.40£.

The yarn cost is calculated from the pattern’s smallest size and the yarn’s cheapest product type. Looking for an even better price? You might find it on the DROPS Deals!

Pattern instructions

NOTE: This pattern is written in British English. All measurements in charts are in cm. For conversion from cm to inches - click here. There are different terms for crocheting in British and American English. If this pattern includes crochet, click for "crochet terms" here. For this pattern in American English, please click here.
-------------------------------------------------------

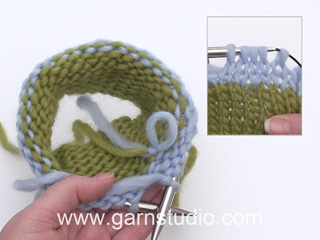
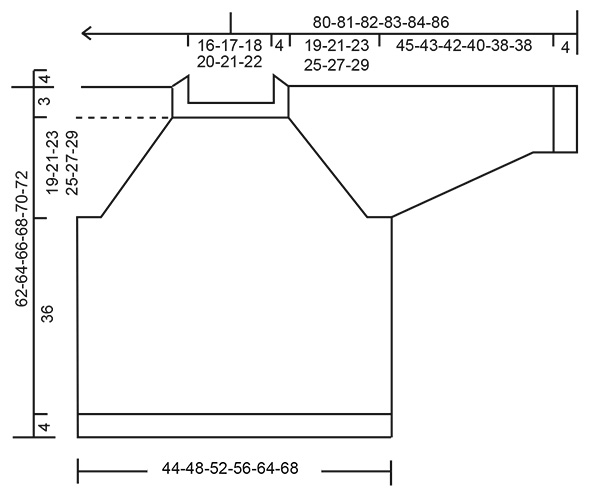
EXPLANATIONS FOR THE PATTERN:

-------------------------------------------------------

PATTERN: 
See diagrams A.1 to A.6.
Pattern A.1 is worked in rib.
Patterns A.2 to A.6 are worked in stocking stitch.

INCREASE TIP (evenly spaced):
To work out how to increase evenly, count the total number of stitches on the needle (e.g. 88 stitches) and divide by the number of increases to be made (e.g. 8) = 11. 
In this example, increase by making 1 yarn over after each 11th stitch. On the next round knit the yarn overs twisted to avoid holes.

KNITTING TIP:
To avoid the knitting tension becoming tighter when working pattern with more than 1 colour it is important that the strands at the back are not tight. Use a size larger needle when working pattern if this is a problem.

CASTING-OFF TIP:
To avoid the cast-off edge being tight you can cast off with a ½-size larger needle; or cast off with knit over knit and purl over purl and make 1 yarn over after approx. each 4th stitch (yarn overs cast off as normal stitches).

DECREASE TIP (for sleeves): 
Decrease 1 stitch on each side of the marker thread as follows: Work until there are 2 stitches left before the marker thread, knit 2 together with off-white (marker thread sits here), slip 1 stitch as if to knit, knit 1 with off-white and pass the slipped stitch over the knitted stitch.

-------------------------------------------------------

START THE PIECE HERE:

-------------------------------------------------------

JUMPER – SHORT OVERVIEW OF THE PIECE:
The neck, yoke and body are worked in the round with circular needle, top down. The sleeves are worked in the round with short circular needle/double pointed needles, top down.

NECK:
Cast on 88-92-96-104-108-112 stitches with short circular needle size 3.5 mm and dark grey. Change to off white and knit 1 round. Work rib (= knit 2/ purl 2) for 4 cm, then work A.1 in rib. Knit 1 round with off white where you increase 8-4-0-8-20-16 stitches evenly spaced – read INCREASE TIP = 96-96-96-112-128-128 stitches. Change to circular needle size 4.5 mm and insert a marker thread at the beginning of the round.

YOKE:
The first round is worked as follows: Work A.2 (= 1 stitch), A.3 over the next 32-32-32-32-40-40 stitches (= 4-4-4-4-5-5 repeats of 8 stitches) and A.4 (= 1 stitch) = back piece, work A.5 (= 2 stitches) = raglan-line, A.2 (= 1 stitch), A.3 over the next 8-8-8-16-16-16 stitches (= 1-1-1-2-2-2 repeats of 8 stitches) and A.4 (= 1 stitch) = sleeve, work A.5 (= 2 stitches) = raglan-line, A.2 (= 1 stitch), A.3 over the next 32-32-32-32-40-40 stitches (= 4-4-4-4-5-5 repeats of 8 stitches) and A.4 (= 1 stitch) = front piece, work A.5 (= 2 stitches) = raglan-line, A.2 (= 1 stitch), A.3 over the next 8-8-8-16-16-16 stitches (= 1-1-1-2-2-2 repeats of 8 stitches) and A.4 (= 1 stitch) = sleeve. Finally work A.5 (= 2 stitches) = raglan-line. The first increase for raglan is now finished, and there is 104-104-104-120-136-136 stitches on the needle (there is 36-36-36-36-44-44 stitches for back and for front piece, 12-12-12-20-20-20 stitches for each sleeve and 2 stitches in each of the 4 raglan lines).
Continue this pattern onwards; i.e. increase 1 stitch on the side of each A.2 and A.4 (= a total of 8 stitches increased every 2nd round). Read KNITTING TIP and REMEMBER THE KNITTING TENSION! When A.2 to A.4 have been worked 1 time in height there are 176-176-176-192-208-208 stitches on the needle.
Continue this pattern onwards; i.e. the pattern repeats itself as shown in A.2/A.4. Diagram A.3 is worked 2 more times in width each time the 16 rows are repeated in height. Continue to increase like this until you have increased a total of 22-26-30-32-32-34 times in height on the side of A.2/A.4. When the last increase is finished there are 272-304-336-368-384-400 stitches on the needle and the piece measures approx. 17-20-23-25-25-26 cm from the neck. Continue with pattern as before, but without further increases, until the piece measures 19-21-23-25-27-29 cm from the neck.
The next round is worked as follows, start 1-1-1-3-3-5 stitches befoe the beginning of the round:
Work 80-88-96-104-112-120 stitches as before (= back piece), place the next 56-64-72-80-80-80 stitches on 1 thread for sleeve, cast on 8-8-8-8-16-16 new stitches on the needle (= in side under sleeve), work 80-88-96-104-112-120 stitches as before (= front piece), place the next 56-64-72-80-80-80 stitches on 1 thread for sleeve, cast on 8-8-8-8-16-16 new stitches on the needle (= in side under sleeve). Cut the strand. The body and sleeves are finished separately. THE PIECE IS NOW MEASURED FROM HERE!

BODY:
= 176-192-208-224-256-272 stitches. Insert 1 marker thread in one side of the piece, in the middle of the 8-8-8-8-16-16 stitches cast on under the sleeve. Allow the thread to follow your work onwards; it marks the beginning of the round. Work A.6 in the round (= 22-24-26-28-32-34 repeats of 8 stitches) – start on the right stitch and right round in the diagram so the pattern is repeated as before, both in width and height.
Continue working until the piece measures approx. 36 cm from the division – adjust to after a complete repeat in height. Change to circular needle size 3.5 mm and knit 1 round with off white where you increase 36-36-40-44-48-52 stitches evenly spaced = 212-228-248-268-304-324 stitches. Work A.1 in rib (= knit 2/ purl 2). When A.1 is finished, cast off with knit over knit and purl over purl using dark grey – read CASTING-OFF TIP.

SLEEVE:
Place the 56-64-72-80-80-80 stitches from the thread on the one side of the piece on short circular needle/double pointed needles size 4.5 mm and knit up 1 stitch in each of the 8-8-8-8-16-16 stitches cast on under the sleeve = 64-72-80-88-96-96 stitches. Insert 1 marker thread in the middle of the 8-8-8-8-16-16 stitches under the sleeve and allow it to follow your work onwards; it will be used when decreasing mid under sleeve. Start the round at the marker thread and work A.6 in the round (= 8-9-10-11-12-12 repeats of 8 stitches) – start on the right stitch and right round in the diagram so the pattern is repeated as before both in width and height, but the first and last stitch on the round are always worked with off white (to give neat decreases under the sleeve).
When the piece measures 7-5-4-3-2-2,5 cm from the division, decrease 2 stitches mid under the sleeve – read DECREASE TIP. Decrease like this every 7-5-4-3-2-2.5 cm a total of 6-8-10-12-16-14 times = 52-56-60-64-64-68 stitches left on needle. Continue working until the sleeve measures approx. 45-43-42-40-38-38 cm from the division (NOTE: Shorter measurements in larger sizes due to wider neck and longer yoke) – adjust to after a complete repeat in height. Change to double pointed needles size 3.5 mm and knit 1 round with off-white. Work A.1 in rib (= knit 2/ purl 2). When A.1 is finished, cast off with dark grey – read CASTING-OFF TIP. Work the other sleeve in the same way.

ASSEMBLY:
Fold the neck double towards the wrong side. Sew the cast-on edge down with dark grey – sew with small, neat stitches on the inside of the jumper (make sure the stitches do not show on the outside and that the seam is not tight).

This pattern has been corrected.

Updated online: 12.08.2021
Correction: The pattern has been looked over, the number of stitches on sleeves and body after the first raglan increase as been added. The diagrams A.2, A.3 og A.4 has be divided. And in addition a error when dividing for sleeves/body has been corrected.

Diagram

symbols = off white
symbols = dark grey
symbols = between 2 stitches make 1 yarn over; on the next round knit the yarn over twisted to avoid a hole
symbols = shows 1 repeat in height and how the patterns are placed over each other
diagram
diagram

Each of our patterns has specific tutorial videos to help you.

Do you have a question? See a list of frequently asked questions (FAQ)

Knitting tension is what determines the final measurements of your work, and is usually measured per 10 x 10 cm. It is provided like so: number of stitches in width x number of rows in height - eg: 19 stitches x 26 rows = 10 x 10 cm.

The knitting tension is very individual; some people knit/crochet loosely while others work tightly. You adjust the knitting tension with the needle size, which is why the suggested needle size is only meant as a guide! You need to adjust this (up or down) to ensure that YOUR knitting tension matches the knitting tension provided in the pattern. If you work with a different knitting tension than provided you will have a different yarn consumption, and your work will have different measurements than what the pattern suggests.

The knitting tension also determines which yarns can replace each other. As long as you achieve the same knitting tension you can replace one yarn with another.

See DROPS lesson: How to measure your tension/gauge

See DROPS video: How to make a gauge tension swatch

The required amount of yarn is provided in grams, eg: 450 g. To calculate how many balls you’ll need you first need to know how many grams are in 1 ball (25g, 50g or 100g). This information is available if you click on the individual yarn quality on our pages. Divide the amount required with the amount of each ball. For example, if each ball is 50g (the most common amount), the calculation will be as follows: 450 / 50 = 9 balls.

The important thing when changing from one yarn to another is that the knitting/crochet tension remains the same. This is so that the measurements of the finished piece will be the same as on the sketch provided. It is easier to achieve the same knitting tension using yarns from the same yarn group. It is also possible to work with multiple strands of a thinner yarn to achieve the knitting tension of a thicker one. Please try our yarn converter. We recommend you to always work a test swatch.

Please NOTE: when changing yarn the garment might have a different look and feel to the garment in the photo, due to individual properties and qualities of each yarn.

See DROPS lesson: Can I use a different yarn than the one mentioned in the pattern?

All our yarns are categorised into yarn groups (from A to F) according to thickness and knitting tension – group A contains the thinnest yarns and group F the thickest. This makes it easier for you to find alternative yarns to our patterns, should you wish to switch yarn. All yarns within the same group have a similar knitting tension and can easily replace each other. However, different yarn qualities have different structures and properties which will give the finished work a unique look and feel.

Click here for an overview of the yarns in each yarn group

At the top of all our patterns you’ll find a link to our yarn calculator, which is a helpful tool should you wish to use a different yarn than suggested. By filling in the yarn quality you wish to replace, the amount (in your size) and number of strands, the calculator will present good alternative yarns with the same knitting tension. Additionally it will tell you how much you’ll require in the new qualities and whether you’ll need to work with multiple strands. Most skeins are 50g (some are 25g or 100g).

If the pattern is worked with multiple colours, every colour will have to be calculated separately. Similarly, if the pattern is worked with several strands of different yarns (for example 1 strand Alpaca and 1 strand Kid-Silk) you will have to find alternatives for each, individually.

Click here to see our yarn calculator

Since different yarns have different qualities and textures we have chosen to keep the original yarn in our patterns. However, you can easily find options among our available qualities by using our yarn calculator, or simply pick a yarn from the same yarn group.

It is possible that some retailers still have discontinued yarns in stock, or that someone has a few skeins at home that they would like to find patterns for.

The yarn calculator will provide both alternative yarn as well as required amount in the new quality.

If you think it's hard to decide what size to make, it can be a good idea to measure a garment you own already and like the size of. Then you can pick the size by comparing those measures with the ones available in the pattern's size chart.

You'll find the size chart at the bottom of the pattern.

See DROPS lesson: How to read size chart

The needle size provided in the pattern serves only as a guide, the important thing is to follow the knitting tension. And since knitting tension is very individual, you will have to adjust the needle size to ensure that YOUR tension is the same as in the pattern – maybe you’ll have to adjust 1, or even 2 needle sizes, up or down to achieve the correct tension. For this, we recommend that you work test swatches.

Should you work with a different knitting tension than the one provided, the measurements of the finished garment might deviate from the measurement sketch.

See DROPS lesson: How to measure your tension/gauge

See DROPS video: How to make a tension/gauge swatch

Working a garment top-down provides more flexibility and room for personal adjustment. For example it is easier to try the garment on while working, as well as making adjustments to length of yoke and shoulder caps.

The instructions are carefully explaining every step, in the correct order. Diagrams are adjusted to the knitting direction and are worked as usual.

The diagram depicts all rows/rounds, and every stitch seen from the right side. It is read from bottom to top, from right to left. 1 square = 1 stitch.

When working back and forth, every other row is worked from the right side and every other row is worked from the wrong side. When working from the wrong side, the diagram will have to be worked reversed: from left to right, knit stitches are purled, purl stitches are knit etc.

When working in the round every round is worked from the right side and the diagram are worked from right to left on all rounds.

See DROPS lesson: How to read knitting diagrams

The diagram depicts all rows/rounds, and every stitch seen from the right side. It is worked from bottom to top, from right to left.

When working back and forth every other row is worked from the right side: from right to left and every other row is worked from the wrong side: from left to right.

When working in the round, every row in the diagram are worked from the right side, from right to left.

When working a circular diagram you start in the middle and work your way outwards, counter clockwise, row by row.

The rows usually start with a given number of chain stitches (equivalent to the height of the following stitch), this will either be depicted in the diagram or explained in the pattern.

See DROPS lesson: How to read crochet diagrams

Instructions for working several diagrams after each other on the same row/round, will often be written like so: “work A.1, A.2, A.3 a total of 0-0-2-3-4 times". This means you work A.1 once, then A.2 is worked once, and A.3 is repeated (in width) the number of times provided for your size – in this case like so: S = 0 times, M = 0 times, L=2 times, XL= 3 times and XXL = 4 times.

The diagrams are worked as usual: begin with the first row in A.1, then work the first row in A.2 etc.

See DROPS lesson: How to read knitting diagrams

See DROPS lesson: How to read crochet diagrams

The total width of the garment (from wrist-to-wrist) will be larger in the larger sizes, despite the actual sleeves being shorter. The larger sizes have longer sleeve caps and wider shoulders, so there will be a good fit in all sizes.

The measurement sketch/schematic drawing provides information regarding the full length of the garment. If it’s a jumper or a jacket the length is measured from the highest point on the shoulder closest to the neckline, and straight down to the bottom of the garment. It is NOT measured from the tip of shoulder. Similarly, the length of yoke is measured from the highest point on the shoulder and down to where yoke is split into body and sleeves.

On a jacket measures are never taken along bands, unless specifically stated. Always measure inside band stitches when measuring the length.

See DROPS lesson: How to read a schematic drawing

Diagrams are often repeated on the round or in height. 1 repeat is the diagram the way it appears in the pattern. If it says to work 5 repeats of A.1 in the round, then you work A.1 a total of 5 times after/next to each other in the round. If it says to work 2 repeats of A.1 vertically/in height you work the entire diagram once, then begin again at the start and work the entire diagram one more time.

Chain stitches are slightly narrower than other stitches and to avoid working the cast-on edge too tight, we simply chain more stitches to begin with. The stitch count will be adjusted on the following row to fit the pattern and measurement sketch.

The rib edge is more elastic and will contract slightly compared to, for example, stocking stitch. By increasing before the rib edge, you avoid a visible difference in width between the rib edge and the rest of the body.

It’s very easy to cast off too tightly, and by making yarn overs while casting off (and simultaneously casting these off) you avoid a too tight cast off edge.

See DROPS video: How to bind off with yarn overs (yo)

To achieve an even increase (or decrease) you can increase on, for example: every 3rd and 4th row alternately, like so: work 2 rows and increase on the 3rd row, work 3 rows and increase on the 4th. Repeat this until the increase is complete.

See DROPS lesson: Increase or decrease 1 st on every 3rd and 4th row alternately

Should you prefer to work in the round instead of back and forth, you may of course adjust the pattern. You’ll need to add steeks mid-front (usually 5 stitches), and follow the instructions. When you would normally turn and work from the wrong side, simply work across the steek and continue in the round. At the end you’ll cut the piece open, pick up stitches to work bands, and cover the cut edges.

See DROPS video: How to knit steeks and cut open

Should you prefer to work back and forth instead of in the round, you may of course adjust the pattern so you work the pieces separately and then assemble them at the end. Divide the stitches for the body in 2, add 1 edge stitch in each side (for sewing) and work the front and back pieces separately.

See DROPS lesson: Can I adapt a pattern for circular needles into straight needles?

Pattern repeats can vary slightly in the different sizes, in order to get the correct proportions. If you’re not working the exact same size as the garment in the photo, yours might deviate slightly. This has been carefully developed and adjusted so that the complete impression of the garment is the same in all sizes.

Make sure to follow instructions and diagrams for your size!

If you have found a pattern you like which is available in women’s size it’s not very difficult to convert it to men’s size. The biggest difference will be the length of sleeves and body. Start working on the women size that you think would fit across the chest. The additional length will be worked right before you cast off for the armhole/sleeve cap. If the pattern is worked top-down you can add the length right after the armhole or before the first decrease on sleeve.

Regarding additional yarn amount, this will depend on how much length you add, but it is better with a skein too many than too few.

All yarns will have excess fibres (from production) that might come off as lint or shedding. Brushed yarns (ie hairier yarns) have more of these loose, excess fibres, causing more shedding.

Shedding also depends on what is worn under or over the garment, and whether this pulls at the yarn fibres. It’s therefore not possible to guarantee that there will be no shedding

Below are some tips on how to get the best result when working with hairier yarns:

1. When the garment is finished (before you wash it) shake it vigorously so the looser hairs come off. NOTE: do NOT use a lint roller, brush or any method that pulls at the yarn.

2. Place the garment in a plastic bag and put it in your freezer - the temperature will cause the fibres to become less attached to each other, and excess fibres will come off easier.

3. Leave in the freezer for a few hours before taking it out and shaking it again.

4. Wash the garment according to the instructions on the yarn label.

Pilling is a natural process that happens to even the most exclusive of fibers. It's a natural sign of wear and tear that is hard to avoid, and that is most visible in high friction areas of your garment like a sweater's arms and cuffs.

You can make your garment look as new by removing the pilling, using a fabric comb or a pill/lint remover.

Still can't find the answer you need? Then scroll down and leave your question so one of our experts can try to help you. This will be done normally within 5 to 10 working days.
In the meantime, you can read the questions and answers that others have left to this pattern or join the DROPS Workshop on Facebook to get help from fellow knitters/crocheters!

You might also like...

Reykjavik

Alexandra Pettersson, Åland Islands

Reykjavik

Karin, Sweden

Reykjavik

Alexandra, Sweden

Reykjavik

Tone Margrethe, Norway

Reykjavik

Skogstrikker, Germany

Reykjavik

Anke, Netherlands

Reykjavik

Raunikki, Finland

Post a comment to pattern DROPS 208-3

We would love to hear what you have to say about this pattern!

If you want to leave a question, please make sure you select the correct category in the form below, to speed up the answering process. Required fields are marked *.

Comments / Questions (82)

country flag Andrew wrote:

For the yoke section in my size, the last row should have 368 stitches. to me, this works out to the following: 98(back)+2(rl)+82(sleeve)+2(rl)+98(front)+2(rl)+82(sleeve)+2(rl). Is that right?

01.04.2024 - 16:59

DROPS Design answered:

Dear Andrew, that's right. Happy knitting!

02.04.2024 - 15:34

country flag Gro wrote:

Jeg har strikket denne genseren. Den ble veldig fin, bortsett fra vrangborden på bolen. Synes det var rart å skulle øke før vrangbord, men fulgte oppskriften. Det resulterte i en alt for vid vrangbord.

15.02.2024 - 02:20

country flag Beverley wrote:

I’m on the yoke section. Size XXL \r\nI’ve worked row 1 to 20 to give me 208 stitches \r\n\r\nI will now knit 16 rows marked by * to give me 8 increased stitches every other row and = (208 + (8*8) = 272\r\nIf I repeat this again = (272 + (8*8) = 338\r\n\r\nHow do I get 338 to 384?\r\n\r\nPlease be as much detailed in your response as the instructions are not clear.

31.12.2023 - 16:55

DROPS Design answered:

Dear Beverly, there were 128 stitches, you increase 8 stitches for the raglan a total of 32 times: 128 + (8x32) = 384 stitches. Happy knitting!

02.01.2024 - 11:31

country flag Beverley wrote:

I have just started this. I am on the neck, it tells me to cast on with grey, then on round of knit with white, then I knit 4cm of white, then follow chart A1. When I look at the photo, the neck rib looks folded and I cannot see the cast on round in grey. Is the photo correct?

26.12.2023 - 20:35

DROPS Design answered:

Dear Beverley, this garment has a double neck and since it's folded towards the wrong side, the cast on row will be inside the garment, so it's not visible. You can see in the ASSEMBLY section at the end of the pattern that there are instructions for folding a double neck. Happy knitting!

28.12.2023 - 23:51

country flag Seielstad Bente Anita wrote:

Hei, holder på å strikke denne genseren. Får dessverre et nøste for lite av grunnfargen (0519-326472). Har igjen 8 omganger + ribbestrikk på siste ermet. Veldig irriterende 🥺

20.10.2023 - 02:39

DROPS Design answered:

Hej, Strikker du i DROPS Lima? Har du 20 m på 10 cm og holder målene i måleskitsen? Hvis ja, skriv gerne hvilken størrelse så vi kan se på den :)

24.10.2023 - 08:23

country flag Ann Högberg wrote:

Hej det är första gången jag stickar detta mönster och kört fast på oket första varvet sticka A2 sen A3 över nästa 40 masker i parentesen står 5 rapporter 8 maskor min fråga är ska sticka 8 maskor och sen göra A 4 eller börjar man med A2 stickar 40 maskaror sen A 5 önskar svar mvh Ann Högberg

28.09.2023 - 17:34

country flag Rebecca Luciette wrote:

I oppskriften under halskant står det (jeg strikker str XL og har da 108 masker). «strikk 1 omgang rett med natur der det økes 8 masker jevnt fordelt. Jeg skal da sitte med 112 masker. Men 8+8=16. Jeg har nå brukt dager på å finne ut at det står feil i oppskriften. Hvor mange masker skal jeg ha? Skal jeg øke med 4 masker eller 8? Skal jeg ha 112 masker eller 116? Veldig forvirrende i oppskriften.

29.08.2023 - 14:11

DROPS Design answered:

Hei Rebecca, I størrelsen XL skal du legge opp 104 masker til halsen. Da blir det 112 masker etter økningen. God fornøyelse!

30.08.2023 - 06:47

country flag Line Skjeflo wrote:

Hei, jeg lurer på om jeg kan få hjelp til og forstå oppskriften, Strikker str xxl til mann. Det står at jeg skal strikke A3 2ganger mer i bredden for hver 16 pinne gjentaes i høyden. Den skjønner jeg ikke helt, snakket med noen venner også men de skjønner den ikke helt de eller:)

02.08.2023 - 12:33

DROPS Design answered:

Hej Line, jo men du fortsætter bare mønsteret efterhånden som du øker :)

07.08.2023 - 15:23

country flag Beatrice Norrgård wrote:

Vad menas med mellom??? I mitten av de 16 ny maskorna eller? Kan man inte behålla märket från början av arbetet i början av varvet??? ” Sett en merketråd mellom de 16 nye maskene under ett av ermene, denne merketråden markerer starten av omgangen. mvh DROPS Design”

21.11.2022 - 13:56

DROPS Design answered:

Hei Beatrice. Du har nå strikket ferdig Oket og skal begynne på Fram- och Bakstycket og nå skal starten av omgangen flyttes. Starten blir nå midt mellom de 16 nye maskene som ble lagt opp under det ene ermet, altså 16 nye maskene = 8 masker - sett 1 merke (viser hvor omgangen nå skal starte) - 8 masker. Merketråden skal brukes litt senere når det skal felles midt under ermet. mvh DROPS Design

21.11.2022 - 14:21

country flag Lina wrote:

Jag stickar denna tröja för man. Upptäckte att likadan tröja för kvinna är lika stor stämmer detta? Sedan finns det ingen förhöjning för hals på mönstret för man.

20.11.2022 - 20:11

DROPS Design answered:

Hei Lina. Ja, vi har denne oppskriften til både dame og herre (og barn & baby). Om du ser på målskissene til oppskriftene, ser du at de ikke har helt like mål. På dame modellen er det valgt å ha forhøyning bak, men ikke på herre modellen. mvh DROPS Design

21.11.2022 - 13:02