
Popular categories
Looking for a yarn?


Comments / Questions (74)
![]() Franzi wrote:
Franzi wrote:
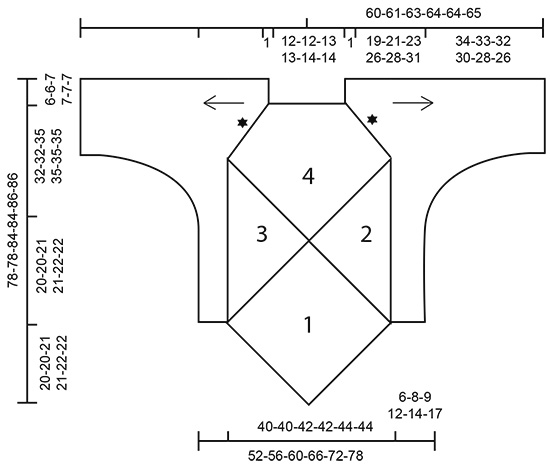
I have a question about the side part. I'm doing size S and I'm supposed to 'Knit up from right side 92 stitches along the side of square (2)'. However, square 2 only has enough rows to knit up 65 stitches. Am I doing it wrong? For all other parts the number of stitches to knit up perfectly fit the rows I had.
06.05.2021 - 20:13DROPS Design answered:
Dear Franzi, Its porbably because that is the longer side of the piece (the diagonal). If you have more stitches than rows, just pick up the stitches evenly, even if you have to pick up 2 stitches in a stitch sometimes. Happy Knitting!
06.05.2021 - 21:09
![]() Elsebeth Hedegaard Larsen wrote:
Elsebeth Hedegaard Larsen wrote:
Hej. Jeg skal nu til at strikke masker op langs rute 2. ( 97 masker) - skal maskeoptagningen ske indenfor rute 2,eller er det til og med stjernen som er vist på diagrammet. Venlig hilsen Elsebeth
05.04.2021 - 13:15DROPS Design answered:
Hei Elsebeth. Det skal strikkes opp masker fra retten langs siden på rute 2 (stjernen viser kanten til rute 4). mvh DROPS design
26.04.2021 - 09:35
![]() Libellule wrote:
Libellule wrote:
Serait il possible d'avoir une photo de la pointe du bas, sur l'endroit, grossie afin de bien voir les mailles. Je n'ai pas de magasin revendeur Drops dans mon secteur. Merci
24.11.2020 - 16:34DROPS Design answered:
Bonjour Libellule, nous n'avons pas d'autres photos que celles présentées, toutefois, la pointe du bas ressemble à celle du domino de la vidéo (time code 05:09 environ) - avec un nombre de mailles naturellement différent et les couleurs différentes (= 1 côte mousse de chaque couleur, en changeant sur l'endroit pour des rayures nettes). En espérant que ça vous aide - rappelez-vous que votre magasin DROPS peut également vous aider par téléphone ou par mail. Bon tricot!
25.11.2020 - 07:13
![]() Françoise RIGNON wrote:
Françoise RIGNON wrote:
Bonsoir, je réalise un test du 1er domino avec deux couleurs unies pour me rendre compte de ce que ça donne. Vu que les couleurs démarrent sur l'envers, on a des rayures bien nettes sur l'envers et plein de petites rayures sur l'endroit. Par ailleurs la ligne formée par les diminutions est plus nette sur l'envers que sur l'endroit. Est-ce normal ? Puis je vous adresser une photo de mon ouvrage ?
21.11.2020 - 21:16DROPS Design answered:
Bonjour Mme Rignon, dans ce modèle, on fait les changements de couleurs sur l'endroit pour avoir des côtes mousse bien distinctes, ainsi tricotez le montage, le 1er rang sur l'envers, et les 2 rangs suivants avec la même couleur et continuez ensuite avec alternativement 2 rangs de couleur différente. Vous pouvez toujours envoyer par mail une photo de votre ouvrage à votre magasin pour recevoir une assistance complémentaire. Vous pouvez également rejoindre notre groupe DROPS Workshop pour demander conseil à d'autres tricoteuses du monde entier. Bon tricot!
23.11.2020 - 09:04
![]() Kris wrote:
Kris wrote:
I am a left handed knitter and am having a difficult time interpreting the half diamond shaping. What I need to know is, is the decrease on every 2nd row done at the neck edge, or the bottom edge?
19.11.2020 - 14:28DROPS Design answered:
Dear Kris, I might misunderstand your question sorry, which domino are you talking about? the WHOLE DOMINO SQUARE WITH DECREASE FOR NECK (4):? for this one the decreases are worked in the middle of domino - on the HALF DOMINO SQUARE(2)/(3), decreases are worked at the beg of RS row = right side of piece seen from RS (2)/end of row from RS = left side of piece, seen from RS (3)= towards the side. Hope this helps. Happy knitting!
19.11.2020 - 16:00
![]() Giorgia wrote:
Giorgia wrote:
Grazie, ora ho capito! Saluti
07.08.2020 - 23:04
![]() Carol wrote:
Carol wrote:
I love this design and want to convert it to crochet myself just using your diagram. I have made my own patterns before. My question is how to adjust the amount of yarn to buy if I use plain single crochet stitches for a size large. Thank you very much for your help Carol
07.08.2020 - 20:13DROPS Design answered:
Dear Carol, please contact your DROPS store - even per mail or telephone for any individual assistance. Happy crocheting!
10.08.2020 - 08:55
![]() Giorgia wrote:
Giorgia wrote:
Buongiorno. Sono arrivata a lavorare la SPALLA SINISTRA, LATO DEL CORPO E DELLE MANICHE per una taglia L. Non capisco cosa significa intrecciare 5 maglie 5 volte, 2 maglie 8 volte e 1 maglia 12 volte a ogni lato di ogni quarto ferro = 85 maglie. Grazie e a presto. Giorgia
05.08.2020 - 11:29DROPS Design answered:
Buongiorno Giorgia. Per gli scalfi, deve intrecciare ogni 4 ferri, 5 maglie per 5 volte, 2 m per 8 volte e 1 m per 12 volte. Deve intrecciare da entrambi i lati, all'inizio del ferro: quindi su un ferro (ferro 1) intreccia le prime 5 m; al ferro successivo (ferro 2) , intreccia le prime 5 maglie, poi lavora 2 ferri senza intrecciare le maglie; poi riprende dal ferro 1, intrecciando il numero di maglie indicato. Buon lavoro!
05.08.2020 - 13:51
![]() Joy wrote:
Joy wrote:
Is this pattern available using two straight needles rather than circular knitting?
17.03.2020 - 04:53DROPS Design answered:
Dear Joy, there is only one version for this pattern on our site, and unfortunately we cannot modify our patterns to each ndvidual request. However, since the piece is mostly knitted back and forth on the knittng needles, you can easily adapt for straight needles. Happy Knitting!
17.03.2020 - 05:19
![]() Lisbeth Gjertsen wrote:
Lisbeth Gjertsen wrote:
Det som jeg og andre sliter med er sidestrikking og skuldrene,ermer. Når jeg har strikket skulder og lagt på tråd så strikker jeg opp langs siden på retten 92 m. Så tar jeg med skulder maskene fra retten. Så tar jeg bakstykket og strikker opp 92 masker på sidestikket der. Slik at alt blir strikket på den ene siden i riller fram og tilbake.
16.03.2020 - 14:49
|
|||||||
Diamond Cut#diamondcuttunic |
|||||||
 |
 |
||||||
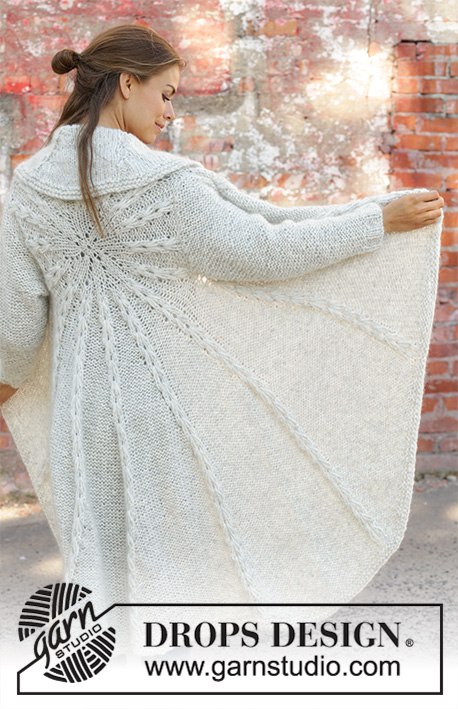
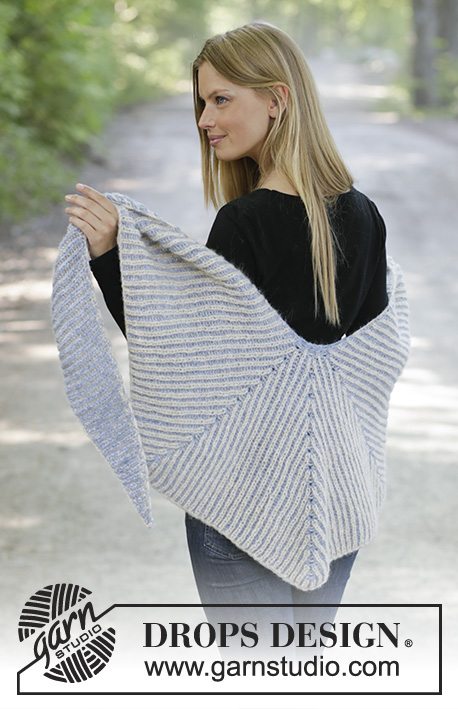
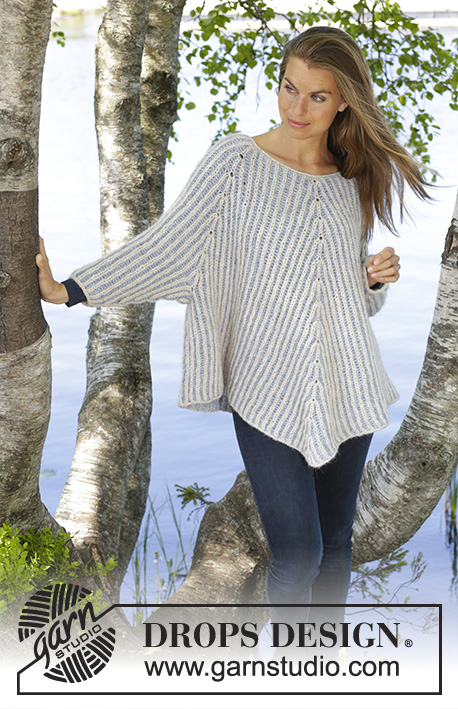
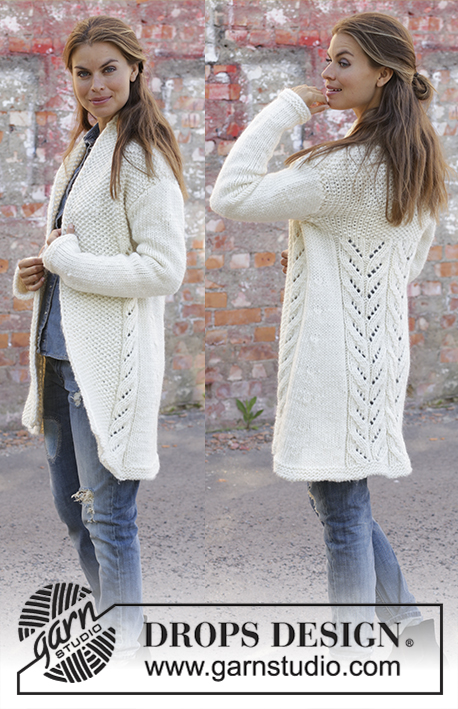
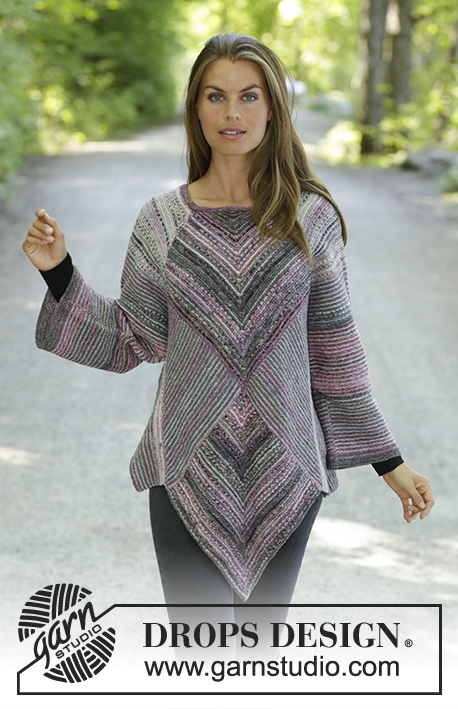
Knitted tunic in DROPS Fabel. The piece is worked back and forth with garter stitch, domino squares and stripes. Sizes S - XXXL.
DROPS 194-27 |
|||||||
|
EXPLANATIONS FOR THE PIECE: ------------------------------------------------------- RIDGE/GARTER STITCH (worked in the round): 1 ridge = 2 rounds. Knit 1 round and purl 1 round. RIDGE/GARTER STITCH (worked back and forth): 1 ridge = Knit 2 rows. STRIPES-1: * 1 ridge wooden rose, 1 ridge salt and pepper *, work from *-*. STRIPES-2: * 1 ridge rose mist, 1 ridge grey *, work from *-*. STRIPES SLEEVES: Work 15-15-16-16-17-17 cm with * 1 ridge rose mist, 1 ridge salt and pepper *, work from *-*. Work 5 cm with * 1 ridge rose mist, 1 ridge grey *, work from *-*. Work 3 cm with * 1 ridge salt and pepper, 1 ridge grey *, work from *-*. Work 15 cm with * 1 ridge wooden rose, 1 ridge rose mist *, work from *-*. Work 1 cm with * 1 ridge grey, 1 ridge salt and pepper *, work from *-*. Work 8 cm with * 1 ridge rose mist, 1 ridge grey *, work from *-*. Work 4 cm with * 1 ridge wooden rose, 1 ridge rose mist *, work from *-*. Continue to finished length with * 1 ridge grey, 1 ridge wooden rose *, work from *-*. ------------------------------------------------------- START THE PIECE HERE: ------------------------------------------------------- TUNIC - SHORT OVERVIEW OF THE PIECE: The piece is worked back and forth with circular needle. You first work whole and half domino squares. Then work the shoulder and pick up stitches down the edge of the section with domino squares before working garter stitch and stripes out to the side for body and sleeves. FRONT PIECE: WHOLE DOMINO SQUARE (1): Cast on 129-129-137-137-145-145 stitches with circular needle size 3.5 mm and wooden rose. Insert a marker in the middle stitch of the row (= 64-64-68-68-72-72 stitches on each side of the stitch with marker). Work GARTER STITCH and STRIPES-1 – read description above and work domino square as follows: ROW 1 (= wrong side): Knit. ROW 2 (= right side): Knit until there is 1 stitch left before the marker, slip 1 stitch as if to knit, knit 2 together and pass the slipped stitch over the knitted together stitches, knit to end of row. Repeat rows 1 and 2, i.e. decrease 2 stitches in middle of square every 2nd row until there is stitch left on the row. Cut the strand and pull it through the stitch. The domino square measures approx. 28-28-30-30-31-31 x 28-28-30-30-31-31 cm. HALF DOMINO SQUARE (2): Start from the right side with circular needle size 3.5 mm and rose mist and knit up 65-65-69-69-73-73 stitches (= 2 stitches in first ridge and 1 stitch in each of the next ridges) along the right side of the first domino square. Work STRIPES-2 – read description above and work a half domino square as follows: ROW 1 (= wrong side): Knit. ROW 2 (= right side): Knit 2 together, knit to end of row. Repeat rows 1 and 2, i.e. decrease 1 stitch every 2nd row until there is 1 stitch left on the row. Cut the strand and pull it through the stitch. HALF DOMINO SQUARE (3): Start from the right side with circular needle size 3.5 mm and rose mist and knit up 65-65-69-69-73-73- stitches (= 1 stitch in each ridge until there is 1 ridge left and 2 stitches in last ridge) along the left side of the first domino square. Work STRIPES-2 and work a half domino square as follows: ROW 1 (= wrong side): Knit. ROW 2 (= right side): Knit until there are 2 stitches left on row, slip 1 stitch as if to knit, knit 1 and pass the slipped stitch over the knitted stitch. Repeat rows 1 and 2, i.e. decrease 1 stitch every 2nd row until there is 1 stitch left. Cut strand and pull it through the stitch. WHOLE DOMINO SQUARE WITH DECREASE FOR NECK (4): Start from right side with circular needle size 3.5 mm and wooden rose and knit up 64-64-68-68-72-72 stitches (= 1 stitch in each ridge) along the side of half domino square (2), knit up 1 stitch in the transition between the 3 domino squares and continue by knitting up 64-64-68-68-72-72 stitches (= 1 stitch in each ridge) along the side of half domino square (3) = 129-129-137-137-145-145 stitches. Insert a marker in the middle stitch of the row (= 64-64-68-68-72-72 stitches on each side of the stitch with marker). Work STRIPES-1 and work domino square as follows: ROW 1 (= wrong side): Knit. ROW 2 (= right side): Knit until there is 1 stitch left before the marker, slip 1 stitch as if to knit, knit 2 together and pass the slipped stitch over the knitted together stitches, knit to end of row. Repeat rows 1 and 2, i.e. decrease 2 stitches in middle of square every 2nd row until there are 47-47-51-51-51-51 stitches left on the row (i.e. after you have worked 41-41-43-43-47-47 ridges). Now work as follows: ROW 83-83-87-87-95-95 (= wrong side): Knit. ROW 84-84-88-88-96-96 (= right side): Knit 2 together, knit until there is 1 stitch left before the marker, slip 1 stitch as if to knit, knit 2 together and pass the slipped stitch over the knitted together stitches, knit until there are 2 stitches left on row, slip 1 stitch as if to knit, knit 1 and pass the slipped stitch over the knitted stitch. Repeat these last 2 rows, i.e. you decrease 2 stitches middle of square and 1 stitch in each side (= 4 stitches decreased) every 2nd row until there are 3 stitches left on row. Knit 1 row over all stitches, then work the last row as follows: Slip 1 stitch as if to knit, knit 2 together and pass the slipped stitch over the knitted together stitches = 1 stitch left. Cut strand and pull it through stitch. BACK PIECE: Cast on and work in same way as front piece. LEFT SHOULDER, SIDE OF BODY AND SLEEVE: Now work left shoulder, side of body and sleeve back and forth in garter stitch and work STRIPES SLEEVES - read description above: Cast on 27-27-31-31-33-33 stitches with circular needle size 3.5 mm and rose mist. Work garter stitch back and forth, AT THE SAME TIME at the end of each row cast on 1 new stitch. Work like this until you have worked 29-29-31-31-31-31 ridges and increased 29-29-31-31-31-31 stitches in each side of the piece = 85-85-93-93-95-95 stitches on needle. After the last row from the wrong side cut the strand. Leave the stitches on a circular needle or thread and work with circular needle size 3.5 mm as follows: Knit up from right side 92-92-97-97-101-101 stitches along the side of square (2) (see sketch) and use the next colour in the stripe. Continue from the right side over the 85-85-93-93-95-95 stitches on needle/thread, knit up 92-92-97-97-101-101 stitches along side of domino square on the other side = 269-269-287-287-297-297 stitches on row. Continue back and forth with garter stitch and stripes until piece measures 6-8-9-12-14-17 cm from where you knitted up stitches along the half domino squares. At the beginning of the next 2 rows cast off 46-46-48-48-51-51 stitches (= sides of tunic) = 177-177-191-191-195-195 stitches on needle. Insert a marker in each side of the piece (they mark the splits in sides and are used later in assembly). Continue with garter stitch and stripes and on the next row begin to cast off in each side for sleeve: Cast off stitches at beginning of every 4th row (every 2nd ridge) in each side as follows: Cast off 5 stitches 4-4-5-5-5-5 times, 2 stitches 7-7-8-8-9-9 times and 1 stitch 14-13-12-11-10-9 times = 81-83-85-87-89-91 stitches. Continue until the sleeve measures 53-54-55-56-56-57 cm from the cast-on edge. Cast off. Make sure that the cast-off edge is not tight. RIGHT SHOULDER, SIDE OF BODY AND SLEEVE: Work in the same way as left shoulder, side of body (i.e., knit up stitches along the side of square (3)) and sleeve. ASSEMBLY: Sew seam in raglan line – see black star in illustration. Sew with rose mist and sew in the outermost stitch-loop so that the seam is flat. Make sure that the seam is not tight. Sew sleeve seam from the cast-off edge at bottom of sleeve and upwards to the marker which was inserted before casting off 46-46-48-48-51-51 stitches for side in tunic. Repeat in other side. NECK: Start in the one raglan seam from the right side and knit up 118-140 stitches with short circular needle size 3.5 mm and wooden rose. Work 3 RIDGES in the round - read description above. Cast off with knit. Cut and fasten strand. |
|||||||
Diagram explanations |
|||||||
|
|||||||
 |
|||||||
Have you finished this pattern?Tag your pictures with #dropspattern #diamondcuttunic or submit them to the #dropsfan gallery. Do you need help with this pattern?You'll find 16 tutorial videos, a Comments/Questions area and more by visiting the pattern on garnstudio.com. © 1982-2026 DROPS Design A/S. We reserve all rights. This document, including all its sub-sections, has copyrights. Read more about what you can do with our patterns at the bottom of each pattern on our site. |
|||||||


With over 40 years in knitting and crochet design, DROPS Design offers one of the most extensive collections of free patterns on the internet - translated to 17 languages. As of today we count 324 catalogues and 12291 patterns translated into English (UK/cm). 12291
We work hard to bring you the best knitting and crochet have to offer, inspiration and advice as well as great quality yarns at incredible prices! Would you like to use our patterns for other than personal use? You can read what you are allowed to do in the Copyright text at the bottom of all our patterns. Happy crafting!
Post a comment to pattern DROPS 194-27
We would love to hear what you have to say about this pattern!
If you want to leave a question, please make sure you select the correct category in the form below, to speed up the answering process. Required fields are marked *.