
Popular categories
Looking for a yarn?


Comments / Questions (20)
![]() Elisabeth wrote:
Elisabeth wrote:
Wie kann ich denn verhindern, dass das muster am rundenübergang nicht stimmt? da ist eine stufe drin.
21.11.2018 - 08:10DROPS Design answered:
Liebe Elisabeth, mit diesem Technick können Sie bei den Streifen diese Stufe vermindern. Ihr DROPS Laden hat auch sicher persönnliche Tipps für Sie, nehmen Sie einfach Kontakt mit ihm - auch telefonisich oder per E-Mail. Viel Spaß beim stricken!
21.11.2018 - 09:59
![]() Janne wrote:
Janne wrote:
Is het mogelijk om een andere maat mouwen te breien (bijvoorbeeld lijfje maat S en mouwen maat M?) De bijbehorende mouwen zijn helaas net te strak.
07.05.2018 - 21:36DROPS Design answered:
Als de mouw wel past bij het armsgat kun je inderdaad de mouw wat groter maken door bijvoorbeeld de minderingen aan te passen. Je zet dan meer steken op en je mindert minder vaak.
14.05.2018 - 19:42
![]() Gudrun wrote:
Gudrun wrote:
Jag lyckas inte sticka ihop ärmar med fram- o bakstycke. Det är för tajt, tror det beror på att det bara är 7 maskor avmaskade för ärmhålen så ärmens rundel är för sluten. När jag trär försöker trä över ärmens maskor på den stora rundstickan stramar det så mkt i ärmen så det inte går. Har ni något tips för hur man gör detta?
05.03.2018 - 22:08DROPS Design answered:
Hej, ofta kan de första varven vara rejält svåra att sticka, fast det brukar gå. Du kan försöka ta en till rundsticka till hjälp i början och sätta en del av maskorna på denna.
07.03.2018 - 18:07
![]() Katrine Rødvig wrote:
Katrine Rødvig wrote:
Er det meningen, at mønsteret brydes i opskriften på ærmet, således, at man tager ud og bryder mønsteret når dette skal forstørres? :) Mvh Katrine
05.03.2018 - 11:49DROPS Design answered:
Hej Katrine, sørg for at mønsteret stemmer over hinanden på ærmet, så du ikke begynder at forskyde dem. De nye masker strikker du ind i mønsteret efterhånden. God fornøjelse!
06.03.2018 - 16:33
![]() Gudrun wrote:
Gudrun wrote:
Tack för svar! De två första svaren är inga problem att förstå, men jag är ändå ännu osäker på det här med ett rätt varv. Utåt ska det väl vara slätstickning hela vägen? Förlåt om jag är trög.
15.01.2018 - 21:03DROPS Design answered:
Eftersom tröjan stickas runt så är det räta varvet helt enkelt ett varv i slätstickning, det stickas alltså räta från rätsidan på detta varv.
16.01.2018 - 14:21
![]() Gudrun wrote:
Gudrun wrote:
Jag undrar tre saker. När ska man byta till den vita färgen? Är det vid minskningen när man just bytt till rundsticka 4? Eller är det efter det räta varvet? Angående minskningen - är det verkligen rätt att man ska minska så mycket EFTER en resår? Det vanliga är väl att man där ökar. Sist: det står att man ska sticka ett varv rätt efter resår och påföljande minskning. Det verkar konstigt, ska det inte vara slätstickning hela vägen?
15.01.2018 - 08:47DROPS Design answered:
Du ska byta till vit enligt diagram A.1, dvs. på varv 2 i diagr. Det minskas maskor efter resåren, så att arb inte ska bli för brett när man stickar slätst, resåren drar ju ihop arb. Det första räta varvet beskrivs skilt för att visa var man ska sätta märkena.
15.01.2018 - 14:31
![]() Heike wrote:
Heike wrote:
Danke für die Antwort. Allerdings verstehe ich nicht, was es bedeuted, dass man 0 1 0 1 2 0 Maschen un diesem Muster stricken solll
04.01.2018 - 20:49DROPS Design answered:
Liebe Heike, Diagram A.3 = 1 Masche. In der 2. und 4. Größe stricken Sie diese Masche einmal (= einmal das Diagram in der Breite). Und in der 5. Größe stricken Sie dieses Diagram 2 x (= die 2 Maschen wie im A.3 stricken). In der 1., 3. und 6. Größe stricken Sie nicht diese Masche. Viel Spaß beim stricken!
05.01.2018 - 08:45
![]() Heike wrote:
Heike wrote:
Bei der Anleitung zu den Ärmeln steht man solle O-1-O- 1 - 2-0 Maschen im Muster A.5 cstricken. In der Anleitung gibt es aber kein Muster A.5
03.01.2018 - 23:24DROPS Design answered:
Liebe Heike, es sollte A.3 sein, Anleitung wird korrigiert, danke für den Hinweis. Viel Spaß beim stricken!
04.01.2018 - 13:33
![]() Lene Birkely wrote:
Lene Birkely wrote:
Hvis jeg skal starte omgangen på bærestykket mellem venstre ærme og rygstykket som opskriften siger passer det ikke med maskeantallet. Umiddelbart sidder omgangsstarten mellem højre ærme og ryggen. Indtagningerne til halskanten sidder underligt skævt placeret, skal de det? Det ville være letter at overskue sammenhængen mellem diagram A2 og A4 hvis de var placeret ved siden af hinanden i henhold til størrelserne, og i den "højde" hvor de bruges i forhold til hinanden.
20.12.2017 - 08:24DROPS Design answered:
Hej Lene, Bærestykket starter mellem højre ærme og rygstykket, det vil sige at man strikker rygstykket først, fortsætter over venstre ærme, så forstykket og sidst højre ærme. Vi skal få lagt en rettelse ud. Tak for info!
20.12.2017 - 11:41
![]() Lene Birkely wrote:
Lene Birkely wrote:
Hvis jeg skal starte omgangen på bærestykket mellem venstre ærme og rygstykket som opskriften siger passer det ikke med maskeantallet. Umiddelbart sidder omgangsstarten mellem højre ærme og ryggen. Indtagningerne til halskanten sidder underligt skævt placeret, skal de det? Det ville være letter at overskue sammenhængen mellem diagram A2 og A4 hvis de var placeret ved siden af hinanden i henhold til størrelserne, og i den "højde" hvor de bruges i forhold til hinanden.
20.12.2017 - 08:16
|
|||||||
Telegram For Her#telegramforhersweater |
|||||||
 |
 |
||||||
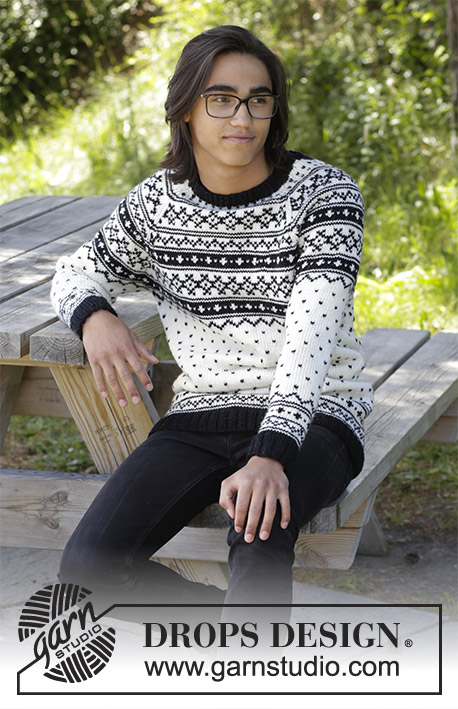
Knitted jumper with multi-coloured pattern and raglan. Size: S - XXXL Piece is knitted in DROPS Karisma.
DROPS 184-21 |
|||||||
|
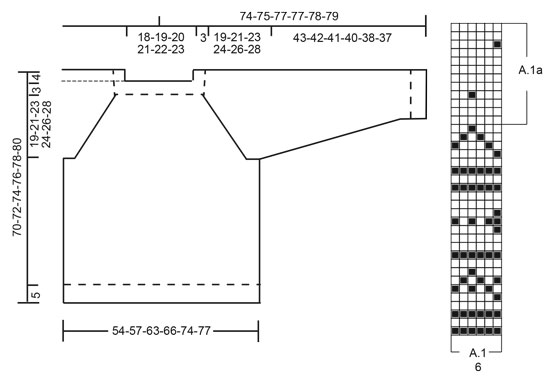
INFORMATION FOR PATTERN: PATTERN: See diagrams A.1 to A.4. Work the entire pattern in stocking stitch. Choose diagram for your size. KNITTING TIP-1: To avoid the knitting tension to tighten when working pattern, it is important not to tighten the strands on back side of piece. Switch to a higher needle number when working pattern if the pattern is somewhat tight. KNITTING TIP-2 (applies to yoke): If knitting tension is incorrect in height and there are more rows vertically on 10 cm than stated in pattern the yoke will be too short and the armhole too small. This can be compensated by working 1 extra row in stocking stitch evenly on yoke. DECREASE TIP: To calculate how to decrease evenly, use the total number of stitches on row (e.g. 272 stitches) and divide stitches by number of decreases to be done (e.g. 44) = 6.1. In this example work approx. every 5th and 6th stitch together. INCREASE TIP: Work until 2 stitches remain before marker thread, make 1 yarn over (= 1 stitch increased), knit 4 (marker thread is in the middle of these stitches), make 1 yarn over (= 1 stitch increased). RAGLAN: Decrease for raglan on each side of every A.4 as follows: Decrease 1 stitch after A.4 as follows: Slip last stitch in A.4, knit 1, pass slipped stitch over (= 1 stitch decreased). Decrease 1 stitch before A.4 as follows: Work until 1 stitch remains before A.4, knit the next 2 stitches together (= 1 stitch decreased). I.e. decrease 2 stitches at every A.4 and 8 stitches in total on round. ---------------------------------------------------------- JUMPER: Worked in the round on circular needle. Sleeves are worked in the round on double pointed needles, change to short circular needle when needed. Join the parts together and work yoke in the round. BODY: Cast on 272-284-316-328-368-384 stitches on circular needle size 3 mm with Black. Work rib (= knit 2/purl 2). When piece measures 5 cm, switch to circular needle size 4 mm and work 1 round in stocking stitch while decreasing 44-44-52-52-56-60 stitches evenly - read DECREASE TIP = 228-240-264-276-312-324 stitches. Knit 1 round as follows: Insert 1 marker in first stitch, knit 113-119-131-137-155-161 stitches, insert 1 marker in next stitch, knit the rest of round. Markers shows sides of garment. Then work A.1 (= 6 stitches) over all stitches (= 38-40-44-46-52-54 repetitions in width) - read KNITTING TIP-1. REMEMBER THE KNITTING TENSION! When A.1 has been worked 1 time vertically, repeat A.1a vertically. When piece measures 39-41-40-42-41-43 cm, work A.2 over A.1. When you have worked up to arrow in A.2, work next round in A.2 as follows: Cast off 4 stitches, work the next 107-113-125-131-149-155 stitches as before, cast off the next 7 stitches, work the next 107-113-125-131-149-155 stitches as before and cast off the last 3 stitches. Piece measures approx. 44-44-44-45-45-45 cm. Put piece aside and work the sleeves. SLEEVES: Work in the round on double pointed needles, switch to a short circular needle when needed. Cast on 48-52-56-60-64-64 stitches on double pointed needles size 3 mm. Work rib (= knit 2/purl 2). When piece measures 5 cm, switch to double pointed needles size 4 mm and work 1 round in stocking stitch while decreasing 6-8-8-10-12-10 stitches evenly = 42-44-48-50-52-54 stitches. Insert 1 marker thread at beginning of round (= mid under sleeve). Work 1 round with black, then work next round as follows: Work 0-1-0-1-2-0 stitches A.3, work A.1 over the next 42-42-48-48-48-54 stitches (= 7-7-8-8-8-9 repetitions), finish with 0-1-0-1-2-0 stitches A.3. When A.1 has been worked 1 time vertically, repeat A.1a. When piece measures 6 cm, increase 1 stitch on each side of marker thread (= 2 stitches increased) - read INCREASE TIP! Increase like this every 3-2½-2-1½-1½-1½ cm 12-14-15-17-19-21 times in total = 66-72-78-84-90-96 stitches. Work stitches in A.3 and the increased stitches in the pattern. When piece measures 38-39-37-37-34-35 cm, work A.2 over A.1. When all stitches under sleeve have been increased, work A.2 11-12-13-14-15-16 times in total in width. When you have worked up to arrow in A.2, work next round as follows: Cast off 4 stitches, work the next 59-65-71-77-83-89 stitches as before, cast off the last 3 stitches. Sleeve measures approx. 43-42-41-40-38-37 cm. Knit another sleeve the same way. YOKE: Slip sleeves on to same circular needle as body where armholes were cast off = 332-356-392-416-464-488 stitches. Begin round in transition between left sleeve and back piece before continuing. Work as follows: Work A.4 (= 2 stitches, begin at arrow marking your size), continue pattern as before over the next 103-109-121-127-145-151 stitches, A.4 (= back piece), work pattern as before over the next 59-65-71-77-83-89 stitches (= sleeve), A.4, continue pattern as before over the next 103-109-121-127-145-151 stitches, A.4 (= front piece), work pattern as before over the next 59-65-71-77-83-89 stitches (= sleeve) – read KNITTING TIP-2. Continue pattern like this and decrease for RAGLAN – see explanation above, every other round 26-29-31-33-36-39 times in total = 124-124-144-152-176-176 stitches. When A.2 has been worked 1 time vertically, switch to black. Work 1 round in black. Yoke measures approx. 19-21-23-24-26-28 cm. An elevation in the back of neck can be worked to get a better fit so that yoke is somewhat higher in the neck. This elevation can be skipped, to make the neck the same at the front and back. Work elevation in the back of neck or start to work the neck edge if you don’t want an elevation. ELEVATION IN BACK OF NECK: Skip this paragraph if you do not want an elevation. Insert 1 marker thread at beginning of round (this marks the beginning of rounds after elevation has been worked). Work until mid back, insert 1 marker. Begin from right side with black and knit as before until 30-30-34-34-40-40 stitches have been worked past marker, turn, tighten yarn and purl 60-60-68-68-80-80. Turn, tighten yarn and knit 54-54-61-61-72-72, turn, tighten yarn and purl 48-48-54-54-64-64. Turn, tighten yarn and knit 42-42-48-48-56-56, turn, tighten yarn and purl 36-36-42-42-48-48. Turn, tighten yarn and knit 30-30-35-35-40-40, turn, tighten yarn and purl 24-24-28-28-32-32, turn, tighten yarn and work mid back. Cut the yarn. Round now begins at the marker thread, i.e. in the transition between left sleeve and back piece. NECK EDGE: On next round decrease as follows: * Knit 42-42-52-56-68-68 and decrease 2-0-8-8-18-16 stitches evenly, work the next 20 stitches together 2 by 2 (= 10 stitches decreased) *, work from *-* 2 times in total = 100-104-108-116-120-124 stitches. Switch to double pointed needles size 3 mm. Work next round as follows: * Knit 2, purl 2, knit 1, make 1 yarn over (= 1 stitch increased), purl 2, knit 2, make 1 yarn over (= 1 stitch increased), purl 1 *, work from *-* until 0-4-8-16-0-4 stitches remain, work rib (= knit 2/purl 2) over the remaining stitches = 120-124-128-136-144-148 stitches. Work yarn overs twisted in rib (i.e. knit 2/purl 2) on next round to avoid holes. When rib measures 3 cm, cast off knit over knit and purl over purl. ASSEMBLY: Sew opening under each sleeve in front loop of outermost stiches. |
|||||||
Diagram explanations |
|||||||
|
|||||||
 |
|||||||
 |
|||||||
Have you finished this pattern?Tag your pictures with #dropspattern #telegramforhersweater or submit them to the #dropsfan gallery. Do you need help with this pattern?You'll find 32 tutorial videos, a Comments/Questions area and more by visiting the pattern on garnstudio.com. © 1982-2026 DROPS Design A/S. We reserve all rights. This document, including all its sub-sections, has copyrights. Read more about what you can do with our patterns at the bottom of each pattern on our site. |
|||||||


With over 40 years in knitting and crochet design, DROPS Design offers one of the most extensive collections of free patterns on the internet - translated to 17 languages. As of today we count 324 catalogues and 12290 patterns translated into English (UK/cm). 12290
We work hard to bring you the best knitting and crochet have to offer, inspiration and advice as well as great quality yarns at incredible prices! Would you like to use our patterns for other than personal use? You can read what you are allowed to do in the Copyright text at the bottom of all our patterns. Happy crafting!
Post a comment to pattern DROPS 184-21
We would love to hear what you have to say about this pattern!
If you want to leave a question, please make sure you select the correct category in the form below, to speed up the answering process. Required fields are marked *.