
Popular categories
Looking for a yarn?


Comments / Questions (16)
![]() Marie Jo wrote:
Marie Jo wrote:
J'ai monté mes 27 cm et fait 4 fois A1 et A2 avec les augmentations Je me retrouve avec 386 mailles au lieu de 434 Il manque 48 mailles = 6x8 Faut il que fasse des augmentations entre chaque A2 c'est à dire 6 mailles Merci pour les explications
07.04.2024 - 21:26DROPS Design answered:
Bonjour Marie-Jo, vous devez tricoter 4 fois A.2 (raglans) et ainsi augmenter 18 mailles à chaque fois que vous tricotez A.2 en hauteur, donc vous aurez: 146 mailles (avant les diagrammes) + 18 augmentations x 4 motifs x 4 fois en hauteur = 434 mailles. Bon tricot!
08.04.2024 - 08:34
![]() Marie-Jo wrote:
Marie-Jo wrote:
Merci je vais mettre en application
27.02.2024 - 17:28
![]() Marie Jo wrote:
Marie Jo wrote:
A2(=1 maille) 19 mailles-6 mailles il faut faire les 6 mailles??? Entre le A1et le A2 au départ par le bas combien de mailles???
27.02.2024 - 15:25DROPS Design answered:
Bonjour Marie-Jo, en taille XL, vous tricotez ainsi: 5 m envers, A.1 (= 13 m), 12 m point mousse, A.2 (1 m au 1er rang), 16 m point mousse, A.2 (= 1 m), 50 m point mousse, A.2 (= 1 m), 16 m point mousse, A.2 (= 1 m), 12 m point mousse, A.1 (= 13 m) et 5 m env soit 5+13+12+1+16+1+50+1+16+1+12+13+5=146 m. Dès le 1er rang, vous allez augmenter 1 m dans chaque A.2 (= 1 m end, 1 jeté), Tous les rangs sur l'endroit, vous augmentez 2 mailles au milieu de chaque A.2 pour terminer par 19 m dans chaque A.2 , Quand A.2 est terminé, tricotez encore 1 fois A.2 en hauteur en centrant le diagramme au-dessus du A.2 précédent. Bon tricot!
27.02.2024 - 16:20
![]() Mariejo wrote:
Mariejo wrote:
Ah donc il faut commencer par le bas du A2 ???on commence par la seule maille avec la jeté noir Merci
23.02.2024 - 17:42
![]() Marie Jo wrote:
Marie Jo wrote:
J'ai monté mon gilet jusqu'au milieu des 2 diagrammes A1 A2 en suivant bien les modèles (refait 4 fois) J'ai toujours le même nombres de maille comment faire pour augmenter Vous dites 3 -4 fois le modèles et avoir 434 mailles comment...?.?? Les jetés noires je les accouplé avec la maille entre les deux jetés car sur le rang suivant j'ai une maille de moins Merci pour vos explications
23.02.2024 - 16:27DROPS Design answered:
Bonjour Marie-Jo, vous allez augmenter dans chaque A.2 comme le montre les diagrammes, autrement dit, vous commencez par 1 maille pour chaque A.2, puis vous augmentez comme l'indique les diagrammes pour terminer avec 19 mailles dans chaque A.2, vous aurez ainsi augmenté 4 fois 18 mailles (pour les 4 motifs de A.2) à chaque fois que vous tricotez A.2 en hauteur, et en taille XL on doit tricoter 4 fois ces diagrammes soit (4x18) x 4 = 288 mailles augmentées au total + les 146 mailles du départ = 434. Bon tricot!
23.02.2024 - 17:06
![]() Céline wrote:
Céline wrote:
Bonjour Je trouve que ce patron est très compliqué, difficile à comprendre. Pourtant je suis loin d'être une débutante en tricot. Y'a t il un moyen d'avoir plus d'explications .merci de votre compréhension.
07.05.2023 - 21:51DROPS Design answered:
Bonjour Céline, les explications sont peut être juste différentes de celles que vous avez l'habitude de suivre, nous pourrons volontiers vous aider si vous nous indiquez précisément quelle(s) partie(s) vous pose(nt) problème. Bon tricot!
08.05.2023 - 09:38
![]() Céline wrote:
Céline wrote:
Bonjour, comment faire les augmentations pour insérer le diagramme A2.? Merci de vos éclaircissements.
07.05.2023 - 21:47DROPS Design answered:
Bonjour Céline, les augmentations de A.2 se font simplement en suivant le diagramme; au 1er rang, on tricote A.2 sur 1 seule maille (= 1 maille, 1 jeté), on a ainsi 2 mailles et on continue à augmenter ainsi tous les rangs sur l'endroit comme le monte le diagramme. Mettez un marqueur entre chaque diagramme, cela peut vous aider à bien vérifier votre nombre de mailles à chaque fois. Bon tricot!
08.05.2023 - 08:30
![]() Celine wrote:
Celine wrote:
Bonjour que veut dire :"1 côte mousse = tricoter 2 rangs endroit." s'il vous plait.Merci de votre aide.
05.05.2023 - 23:28DROPS Design answered:
Bonjour Céline, cela signifie que pour tricoter au point mousse, on doit tricoter en mailles endroit (1 rang sur l'endroit et 1 rang sur l'envers vont former 1 côte mousse, vu sur l'endroit). Bon tricot!
08.05.2023 - 10:15
![]() Christina wrote:
Christina wrote:
Hei . Hva betyr A2 (= 1 maske)? Strikk 5 masker vrang (= stolpemasker), A.1 (= 13-15-17-13-15-17 masker) og 7-7-5-12-13-13 masker i rille (= venstre forstykke), A.2 (= 1 maske), strikk 12-16-18-16-12-6 masker i rille (= erme), A.2, strikk 40-44-44-50-56-60 masker i rille (= bakstykke), A.2, strikk 12-16-18-16-12-6 masker i rille (= erme), A.2, strikk 7-7-5-12-13-13 masker i rille, A.1 (= høyre forstykke) og avslutt med 5 masker vrang (= stolpemasker).
23.08.2022 - 11:17
![]() Sheila Curtis wrote:
Sheila Curtis wrote:
After the cast on to 134 sts(2nd size) - the figures to mark up the A1 & A2 & Back do not add up to 134 . The information adds up to 116. Please advise where I am going wrong.
28.07.2020 - 09:59DROPS Design answered:
Dear Sheila, We just counted all the stitches for A.1, A.2 in Size M and with the 5 band purl stitches on each side (5 sts on each side) it adds up to 134 sts Maybe you are following a wrong diagram? There is a specific diagram for sice M at the bottom of the page. We hope you will knit up the beautiful jacket! Happy Knitting!.
28.07.2020 - 11:15
|
||||||||||||||||||||||
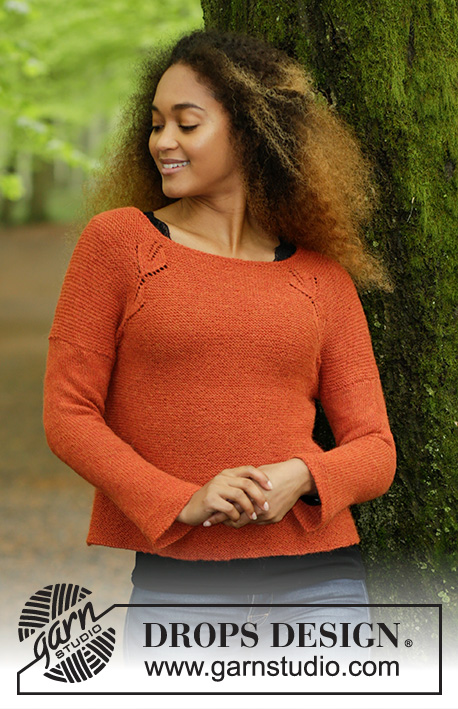
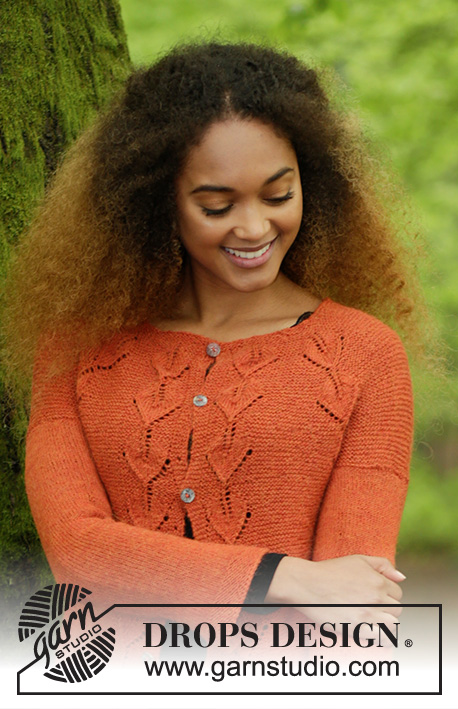
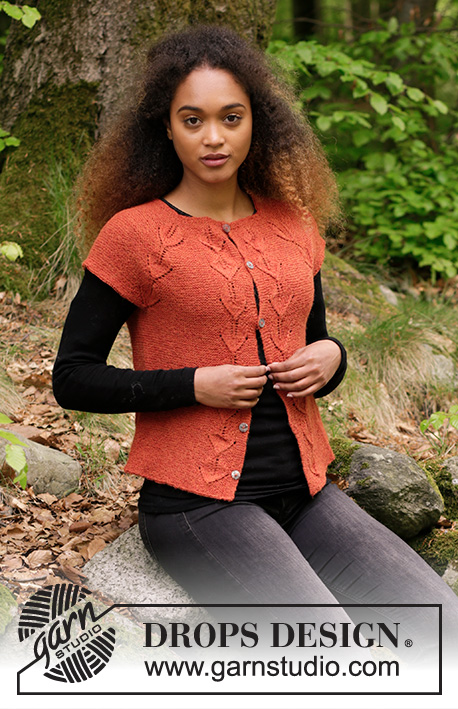
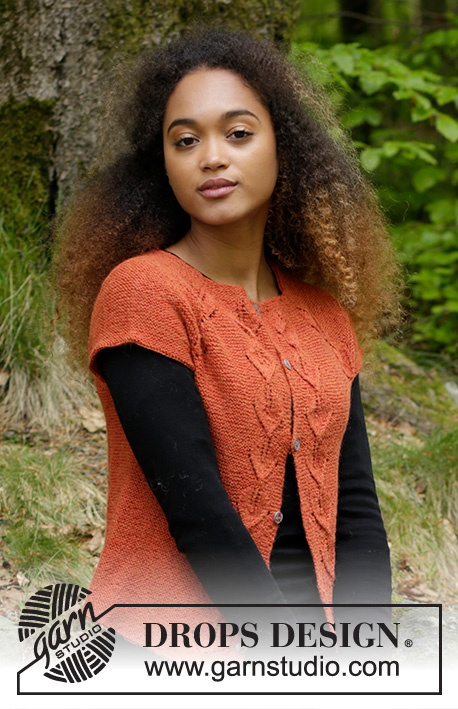
Autumn Vines Top#autumnvinestop |
||||||||||||||||||||||
 |
 |
|||||||||||||||||||||
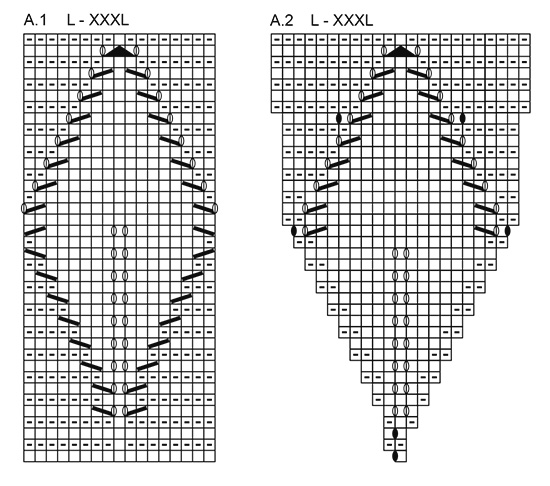
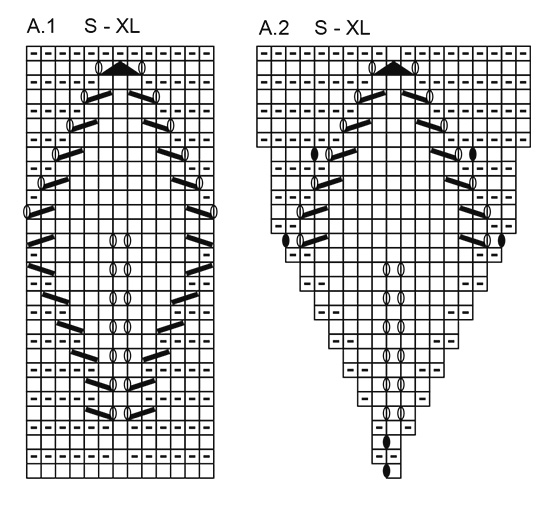
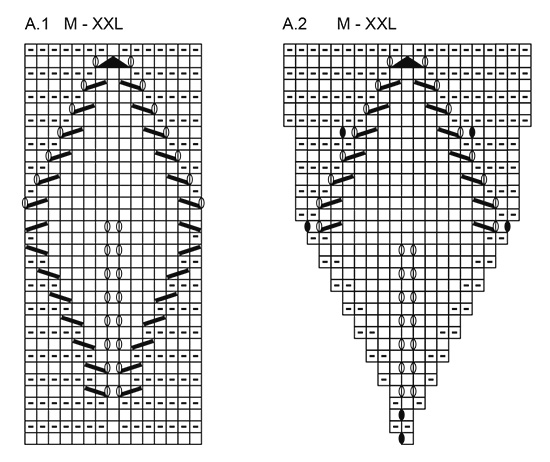
Jacket with short sleeve, leaf pattern and raglan, knitted top down. Size: S - XXXL Piece is knitted in DROPS Alpaca.
DROPS 179-31 |
||||||||||||||||||||||
|
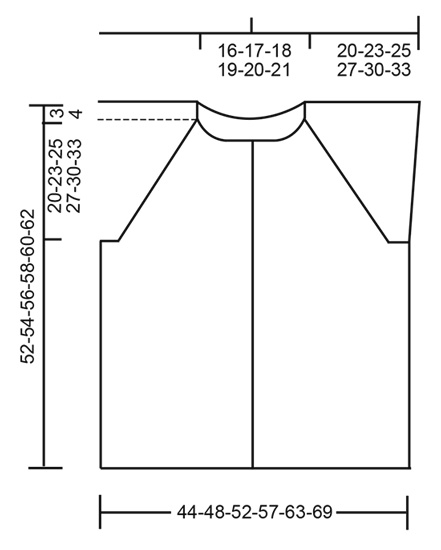
INFORMATION FOR PATTERN: GARTER STITCH (back and forth): 1 ridge = knit 2 rows. PATTERN: See diagrams A.1 and A.2. Diagrams show all rows in pattern seen from the right side. Choose diagram for your size. CAST-OFF TIP: Make 1 yarn over after approx. every 5th stitch while casting off (cast off yarn over as stitch) to make the cast-off edge more elastic. BUTTONHOLES: Decrease for first buttonhole on first row from right side after edge in garter stitch in neck, then decrease the next 5-5-5-6-6-6 approx. 8 cm apart. Decrease for buttonholes on right band as follows: Work until 3 stitches remain on needle (seen from right side), make 1 yarn over, purl 2 together and purl 1. On next row purl the yarn over to make holes. ---------------------------------------------------------- Work back and forth on circular needle from mid front, work top down. JACKET WITH SHORT SLEEVES: Cast on 106-110-116-122-128-134 stitches (including 5 band stitches in each side towards mid front) on circular needle size 3 mm with Alpaca. Work 3 ridges in GARTER STITCH - see explanation above. Decrease for BUTTONHOLES on right band - see explanation above. Knit 1 row from right side while increasing 12-24-22-24-22-12 stitches evenly (purl the outermost 5 stitches in each side on every row) = 118-134-138-146-150-146 stitches. Knit 1 row. Work next row as follows from right side: Purl 5 stitches (= band stitches), A.1 (= 13-15-17-13-15-17 stitches) and 7-7-5-12-13-13 stitches in garter stitch (= left front piece), A.2 (= 1 stitch), work 12-16-18-16-12-6 stitches in garter stitch (= sleeve), A.2, work 40-44-44-50-56-60 stitches in garter stitch (= back piece), A.2, work 12-16-18-16-12-6 stitches in garter stitch (= sleeve), A.2, work 7-7-5-12-13-13 stitches in garter stitch, A.1 (= right front piece) and finish with purl 5 (= band stitches). Continue with A.1, A.2 and purl 5 for band in each side. Work the rest of stitches in garter stitch. REMEMBER THE KNITTING TENSION! Work A.1 and A.2 3-3-3-4-4-4 times in total vertically, make sure that first stitch in A.2 is directly above middle stitch in previous repetition = 334-374-402-434-470-498 stitches on needle and piece measures approx. 20-23-25-27-30-33 cm from cast-on edge. Work next row as follows from right side: Work 53-58-61-67-74-80 stitches (= left front piece), READ CAST-OFF TIP - cast off the next 66-76-84-88-92-94 stitches, work 96-106-112-124-138-150 stitches (= back piece), cast off the next 66-76-84-88-92-94 stitches, and work the remaining 53-58-61-67-74-80 stitches (= right front piece).Knit 1 row from wrong side while casting on 10-10-12-12-14-16 new stitches in each side (between front pieces and back piece). BODY: = 222-242-258-282-314-342 stitches. Continue to work in garter stitch, A.1 and purl 5 band stitches as before - remember buttonholes on right band. When piece measures approx. 26-25-25-25-24-23 cm, adjust after one whole or half repetition vertically, work ridges back and forth over all stitches. Work 5 ridges over all stitches (continue to purl band), then loosely cast off - READ CAST-OFF TIP. Jacket measures approx. 52-54-56-58-60-62 cm from shoulder. ASSEMBLY: Sew the buttons on to the left band. |
||||||||||||||||||||||
Diagram explanations |
||||||||||||||||||||||
|
||||||||||||||||||||||
 |
||||||||||||||||||||||
 |
||||||||||||||||||||||
 |
||||||||||||||||||||||
 |
||||||||||||||||||||||
Have you finished this pattern?Tag your pictures with #dropspattern #autumnvinestop or submit them to the #dropsfan gallery. Do you need help with this pattern?You'll find 22 tutorial videos, a Comments/Questions area and more by visiting the pattern on garnstudio.com. © 1982-2026 DROPS Design A/S. We reserve all rights. This document, including all its sub-sections, has copyrights. Read more about what you can do with our patterns at the bottom of each pattern on our site. |
||||||||||||||||||||||


With over 40 years in knitting and crochet design, DROPS Design offers one of the most extensive collections of free patterns on the internet - translated to 17 languages. As of today we count 324 catalogues and 12290 patterns translated into English (UK/cm). 12290
We work hard to bring you the best knitting and crochet have to offer, inspiration and advice as well as great quality yarns at incredible prices! Would you like to use our patterns for other than personal use? You can read what you are allowed to do in the Copyright text at the bottom of all our patterns. Happy crafting!
Post a comment to pattern DROPS 179-31
We would love to hear what you have to say about this pattern!
If you want to leave a question, please make sure you select the correct category in the form below, to speed up the answering process. Required fields are marked *.