
Popular categories
Looking for a yarn?


Comments / Questions (5)
![]() Andrea Lyn wrote:
Andrea Lyn wrote:
I've tried to read your tiny charts--- it takes 100 times longer to fathom than written directions. Why on earth would anyone want to torture experienced or new knitters? I've been knitting over 50 years-- it's relaxing-- but not with tiny little squares! Sorry, but won't use these!!!! Why would anyone think charts are better???? They are maddening!!!
14.01.2020 - 16:08
![]() Andrea Lyn wrote:
Andrea Lyn wrote:
How can I get written instead of charged pattern directions? Please!!!
13.01.2020 - 17:48DROPS Design answered:
Dear Mrs Lynn, we only have diagram to this pattern, you'll find here how to read diagrams. Happy knitting!
14.01.2020 - 07:21
![]() Freda Ramos wrote:
Freda Ramos wrote:
En la parte que indican los aumentos para las mangas no es claro, es en cada vez que se hace un diagrama?
13.08.2018 - 01:19
![]() Silke wrote:
Silke wrote:
Ich hatte keine Probleme mit der Anleitung. Meiner Meinung nach, ist es jedoch vorteilhaft die Strickgrundlagen zu beherrschen und sich genau durchzulesen, was in der Anleitung steht. Dieser Schnitt ist gerade für Damen geeignet, die größere Kleidergrößen tragen. Ich habe das Revers übrigens komplett im Krausrippen-Muster gestrickt. Das sieht sehr edel aus. Liebes Drops-Team, Dankeschön! Diese Anleitung gehört ab jetzt zu meinen Favoriten!
31.05.2018 - 17:26
![]() Dietlind-Kueppers wrote:
Dietlind-Kueppers wrote:
Eine ausgesprochen schwer zu verstehende Anleitung, gilt auch für das Diagramm. Bis zur Maschenaufnahme für die Ärmel ist alles ok, doch mit dem Rest quäle ich mich seit Tagen - schade um das schöne Bouclégarn.
28.04.2018 - 20:16
|
|||||||
Miss Marina#missmarinacardigan |
|||||||
 |
 |
||||||
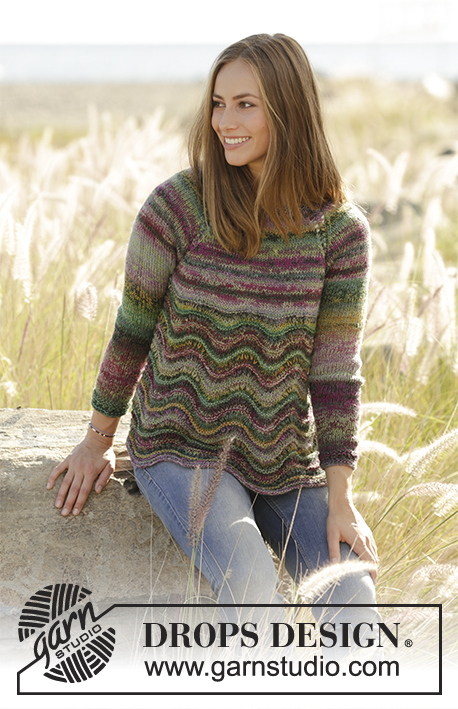
Knitted jacket with seam-less sleeves and rib, worked bottom up in DROPS Alpaca Bouclé. Sizes S - XXXL.
DROPS 178-28 |
|||||||
|
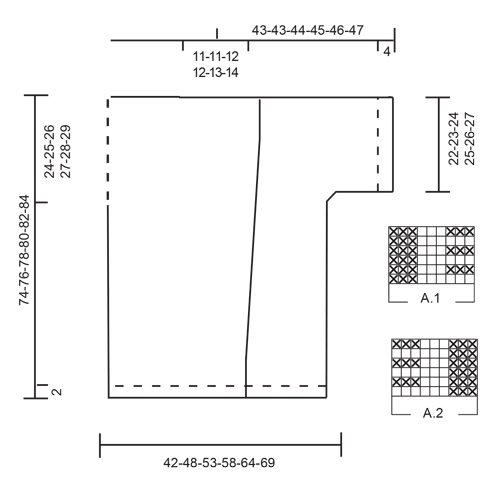
RIDGE/GARTER STITCH (worked back and forth): 1 ridge = Knit 2 rows. INCREASE TIP: All increases are from the right side! Increase 1 stitch by making a yarn over. On the next row knit the yarn overs twisted to prevent holes. PATTERN: See diagrams A.1 and A.2. The diagrams show all the rows in the pattern from the right side. ---------------------------------------------------------- JACKET: The piece is worked back and forth with circular needle in sections which are sewn together at the end. BACK PIECE: Cast on a little loosely 74-83-92-101-110-119 stitches with circular needle size 5 mm and Alpaca Bouclé. Work 3 RIDGES – see description above. The next row is worked as follows from the right side: Work 1 edge stitch in garter stitch, work A.1 (= 9 stitches), repeat A.1 until there is 1 stitch left, 1 edge stitch in garter stitch. Continue in this way, back and forth until the piece measures 50-51-52-53-54-55 cm. REMEMBER THE KNITTING TENSION! Now cast on new stitches at the end of every row for the sleeves in each side as follows: Cast on 2 stitches 2 times and 31-28-25-22-19-16 stitches 1 time (= in total 35-32-29-26-23-20 new stitches in each side) = 144-147-150-153-156-159 stitches. The new stitches are worked in to pattern A.1 as you go, with 6 stitches in garter stitch outermost in each side (= sleeve edge) – in other words, when all stitches are cast on, the next row from the right side is worked as follows: Work 6 stitches garter stitch, start on the 7th-1st-4th-7th-1st-4th stitch in diagram A.1 and work the rest of the diagram. Repeat A.1 until there are 6 stitches left on the needle and work 6 stitches garter stitch. When the piece measures 72-74-76-78-80-82 cm cast off the middle 16-17-18-19-20-21 stitches for the neck and each shoulder/sleeve is finished separately = 64-65-66-67-68-69 stitches. On the next row from the neck, cast off 1 stitch = 63-64-65-66-67-68 stitches. When the piece measures 74-76-78-80-82-84 cm cast off loosely – make sure the cast-off edge is not tight! Work the other shoulder/sleeve reversed in the same way. RIGHT FRONT PIECE: Cast on a little loosely 59-59-62-62-65-65 stitches with circular needle size 5 mm and Alpaca Bouclé. Work 3 ridges. The next row is worked as follows from the right side: Work 4 stitches in garter stitch for the band. Start on the 1st-1st-7th-7th-4th-4th stitch in diagram A.2 (= 9 stitches) and work the rest of the diagram. Repeat A.2 until there is 1 stitch left on the needle and work 1 edge stitch in garter stitch. When the piece measures 8 cm in all sizes increase 1 stitch inside the 4 band stitches in garter stitch towards mid front – READ INCREASE TIP! Increase in this way every 8th-6th-6th-6th-6th-6th row in total 11-11-17-15-13-7 times and every 10th-8th-8th-4th-4th-4th row 4-8-4-12-17-28 times = in total 15-19-21-27-30-35 stitches increased towards mid front. The new stitches are worked into the pattern as you go. AT THE SAME TIME when the piece measures 50-51-52-53-54-55 cm cast on new stitches at the end of each row from the right side as follows: Cast on 2 stitches 2 times and 31-28-25-22-19-16 stitches 1 time (= a total of 35-32-29-26-23-20 new stitches for the sleeve in the side). The new stitches are worked into the pattern as you go and the outermost 6 stitches are worked in garter stitch for the sleeve edge as for the back piece. When all the increases for the sleeve and the wrap- around are finished, there are 109-110-112-115-118-120 stitches on the needle. When the piece measures 74-76-78-80-82-84 cm work as follows on the next row from the right side: Work the first 46-46-47-49-51-52 stitches before placing them on a thread, cast off loosely the remaining 63-64-65-66-67-68 stitches on the needle for the neck. Make sure the cast-off edge is not tight! LEFT FRONT PIECE: Cast on a little loosely 59-59-62-62-65-65 stitches with circular needle size 5 mm and Alpaca Bouclé. Work 3 ridges. The next row is worked from the right side as follows: Work 1 edge stitch in garter stitch, work A.2 until there are 4-4-7-7-10-10 stitches left on the needle, work 0-0-3-3-6-6 stitches in A.2 (in sizes S and M no stitches are worked), work 4 edge stitches in garter stitch. When the piece measures 8 cm in all sizes increase 1 stitch inside the 4 band stitches in garter stitch as for the right front piece. And when the piece measures 50-51-52-53-54-55 cm cast on new stitches for the sleeve at the end of the row from the wrong side in the same way as for the right front piece. The new stitches are worked into the pattern as you go and the outermost 6 stitches are worked in garter stitch for the sleeve edge as for the right front piece and the back piece. When all the increases for the sleeve and the wrap-around are finished, there are 109-110-112-115-118-120 stitches on the needle. When the piece measures 74-76-78-80-82-84 cm work as follows on the next row from the right side: Cast off loosely the first 63-64-65-66-67-68 stitches on the needle, then work the remaining 46-46-47-49-51-52 stitches before they are placed on a thread. ASSEMBLY: Sew the shoulder/sleeve seam. Sew together under the sleeve and side seam in one go inside the 1 edge stitch. COLLAR: Place the 46-46-47-49-51-52 stitches from the right front piece back on the needle, knit up 18-19-20-21-22-23 stitches back of the neck and place the 46-46-47-49-51-52 stitches from the left front piece back on the needle = 110-111-114-119-124-127 stitches. Work 5 cm in garter stitch, cast off with double strand and make sure the cast-off edge is not tight! Cut and fasten the strands. |
|||||||
Diagram explanations |
|||||||
|
|||||||
 |
|||||||
Have you finished this pattern?Tag your pictures with #dropspattern #missmarinacardigan or submit them to the #dropsfan gallery. Do you need help with this pattern?You'll find 20 tutorial videos, a Comments/Questions area and more by visiting the pattern on garnstudio.com. © 1982-2026 DROPS Design A/S. We reserve all rights. This document, including all its sub-sections, has copyrights. Read more about what you can do with our patterns at the bottom of each pattern on our site. |
|||||||


With over 40 years in knitting and crochet design, DROPS Design offers one of the most extensive collections of free patterns on the internet - translated to 17 languages. As of today we count 324 catalogues and 12290 patterns translated into English (UK/cm). 12290
We work hard to bring you the best knitting and crochet have to offer, inspiration and advice as well as great quality yarns at incredible prices! Would you like to use our patterns for other than personal use? You can read what you are allowed to do in the Copyright text at the bottom of all our patterns. Happy crafting!
Post a comment to pattern DROPS 178-28
We would love to hear what you have to say about this pattern!
If you want to leave a question, please make sure you select the correct category in the form below, to speed up the answering process. Required fields are marked *.