
Popular categories
Looking for a yarn?


Comments / Questions (116)
![]() Susanne wrote:
Susanne wrote:
Ich hab jetzt bis zu der Stelle mit dem Pfeil immer vor und nach A2 2 M zugenommen- ist das falsch ab wann nimmt man nur noch 1M zu und wo - auch direkt vor und nach den Maschenmarkierern?
22.09.2025 - 21:53DROPS Design answered:
Liebe Susanne, vor und nach A.2 nehmen Sie je 1 Masche zu (= 4 Maschen zugenommen pro Zunahmerunde). Die Zunahmen mit 2 Maschen erfolgen nur am Vorderteil und am Rückenteil an den Markierern.
24.10.2025 - 13:01
![]() Susanne wrote:
Susanne wrote:
Hallo, die Zunahme geht bis zum Pfeil immer + 2 M je vound nach A2? Und dann? Wo nimmt man für dir Ärmel auf?
22.09.2025 - 21:46
![]() Loredana wrote:
Loredana wrote:
Le 21 maglie che vanno lavorate a dritto si riferiscono ai 21 aumenti/gettati maniche + dietro/davanti?
16.07.2025 - 07:56DROPS Design answered:
Buonasera Loredana, si fa riferimento ai primi 21 aumenti. Buon lavoro!
20.07.2025 - 17:12
![]() Loredana wrote:
Loredana wrote:
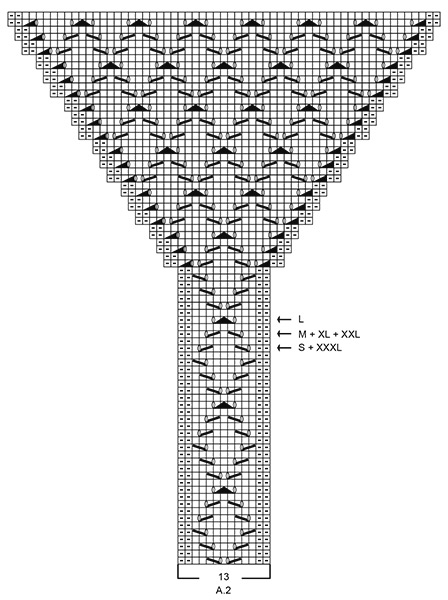
Buongiorno, sono arrivata agli aumenti per maniche, mentre si fanno i primi 21 ( lavoratina dritto) si prosegue con il diagramma su 13 maglie. Dopodiché si inizia ad inserire allargamento del diagramma, è così? Mi lascia perplessa l'immagine, è verosimile che per la taglia XL lo schema su 13 m venga ripetuto 2 volte in altezza? Grazie
16.07.2025 - 07:23DROPS Design answered:
Buonasera Loredana, al momento non sono segnalati errori per questo modello. Buon lavoro!
20.07.2025 - 17:11
![]() Loredana wrote:
Loredana wrote:
Buongiorno, adesso mi è tutto chiaro, avevo saltato un pezzo della spiegazione! Buona giornata e buon lavoro
15.07.2025 - 11:30DROPS Design answered:
Buonasera Loredana, perfetto, allora buon proseguimento. Buon lavoro!
20.07.2025 - 17:09
![]() Loredana wrote:
Loredana wrote:
Buongiorno, gli aumenti per arrotondamento maniche dove vanno fatti? All'interno dello schema A2 ( visto che ci sono ancora aumenti spalla da realizzare)? Cosa s'intende lavorare le prime 21 m a dritto e allo stesso tempo le nuove seguendo il diagramma A2... Vi ringrazio per l'aiuto che saprete darmi
15.07.2025 - 11:02DROPS Design answered:
Buonasera Loredana, deve seguire le indicazioni riportate nel paragrafo "AUMENTARE PER L’ARROTONDAMENTO DELLE MANICHE COME SEGUE". Buon lavoro!
20.07.2025 - 17:09
![]() Rosa Alvarez wrote:
Rosa Alvarez wrote:
Buenos días, tengo un problema con este patrón. Después de hacer las vueltas corta como indica el patrón y teniendo los 14 puntos indicados en el delantero de la labor. Hay que recoger todos los puntos en ese momento? O seguimos haciendo la segunda parte de aumentos? Por otra parte al hacer vueltas cortas y tejer el dibujo A2 en el hombro trasero derecho va con una fila de retraso con respecto al hombro trasero izquierdo.
13.11.2024 - 12:26DROPS Design answered:
Hola Rosa, después de terminar las vueltas cortas trabajamos en redondo sobre todos los puntos y continuamos con los aumentos. En principio, A.2 debería igualarse después de trabajar las filas cortas de ida y vuelta.
18.11.2024 - 00:02
![]() Małgorzata wrote:
Małgorzata wrote:
Cześć Drops, mam pytanie o dodawanie oczek na ramiona. Robię rozmiar XXXL, więc dodaję 10x2 oczka i 18x1 oczko na tył, co daje 76 dodanych oczek, plus 42 początkowe, to razem 118 oczek. A w opisie jest napisane, że po dodaniu wszystkich oczek na ramiona ma być ich 142- skąd taka liczba?
13.09.2024 - 11:08DROPS Design answered:
Witaj Małgosiu, przed rozpoczęciem dodawania oczek, o którym piszesz, czyli po rzędach skróconych, w rozmiarze XXXL było 150 o. (13x2= schematy na ramieniu + 58 o. na przód i 66 o. na tył). Dodawanie oczek na tył: 10 razy 2 oczka (dodanych 40 o.) i 18 razy 1 o. (dodanych 36 o.). Wyjściowe 66 o. + dodanych 76 o. =142 oczka. Pozdrawiamy!
17.09.2024 - 13:45
![]() Małgorzata wrote:
Małgorzata wrote:
Drogi Drops- czy mogłabym otrzymać odpowiedź na moje pytanie z 30.08? Bardzo proszę, bo stoję z robotą
04.09.2024 - 10:22DROPS Design answered:
Witaj Małgosiu, wysyłając zapytanie zaznaczyłaś pole komentarz, a nie pytanie, dlatego nie było widoczne. Dziś lub jutro otrzymasz odpowiedź. Pozdrawiamy!
04.09.2024 - 12:24
![]() Małgorzata wrote:
Małgorzata wrote:
Cześć Drops, ja nadal nie rozumiem dodawania oczek na rękaw- o dodanych oczkach z boków A.2 jest mowa, że mają być na lewo (potem one są na bieżąco wchłaniane przez ażur- dobrze rozumiem?), a potem jest mowa, że pierwszych 21 dodanych oczek ma być na prawo- nie rozumiem tego miejsca. Po drugie- te dodane na bokach A.2 oczka kończą się szybciej niż jest potrzeba rozszerzania ażuru- skąd brać nowe oczka? bo moje zachodzą już na tył/przód, czyli przekraczają znaczniki...
30.08.2024 - 11:07DROPS Design answered:
Witaj Małgorzato, dodawane oczka są na bieżąco wchłaniane przez ażur, aż schemat A.2 zostanie zakończony. Pozostałe dodane oczka będą oczkami lewymi rękawa, które znajdują się na środku pod rękawem. Schemat A.2 będzie miał taką sama liczbę oczek na końcu we wszystkich rozmiarach. Będzie różniła się za to liczba oczek lewych na środku pod rękawem. Pozdrawiamy!
04.09.2024 - 13:42
|
||||||||||||||||||||||
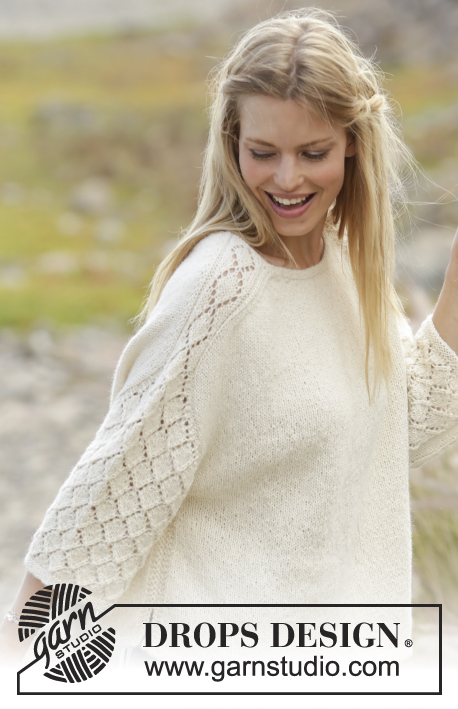
Vanilla Kiss#vanillakisssweater |
||||||||||||||||||||||
 |
 |
|||||||||||||||||||||
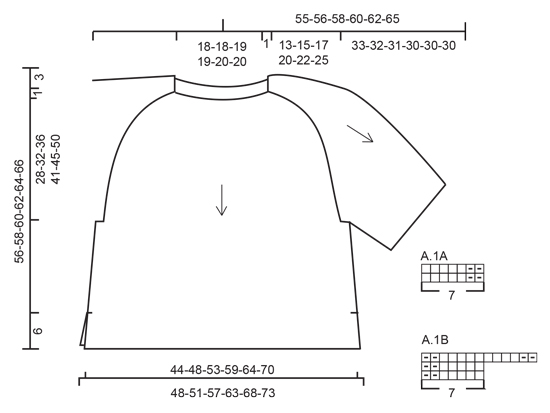
Jumper with lace pattern on shoulders and sleeves, knitted top down in DROPS Puna or Sky. Size: S - XXXL
DROPS 178-16 |
||||||||||||||||||||||
|
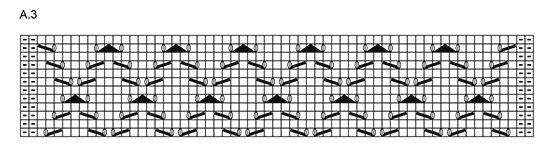
RIDGE/GARTER STITCH (worked in the round): 1 ridge = 2 rounds. Knit 1 round and purl 1 round. RIDGE/GARTER STITCH (worked back and forth): 1 ridge = Knit 2 rows. PATTERN: See diagrams A.1 to A.3. The diagrams show all rows in pattern seen from the right side. SHOULDER: NOTE: All increases worked from right side! On next row work yarn overs twisted to avoid holes. Increase 2 stitches as follows: INCREASE 2 STITCHES BEFORE MARKERS 1 AND 3: Start 3 stitches before marker, 1 yarn over, knit 2, 1 yarn over, knit 1, (= 2 stitches increased). INCREASE 2 STITCHES AFTER MARKERS 2 AND 4: Knit 1, 1 yarn over, knit 2, 1 yarn over (= 2 stitches increased). Increase 1 stitch as follows: INCREASE 1 STITCH BEFORE MARKERS 1 AND 3: Start 1 stitch before marker, 1 yarn over, knit 1 (= 1 stitch increased). INCREASE 1 STITCH AFTER MARKERS 2 AND 4: Knit 1, 1 yarn over (= 1 stitch increased). SLEEVE CAP: Increase 1 stitch by making 1 yarn over (make sure the yarn over is not too loose). On next round: work yarn over twisted to avoid holes – knit the first 21 stitches increased, purl the remaining stitches. next round purl yarn over twisted to avoid a hole – all increased stitches on sleeve cap are purled. INCREASE TIP (for sides of front and back pieces): Increase on inside of the 4 outermost stitches in each side (i.e. 3 edge stitches in garter stitch + 1 stitch in stocking stitch). Increase 1 stitch by making 1 yarn over, on next row work yarn over twisted to avoid a hole (the increased stitch is worked in stocking stitch). DECREASE TIP (for mid under sleeve): Start 3 stitches before marker mid under sleeve, purl 2 together, knit 2 (the marker sits in the middle of these 2 stitches), purl 2 together (= 2 stitches decreased). ---------------------------------------------------------- JUMPER The piece is worked in the round with circular needle, top down, as far as below the sleeves. Then the front and back pieces are worked separately back and forth. The sleeves are worked in the round. The photo deviates somewhat from pattern regarding increases in sleeve caps (A.2) – the fit has been improved. YOKE: Cast on 102-102-106-106-110-110 stitches with short circular needle size 3 mm and Puna. The round starts mid back. Insert a marker here which will follow your work onwards. Work 2 RIDGES in the round – see description above. Insert 4 new markers in the piece as follows (without working the stitches): Insert marker 1 after the first 19-19-20-20-21-21 stitches (= ½ back piece), marker 2 after the next 13 stitches (= shoulder/sleeve), marker 3 after the next 38-38-40-40-42-42 stitches (= front piece), marker 4 after the next 13 stitches (= shoulder/sleeve), there are now 19-19-20-20-21-21 stitches left after the last marker (= ½ back piece). Change to circular needle size 4 mm. Now work short rows over the stitches in the neck for a better fit, AT THE SAME TIME as you increase stitches to shoulder and work pattern on shoulders/sleeves (= 13 stitches) as follows: ROW 1 (from right side): Knit until 3 stitches before the marker 1, increase 2 stitches to SHOULDER – see description above, work A.1A (= 7 stitches), turn piece and tighten strand. ROW 2 (from wrong side): Work A.1A, purl as far as marker 4, A.1B (= 7 stitches –you read the diagram from left to right when working from the wrong side), turn the piece and tighten strand. ROW 3: Work A.1B, increase 2 stitches to shoulder, knit to 3 stitches before marker 1 and increase 2 stitches to shoulder, work A.2 (= 13 stitches), marker 2 is here, turn the piece and tighten strand. ROW 4: Work A.2, purl to marker 4, work A.2 – start on row 2 in the diagram, marker 3 is here, turn the piece and tighten strand. ROW 5: Work A.2, increase 2 stitches to shoulder, knit to 3 stitches before marker 1, increase 2 stitches to shoulder, continue A.2 and increase 2 stitches to shoulder on front piece, (i.e. you work as follows after marker 2: Knit 1, 1 yarn over, knit 2, 1 yarn over), knit 1, (= 4 stitches + 2 yarn overs on front piece), turn the piece and tighten strand. ROW 6: Purl to marker 2 (= purl 6 stitches on front piece), continue A.2, purl to marker 4, continue A.2, purl 4 stitches on front piece (= 4 stitches past marker 3) turn the piece and tighten strand. REMEMBER THE KNITTING TENSION! ROW 7: Knit 1, increase 2 stitches to shoulder (= 4 stitches + 2 yarn overs on front piece), continue A.2, increase 2 stitches to shoulder, knit to 3 stitches before marker 1, increase 2 stitches to shoulder, continue A.2, increase 2 stitches to shoulder on front piece and knit over 2 more stitches than on previous row on front piece (= 8 stitches + 2 yarn overs on front piece), turn the piece and tighten the strand. ROW 8: Purl to marker 2 (= 10 purled stitches on front piece), continue A.2, purl to marker 4, continue A.2 and purl over 2 stitches more than on the previous row on front piece (= 8 stitches on front piece), turn the piece and tighten strand. ROW 9: Knit to 3 stitches before the marker, increase 2 stitches to shoulder (= 8 knitted stitches + 2 yarn overs on front piece), continue A.2, increase 2 stitches to shoulder, knit to 3 stitches before marker 1, increase 2 stitches to shoulder, continue A.2, increase 2 stitches to shoulder on front piece, Knit over 2 stitches more than on the previous row on front piece (= 12 stitches + 2 yarn overs on front piece), turn piece and tighten strand. ROW 10: Purl to marker 2 (= 14 purled stitches on front piece), continue A.2, purl to marker 4, continue A.2 and purl over 2 stitches more than on previous row on front piece (= 12 stitches on front piece), turn the piece and tighten strand. ROW 11: Knit to 3 stitches before the marker, increase 2 stitches to shoulder (= 12 knitted stitches + 2 yarn overs on front piece), continue A.2, increase 2 stitches to shoulder, knit to 3 stitches before marker 1, increase 2 stitches to shoulder, continue A.2, increase 2 stitches to shoulder on front piece, knit over 2 more stitches than on the previous row on front piece (= 16 stitches + 2 yarn overs on front piece), turn the piece and tighten strand. ROW 12: Purl to marker 2 (= 18 purled stitches on front piece), continue A.2, purl to marker 4, continue A.2 and purl over 2 stitches more than on previous row on front piece (= 16 stitches on front piece), turn piece and tighten strand. ROW 13: Knit to 3 stitches before marker, increase 2 stitches to shoulder (= 18 stitches before next marker), continue A.2, increase 2 stitches to shoulder, knit to mid back (= start of the round). Continue with pattern but without increasing as far as marker 2. Now you have worked 11 rows of A.2. Cut the strand. You have now increased 2 stitches to shoulder in each side of the front piece 4 times and 2 stitches to shoulder in each side of the back piece 6 times = 142-142-146-146-150-150 stitches (= 54-54-56-56-58-58 stitches on front piece and 62-62-64-64-66-66 stitches on back piece). The short rows are now finished and you continue in the round with circular needle. Start at marker mid back. On the next round continue the increases to shoulder (= work the increased stitches on front and back piece in stocking stitch) and work A.2 as before, AT THE SAME TIME on round with arrow in A.2 (i.e. before the increases to shoulder are finished) start the increases to sleeve cap (= work the first 21 increased stitches knit. AT THE SAME TIME work the new stitches into A.2 as A.2 expands outwards). When A.2 has been completed in height, repeat A.3 over A.2 to finished length. Increase to shoulder and to sleeve cap as described below: INCREASE TO SHOULDER AS FOLLOWS: NOTE: You increase differently on front and back pieces and, on the rounds after increases, the yarn overs are knitted twisted to avoid holes - Remember SHOULDER! INCREASE ON BACK PIECE (= between markers 4 and 1): Increase 2 stitches every 2nd round a total of 2-3-5-7-8-10 times, then increase 1 stitch every 2nd round a total of 9-11-12-14-16-18 times. INCREASE ON FRONT PIECE (= between markers 2 and 3): Increase 2 stitches every 2nd round a total of 6-7-9-11-12-14 times, then increase 1 stitch every 2nd round a total of 5-7-8-10-12-14 times. After all increases to shoulder there are 88-96-108-120-130-142 stitches on both front and back pieces. INCREASE TO SLEEVE CAP AS FOLLOWS: On the round with an arrow in diagram A.2 start increasing to SLEEVE CAP – see description above. Increase 1 stitch on each side of A.2 on every shoulder/sleeve (= 4 stitches increased on round). Increase in this way every round a total of 1-4-6-4-4-2 times and then every 2nd round a total of 25-26-28-32-34-38 times. There should always be at least 2 purled stitches on each side of the lace pattern A.2 on sleeves. (These purl stitches are included in the diagram). A.2 expands outwards as diagram is worked, so that more and more stitches are included in the lace pattern. When all increases to sleeve cap are finished, there are 65-73-81-85-89-93 stitches on each sleeve. After all increases to shoulder and sleeve cap there are 306-338-378-410-438-470 stitches on the needle and piece measures 31-33-35-37-38-41 cm (measured from shoulder down). There are now 4-8-12-14-16-18 purled stitches on each side of the lace pattern (including the 2 stitches in each side of A.2/A.3). The next round is worked as follows: Work 44-48-54-60-65-71 stitches stocking stitch (= ½ back piece), place the next 65-73-81-85-89-93 stitches on 1 thread (= sleeve), cast on 4 new stitches on needle (= in side under sleeve), work 88-96-108-120-130-142 stitches stocking stitch (= front piece), place the next 65-73-81-85-89-93 stitches on 1 thread (= sleeve), cast on 4 new stitches on needle (= in side under sleeve) and work the remaining 44-48-54-60-65-71 stitches in stocking stitch (= ½ back piece). BODY: = 184-200-224-248-268-292 stitches. THE PIECE IS NOW MEASURED FROM HERE! Now divide the piece in the middle of the 4 new stitches under each sleeve and the front and back pieces are worked separately, back and forth on circular needle to finished length. BACK PIECE: = 92-100-112-124-134-146 stitches. Work stocking stitch with 3 edge stitches in GARTER STITCH – see description above, in each side. When piece measures 3 cm from the division, increase 1 stitch in each side – read INCREASE TIP (= 2 stitches increased). Increase in this way every 14th-14th-14th-14th-14th-14th row a total of 4 times in each side = 100-108-120-132-142-154 stitches. When piece measures 24-24-24-24-25-24 cm from the division, change to circular needle size 3 mm. Work 3 ridges, change back to circular needle size 4 mm and loosely cast off. The jumper measures approx. 56-58-60-62-64-66 cm from top of shoulder down. FRONT PIECE: = 92-100-112-124-134-146 stitches. Work in the same way as the back piece. SLEEVE: Place the 65-73-81-85-89-93 stitches from the thread in one side of the piece onto short circular needle/double pointed needles size 4 mm and, in addition, knit up 1 stitch in each of the 4 stitches cast on under the sleeve = 69-77-85-89-93-97 stitches on needle. Insert 1 marker in the middle of the 4 new stitches mid under sleeve and allow the marker to follow your work onwards. Continue A.3 as before, knit 1 stitch on each side of the marker mid under sleeve and purl the remaining stitches on the round. When piece measures 3 cm from the division, decrease 2 stitches mid under sleeve – read DECREASE TIP. Repeat the decrease when piece measures 8-8-7-7-6-6 cm = 65-73-81-85-89-93 stitches. Continue working until piece measures 14-12-11-11-11-12 cm from the division. Change to double pointed needles size 3 mm. Work 3 ridges over all stitches, change back to double pointed needles size 4 mm and cast off. Work the other sleeve in the same way. ASSEMBLY: Sew side seams in outermost loop of outermost stitch so that the seam is flat, but stop when there is 6 cm left in each side (= split). |
||||||||||||||||||||||
Diagram explanations |
||||||||||||||||||||||
|
||||||||||||||||||||||
 |
||||||||||||||||||||||
 |
||||||||||||||||||||||
 |
||||||||||||||||||||||
Have you finished this pattern?Tag your pictures with #dropspattern #vanillakisssweater or submit them to the #dropsfan gallery. Do you need help with this pattern?You'll find 34 tutorial videos, a Comments/Questions area and more by visiting the pattern on garnstudio.com. © 1982-2026 DROPS Design A/S. We reserve all rights. This document, including all its sub-sections, has copyrights. Read more about what you can do with our patterns at the bottom of each pattern on our site. |
||||||||||||||||||||||


With over 40 years in knitting and crochet design, DROPS Design offers one of the most extensive collections of free patterns on the internet - translated to 17 languages. As of today we count 324 catalogues and 12290 patterns translated into English (UK/cm). 12290
We work hard to bring you the best knitting and crochet have to offer, inspiration and advice as well as great quality yarns at incredible prices! Would you like to use our patterns for other than personal use? You can read what you are allowed to do in the Copyright text at the bottom of all our patterns. Happy crafting!
Post a comment to pattern DROPS 178-16
We would love to hear what you have to say about this pattern!
If you want to leave a question, please make sure you select the correct category in the form below, to speed up the answering process. Required fields are marked *.