
Popular categories
Looking for a yarn?


Comments / Questions (32)
![]() Knut wrote:
Knut wrote:
Stgickas på KANTEN
30.04.2016 - 19:01
![]() Berit Skaarud wrote:
Berit Skaarud wrote:
Det er bilde av Mønster A 4 - er ikke nevnt i teksten. Hvor skal det strikkes?
30.04.2016 - 08:59DROPS Design answered:
Hej Berit, således står det under Kanten: Strikk 1 omg vrang og 1 omg rett. Videre strikkes det mønster rundt etter diag A.4. God fornøjelse!
02.05.2016 - 09:17
![]() Maarit Kuosari wrote:
Maarit Kuosari wrote:
Vasemman hihan aloitus tuottaa ongelmia. Aloitetaanko kuvio A2a ( 29 s) + A3 ( s koko 15 s ) + a2c ( 30s ) eli yhteensä mielestäni 74 s, eli vain toiseen reunaan jää reunasilmukka kun kuviosta laskee. Vai a2b ( 30s ) + A3 ( s. koko 15s) + a2d ( 30s) yhteensä 75 silmää. Puikoilla on 75 silmää, mutta kuvioista en saa 73 millään.... Ja lähinnä tuo että mennäänkö alusta asti a2a+a3+a2c sitten a2b+a3+a2d vai aloitetaanko a2b+a3+a2d
28.04.2016 - 06:41DROPS Design answered:
Hei! Hihassa neulotaan A.2B, A.3 ja A.2D: 30 + 15 + 30 = 75 s. Koska lisäykset on nyt tehty (eli piirrosten A.2B ja D ulkoreunojen langankierrot jätetään jatkossa tekemättä), työssä on ensimmäisellä krs:lla 29 + 15 + 29 s, eli kumpaankin reunaan mahtuu 1 reunasilmukka.
25.10.2016 - 16:12
![]() Ansa Grahn wrote:
Ansa Grahn wrote:
En ymmärrä tuota vasemman hihan aloitusta. Mistä kohtaa A2 a vai A2 b hihaa aletaan kutomaan? En saa silmukoita täsmäämään, koska hihassa olisi 75 silmukkaa, mutta A.2a+A3+A2c ovat yhteensä 73 silmukkaa.
18.04.2016 - 06:22DROPS Design answered:
Hei! Kummassakin reunassa neulotaan yksi reunasilmukka, jolloin mallineule täsmää.
19.04.2016 - 13:35
![]() Kirsten Algrensen wrote:
Kirsten Algrensen wrote:
Hej jeg er ved og strikke lemon cross men har et problem med opskriften jeg kan ikke finde a2 mønstre nogen steder er det en fejl eller hvad hilsen kirsten algrensen
23.03.2016 - 13:50DROPS Design answered:
Hej Kirsten. De staar nederst lige under A.1: A.2A, A.2B osv.
23.03.2016 - 14:26
![]() Alice Cardoso wrote:
Alice Cardoso wrote:
Para as mangas utilizar A.2C e A.2D não encontro problema, mas para utilizar A.2A e A.2B para que as diminuições sejam feitas no inicio da carreira não esta dando certo
25.02.2016 - 18:55DROPS Design answered:
Verifique junto da foto, no separador correcções, se houve alguma correcção feita. Veja também se passou alguma laçada que altera o número de malhas. Bom tricô!
03.03.2016 - 12:57
![]() Alice Cardoso wrote:
Alice Cardoso wrote:
Achei lindíssimo o boleto, comecei a fazer e estou encontrando muita dificuldade em compreender como continuar fazendo a manga.
19.02.2016 - 16:20DROPS Design answered:
Pode sempre consultar os nossos vídeos que ajudam a fazer o modelo. Junto da foto, em separador videos.
03.03.2016 - 12:58
![]() Kris wrote:
Kris wrote:
Can't wait to start this gorgeous shrug. All your designs are awesome.
23.01.2016 - 18:44
![]() Maggie wrote:
Maggie wrote:
Looks very pretty and feminine.
08.01.2016 - 23:02
![]() Josiane wrote:
Josiane wrote:
Très beau modèle ... j'espère pouvoir le tricoter !
08.01.2016 - 20:34
|
||||||||||||||||
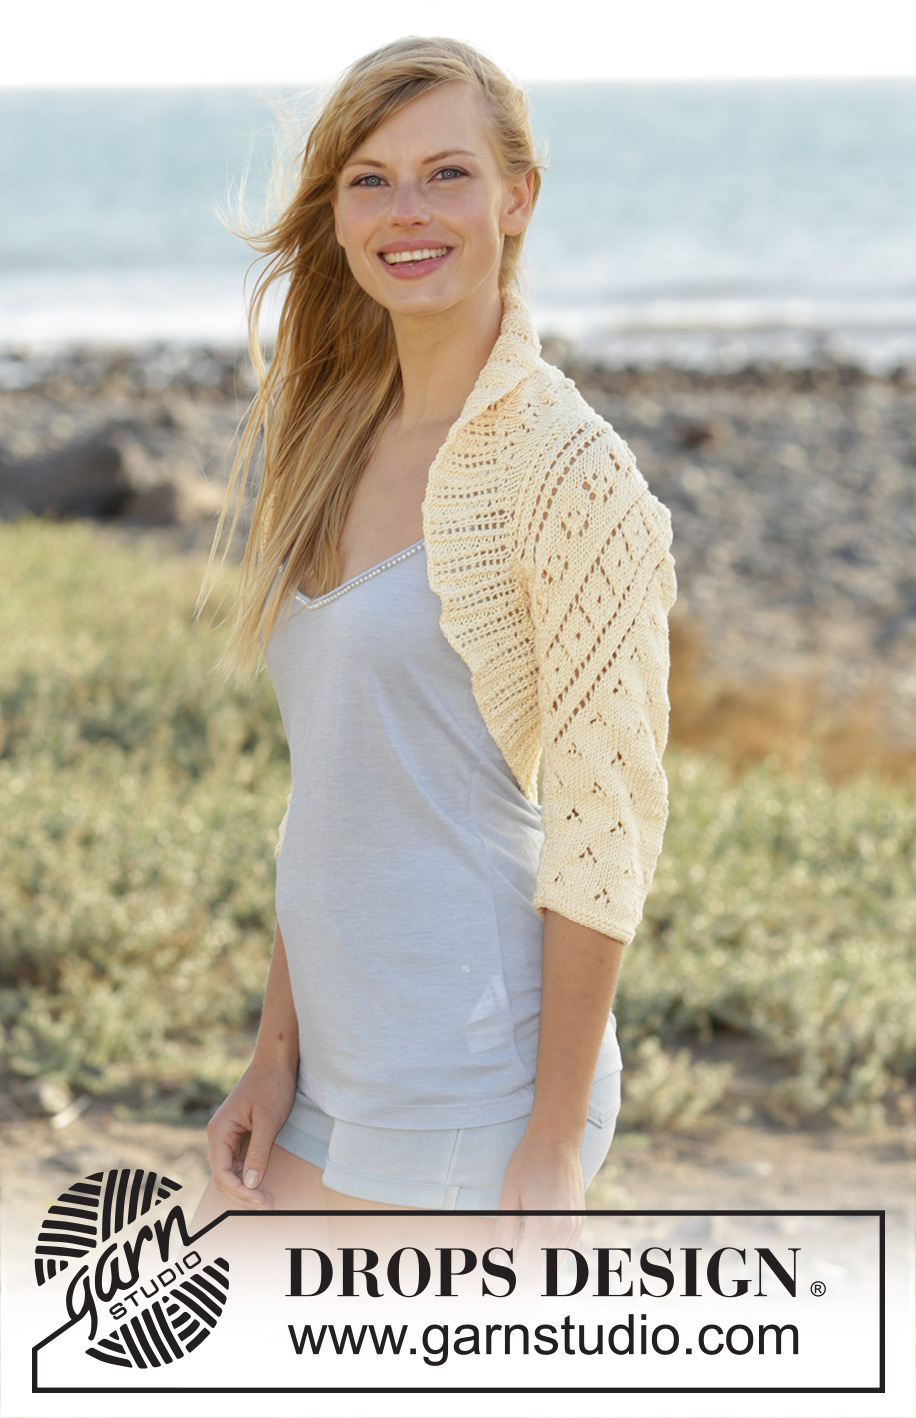
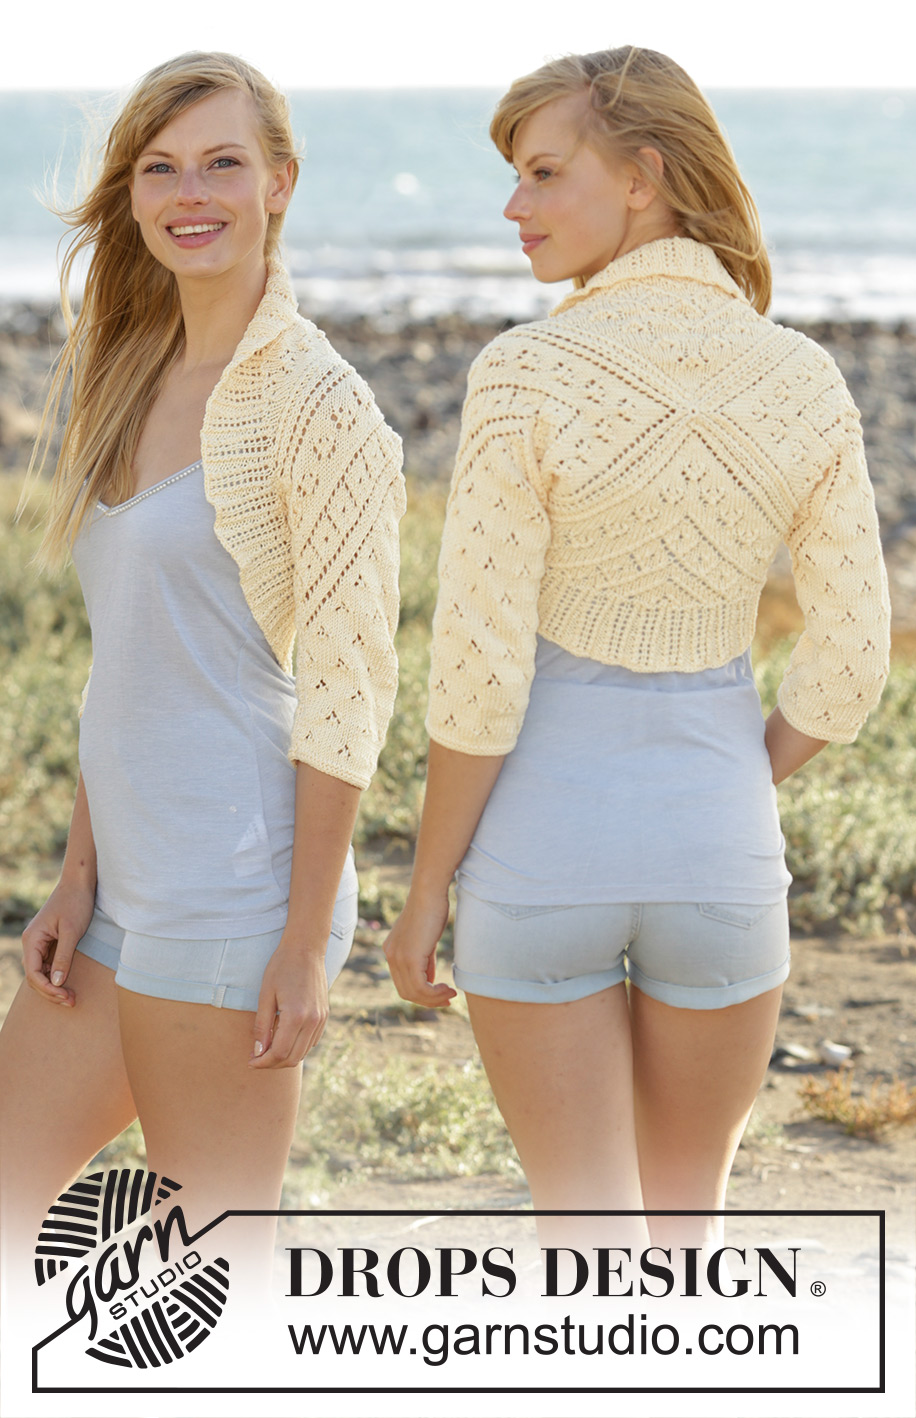
Lemon Cross#lemoncrossbolero |
||||||||||||||||
 |
 |
|||||||||||||||
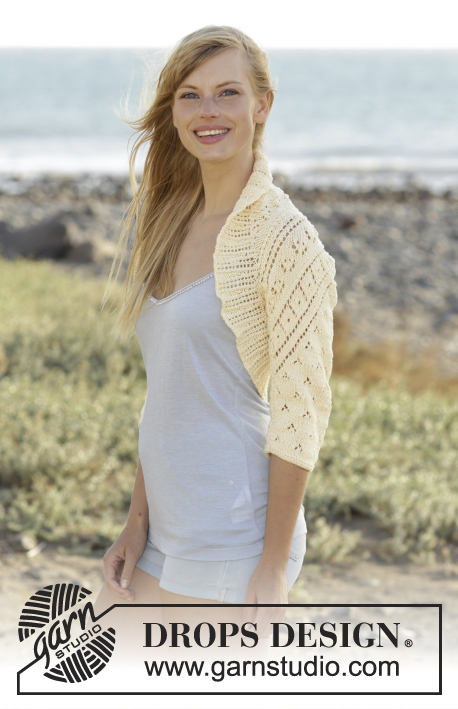
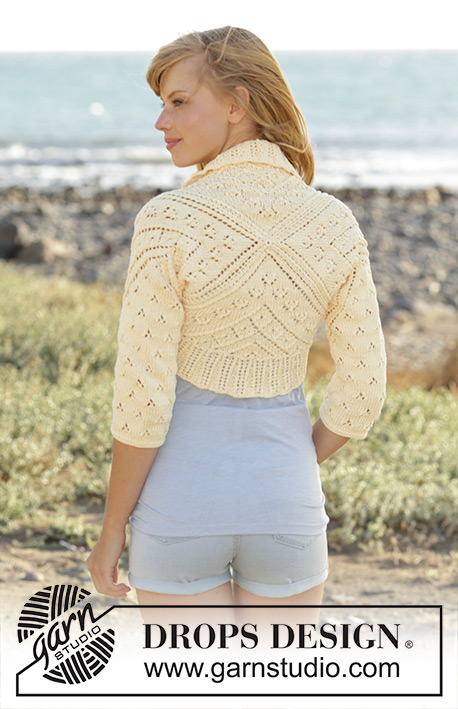
Knitted DROPS bolero worked as a square with lace pattern in ”Muskat”. Size: S - XXXL.
DROPS 170-5 |
||||||||||||||||
|
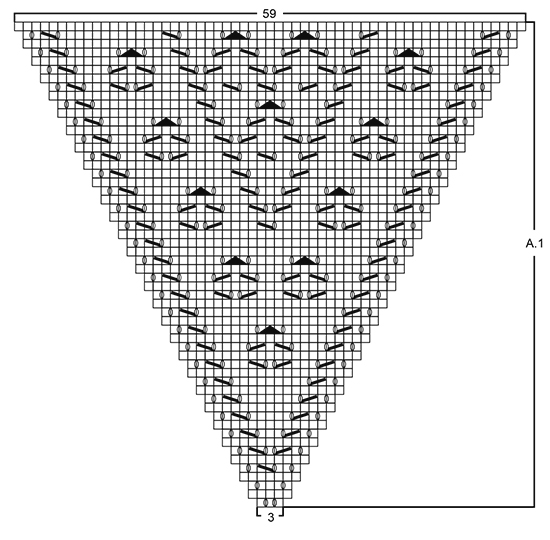
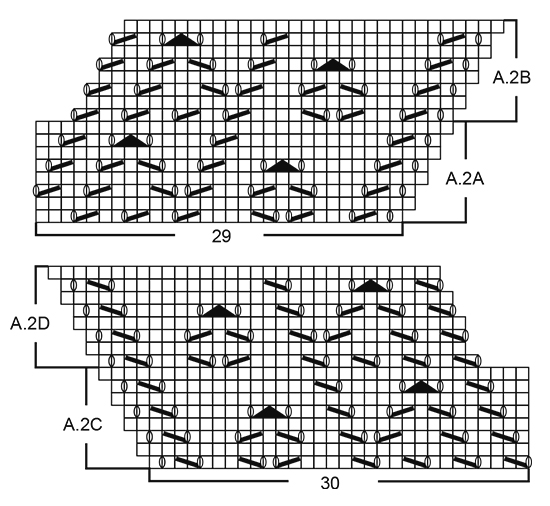
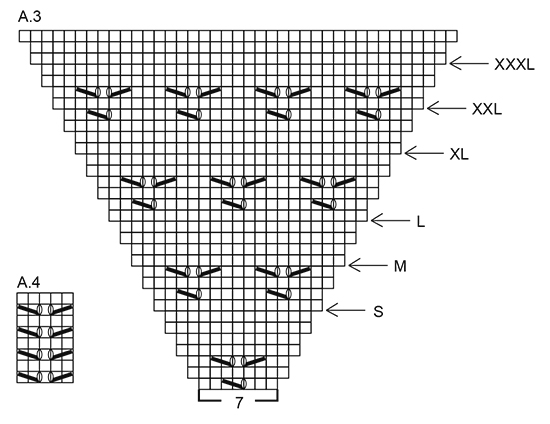
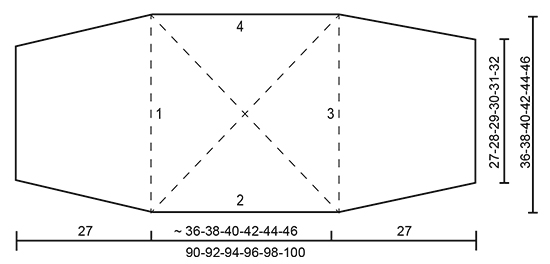
MAGIC CIRCLE: To avoid hole in the middle beg with this technique: Hold yarn end in the left hand and make a loop around left index finger (from left to right). Hold the loop with left thumb and index finger. Insert needle through loop, get yarn from ball (i.e. place yarn 1 time over needle from you), pull yarn back through loop, 1 YO (now place yarn from the back and towards you) and pull YO through sts on needle, * insert needle through loop, 1 YO (place yarn from the back and towards you), pull YO through loop, 1 YO (from the back and towards you) and pull YO through outermost st on right needle (i.e. the last st made) *, repeat from *-* until there are 12 sts on needle. Distribute sts on 4 double pointed needles size 3.5 mm as explained in pattern. Then work as explained in pattern – AT THE SAME TIME pull yarn end so that loop is tighten tog and the hole disappears. GARTER ST (back and forth): K all rows. 1 ridge = 2 rows K. PATTERN: See diagrams A.1 to A.4. The diagrams show all rows in pattern seen from RS. DECREASE TIP: Dec inside 1 edge sts in garter st. All dec are done from RS! Dec as follows after 1 edge sts: Slip 1 st as if to K, K 1, psso. Dec as follows before 1 edge st: K 2 tog. INCREASE TIP: Inc 1 st by making 1 YO. On next round P YO twisted to avoid holes - P inc sts (seen from RS). ---------------------------------------------------------- BOLERO: Work back piece as a square from mid back. Beg on double pointed needles, switch to circular needle when needed. Work sleeves back and forth on circular needle from two of the sides on square. Then work an edge around the opening on bolero. BACK PIECE: Beg with MAGIC CIRCLE – see explanation above and Muskat = 12 sts distributed on 4 double pointed needles size 3.5 mm. Work pattern in the round according to diagram A.1, i.e. repeat A.1 4 times in total on round (1 repetition per needle) and inc as shown in diagram. REMEMBER THE KNITTING TENSION When A.1 has been worked, there are 236 sts on needle (i.e. 59 sts in every repetition). Work next round as follows: * Work A.2A (= 29 sts), A.2C (= 30 sts) *, repeat from *-* 3 more times. Continue pattern like this and inc as shown in diagram. When A.2A/A.2C have been worked 1 time vertically, there are 268 sts on needle (i.e. 67 sts in every repetition). Work next round as follows: * Work A.2B (= 30 sts), A.3 (= 7 sts), work A.2D (= 30 sts) *, repeat from *-* 3 more times. Continue the pattern like this outwards until there are 300-316-332-356-372-388 sts on needle (i.e. 75-79-83-89-93-97 sts in every repetition) - NOTE: A.3 will get bigger and bigger between A.2B/A.2D. Now keep sts along side 1 on needle - see chart (= left sleeve). Slip sts along side 2 on a stitch holder (= bottom of back piece). Slip sts along side 3 on a stitch holder (= right sleeve). Slip sts along side 4 on a stitch holder (= at the top of back piece towards the neck). LEFT SLEEVE: = 75-79-83-89-93-97 sts. READ ALL OF THE FOLLOWING SECTION BEFORE CONTINUING! Insert 1 marker in each side – NOW MEASURE PIECE FROM HERE! Continue pattern back and forth on circular needle size 3.5 mm according to diagram A.2B/A.2D and A.3 as before with 1 edge st in GARTER ST in each side – see explanation above (arrow in A.3 shows where pattern continues in the different sizes in A.3). NOTE: Inc in each side is now finished (do not make YO outermost in A.2B/A.2D anymore -i.e. no of sts will be the same on every row. A.3 will continue to get bigger and bigger and therefore A.2B/A.2D will now get smaller and smaller in each side). AT THE SAME TIME when piece measures 3-3-3-2-2-2 cm, dec 1 st in each side - READ DECREASE TIP. Repeat dec in each side every 6th-6th-4th-4th-4th-4th row a total of 9-10-11-13-14-15 times in each side = 57-59-61-63-65-67 sts remain on needle - NOTE: When there are no sts left in A.2B/A.2D in each side, work A.3 over all sts with 1 edge st in garter st in each side - work the sts that do not the pattern in stocking st when dec. When piece measures 26 cm from markers (or desired length), switch to circular needle size 3 mm. Work 2 ridges back and forth (1st row = RS) and then loosely cast off with K from RS. Sleeve measures approx. 27 cm from markers. RIGHT SLEEVE: Slip the 75-79-83-89-93-97 sts from stitch holder along side 3 back on circular needle size 3.5 mm and work back and forth on circular needle the same way as on left sleeve. ASSEMBLY: Fold the piece double along so that sts from stitch holder 2 and 4 on back piece (and markers on each sleeve) are place against each other. Sew sleeve seams inside 1 edge st - beg at the bottom of each sleeve and sew up to markers. EDGE: Slip sts from stitch holder 2 and 4 on circular needle size 3 mm = 150-158-166-178-186-194 sts on needle. K 1 round while inc 50-52-54-62-64-66 sts evenly (inc approx. every 3rd st) = 200-210-220-240-250-260 sts. P 1 round and K 1 round. Then continue pattern in the round according to diagram A.4. When edge measures 2 cm, inc 1 st after every repetition - READ INCREASE TIP = 240-252-264-288-300-312 sts. Repeat inc when edge measures 4 and 6 cm = 320-336-352-384-400-416 sts (there are now 3 P between every repetition the entire round). When edge measures 7 cm, cast off with K over K and P over P. |
||||||||||||||||
Diagram explanations |
||||||||||||||||
|
||||||||||||||||
 |
||||||||||||||||
 |
||||||||||||||||
 |
||||||||||||||||
 |
||||||||||||||||
Have you finished this pattern?Tag your pictures with #dropspattern #lemoncrossbolero or submit them to the #dropsfan gallery. Do you need help with this pattern?You'll find 21 tutorial videos, a Comments/Questions area and more by visiting the pattern on garnstudio.com. © 1982-2026 DROPS Design A/S. We reserve all rights. This document, including all its sub-sections, has copyrights. Read more about what you can do with our patterns at the bottom of each pattern on our site. |
||||||||||||||||


With over 40 years in knitting and crochet design, DROPS Design offers one of the most extensive collections of free patterns on the internet - translated to 17 languages. As of today we count 324 catalogues and 12290 patterns translated into English (UK/cm). 12290
We work hard to bring you the best knitting and crochet have to offer, inspiration and advice as well as great quality yarns at incredible prices! Would you like to use our patterns for other than personal use? You can read what you are allowed to do in the Copyright text at the bottom of all our patterns. Happy crafting!
Post a comment to pattern DROPS 170-5
We would love to hear what you have to say about this pattern!
If you want to leave a question, please make sure you select the correct category in the form below, to speed up the answering process. Required fields are marked *.