Comments / Questions (32)
![]() Vibeke Wiwe wrote:
Vibeke Wiwe wrote:
Nu har jeg strikket A2B, A3 ogA2D og har nu 75 masker på hver side i firkanten Jeg kan godt se hvordan jeg strikker videre med A.3 Men hvad skal jeg ellers strikke for at nå de 83 masker i størrelse L Der må være noget jeg skal gentage
01.04.2025 - 16:50DROPS Design answered:
Hej Vibeke, A.3 vil blive større og større for hver 2.pind :)
08.04.2025 - 14:12
![]() Benedicte wrote:
Benedicte wrote:
Jeg er ferdig med ryggstykket og skal begynne på venstre erme. Jeg synes alltid det er greiest å strikke glatt strikk fra vrangen og mønsteret fra retten. Her blir det motsatt hvis pilen markerer overgang fra rygg til erme. Jeg lurer på om det er lurt å strikke en omgang rett før jeg begynner på ermet. Eller om jeg skal snu strikketøyet slik at 1. omgang blir fra vrangen. Slik det står blir det glattstrikk fra retten og mønster fra vrangen og det er plundrete
07.02.2025 - 09:18DROPS Design answered:
Hej Benedicte, ja gør du bare det :)
12.02.2025 - 13:37
![]() Evi Regenberg wrote:
Evi Regenberg wrote:
Hallo, ich stricke gerade den Bolero und komme beim linken Ärmel nicht weiter. - Ist es richtig, dass die Muster wechseln? Die richtige Reihenfolge ist tatsächlich 1. A.2B, 2. A.2D, 3. A.3? Muss A.4 nicht zwischen A.2B und A.2D liegen? - Wenn ich bei A.2B in jeder 2. Reihe den ersten Umschlage (= Zunahme) weglasse wird das Muster ja kleiner. Auf welcher Seite sollen dann Maschen weggelassen werden? Wird das Muster rechts oder links schmaler? Danke!
23.01.2025 - 11:43DROPS Design answered:
Liebe Frau Regenberg, jetzt stricken Sie nur eine Seite wie zuvor: A.2B, A.3 und A.2D aber damit die Maschenanzahl nicht mehr zunimmt, arbeiten Sie nicht mehr den 1. Umschlag in A.2B und den letzten Umschlag in A.2D, so sind es genausoviele Abnahmen wie Umschläge; so wird A.3 sich verbreiten und das Lochmuster in A.2B/D "verschwinden"; gleichzeitig nach 3-2 cm (siehe Größe) beidseitig abnehmen. Viel Spaß beim Stricken!
24.01.2025 - 07:36
![]() Wanda wrote:
Wanda wrote:
Je commence la manche gauche et ne comprend pas comment continuer A2b et A2c. J'ai bien compris qu'il ne faut plus tricoter le jeté à droite de A2b et à gauche de A2c, mais je ne comprend pas comment continuer le point fantaisie. Les mailles de A2b vont-elles diminuer une par une depuis la droite et celles de A2c depuis la gauche ou est-ce le contraire ? Je ne parle bien sûr pas des diminutions sous le bras.
11.08.2024 - 21:26DROPS Design answered:
Bonjour Wanda, comme vous ne faites plus le premier jeté de A.2 B ni le dernier de A.2D, le nombre de mailles va rester le même (vous aurez autant de jetés que de diminutions). Les diminutions sous la manche se font de chaque côté: au début du rang et à la fin du rang; le nombre de mailles de A.2B/A.2D va alors diminuer. Bon tricot!
12.08.2024 - 08:27
![]() Allison wrote:
Allison wrote:
I'm afraid I'm lost when it comes to knitting the sleeves. Th instructions say to not do the outermost YO on A.2B and A 2D, is that the YO that is at the end of these sections (left end for A.2B and right end for A 2D)? If I don't do those YOs, how can A3 continue to increase in stitches? How do I make sure A3 increases to get bigger if the stitches in B and D stay the same? Grateful for help 😊
28.04.2024 - 17:37DROPS Design answered:
Dear Allison, the number of stitches in the row is maintained. However, the stitches that previously should have been worked in A.2B and D will now slowly start to be worked in A.3, to compensate for the missing increases. So the charts will be slowly displaced. Happy knitting!
29.04.2024 - 00:35
![]() Bernice Nicholl wrote:
Bernice Nicholl wrote:
Hi, Love your patterns. I'm a little confused with the sizing on chart A.3.If I need to knit an XL, do I knit until the XL arrow? Sorry I'm new to charts and still trying understand how they work.
29.01.2023 - 21:54DROPS Design answered:
Dear Bernice, for size XL, you start working A.3 from the arrow marked with XL upwards. Happy knitting!
29.01.2023 - 22:26
![]() Elfrieda wrote:
Elfrieda wrote:
Ik snap niet hoe ik de armen moet maken in patroon. Ik kom elke keer niet uit hoe kan dit?
20.09.2022 - 16:33DROPS Design answered:
Dag Elfrieda,
Nadat je de steken van de hulpdraad op de naald hebt gezet brei je verder in patroon heen en weer volgens de telpatronen. Kan je aangeven wat er precies niet ui komt? Welke maat brei je? Misschien kunnen we je dan beter helpen?
21.09.2022 - 19:33
![]() Carmen-Gabriela wrote:
Carmen-Gabriela wrote:
Hallo, ist es möglich auch "kleine" Vorderteile zu stricken, so dass es etwas besser zur vorderen Mitte "schließt"? Ja, man könnte die Blende/Schalkragen breiter stricken, aber so würde man am VT das schöne Muster nicht sehen. Gleiches für Mod. 160-25. Beide so schön, aber eher Shrug:(
28.04.2022 - 18:44DROPS Design answered:
Liebe Carmen-Gabriela, solche Modellen werden meistens nicht wie bei Jacken "geschlossen", aber einigen andere Modellen für Boleros haben wir schon, vielleicht kann Ihnen ein davon inspirieren. Viel Spaß beim stricken!
29.04.2022 - 08:12
![]() Stephanie wrote:
Stephanie wrote:
How do continue in A2B and A2D for the sizes for the back piece? (A3 shows 4 rows to become Medium but A2B and A2D are 8 rows) Thanks
21.08.2020 - 17:18DROPS Design answered:
Dear Stephanie, work A.2B/A.2D and A.3 at the same time, butwhen you reach the correct number of sts = 316 in size M, then slip the stitches on different strands/stitch holders and work first left sleeve then right sleeve then knit the edge around whole piece after you have sewn sleeves. Happy knitting!
24.08.2020 - 07:48
![]() Silke wrote:
Silke wrote:
Ist es denkbar, die Ärmel auch in Runden auf einem Nadelspiel zu stricken? Zusammennähen gehört nicht zu meiner Lieblingsbeschäftigung ;-)
21.04.2019 - 21:56DROPS Design answered:
Liebe Silke, wahrscheinlich können Sie die Ärmel in Runden stricken, die Anleitungen der Ärmel sollen Sie aber so anpassen, denn Sie dann keine Randmasche habe, aber trozdem 2 Maschen abnehmen sollen. Viel Spaß beim stricken!
23.04.2019 - 12:55
Lemon Cross#lemoncrossbolero |
||||||||||||||||
 |
 |
|||||||||||||||
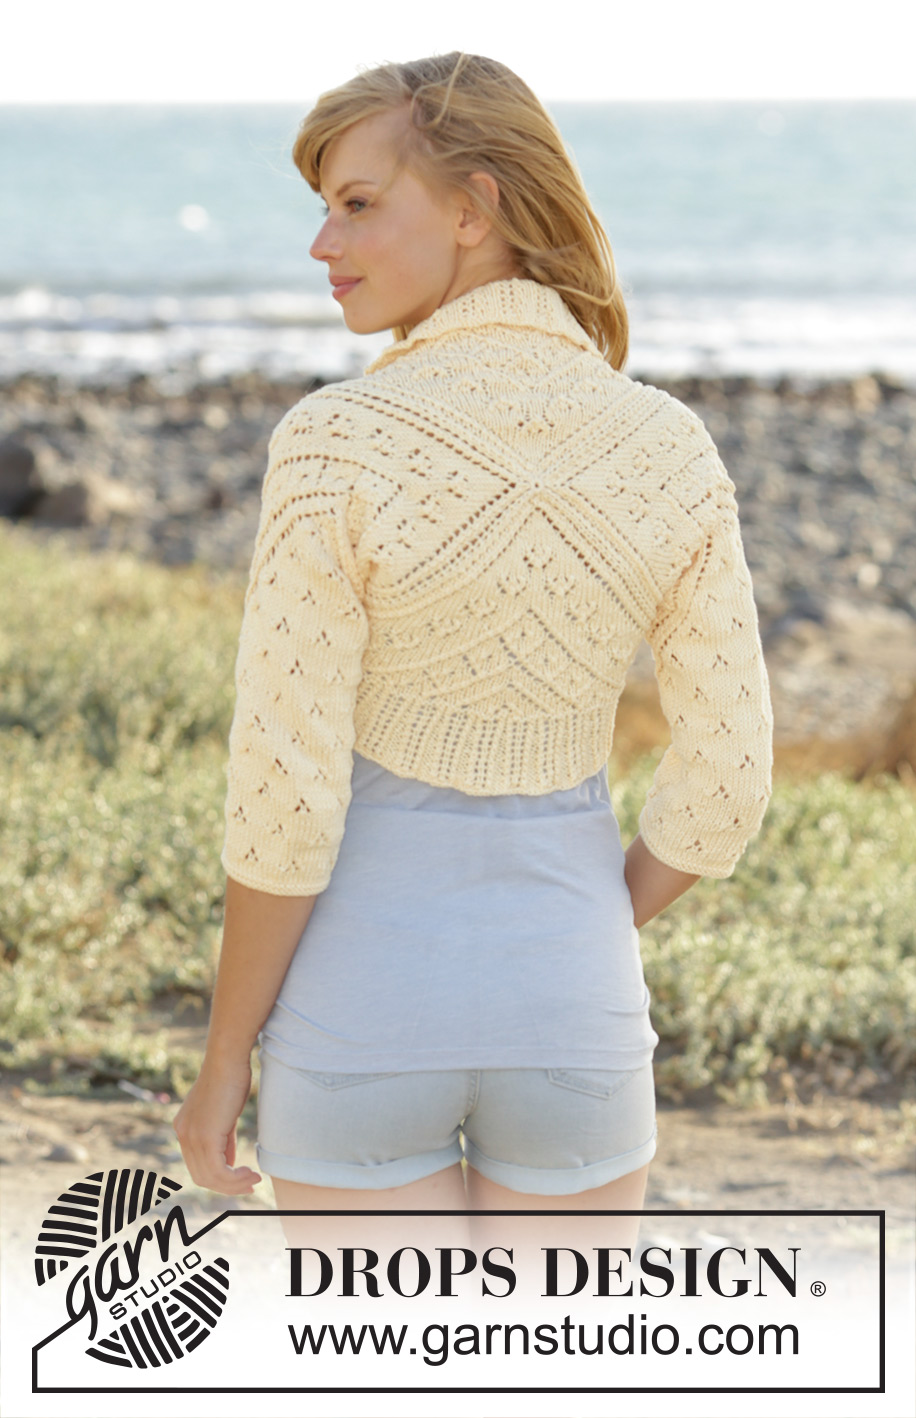
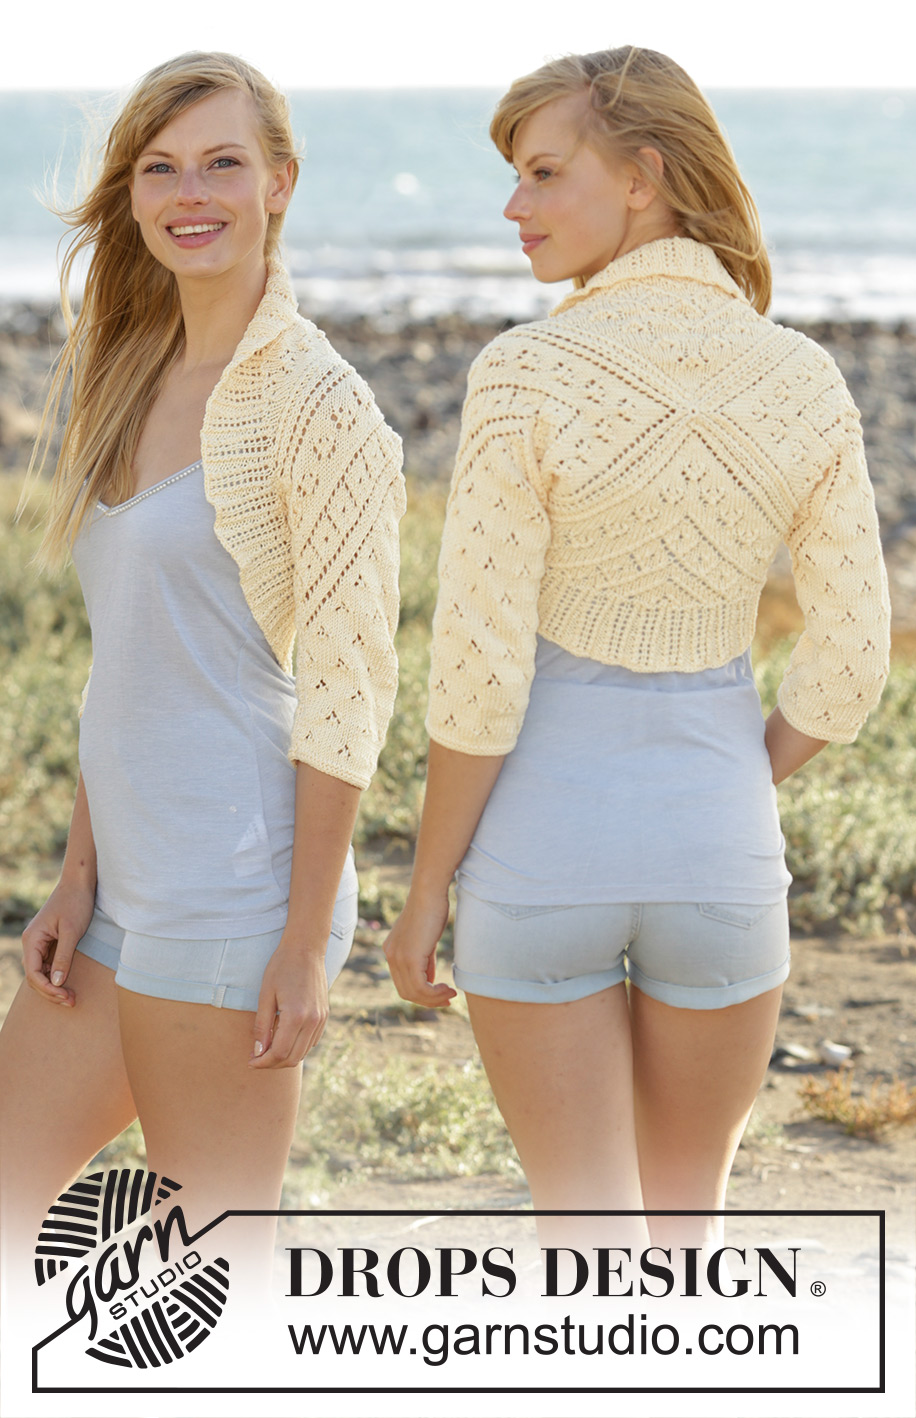
Knitted DROPS bolero worked as a square with lace pattern in ”Muskat”. Size: S - XXXL.
DROPS 170-5 |
||||||||||||||||
|
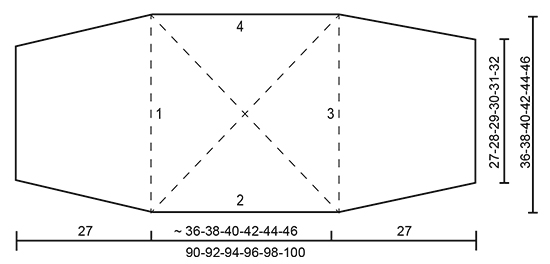
MAGIC CIRCLE: To avoid hole in the middle beg with this technique: Hold yarn end in the left hand and make a loop around left index finger (from left to right). Hold the loop with left thumb and index finger. Insert needle through loop, get yarn from ball (i.e. place yarn 1 time over needle from you), pull yarn back through loop, 1 YO (now place yarn from the back and towards you) and pull YO through sts on needle, * insert needle through loop, 1 YO (place yarn from the back and towards you), pull YO through loop, 1 YO (from the back and towards you) and pull YO through outermost st on right needle (i.e. the last st made) *, repeat from *-* until there are 12 sts on needle. Distribute sts on 4 double pointed needles size 3.5 mm as explained in pattern. Then work as explained in pattern – AT THE SAME TIME pull yarn end so that loop is tighten tog and the hole disappears. GARTER ST (back and forth): K all rows. 1 ridge = 2 rows K. PATTERN: See diagrams A.1 to A.4. The diagrams show all rows in pattern seen from RS. DECREASE TIP: Dec inside 1 edge sts in garter st. All dec are done from RS! Dec as follows after 1 edge sts: Slip 1 st as if to K, K 1, psso. Dec as follows before 1 edge st: K 2 tog. INCREASE TIP: Inc 1 st by making 1 YO. On next round P YO twisted to avoid holes - P inc sts (seen from RS). ---------------------------------------------------------- BOLERO: Work back piece as a square from mid back. Beg on double pointed needles, switch to circular needle when needed. Work sleeves back and forth on circular needle from two of the sides on square. Then work an edge around the opening on bolero. BACK PIECE: Beg with MAGIC CIRCLE – see explanation above and Muskat = 12 sts distributed on 4 double pointed needles size 3.5 mm. Work pattern in the round according to diagram A.1, i.e. repeat A.1 4 times in total on round (1 repetition per needle) and inc as shown in diagram. REMEMBER THE KNITTING TENSION When A.1 has been worked, there are 236 sts on needle (i.e. 59 sts in every repetition). Work next round as follows: * Work A.2A (= 29 sts), A.2C (= 30 sts) *, repeat from *-* 3 more times. Continue pattern like this and inc as shown in diagram. When A.2A/A.2C have been worked 1 time vertically, there are 268 sts on needle (i.e. 67 sts in every repetition). Work next round as follows: * Work A.2B (= 30 sts), A.3 (= 7 sts), work A.2D (= 30 sts) *, repeat from *-* 3 more times. Continue the pattern like this outwards until there are 300-316-332-356-372-388 sts on needle (i.e. 75-79-83-89-93-97 sts in every repetition) - NOTE: A.3 will get bigger and bigger between A.2B/A.2D. Now keep sts along side 1 on needle - see chart (= left sleeve). Slip sts along side 2 on a stitch holder (= bottom of back piece). Slip sts along side 3 on a stitch holder (= right sleeve). Slip sts along side 4 on a stitch holder (= at the top of back piece towards the neck). LEFT SLEEVE: = 75-79-83-89-93-97 sts. READ ALL OF THE FOLLOWING SECTION BEFORE CONTINUING! Insert 1 marker in each side – NOW MEASURE PIECE FROM HERE! Continue pattern back and forth on circular needle size 3.5 mm according to diagram A.2B/A.2D and A.3 as before with 1 edge st in GARTER ST in each side – see explanation above (arrow in A.3 shows where pattern continues in the different sizes in A.3). NOTE: Inc in each side is now finished (do not make YO outermost in A.2B/A.2D anymore -i.e. no of sts will be the same on every row. A.3 will continue to get bigger and bigger and therefore A.2B/A.2D will now get smaller and smaller in each side). AT THE SAME TIME when piece measures 3-3-3-2-2-2 cm, dec 1 st in each side - READ DECREASE TIP. Repeat dec in each side every 6th-6th-4th-4th-4th-4th row a total of 9-10-11-13-14-15 times in each side = 57-59-61-63-65-67 sts remain on needle - NOTE: When there are no sts left in A.2B/A.2D in each side, work A.3 over all sts with 1 edge st in garter st in each side - work the sts that do not the pattern in stocking st when dec. When piece measures 26 cm from markers (or desired length), switch to circular needle size 3 mm. Work 2 ridges back and forth (1st row = RS) and then loosely cast off with K from RS. Sleeve measures approx. 27 cm from markers. RIGHT SLEEVE: Slip the 75-79-83-89-93-97 sts from stitch holder along side 3 back on circular needle size 3.5 mm and work back and forth on circular needle the same way as on left sleeve. ASSEMBLY: Fold the piece double along so that sts from stitch holder 2 and 4 on back piece (and markers on each sleeve) are place against each other. Sew sleeve seams inside 1 edge st - beg at the bottom of each sleeve and sew up to markers. EDGE: Slip sts from stitch holder 2 and 4 on circular needle size 3 mm = 150-158-166-178-186-194 sts on needle. K 1 round while inc 50-52-54-62-64-66 sts evenly (inc approx. every 3rd st) = 200-210-220-240-250-260 sts. P 1 round and K 1 round. Then continue pattern in the round according to diagram A.4. When edge measures 2 cm, inc 1 st after every repetition - READ INCREASE TIP = 240-252-264-288-300-312 sts. Repeat inc when edge measures 4 and 6 cm = 320-336-352-384-400-416 sts (there are now 3 P between every repetition the entire round). When edge measures 7 cm, cast off with K over K and P over P. |
||||||||||||||||
Diagram explanations |
||||||||||||||||
|
||||||||||||||||
 |
||||||||||||||||
 |
||||||||||||||||
 |
||||||||||||||||
 |
||||||||||||||||
Have you finished this pattern?Tag your pictures with #dropspattern #lemoncrossbolero or submit them to the #dropsfan gallery. Do you need help with this pattern?You'll find 21 tutorial videos, a Comments/Questions area and more by visiting the pattern on garnstudio.com. © 1982-2026 DROPS Design A/S. We reserve all rights. This document, including all its sub-sections, has copyrights. Read more about what you can do with our patterns at the bottom of each pattern on our site. |
||||||||||||||||


Post a comment to pattern DROPS 170-5
We would love to hear what you have to say about this pattern!
If you want to leave a question, please make sure you select the correct category in the form below, to speed up the answering process. Required fields are marked *.