
Popular categories
Looking for a yarn?


Comments / Questions (19)
![]() Marianne wrote:
Marianne wrote:
Jeg er i tvivl omkring mønster, jeg starter med en vrang pind, på retsiden, Men kan det så være rigtig at mønsterpi ndene strikkes på vrangpinden. Jeg har rigtig meget brug for hjælp. På forhånd tak
31.03.2026 - 10:13DROPS Design answered:
Hej Marianne, sørg for at omslagene strikkes fra retsiden :)
08.04.2026 - 15:15
![]() Jenny wrote:
Jenny wrote:
. Det är fel i diagrammet. Även i det norska. Då mönstervarv sker från avigan borde det stå två am tillsammans och inte två räta. Nu har jag repat upp många timmars arbete.
25.02.2020 - 20:47DROPS Design answered:
Hej Jenny, jo men du stickar första varvet från avigsidan, så du stickar mönster varvet från rätsidan. Lycka till!
26.02.2020 - 09:47
![]() Deborah wrote:
Deborah wrote:
Ok spno proprio curiosa ! Grazie come sempre
01.09.2017 - 21:38Deborah wrote:
Buonasera, ho terminato il modello e mi chiedevo se ci fosse una dimenticanza nella lavorazione delle maniche. Dopo averle lasciate in sospeso per lavorare il corpo, quando si riprendono la spiegazione dice di fare subito il bordo a legaccio ma nella foto le maniche sono molto più lunghe...da quando si riprendono si lavorano almeno una ventina di ferri a rasata e poi il bordo a legaccio. Mi sbaglio?
01.09.2017 - 19:12DROPS Design answered:
Buonasera Deborah. Le istruzioni corrispondono al testo originale norvegese. Possiamo inoltrare la sua osservazione al settore design. Buon lavoro!
01.09.2017 - 20:08
![]() Deborah wrote:
Deborah wrote:
Perfetto grazie mille!
29.07.2017 - 21:51
![]() Deborah wrote:
Deborah wrote:
Buonasera sono arrivata agli aumenti per le raglan ultimato il motivo operato. Sto lavorando la taglia M per cui eseguo 5 volte gli aumenti ogni 4 ferri e poi la spiegazione dice ogni 2 ferri 0 volte. Non essendoci aumenti quindi faccio due ferri a rasata o salto direttamente alla divisione per le maniche? Grazie mille
29.07.2017 - 21:12DROPS Design answered:
Buonasera Deborah. Prosegue direttamente con la divisione per le maniche. Buon lavoro!
29.07.2017 - 21:18
![]() Griffin wrote:
Griffin wrote:
Bonjour, Est ce que le premier rang du diagramme est l'envers du tricot? Merci de votre aide.
27.05.2017 - 15:10DROPS Design answered:
Bonjour Mme Griffin, dans ce modèle, le 1er rang des diagrammes se tricote sur l'endroit, soit pour A.1, on tricote à l'envers sur l'endroit au 1er rang (= sur l'endroit) et à l'envers sur l'envers au 2ème rang (= sur l'envers). Bon tricot!
29.05.2017 - 09:04Christine Weir wrote:
Hi I'm on the part where you insert the markers...I'd like to know if the raglan inc.start on next row then every 4th or on 4th row after markers...
14.03.2016 - 23:13DROPS Design answered:
Dear Mrs Weir, raglan inc start on next row after you have inserted markers - and repeat the inc for raglan every 4th row, then every other row. Happy knitting!
15.03.2016 - 09:14
![]() Loredana wrote:
Loredana wrote:
Buongiorno! Quindi ferri dispari Dritto del lavoro e ferri Pari rovescio del lavoro.... 1° ferro Rovescio ( dritto del lavoro ) 2° ferro Rovescio ( rovescio del lavoro) 3° ferro Dritto (dritto del lavoro) 4° ferro Gettate......( rovescio del lavoro)!!! Quello chè mi lascia il dubbio è che il ferro con i gettati è un ferro pari..... Probabilmente lo schema è per lavorazione in tondo? Grazie mille Loredana
09.02.2016 - 08:05DROPS Design answered:
Buongiorno Loredana. Abbiamo chiesto di verificare le spiegazioni e il diagramma. Con il diagramma così come è adesso, il primo ferro viene lavorato a dir sul rovescio del lavoro. In questo modo i gettati sono sul diritto del lavoro. Buon lavoro!
09.02.2016 - 15:02
![]() Loredana wrote:
Loredana wrote:
Buongiorno! Quindi ferri dispari Dritto del lavoro e ferri Pari rovescio del lavoro.... 1° ferro Rovescio ( dritto del lavoro ) 2° ferro Rovescio ( rovescio del lavoro) 3° ferro Dritto (dritto del lavoro) 4° ferro Gettate......( rovescio del lavoro)!!! Quello chè mi lascia il dubbio è che il ferro con i gettati è un ferro pari..... Probabilmente lo schema è per lavorazione in tondo? Grazie mille Loredana
09.02.2016 - 08:05DROPS Design answered:
Buongiorno Loredana. Abbiamo chiesto di verificare le spiegazioni e il diagramma. Con il diagramma così come è adesso, il primo ferro viene lavorato a dir sul rovescio del lavoro. In questo modo i gettati sono sul diritto del lavoro. Buon lavoro!
09.02.2016 - 15:03
|
|||||||||||||
Becca Cardigan#beccacardigan |
|||||||||||||
|
|
|||||||||||||
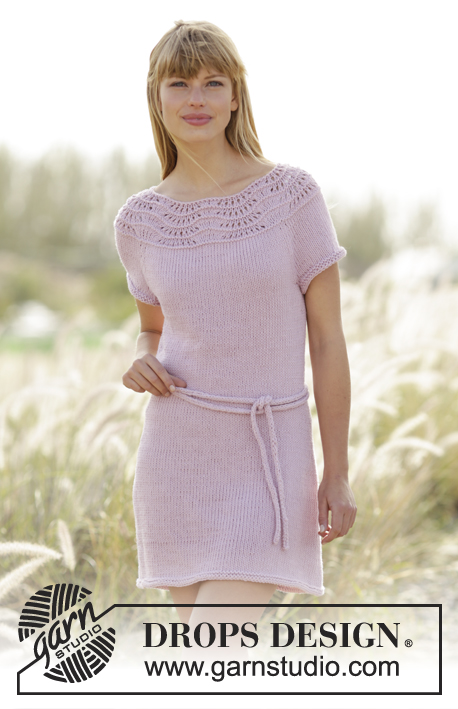
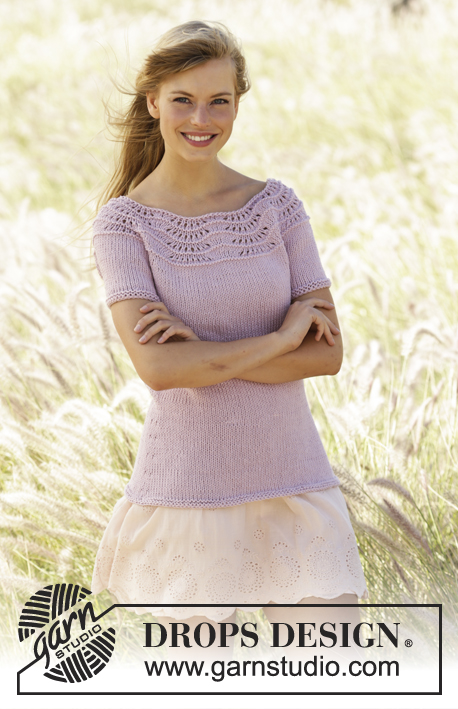
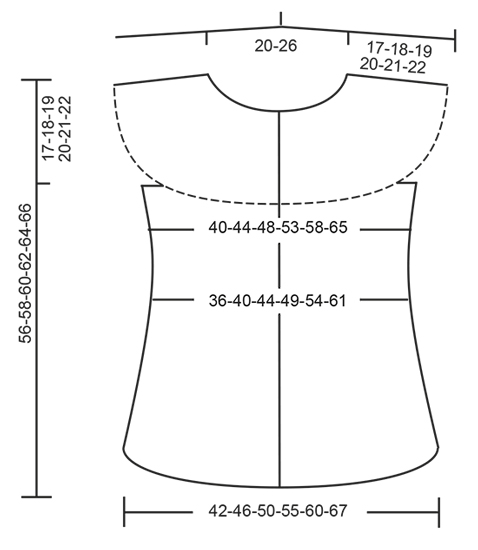
Knitted DROPS fitted jacket with wave pattern, round yoke and raglan in ”Paris”. Worked top down. Size: S - XXXL.
DROPS 167-3 |
|||||||||||||
|
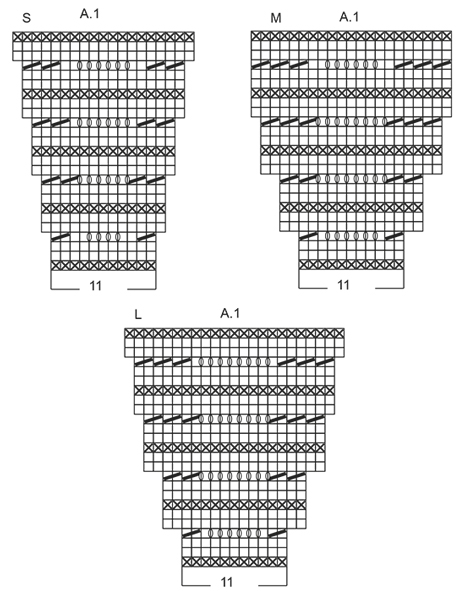
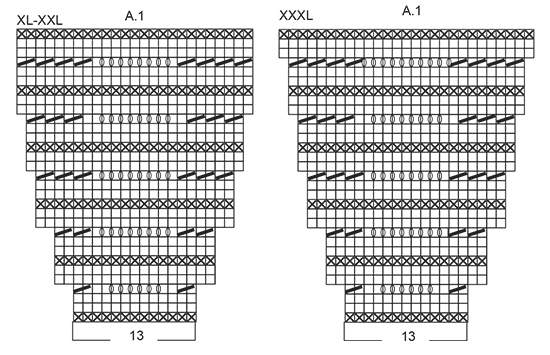
PATTERN: See diagram A.1. The diagram shows all rows in pattern seen from RS. See diagram for size! GARTER ST (back and forth): K all rows. 1 ridge = 2 rows K. GARTER ST (worked in the round): 1 ridge = 2 rounds. * K 1 round and P 1 round *, repeat from *-*. RAGLAN: Inc for raglan on each side of every marker (= 8 sts inc): Work until 1 st before marker, 1 YO, K 2 (marker is in the middle of these sts), 1 YO. On next row P YO twisted to avoid holes. BUTTONHOLES: Dec for buttonholes on right band. 1 buttonhole = K tog second and third st from edge and make 1 YO. Dec for buttonholes when piece measures (measured from cast-on edge): SIZE S-M-L: 2, 10, 18, 26, 34 and 42 cm. SIZE XL-XXL-XXXL: 2, 11, 20, 29, 38, 47 and 56 cm ---------------------------------------------------------- JACKET: Worked back and forth on needle, top down. Cast on 98-98-98-114-114-114 sts on circular needle size 5 mm with Paris. Dec for BUTTONHOLES on right band - see explanation above. Work A.1 with 5 sts in GARTER ST in each side (= 8 repetitions of A.1 - see diagram for your size). REMEMBER THE KNITTING TENSION When A.1 has been worked one time vertically there are 162-178-194-210-210-226 sts on needle and piece measures approx. 10-10-10-10-12-12 cm. Insert 4 markers in the piece as follows: 1 marker after the first 30-33-36-39-40-44 sts, next marker after another 26-28-30-32-30-30 sts, next marker after another 50-56-62-68-70-78 sts and last marker after another 26-28-30-32-30-30 sts (= 30-33-36-39-40-44 sts remain on needle after last marker). Continue working stocking st and garter st on bands as before while AT THE SAME TIME inc for raglan as follows - READ RAGLAN. Inc every 4th row 4-5-6-5-0-0 times, then every other row 1-0-0-2-10-12 times (5-5-6-7-10-12 times in total) = 202-218-242-266-290-322 sts. Work next row as follows from RS: Work 35-38-42-46-50-56 sts (= front piece), slip the next 36-38-42-46-50-54 sts on a stitch holder for sleeve, cast on 8 sts new sts, work the next 60-66-74-82-90-102 sts (= back piece), slip the next 36-38-42-46-50-54 sts on a stitch holder for sleeve, cast on 8 new sts, work the last 35-38-42-46-50-56 sts (= front piece). BODY: = 146-158-174-190-206-230 sts. NOW MEASURE THE PIECE FROM HERE. Insert a marker in each side, in the middle of the new sts that were cast on. Work in stocking st with 5 sts in garter st in each side. When piece measures 4 cm, dec 1 st on each side of each marker (= 4 sts dec), repeat dec when piece measures 10 and 16 cm = 134-146-162-178-194-218 sts. When piece measures 22 cm, inc 1 st on each side of markers (= 4 sts inc), repeat inc every 3-3-3½-3½-4-4 cm 4 more times = 154-166-182-198-214-238 sts. Work until piece measures 38-39-40-41-42-43 cm, work 2 ridges over all sts. Cast off. Piece measures approx. 56-58-60-62-64-66 cm from shoulder. SLEEVE EDGE: Slip sts from stitch holder back on double pointed needles size 5 mm, pick up 1 st in each of the 8 new sts under armhole = 44-46-50-54-58-62 sts. Work 2 ridges in GARTER ST - see explanation above. Cast off. ASSEMBLY: Sew the buttons on to the left band. |
|||||||||||||
Diagram explanations |
|||||||||||||
|
|||||||||||||
 |
|||||||||||||
 |
|||||||||||||
 |
|||||||||||||
Have you finished this pattern?Tag your pictures with #dropspattern #beccacardigan or submit them to the #dropsfan gallery. Do you need help with this pattern?You'll find 22 tutorial videos, a Comments/Questions area and more by visiting the pattern on garnstudio.com. © 1982-2026 DROPS Design A/S. We reserve all rights. This document, including all its sub-sections, has copyrights. Read more about what you can do with our patterns at the bottom of each pattern on our site. |
|||||||||||||


With over 40 years in knitting and crochet design, DROPS Design offers one of the most extensive collections of free patterns on the internet - translated to 17 languages. As of today we count 325 catalogues and 12298 patterns translated into English (UK/cm). 12298
We work hard to bring you the best knitting and crochet have to offer, inspiration and advice as well as great quality yarns at incredible prices! Would you like to use our patterns for other than personal use? You can read what you are allowed to do in the Copyright text at the bottom of all our patterns. Happy crafting!
Post a comment to pattern DROPS 167-3
We would love to hear what you have to say about this pattern!
If you want to leave a question, please make sure you select the correct category in the form below, to speed up the answering process. Required fields are marked *.