
Popular categories
Looking for a yarn?


Comments / Questions (98)
![]() Francine Grenier wrote:
Francine Grenier wrote:
This part I get it but I already slip my stitch for my armhole. Where do I start the increase for the 15 times every 4 rows for the side (60Rows)?
08.03.2018 - 01:43DROPS Design answered:
Dear Mrs Grenier, begin the increases on the sides when piece measures 12 cm from where sts were divided from yoke. (size S: inc 1 st on each side of both markers on the sides every 2nd cm a total of 15 times). Happy knitting!
08.03.2018 - 09:26
![]() Francine Grenier wrote:
Francine Grenier wrote:
The size is small I find this jacket so attractive I will be sad that I would not be able to did it Thank you for anwsesring so quickly
07.03.2018 - 13:48DROPS Design answered:
Dear Mrs Grenier, you will work a total of 48 rows after the garter st edge on neckline, ie 4 first row after neck edge + a total of 48 rows for raglan increase = approx. 21 cm. Remember to measure along front band edge worked in garter st. Happy knitting!
07.03.2018 - 16:00
![]() Francine Grenier wrote:
Francine Grenier wrote:
I am trying to write down the instruction but nothing make sense. 22rows for 10cm would be about 168 row. After armhole I am at 66 rows If I make all the lenght of A4 68 row and AZ about 14 times and incorporate the 15 increase for the side I am up to 200 rows and I have to make the edging. aftere 50 years of knitting I never thaught I will come face to face to a pattern I do not understad LOL. Have you make a new version with the update?
06.03.2018 - 19:56DROPS Design answered:
Dear Mrs Grenier, could you please tell us the size you are writing?
07.03.2018 - 08:31
![]() Nel wrote:
Nel wrote:
De oplossing is na lang puzellen Voor de grootste maat bij lijf de kabel verdeling Er staat 20 trico dan 15 kabel A4 en 28 st trico enz. Die 20 st moet zijn , geen trico maar binnen die 20 st de kabel A4 .dus na A3 5 recht dan A4 en 5 st recht dan de 28 trico met markeerder
27.02.2018 - 14:00
![]() Nel wrote:
Nel wrote:
Vraag ik ben bezig met de grootste maat Ben bij het lijf en met de verdeling bezig voor de kabels Daar staat 20 st trico 15 steken kabel A4 28 st trico dan markeerder ivm de zij kant. Dan 36 trico 45 st A5 weer 36 st trico weer een markeerder Dan 28 st trico en 20 st trico Maar waar blijft de kabel van 15 steken A4 dan? Deze steken kom ik dus te kort schijnbaar? Maar het aantal op de rondbrei klopt wel!!
27.02.2018 - 13:10
![]() Anne-Charlotte Hansson wrote:
Anne-Charlotte Hansson wrote:
Varifrån mäter man sista måttet som ska vara 73 cm i storl L? När jag tittar på måtten på ritningen av tröjan är den totalt 80 cm lång från axeln till nederkant. Är detta korrekt tolkat av mig? Mvh A-C Hansson
13.10.2017 - 23:36DROPS Design answered:
Hej! Detta mått mäts från början av arb, som helt rätt ska mäta 80 cm i storlek L då jackan är färdig.
16.10.2017 - 17:07
![]() Gitte Langhoff Henriksen wrote:
Gitte Langhoff Henriksen wrote:
Hvad er strikkefastheden på denne opskrift? Jeg kan ikke finde den og jeg vil ikke gå igang uden.
08.10.2017 - 20:45DROPS Design answered:
Hej, du finder strikkefastheden lige under garnforbruget, til højre for billedet. God fornøjelse!
11.10.2017 - 15:25
![]() Anne-Charlotte Hansson wrote:
Anne-Charlotte Hansson wrote:
ÖKNING i varje sida: När arbetet mäter 12 13 14 15 15 16 cm. Menar ni att man ska öka dubbelt när arbetet mäter 15 cm? Eller är det en felskrivning?
02.10.2017 - 19:42DROPS Design answered:
Hej Anne-Charlotte, Nej det är måtten i de olika storlekarna, vi skriver så genom hela mönstret. Lycka till!
03.10.2017 - 12:08
![]() Lea wrote:
Lea wrote:
Ich stricke die Größe M und das mit den Raglanzunahmen geht meines Erachtens nicht auf. Vor den Zunahmen sind es 95 Maschen, dann werden (14+5)x8=152 Maschen zugenommen und am Ende soll man bei 255 Maschen landen. Da fehlt eine Zunahme bzw. 8 Maschen, oder nicht?
10.06.2017 - 13:42DROPS Design answered:
Liebe Lea, es wird insgesamt 15 x jede 2. Reihe ("noch weitere 14 x wdh") + 5 x jede 4. Reihe = 15+5= 20 x 8 Zunahmen = 160 + 95 = 255 M. Viel Spaß beim stricken!
12.06.2017 - 09:12
![]() Kelsey K wrote:
Kelsey K wrote:
In regards to the short rows, how often do I do them. Just the raglan part or the whole jacket? Thank you!
25.05.2017 - 20:11DROPS Design answered:
Dear Mrs Kelsey K, repeat the short rows to the finished measurements, to avoid band contracting vertically. Happy knitting!
26.05.2017 - 10:55
|
||||||||||||||||||||||||||||||||||||||||
Renaissance#renaissancejacket |
||||||||||||||||||||||||||||||||||||||||
 |
 |
|||||||||||||||||||||||||||||||||||||||
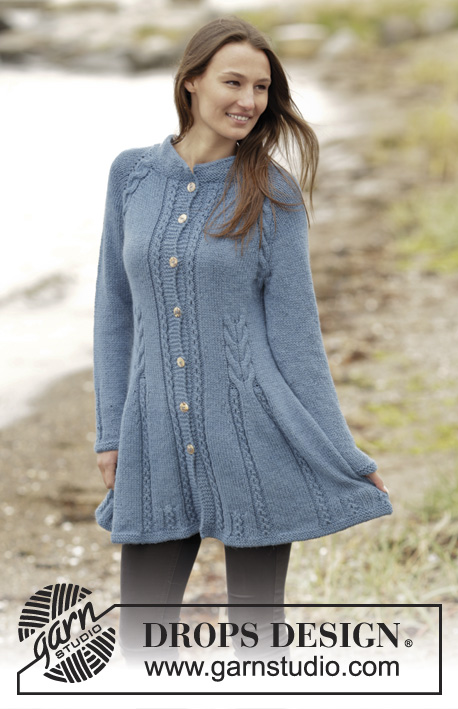
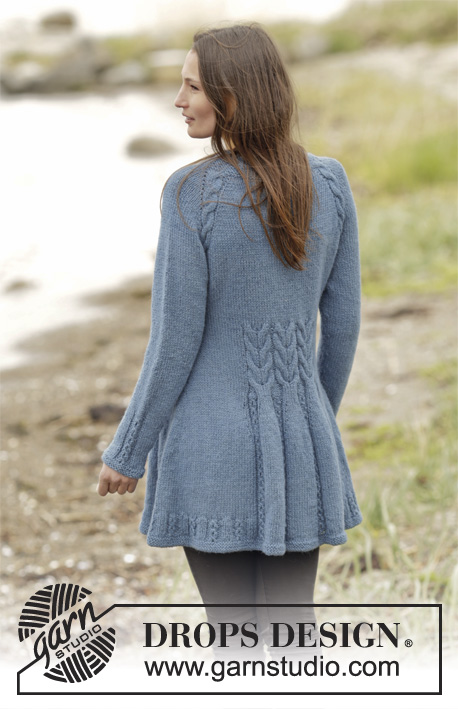
Knitted DROPS fitted jacket with cables, raglan and edges in garter st, worked top down in 2 strands "Alpaca". Size: S - XXXL.
DROPS 165-3 |
||||||||||||||||||||||||||||||||||||||||
|
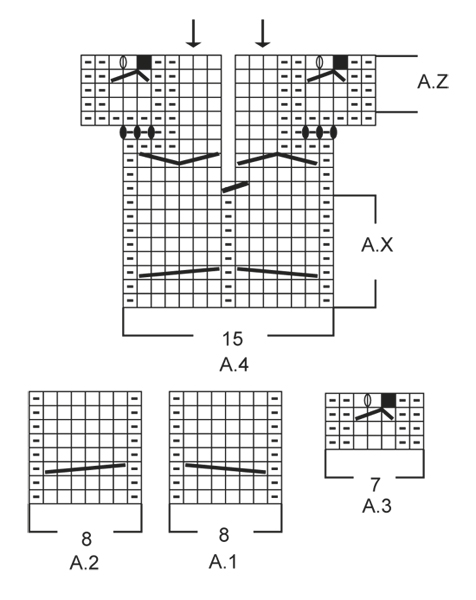
GARTER ST (worked in the round): 1 ridge = 2 rounds. * K 1 round and P 1 round *, repeat from *-*. GARTER ST (back and forth): K all rows. 1 ridge = 2 rows K. PATTERN: See diagrams A.1-A.5. The diagrams show all rows in pattern seen from RS. SHORT ROWS (band): Work short rows over sts in band to avoid it contracting vertically. Work as follows from RS on every 20th row: K 5 (= left band), turn and work back. Work 1 row over all sts as before. Turn and K 5 (= right band), turn and work back. Turn and work 1 row over all sts as before. RAGLAN: All inc are done from RS. Inc 1 st on each side of every repetition A.1 and A.2 by making one YO. On next row P YOs twisted (i.e. work in back loop of st instead of front) to avoid holes. Then work the new sts in stocking st. INCREASE TIP: Inc 1 st by making 1 YO, on next row P YO twisted (i.e. work in back loop of st instead front) to avoid holes. DECREASE TIP: Dec as follows before marker: Work until 3 sts remain before marker, K 2 tog, 2 sts in stocking st (marker is between these sts), slip 1 st as if to K, K 1, psso. BUTTONHOLES: Dec for buttonhole on right band (i.e. band at the end of row seen from RS). 1 buttonhole = K tog third and fourth st from edge and make 1 YO. Dec for buttonholes when piece measures (from cast-on edge and along the band): SIZE S: 5, 13, 21, 29, 37, 45 and 53 cm SIZE M: 5, 13, 21, 29, 37, 46 and 55 cm SIZE L: 5, 13, 22, 31, 40, 49 and 58 cm SIZE XL: 5, 13, 21, 29, 37, 45, 53 and 61 cm. SIZE XXL: 5, 13, 21, 29, 37, 45, 54 and 63 cm. SIZE XXXL: 5, 13, 21, 29, 38, 47, 56 and 65 cm. ---------------------------------------------------------- JACKET: Worked back and forth on circular needle, top down. Cast on 73-76-76-79-79-82 sts on circular needle size 4.5 mm with 2 strands Alpaca. Work 1 ridge in GARTER ST - see explanation above. Continue in garter st and work a collar with short rows, beg from RS: * Work all sts. Turn and work back until 5 sts remain in the other side. Turn and work until 5 sts remain, turn and work back until 10 sts remain. Turn and work until 10 sts remain, turn and work back over all sts *, repeat from *-* 1 more time. Then work an elevation in the neck as follows: Work until 28-29-29-29-29-30 sts remain on needle, turn and work back until 28-29-29-29-29-30 sts remain in the other side. Turn and work until 25-26-26-26-26-27 sts remain on needle, turn and work back until 25-26-26-26-26-27 sts remain in the other side. Turn and work until 23-24-24-24-24-25 sts remain on needle, turn and work back until 23-24-24-24-24-25 sts remain in the other side. Turn and work the remaining sts (from RS), turn and work back over all sts. REMEMBER BUTTONHOLES! Switch to circular needle size 5 mm. Insert a marker here. NOW MEASURE THE PIECE FROM HERE. Work 1 row in stocking st with 5 band sts in garter st in each side while inc 18-19-19-24-32-45 sts evenly (but not over band sts) = 91-95-95-103-111-127 sts. Continue the 5 band sts in garter st in each side of piece until finished measurements and work SHORT ROWS - see explanation above, over band sts. Work 1 row. Now work pattern as follows from RS: 5 band sts in garter st, A.3 (= 7 sts), 3-4-4-6-8-12 sts in stocking st, A.1 (= 8 sts), 6 sts in stocking st, A.2 (= 8 sts), 17-19-19-23-27-35 sts in stocking st, A.1, 6 sts in stocking st, A.2, 3-4-4-6-8-12 sts in stocking st, A.3, 5 band sts in garter st. NOTE: Note which way the cables go. Cables on back piece are reversed from each other and cables on each front piece are reversed from each other. REMEMBER THE KNITTING TENSION On next row from RS beg inc for RAGLAN - see explanation above, on each side of every A.1 and A.2 (= 8 inc). Repeat inc every other row (i.e. every row from RS) 9-14-19-25-28-29 more times, and every 4th row (i.e. every other row from RS) 7-5-3-0-0-0 times = 227-255-279-311-343-367 sts. Piece measures approx. 21-22-23-24-26-27 cm measured along band. Now work as follows: Work the first 36-40-43-48-53-58 sts (= left front piece), slip the next 48-54-60-66-72-74 sts on a stitch holder (= sleeve), cast on 8 new sts under sleeve, work the next 59-67-73-83-93-103 sts (= back piece), slip the next 48-54-60-66-72-74 sts on a stitch holder (= sleeve), cast on 8 new sts under sleeve, work the remaining 36-40-43-48-53-58 sts (= right front piece). BODY: There are now 147-163-175-195-215-235 sts for body. NOW MEASURE THE PIECE FROM HERE. Now work pattern as follows: 5 band sts in garter st, A.3, stocking st over the next 28-32-35-40-45-50 sts, insert a marker (= side), stocking st over the next 67-75-81-91-101-111 sts, insert a marker (= side), stocking st over the next 28-32-35-40-45-50 sts, A.3, 5 band sts in garter st. When piece measures 3 cm, dec 1 st on each side of each marker - READ DECREASE TIP. Repeat dec when piece measures 5-6-7-8-8-9 cm = 139-155-167-187-207-227 sts. When piece measures 8-9-10-11-11-12 cm, work next row from RS as follows: 5 band sts in garter st, A.3, work 8 sts in stocking st. Work in stocking st over the next 12 sts in all sizes and inc 3 sts evenly. Work in stocking st over the next 20-28-34-44-54-64 sts. Work in stocking st over the next 35 sts in all sizes and inc 10 sts evenly. Work in stocking st over the next 20-28-34-44-54-64 sts. Work in stocking st over the next 12 sts and inc 3 sts evenly. Work in stocking st over the next 8 sts, A.3, 5 band sts in garter st. There are now 155-171-183-203-223-243 sts on needle. READ ALL OF THE FOLLOWING SECTION BEFORE CONTINUING! Now continue with pattern and inc sts as explained below: PATTERN AND INC BETWEEN CABLES: On next row from RS work as follows: Work as before over the first 20 sts, A.4 (= 15 sts), stocking st over the next 6-10-13-18-23-28 sts, insert a new marker (follows down until inc in the sides are done), stocking st over the next 14-18-21-26-31-36 sts, A.5 (= 45 sts), stocking st over the next 14-18-21-26-31-36 sts, insert a new marker (follows down until inc in the sides are done), stocking st over the next 6-10-13-18-23-28 sts, A.4, work the remaining 20 sts as before. Continue like this back and forth until A.X has been worked 3 times in total vertically. Then work the remaining rows in A.4 and A.5. NOTE: Adjust so that cable in A.Z beg on same row as cable in A.3 towards mid front. When entire A.4 and A.5 are done vertically, repeat A.Z until finished measurements, AT THE SAME TIME inc sts in stocking st as follows - see arrow in diagram: Work until 1 st before first repetition A.4, 1 YO, 1 st in stocking st, work the first 8 sts in A.4, 1 YO, stocking st until 8 sts remain in diagram, 1 YO, work the remaining 8 sts in A.4. Continue in stocking st until A.5. Work the first 8 sts in A.5, * 1 YO, stocking st until 1 st remains before next P st in diagram, 1 YO, work the next 9 sts *, repeat from *-* 1 more time, 1 YO, work in stocking st until 1 st remains before next P st, 1 YO, work the remaining 8 sts in A.5. Then work in stocking st until next repetition A.4. Work the first 8 sts in A.4, 1 YO, stocking st until 8 sts remain in diagram, 1 YO, work the remaining 8 sts in A.4, 1 st in stocking st, 1 YO, work the remaining sts on row. 12 sts inc in total on row. On next row P YOs twisted to avoid holes. Repeat inc every 6th row 3 more times. INC IN EACH SIDE: When piece measures 12-13-14-15-15-16 cm, inc 1 st on each side of marker in each side (= 4 sts inc) – see INCREASE TIP. Repeat inc every 2 cm 14-15-16-16-16-16 more times = 50-60-68-78-88-98 sts in every section with stocking st in each side. When all inc in diagram and in the sides are done, there are 274-294-310-330-350-370 sts on needle. Continue with pattern until piece measures 69-71-73-75-77-79 cm, adjust so that next row from RS is 3rd row in A.3. Now continue pattern and inc sts in sections with stocking st as follows: Inc 1 st in section with stocking st inside bands and A.3 in each side, and inc 3-3-5-5-5-5 sts evenly in section with stocking st in each side of jacket (i.e. between A.4 and A.5) = 282-302-322-342-362-382 sts. Now work a finishing edge as follows: 5 band sts in garter st, A.3, 3 sts in stocking st, A.3, 3 sts in stocking st, continue the next 28 sts as before, * 3 sts in stocking st, A.3 *, repeat from *-* 4-5-6-7-8-9 more times, 3 sts in stocking st, work the next 70 sts as before, ** 3 sts in stocking st, A.3 **, repeat from **-** 4-5-6-7-8-9 more times, 3 sts in stocking st. Work the next 28 sts as before, 3 sts in stocking st, A.3, 3 sts in stocking st, A.3, 5 band sts in garter st. Continue like this until A.3 has been worked 3 times vertically. Switch to circular needle size 4.5 mm and work 1 row in stocking st while inc 16-18-19-20-22-22 sts evenly (but not over bands) = 298-320-341-362-384-404 sts. Work 3 ridges and cast off. SLEEVE: Work sleeve in stocking st in the round on circular needle/double pointed needles. There are 48-54-60-66-72-74 sts for each sleeve. Slip sts from stitch holder back on circular needle/double pointed needles size 5 mm and cast on 8 new sts under sleeve = 56-62-68-74-80-82 sts. Work in stocking st, AT THE SAME TIME insert a marker in the middle of the new sts under sleeve. NOW MEASURE THE PIECE FROM HERE. When piece measures 3 cm, dec 1 st on each side of marker. Repeat dec approx. every 3-2½-2-1½-1½-1 cm, 9-11-13-16-19-19 more times = 36-38-40-40-40-42 sts. When sleeve measures 34-33-33-33-32-31 cm, inc 1 st = 37-39-41-41-41-43 sts. On next round, work as follows: Work the first 15-16-17-17-17-18 sts, A.3, work the remaining 15-16-17-17-17-18 sts. Continue like this until A.3 has been worked 6 times vertically. Switch to double pointed needles size 4.5 mm and inc 2-2-3-3-3-3 sts evenly = 39-41-44-44-44-46 sts. Work 3 ridges. Cast off. Knit another sleeve the same way. ASSEMBLY: Sew the openings under the sleeves. Sew the buttons on to left band. |
||||||||||||||||||||||||||||||||||||||||
Diagram explanations |
||||||||||||||||||||||||||||||||||||||||
|
||||||||||||||||||||||||||||||||||||||||
 |
||||||||||||||||||||||||||||||||||||||||
 |
||||||||||||||||||||||||||||||||||||||||
 |
||||||||||||||||||||||||||||||||||||||||
Have you finished this pattern?Tag your pictures with #dropspattern #renaissancejacket or submit them to the #dropsfan gallery. Do you need help with this pattern?You'll find 26 tutorial videos, a Comments/Questions area and more by visiting the pattern on garnstudio.com. © 1982-2026 DROPS Design A/S. We reserve all rights. This document, including all its sub-sections, has copyrights. Read more about what you can do with our patterns at the bottom of each pattern on our site. |
||||||||||||||||||||||||||||||||||||||||


With over 40 years in knitting and crochet design, DROPS Design offers one of the most extensive collections of free patterns on the internet - translated to 17 languages. As of today we count 324 catalogues and 12290 patterns translated into English (UK/cm). 12290
We work hard to bring you the best knitting and crochet have to offer, inspiration and advice as well as great quality yarns at incredible prices! Would you like to use our patterns for other than personal use? You can read what you are allowed to do in the Copyright text at the bottom of all our patterns. Happy crafting!
Post a comment to pattern DROPS 165-3
We would love to hear what you have to say about this pattern!
If you want to leave a question, please make sure you select the correct category in the form below, to speed up the answering process. Required fields are marked *.