
Popular categories
Looking for a yarn?


Comments / Questions (23)
![]() Maryk wrote:
Maryk wrote:
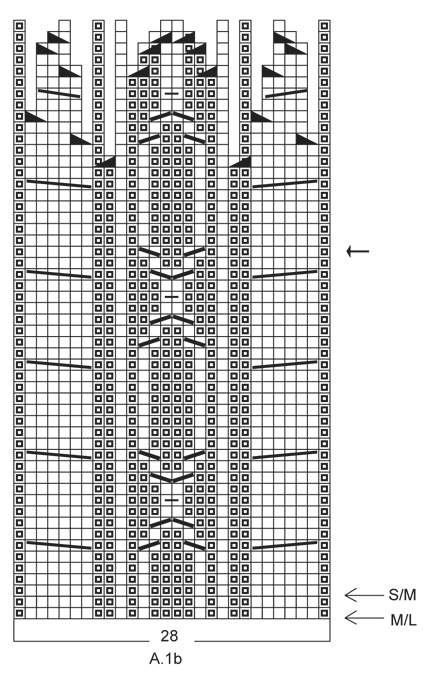
For the diagram-RS(row 1)- do we knit right to left, WS(row 2-do we knit right to left or left to right on the diagram. Thanks for your help
12.05.2019 - 12:36DROPS Design answered:
Dear Mary, the hat is worked in the round, so you'll knit every round of diagram right to left, while the neckwarmer is knitted back and forth, so you'll knit right side rows right to left and wrong side rows left to right. Happy knitting!
12.05.2019 - 13:25
![]() Merel wrote:
Merel wrote:
Leuk patroon, maar ik denk dat er 2 dingen verkeerd in het patroon staan: 1. De icoontjes om 1 st (recht of averecht) op een kabelbaan te plaatsen staan verkeerd om in het patroon. Daar waar staat zet 1 av st op de kabelnaald moet staan zet 1 st op de kabelnaald en andersom. 2. Als ik het patroon volg aan de achterkant van de muts krijg ik de rechte st boven de av st van de boord en de afwisselend recht en av st boven de rechte st van de boord, dit lijkt mij ook niet de bedoeling.
02.12.2018 - 16:32
![]() Merel wrote:
Merel wrote:
Hoe kan ik een ‘av st op de kanelbaald zetten’? Is dit anders dan een ‘st op de kanelnaald zetten’?
23.11.2018 - 09:01DROPS Design answered:
Dag Merel,
Een averechte steek op een kabelnaald zetten werkt precies hetzelfde als een rechte steek op een kabelnaald zetten. Je hoeft verder nergens rekening mee te houden en kunt gewoon de kabel breien zoals aangegeven in het patroon.
25.11.2018 - 16:25
![]() Rosy wrote:
Rosy wrote:
Bonjour, pouvez vous me dire quelle doit être la largeur du tour de cou avant le montage ? La longueur est de 85cm mais rien n est indiqué pour la largeur. Merci !
30.12.2016 - 22:10DROPS Design answered:
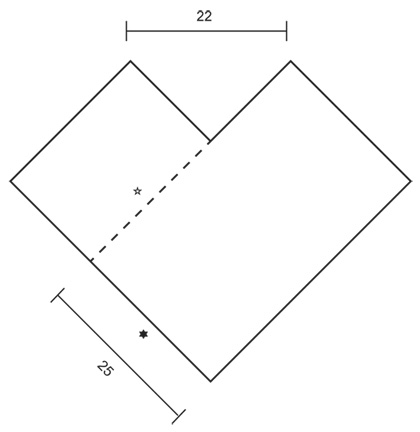
Bonjour Rosy, la bande tricotée pour le tour de cou mesure approx. 25 cm de large (cf schéma en bas de page). Bon tricot!
02.01.2017 - 08:26
![]() Daniela wrote:
Daniela wrote:
Buongiorno, Non riesco ad interpretare le diminuzioni nel seguente punto dello schema: Quando le coste sono state lavorate per 2 cm, lavorare insieme a dir la m a rov con la m dopo a dir, a m a rov alternate (13-14 diminuzioni) Grazie
05.01.2016 - 00:29DROPS Design answered:
Buongiorno Daniela. Deve lavorare insieme a dir la m rov con la m dir successiva; deve però farlo una maglia rov sì e una no, per un totale di 13-14 diminuzioni a seconda della taglia. Buon lavoro!
05.01.2016 - 13:28
![]() Anne-Marie Derksen wrote:
Anne-Marie Derksen wrote:
Ik heb een vraag over de muts Elga by drops design 164-35. Heeft iemand deze muts als eens gebreid? Wie kan mij helpen? Ik kom er niet uit.
26.12.2015 - 19:32DROPS Design answered:
Hoi Anne-Marie. Als je kan uitleggen wat je probleem is, dan zullen wij proberen verder te helpen.
04.01.2016 - 14:30
![]() Haquart wrote:
Haquart wrote:
Bonjour Absolument impossible à commencer. Les explications ne sont pas claires .Je ne comprends pas s'il faut répéter les 28 mailles du dia gramme ou faire des côtes 1m endroit -2 envers
22.11.2015 - 15:53DROPS Design answered:
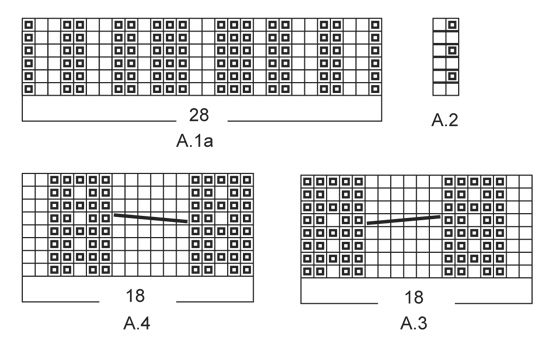
Bonjour Mme Haquart, le bonnet se tricote ainsi en rond: d'abord les 28 m du diagramme A.1a, puis continuez en côtes ainsi:1 m env, *1 m end, 2 m env*, répétez de *-* jusqu'à ce qu'il reste 2 m et terminez par 1 m end et 1 m env. N'hésitez pas à contacter votre magasin DROPS, il saura vous apporter toute l'aide nécessaire à la réalisation de ce modèle. Bon tricot!
23.11.2015 - 11:17DROPS Design wrote:
Une modification a été faite dans le diagramme pour que la taille S/M commence après la taille M/L.
11.08.2015 - 14:37
![]() Elsa wrote:
Elsa wrote:
C'est encore moi., le diagramme et sa légende (pour le bonnet) me posent problème car la légende semble être écrite pour un tricot en allers retours. Et puis je ne comprends pas les 2 flèches (le bonnet en S/M est plus long?La 2ème flèche est -elle placée au 33ème rang? Tricoter A1 comme avant???). Pour finir je pense qu'au 6 ème tour , il y a un oubli du mot "ensemble" (2 m env) pour avoir les 26 diminutions.
06.08.2015 - 19:28DROPS Design answered:
Bonjour Elsa, les symboles sont les mêmes pour les diag. tricotés en allers retours et pour ceux tricotés en rond. Ainsi, pour le bonnet, suivez les indications "sur l'endroit" car vous tricotez toujours en rond, donc sur l'endroit. La correction a été faite pour le 6ème tour, merci. Bon tricot!
07.08.2015 - 09:35
![]() Elsa wrote:
Elsa wrote:
Bonjour, Pour les côtes du bonnet c'est à dire A1, il est dit de répéter : *1 m end, 2 m env* alors que le schéma indique plutôt "1m end, 2 m envers, 1 m end", non? Que suivre comme indication?
05.08.2015 - 18:02Elsa answered:
Désolée, ma question était un peu précipitée. j'ai mieux lu...
05.08.2015 - 18:11
|
|||||||||||||||||||||||||||||||||||||||||||
Elga#elgaset |
|||||||||||||||||||||||||||||||||||||||||||
|
|
|||||||||||||||||||||||||||||||||||||||||||
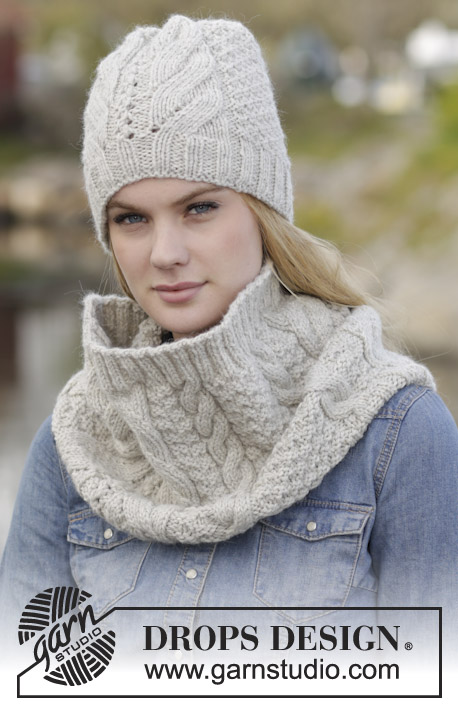
Set consists of: Knitted DROPS hat and neck warmer with cables and textured pattern in 2 strands ”Alpaca”.
DROPS 164-35 |
|||||||||||||||||||||||||||||||||||||||||||
|
GARTER ST (back and forth): K all rows. 1 ridge = 2 rows K. PATTERN: See diagrams A.1 to A.4. ---------------------------------------------------------- HAT: Worked in the round on circular needle and double pointed needles. Cast on 109-115 sts on circular needle size 4.5 mm with 2 strands Alpaca. Work rib in the round as follows: A.1a (= 28 sts), P 1, * K 1, P 2 *, repeat from *-* until 2 sts remain on round, K 1, P 1. Continue like this until 5 rounds have been worked of A.1a. On next round switch to circular needle size 5 mm and work as follows: Work 6th round in A.1a, P 1, * K 1, P the next 2 tog *, repeat from *-* until 2 sts remain, K 1, P 1. 26-28 sts are dec and there are 83-87 sts on round. Now continue as follows: Work A.1b (- find correct size in diagram), P 1, work last st in A.2, continue with A.2 until 1 st remains, P 1. REMEMBER THE KNITTING TENSION When piece measures 17-18 cm (see arrow in diagram), continue with rib, i.e. P over 1st st in A.2 and K over 2nd st in A.2. NOTE: Continue A.1b and P st on each side of A.1b until finished measurements. When rib has been worked for 2 cm, K every other P st tog with K st after (= 13-14 sts dec) = 42-45 sts + A.1b. When piece measures 21-22 cm, work the remaining P sts tog with K st after (= 13-14 sts dec) = 29-31 sts + A.1b. When piece measures 23-24 cm, dec 13-14 sts evenly in the section with stocking st = 16-17 sts + A.1b. On next round in A.1b K 2 and 2 sts tog over the remaining sts on needle (= 8-8 sts dec) = 18-19 sts remain in total. Cut the yarn and pull it through the remaining sts. Hat measures approx. 26-27 cm. Fasten yarn tightly. POMPOM: Make a pompom approx. 7 cm in diameter and fasten it at the top. ---------------------------------------------------------- NECK WARMER: Worked back and forth on circular needle like a scarf and sewn tog when finished. Cast on 47 sts (incl 1 edge st in garter st in each side) on circular needle size 4.5 mm with 2 strands Alpaca. Work 1 ridge in GARTER ST - see explanation above. Now switch to circular needle size 5 mm. Work 2 rows in stocking st with 1 edge st in garter st in each side, AT THE SAME TIME on row from RS inc 6 sts evenly = 53 sts. Now work pattern as follows from RS: 1 edge st in garter st, A.3 (= 18 sts), work last st in A.2, then A.2 over the next 14 sts, A.4 (= 18 sts), 1 edge st in garter st. REMEMBER THE KNITTING TENSION Insert a marker in last st on row when piece measures 25 cm. Continue like this until piece measures approx. 85 cm, adjust after a whole repetition vertically. Now work 2 rows in stocking st inside 1 edge st in garter st in each side, AT THE SAME TIME on row from RS dec 6 sts evenly = 47 sts. Cast off. ASSEMBLY: Sew cast-off edge to the side, i.e. between marker inserted and the first ridge at beg of piece (see chart). Fasten off. |
|||||||||||||||||||||||||||||||||||||||||||
Diagram explanations |
|||||||||||||||||||||||||||||||||||||||||||
|
|||||||||||||||||||||||||||||||||||||||||||
 |
|||||||||||||||||||||||||||||||||||||||||||
 |
|||||||||||||||||||||||||||||||||||||||||||
 |
|||||||||||||||||||||||||||||||||||||||||||
Have you finished this pattern?Tag your pictures with #dropspattern #elgaset or submit them to the #dropsfan gallery. Do you need help with this pattern?You'll find 20 tutorial videos, a Comments/Questions area and more by visiting the pattern on garnstudio.com. © 1982-2026 DROPS Design A/S. We reserve all rights. This document, including all its sub-sections, has copyrights. Read more about what you can do with our patterns at the bottom of each pattern on our site. |
|||||||||||||||||||||||||||||||||||||||||||


With over 40 years in knitting and crochet design, DROPS Design offers one of the most extensive collections of free patterns on the internet - translated to 17 languages. As of today we count 324 catalogues and 12290 patterns translated into English (UK/cm). 12290
We work hard to bring you the best knitting and crochet have to offer, inspiration and advice as well as great quality yarns at incredible prices! Would you like to use our patterns for other than personal use? You can read what you are allowed to do in the Copyright text at the bottom of all our patterns. Happy crafting!
Post a comment to pattern DROPS 164-35
We would love to hear what you have to say about this pattern!
If you want to leave a question, please make sure you select the correct category in the form below, to speed up the answering process. Required fields are marked *.