
Popular categories
Looking for a yarn?


Comments / Questions (73)
![]() Joana wrote:
Joana wrote:
Olá outra vez! Preciso novamente da vossa ajuda. Já terminei os aumentos do Raglan e, de acordo com as instruções, deveria ter 325 malhas (8 aumentos x 20 repetições = 160 + 165 = 325), mas terminei com 326. Já contei os aumentos iniciais e deu certo (165), contei os ajours do Raglan e estão certos, por isso não sei o que fiz de errado.
29.03.2017 - 11:44DROPS Design answered:
Ficamos contentes por saber que conseguiu dar com o erro! E quando terminar este bonito casaco pode sempre partilhar uma foto no grupo DROPS do Facebook! Bom tricô!
30.03.2017 - 12:29Sabine Coleman wrote:
In diagram A 5 28th row from top the pattern has k6 on one side of the symetry line and k7 on the other side. Is that correct? Thank you very much for yr help. Have a nice day Sabine
29.03.2017 - 05:28DROPS Design answered:
Dear Mrs Coleman, you will have on the right side K7 between 2 YOs (... K2 tog, YO, K7, YO ...) and on the left side you will also have K7 between both YOs: (... YO, K6, K2 tog, YO). Happy knitting!
29.03.2017 - 09:54
![]() Joana wrote:
Joana wrote:
Olá! Estou a fazer o tam. M e tenho dúvidas em relação ao Raglan. Será que podem esclarecer o seguinte: 1°- ao fazer a malha meia torcida pelo direito, tenho de fazer uma malha liga torcida pelo avesso; 2°- a malha que tem o marcador é para fazer sempre em ponto meia, quer seja pelo direito como pelo avesso (fazendo assim ponto jarreteira). Obrigada!
23.03.2017 - 18:51DROPS Design answered:
Boa tarde, 1.º - deve fazer a malha em liga, pelo avesso, sem a torcer, para formar um ajour (ou buraco). 2.º. sim, a malha com o marcador deve ser sempre tricotada em ponto jarreteira (em meia pelo direito e pelo avesso). Bom tricô!
27.03.2017 - 16:11
![]() Else wrote:
Else wrote:
Frustreret! Min "pæne" strikjakke er ubrugelig! Maskeantal og strikkefasthed passede, vidden passer fra ærmegab og ned. Lukkede af næsten før ind- og udtagning færdig, men den blev alligevel noget længere end på fotoet. Værst: Ser ud, som om, jeg skulle være startet med en del færre masker ved halsen og derefter have taget hurtigere ud, så jeg nåede samme maskeantal efter raglanudtagning. Ingen * til den opskrift.
13.11.2016 - 23:06
![]() Sandra wrote:
Sandra wrote:
Tere! Oskaksite te mulle öelda, mitme cm tagant tuleb esiliistule kolm auku kududa (ühtlasi siis nööpaugud) nagu 11. real?
11.06.2016 - 18:36DROPS Design answered:
Tere Sandra! Nööpaukudena kasutatakse mustri auke paremal hõlmal. Õmmelge nööbid vasakule hõlmale kohakuti iga teise augureaga. Head kudumist!
15.06.2016 - 16:00
![]() Margreet wrote:
Margreet wrote:
Het aantal steken is symmetrisch maar bij markeerder 1 en 3 loopt dit mijns inziens fout of ik doe toch iets verkeerd. Bij 1 "loop"'ik richting A2 aan en bij 3 loop ik tegen het patroon A4 aan....
17.05.2016 - 14:45DROPS Design answered:
Hoi Margreet. Ik denk dat er iets fout gaat. Je zal nieuwe st nodig hebben aan het eind van A.4, maar pas na 20 nld, en je meerdert tegelijkertijd voor de raglan (ik weet niet welke maat je maakt, maar bijvoorbeeld de kleinste maat meerder je 1 st in elke 2e nld, dwz, ca. 10 nieuwe st bij markeerder 3 voordat je komt bij de nld waar het motief breder wordt (= +7 totaal aan de linkerkant). Ik hoop dat dit duidelijk is zo.
18.05.2016 - 16:11
![]() Margreet wrote:
Margreet wrote:
Ik kom niet uit met mijn ene raglan mouw.bij markeerder 3 loopt de raglan tegen de ruit van patroon dus hij moet de andere kant op. Hoe moet ik nu verder
15.05.2016 - 20:46DROPS Design answered:
Hoi Margreet. Het aantal st voor de raglan moet symmetrisch zijn - ik bedoel hiermee dat je hetzelfde aantal st moet hebbene op beide voorpanden / mouwen. Ik denk dat je iets verkeerd heb gedaan bij markeerder 3 (overgang achterpand - linker mouw). Vergelijk met overgang markeerder 2 (overgang rechter mouw - achterpand).
17.05.2016 - 12:02
![]() Tina wrote:
Tina wrote:
You list bust sizes "32 1/4"-34½"-37 3/4"-41 3/4"-47 1/4"-51½" but there is no 36" listed. Does this pattern work with negative ease and therefore I am to use a 34 1/2 for 36" ? Or is the 36" left out of the pattern? Please advise.
11.02.2016 - 18:51DROPS Design answered:
Dear Tina, you will find at the end of the pattern a measurement chart with all measurements for each size in cm (convert here into inch) taken flat from side to side. Compare these to a similar garment you have and like the shape to find out the matching size - read more here. Happy knitting!
12.02.2016 - 12:05
![]() Freja wrote:
Freja wrote:
Tak :-)
27.01.2016 - 16:47
![]() Freja wrote:
Freja wrote:
Jeg strikker XXXL. Jeg har et problem med markørerne: Efter at jeg har taget ud til 205 masker, skal der sættes markører, men antallet af masker, når man tæller sammen 6+29+1+24+1+71+1+24+1+29+6 = 193. Hvad med de sidste 12 masker??
24.01.2016 - 21:21DROPS Design answered:
Hej Freja, Jeg kan se at du har glemt A.2 og A.3 i hver side mod midt foran. Derimod ser det ud som om at man har 2 masker for lidt når man sætter mærketrådene. Det skal vi se på og komme tilbage!
27.01.2016 - 16:06
|
|||||||||||||||||||
Peach Macaroon#peachmacaroonsweater |
|||||||||||||||||||
 |
 |
||||||||||||||||||
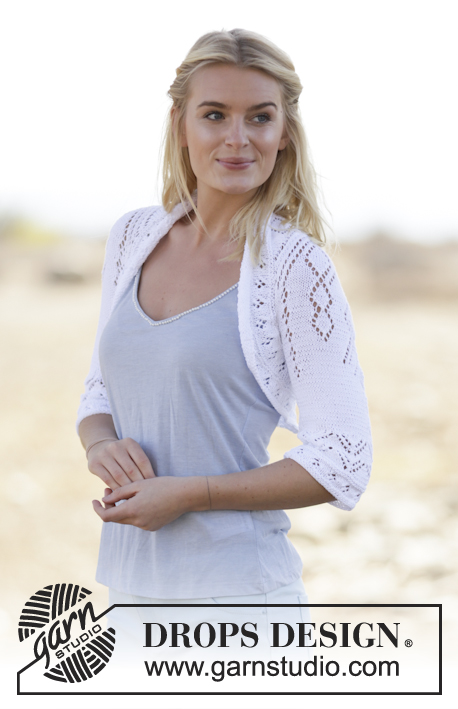
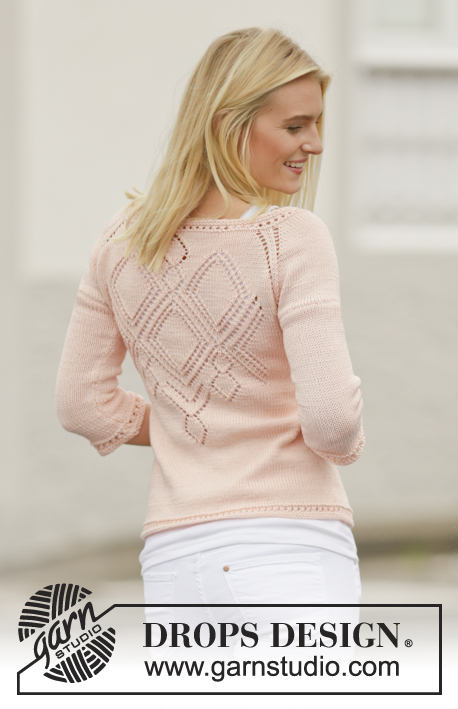
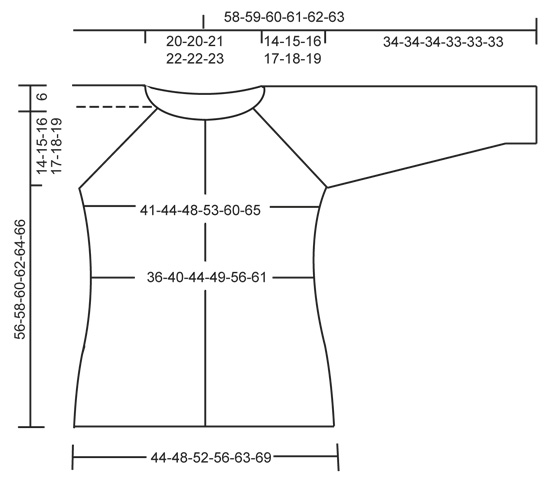
Knitted DROPS jacket with lace pattern and raglan in ”Muskat”. Worked top down. Size: S - XXXL.
DROPS 160-23 |
|||||||||||||||||||
|
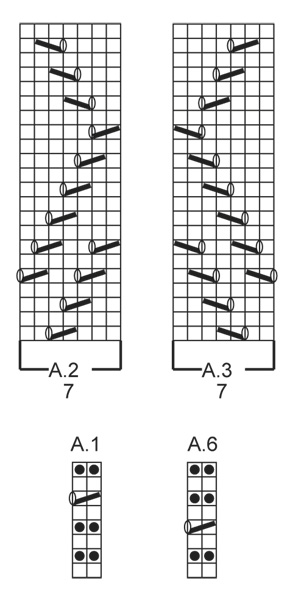
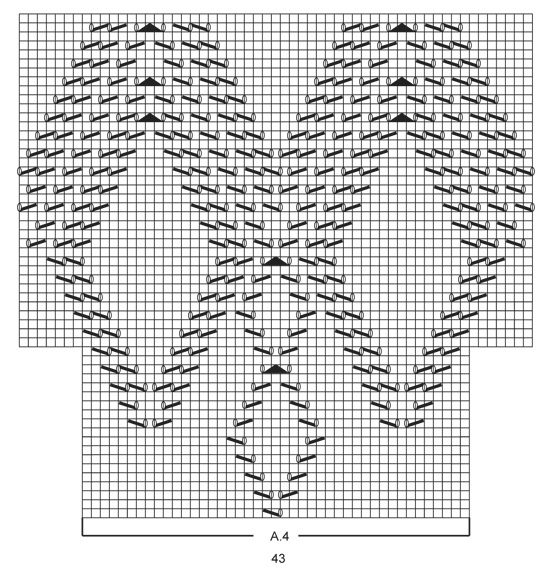
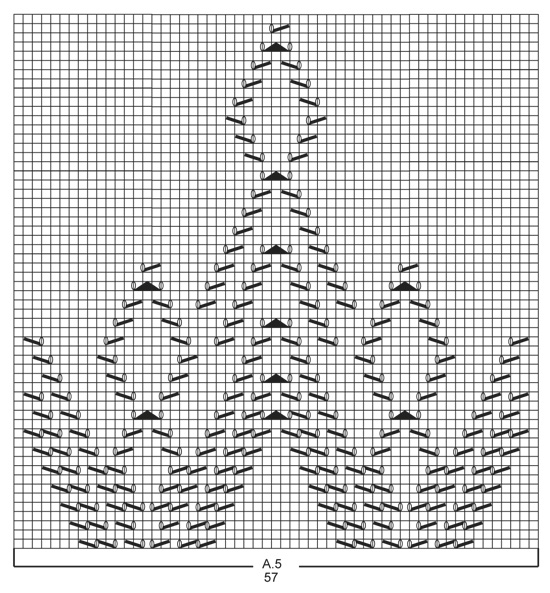
PATTERN: See diagrams A.1 to A.6. The diagrams show all rows in pattern seen from RS. DECREASE TIP: Dec 1 st before marker as follows: Work until 2 sts remain before marker, slip 1 st as if to K, K 1, psso. Dec 1 st after marker as follows: K 2 tog. BAND STS: Work band (= 6 sts) as follows: ROW 1 (= RS): K 6. ROW 2: K 6. Repeat 1st-2nd row 5 times in total (= 5 ridges). ROW 11 (= RS): * K 2 tog, 1 YO *, repeat from *-* 3 times in total, work reversed in the other side of piece, i.e.: 1 YO, K 2 twisted tog (= eyelet row). ROW 12: K all sts, do not work YOs twisted; they should make holes. RAGLAN: Inc differently for raglan in the different sizes: SIZE S-M: Inc on every row from RS (= every other row) as follows: Inc 1 sts each side of each marker (= 8 sts inc) as follows: 1 YO, K 1 twisted, K 1( = st with marker), K 1 twisted, 1 YO. Do not work YOs twisted on next row, they should make holes, repeat inc every other row 17-19 more times. SIZE L-XL-XXL-XXXL: Inc on every row from RS (= every other row) as follows: Inc 2 sts each side of each marker (= 16 sts inc in total) as follows: 1 YO, K 1, 1 YO, K 1 twisted, K 1(= st with maker), K 1 twisted, 1 YO, K 1, 1 YO (the first and last YO work P twisted on next row, it should not make a hole, P the 2 middle YO, they should make holes). Repeat inc on every row from RS 1-1-1-3 more times. Then inc on every row from RS (= every other row) as follows: Inc 1 st on each side of each marker (= 8 sts inc in total) as follows: YO, K 1 twisted, K 1 (= st with maker), K 1 twisted, YO. Do not P YOs twisted on next row, they should make holes, repeat inc every other row 19-20-22-21 times in total. INCREASE TIP: Inc 1 st by making a YO. On next row P YO twisted (i.e. work in the back loop of st instead of front) to avoid holes. KNITTING TIP: Picture deviate from pattern, there is no seam on sleeve in pattern. ---------------------------------------------------------- YOKE: Worked back and forth on circular needle, top down. Cast on 147-147-153-157-157-161 sts (incl 6 band sts in each side of piece) on circular needle size 3.5 mm with Muskat. Work 6 BAND STS - see explanation above, A.1 (= 2 sts) until 7 sts remain, K 1, finish with 6 band sts. When A.1 has been worked 1 time vertically, switch to circular needle size 4 mm. Work the 6 band sts like this until finished measurements. On next row from RS, 6 band sts, A.2 (= 7 sts), K until 13 sts remain - AT THE SAME TIME inc 14-18-12-20-40-44 sts evenly, A.3 (= 7 sts), ending with 6 band sts = 161-165-165-177-197-205 sts. On next row (= from WS) insert 4 markers in the piece as follows: 6 band sts, A.3, P 15-16-17-20-25-28 sts (= front piece), P 1 and insert 1st marker in this st, P 28-28-26-26-26-24 (= sleeve), P 1 st and insert 2nd marker in this st, P 45-47-49-55-65-71 sts (= back piece), P 1 st and insert 3rd marker in this st, P 28-28-26-26-26-24 sts(= sleeve), P 1 and insert 4th marker in this st, P 15-16-17-20-25-28 sts (= front piece), A.2 and finish with 6 band sts. REMEMBER THE KNITTING TENSION! A.2-A.3 is worked like this until finished measurements. Then work as follows (from RS) - AT THE SAME TIME inc for RAGLAN - see explanation above. Work 6 band sts, A.2, K until 1-1-2-2-2-2 st remains before 1st marker, work RAGLAN - see explanation above, K until 1-1-2-2-2-2 sts remain before 2nd marker, work raglan, K 0-1-1-4-9-12, A.4 (= 43 sts), K until 1-1-2-2-2-2 st remains before 3rd marker, work raglan, K until 1-1-2-2-2-2 sts remain before 4th marker, work raglan, work in stocking st until 13 sts remain, A.3 (= 7 sts), finish with 6 band sts. Work the inc sts in stocking st until they can be worked in pattern as shown in A.4. When A.4 has been worked 1 time vertically, work A.5 (= 57 sts) over A.4. After all inc are done there are 305-325-349-369-405-437 sts on needle. Piece measures approx. 14-15-16-17-18-19 cm. Continue with pattern and stocking st as before AT THE SAME TIME work as follows on next row from RS: Work 6 band sts, A.2 as before, 33-36-40-44-51-57 sts in stocking st (= front piece), insert the next 66-70-74-76-80-84 sts on a stitch holder for sleeve, cast on 6-6-6-8-8-8 sts under sleeve (insert marker in the middle of the new sts), work the next 81-87-95-103-117-129 sts (= back piece) as before, slip the next 66-70-74-76-80-84 sts on a stitch holder for sleeve, cast on 6-6-6-8-8-8 sts under sleeve (insert a marker in the middle of the new sts), 33-36-40-44-51-57 sts in stocking st (= front piece), A.3 as before, finish with 6 band sts = 185-197-213-233-261-285 sts remain on needle. Insert 1 marker in piece, NOW MEASURE PIECE FROM HERE. Continue with pattern and stocking st over the remaining sts. When piece measures 3 cm, dec 1 st on each side of each markers in the side (= 4 sts dec) - READ DECREASE TIP! Repeat dec every 2½-4-4-4-4-4 cm 5-3-3-3-3-3 more times = 161-181-197-217-245-269 sts. Work as before until piece measures 18-19-20-21-22-23 cm. When A.5 has been worked 1 time vertically, work in stocking st over all sts. Then inc 1 st on each side of each markers in the sides (= 4 sts inc) - READ INCREASE TIP! Repeat inc every 2 cm 8-7-7-7-7-7 more times = 197-213-229-249-277-301 sts. When piece measures 40-41-42-43-44-45 cm (adjust so that next row is from RS), switch to circular needle size 3.5 mm. Then work as follows: 6 band sts, work A.6 (= 2 sts) until 7 sts remain, 1 st in stocking st and 6 band sts. When A.6 has been worked 1 time vertically, cast off. SLEEVE: Worked in the round on double pointed needles. Insert 1 marker in piece, NOW MEASURE PIECE FROM HERE. Slip sts from stitch holder back on double pointed needles size 4 mm and cast on 6-6-6-8-8-8 new sts under sleeve (insert a marker in the middle of the new sts) = 72-76-80-84-88-92 sts - see KNITTING TIP. Work in stocking st. When piece measures 3 cm, dec 1 st on each side of marker mid under sleeve (= 2 sts dec), repeat dec every 2-1½-1½-1½-1-1 cm 12-13-14-15-17-18 more times = 46-48-50-52-52-54 sts. When piece measures 32-32-32-31-31-31 cm (shorter measurements in the larger sizes because of wider shoulders), switch to double pointed needle size 3.5 mm. Work A.6. Cast off when A.6 has been worked 1 time vertically. Work the other sleeve the same way. ASSEMBLY: Sew the opening under the sleeves. Sew on buttons, button in eyelet row for band sts. Fasten the top button in neck on left band in first eyelet row, skip 2 eyelet rows, fasten the next button, then fasten the other button in every other eyelet row. |
|||||||||||||||||||
Diagram explanations |
|||||||||||||||||||
|
|||||||||||||||||||
 |
|||||||||||||||||||
 |
|||||||||||||||||||
 |
|||||||||||||||||||
 |
|||||||||||||||||||
Have you finished this pattern?Tag your pictures with #dropspattern #peachmacaroonsweater or submit them to the #dropsfan gallery. Do you need help with this pattern?You'll find 25 tutorial videos, a Comments/Questions area and more by visiting the pattern on garnstudio.com. © 1982-2026 DROPS Design A/S. We reserve all rights. This document, including all its sub-sections, has copyrights. Read more about what you can do with our patterns at the bottom of each pattern on our site. |
|||||||||||||||||||


With over 40 years in knitting and crochet design, DROPS Design offers one of the most extensive collections of free patterns on the internet - translated to 17 languages. As of today we count 324 catalogues and 12290 patterns translated into English (UK/cm). 12290
We work hard to bring you the best knitting and crochet have to offer, inspiration and advice as well as great quality yarns at incredible prices! Would you like to use our patterns for other than personal use? You can read what you are allowed to do in the Copyright text at the bottom of all our patterns. Happy crafting!
Post a comment to pattern DROPS 160-23
We would love to hear what you have to say about this pattern!
If you want to leave a question, please make sure you select the correct category in the form below, to speed up the answering process. Required fields are marked *.