
Popular categories
Looking for a yarn?


Comments / Questions (75)
![]() Margarete wrote:
Margarete wrote:
Hallo,um welche zugenommenen Maschen handelt sich in Beschreibung von Passe:„Die zugenommenen M glat rechts str,bis sie im Muster A4 aufgehen“? Handelt es sich um M am Rücken bei Muster A4? Ale andere soll man die zugenommenen M mit Loch stricken. Mit freundlichen Grüßen Margarete
15.04.2025 - 21:09DROPS Design answered:
Liebe Margarete, es handelt sich um die Maschen, die Sie als Raglanzunahmen zunehmen. Diese Maschen fließen im Laufe des Strickens von A.4 mit ins Muster ein - das passiert aber automatisch, wenn Sie das Muster stricken, sonst würde die Maschenzahl nicht reichen (zumindest nicht bei den kleineren Größen). A.4 beginnt ja mit 43 Maschen, dann sind nach einer Weile an beiden Seiten je 7 Maschen dazu eingezeichnet, die sich aus den Raglanzunahmen ergeben, die Raglanzunahmen selbst sind aber nicht direkt im Diagramm eingezeichnet. Gutes Gelingen!
17.04.2025 - 22:31
![]() Gilda Le Pera wrote:
Gilda Le Pera wrote:
Salve, all inizio del aumento raglan dice di aumentare 8 maglie ogni due giri. Ma nella spiegazione sembra che ne aumenta 16. Nella taglia S/M cita "aumentare 1 maglia da ciascun lato del segno come segue: 1 m gettata, 1 m a diritto ritorta," quest ultima maglia a diritto ritorta è già assistente o va aumentata? L aumento va fatto 2maglie prima del segno? Grazie mille
29.05.2022 - 07:39DROPS Design answered:
Buonasera Gilda, durante il raglan si aumentano 8 maglie per giro facendo 1 gettato, come indicato nel paragrafo relativo: la maglia ritorta è una maglia già presente sul ferro. Buon lavoro!
29.05.2022 - 14:29
![]() Donna Zhang wrote:
Donna Zhang wrote:
On the first row of inc for RAGLAN (RS), for size L, between marker 2 and 3, there are 50 sts, follow instruction, the raglan will use 3 sts, then K 3, then A.4 (43 sts), these will use total of 3+3+43=49 sts, so there is only 1 st left and I cannot complete the last step of "K until 2 st remains before 3rd marker" because I would need at least 2 sts left before 3rd marker. Please help me. Thank you so much!
25.04.2022 - 13:38DROPS Design answered:
Dear Mrs Zhong, there are 49 sts between 2nd and 3rd marker, you increase 2 sts before 2nd marker (2 sts + 1 st with marker + 2 sts), 45 sts remain before 3rd marker, work stocking stitch + the lace pattern in A.4 centered in the middle of back piece + stocking st until 2 sts remain before 3rd marker and increase as before for raglan. Happy knitting!
26.04.2022 - 09:12
![]() Donna Zhang wrote:
Donna Zhang wrote:
Hi: I just posted a question with 499 characters, but got a reply "Your comment is too long!". Please reply to my email and explain why I cannot post a question that has 499 characters which is within your limit of 500 characters. Thank you. Donna Zhang
25.04.2022 - 00:35DROPS Design answered:
Dear Mrs Zhang, for technical reason, there is a limit to the number of characters in every questions and answers; please try to reword your question to make it shorter so that we can help you. Thanks for your comprehension. Happy knitting!
25.04.2022 - 08:34
![]() Jess wrote:
Jess wrote:
I'm wondering what the best way to attach the buttons is: if align it with the YO on the band, it would seem I'd have to sew it to what is effectively a hole. Do you have recommendations on how best to tackle this? Thanks in advance!
06.09.2021 - 22:59DROPS Design answered:
Dear Jess, the holes on the front band are the buttonholes, so that you will have to sew the buttons facing one of these holes/over the hole on the left front band to match the hole on the right front band. Happy knitting!
07.09.2021 - 08:35
![]() Manon wrote:
Manon wrote:
Je tricote la grandeur S. Je suis à faire le début du raglan. Entre le marqueur 2 et 3, j'ai 45 mailles. Si l'a dessus, je tricote les mailles torses que j'ai besoin pour le raglan des marqueurs 2 et 3, il me reste 43 mailles comme demandé dans A4. Cependant, on me demande suite au raglan du marqueur 2 de tricoter un maille endroit avant de tricoter A4. Il me manque donc 1 maille pour faire le motif du dos. Merci de votre aide.
14.05.2020 - 17:08DROPS Design answered:
Bonjour Manon, effectivement, au 1er tour de A.4, vous allez augmenter pour le raglan, tricoter A.4 et augmenter pour le raglan, la maille endroit de part et d'autre de A.4 est utilisée pour le raglan. Bon tricot!
15.05.2020 - 08:04
![]() Nicole wrote:
Nicole wrote:
Is het de bedoeling dat A4 voltooid is voordat de steken op de hulpdraad worden gezet, of moet dit gebeuren als de raglan meerderingen voltooid zijn? Alvast bedankt
12.03.2020 - 18:02DROPS Design answered:
Dag Nicole,
Het is de bedoeling dat je A.4 helemaal afmaakt in de hoogte en daarna A.5 breit boven A.4. Je zet steken op de hulpdraad wannneer je op het aantal aangegeven steken zit, of de aangegeven hoogte voor jou maat. Met andere woorden: het steken op een hulpdraad zetten staat los van hoe ver je met A.4 bent.
22.03.2020 - 11:29
![]() Anna wrote:
Anna wrote:
Hallo ich versuche mich gerade an der Größe S. Ich hab jetzt fleißig bei jeder Reihe beim Raglan zugenommen. Jetzt komme ich nach A.4 aber weit über die Zahl von 305 Maschen. Also hab ich nochmal in der Beschreibung nachgelesen und gesehen das ich das 17 mal am Raglan nur wiederholen soll. Was soll ich danach an den Raglan Markierungen Stricken? Da A4 ja 28 Hinreihen hat. Und ich erst danach für mein Ärmel die Maschen still lege.
10.01.2020 - 05:16DROPS Design answered:
Liebe Anna, bei der Größe S haben Sie 161 M + die Raglanzunahmen: 8 Maschen x 18 = 144 Raglanzunahmen + 161 = 305 Maschen. A.4 wird zuerst über 43 Maschen gestrickt, aber ab 20. Reihe wird A.4 über 57 Maschen (=7 M mehr beidseitig). Hoffentlich kann das helfen. Viel Spaß beim stricken!
10.01.2020 - 09:40
![]() Joana wrote:
Joana wrote:
Olá... mais outra vez 😶 Finalmente consegui dar com o erro! Fiz uma laçada a mais na parte das costas.😜 Felizmente, foi mesmo na última carreira terminada, por isso não tive que desfazer muito! ☺ Assunto resolvido! Ufa! Obrigada,de qualquer forma, pela vossa disponibilidade! Bom trabalho! ☺
29.03.2017 - 21:38DROPS Design answered:
Ficamos contentes por saber que conseguiu dar com o erro! E quando terminar este bonito casaco pode sempre partilhar uma foto no grupo DROPS do Facebook! Bom tricô!
30.03.2017 - 12:29
![]() Joana wrote:
Joana wrote:
Continuando... Esta é a contagem que fiz logo após ter terminado os aumentos do Ragan, pode ser que consigam detectar algum erro: 6 (orla) + 7 (A2) + 35 (frente) + 3* (*correspondem à malha meia torcida+malha marcador+malha meia torcida do Raglan) + 66 (manga) + 3* + 86 (costas) + 3* + 66 (manga) + 3* + 35 (frente) + 7 (A3) + 6 (orla). Obrigada!
29.03.2017 - 12:11DROPS Design answered:
Deverá continuar e seguir as explicações do modelo para verificar o número final de malhas, após os aumentos do raglan. Bom tricô!
03.04.2017 - 13:06
|
|||||||||||||||||||
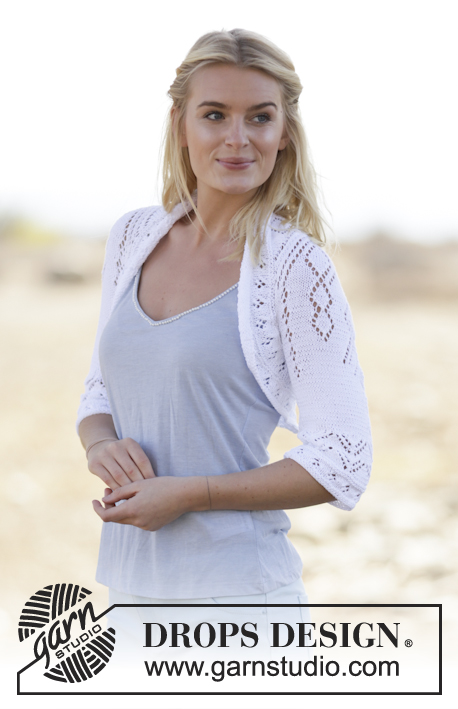
Peach Macaroon#peachmacaroonsweater |
|||||||||||||||||||
 |
 |
||||||||||||||||||
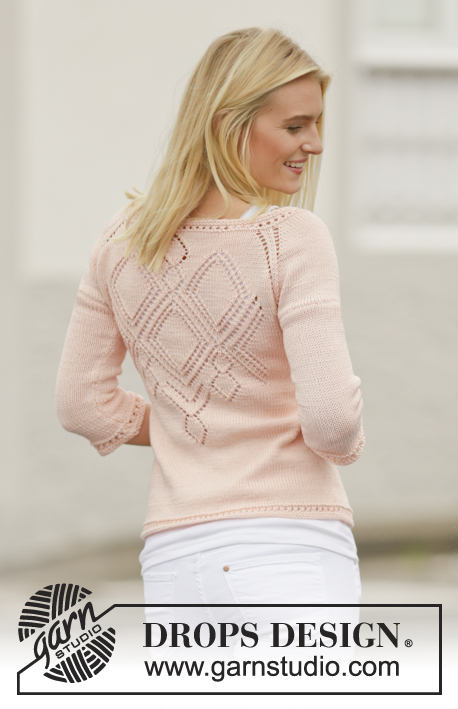
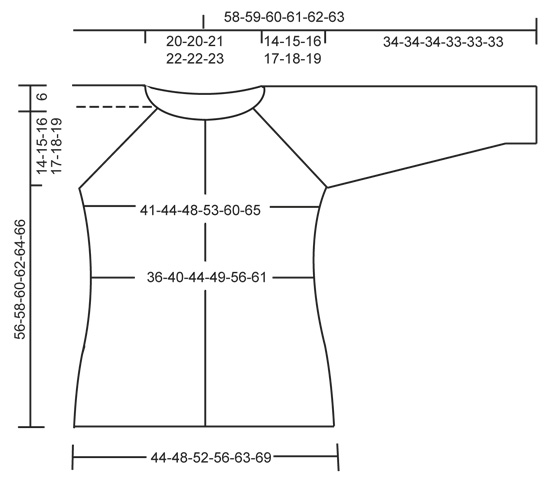
Knitted DROPS jacket with lace pattern and raglan in ”Muskat”. Worked top down. Size: S - XXXL.
DROPS 160-23 |
|||||||||||||||||||
|
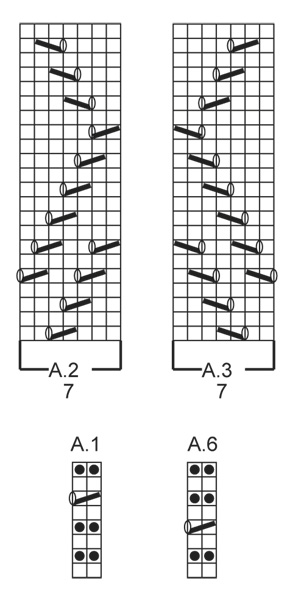
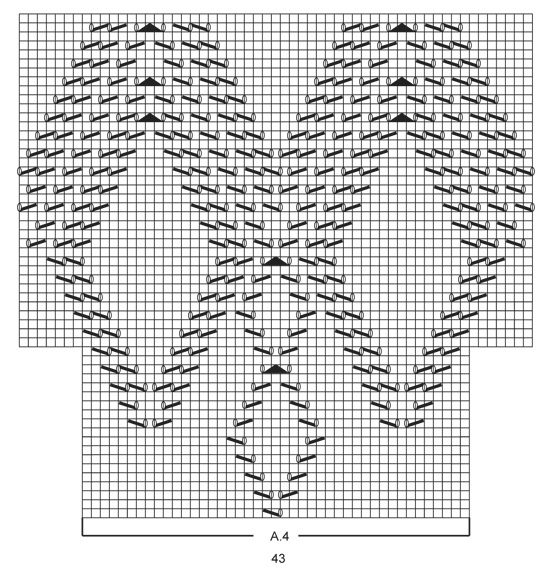
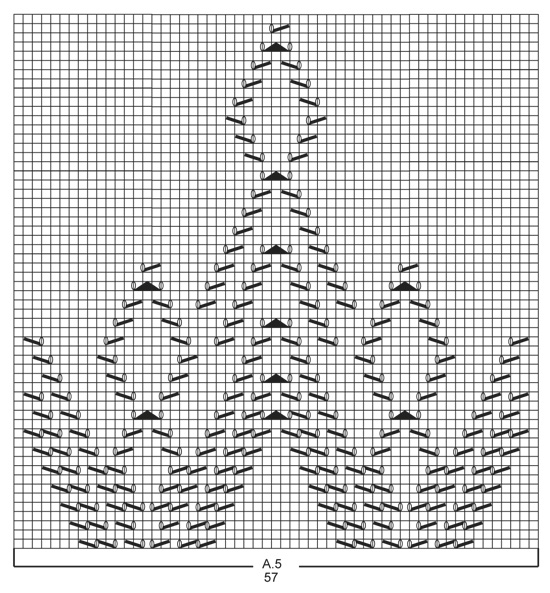
PATTERN: See diagrams A.1 to A.6. The diagrams show all rows in pattern seen from RS. DECREASE TIP: Dec 1 st before marker as follows: Work until 2 sts remain before marker, slip 1 st as if to K, K 1, psso. Dec 1 st after marker as follows: K 2 tog. BAND STS: Work band (= 6 sts) as follows: ROW 1 (= RS): K 6. ROW 2: K 6. Repeat 1st-2nd row 5 times in total (= 5 ridges). ROW 11 (= RS): * K 2 tog, 1 YO *, repeat from *-* 3 times in total, work reversed in the other side of piece, i.e.: 1 YO, K 2 twisted tog (= eyelet row). ROW 12: K all sts, do not work YOs twisted; they should make holes. RAGLAN: Inc differently for raglan in the different sizes: SIZE S-M: Inc on every row from RS (= every other row) as follows: Inc 1 sts each side of each marker (= 8 sts inc) as follows: 1 YO, K 1 twisted, K 1( = st with marker), K 1 twisted, 1 YO. Do not work YOs twisted on next row, they should make holes, repeat inc every other row 17-19 more times. SIZE L-XL-XXL-XXXL: Inc on every row from RS (= every other row) as follows: Inc 2 sts each side of each marker (= 16 sts inc in total) as follows: 1 YO, K 1, 1 YO, K 1 twisted, K 1(= st with maker), K 1 twisted, 1 YO, K 1, 1 YO (the first and last YO work P twisted on next row, it should not make a hole, P the 2 middle YO, they should make holes). Repeat inc on every row from RS 1-1-1-3 more times. Then inc on every row from RS (= every other row) as follows: Inc 1 st on each side of each marker (= 8 sts inc in total) as follows: YO, K 1 twisted, K 1 (= st with maker), K 1 twisted, YO. Do not P YOs twisted on next row, they should make holes, repeat inc every other row 19-20-22-21 times in total. INCREASE TIP: Inc 1 st by making a YO. On next row P YO twisted (i.e. work in the back loop of st instead of front) to avoid holes. KNITTING TIP: Picture deviate from pattern, there is no seam on sleeve in pattern. ---------------------------------------------------------- YOKE: Worked back and forth on circular needle, top down. Cast on 147-147-153-157-157-161 sts (incl 6 band sts in each side of piece) on circular needle size 3.5 mm with Muskat. Work 6 BAND STS - see explanation above, A.1 (= 2 sts) until 7 sts remain, K 1, finish with 6 band sts. When A.1 has been worked 1 time vertically, switch to circular needle size 4 mm. Work the 6 band sts like this until finished measurements. On next row from RS, 6 band sts, A.2 (= 7 sts), K until 13 sts remain - AT THE SAME TIME inc 14-18-12-20-40-44 sts evenly, A.3 (= 7 sts), ending with 6 band sts = 161-165-165-177-197-205 sts. On next row (= from WS) insert 4 markers in the piece as follows: 6 band sts, A.3, P 15-16-17-20-25-28 sts (= front piece), P 1 and insert 1st marker in this st, P 28-28-26-26-26-24 (= sleeve), P 1 st and insert 2nd marker in this st, P 45-47-49-55-65-71 sts (= back piece), P 1 st and insert 3rd marker in this st, P 28-28-26-26-26-24 sts(= sleeve), P 1 and insert 4th marker in this st, P 15-16-17-20-25-28 sts (= front piece), A.2 and finish with 6 band sts. REMEMBER THE KNITTING TENSION! A.2-A.3 is worked like this until finished measurements. Then work as follows (from RS) - AT THE SAME TIME inc for RAGLAN - see explanation above. Work 6 band sts, A.2, K until 1-1-2-2-2-2 st remains before 1st marker, work RAGLAN - see explanation above, K until 1-1-2-2-2-2 sts remain before 2nd marker, work raglan, K 0-1-1-4-9-12, A.4 (= 43 sts), K until 1-1-2-2-2-2 st remains before 3rd marker, work raglan, K until 1-1-2-2-2-2 sts remain before 4th marker, work raglan, work in stocking st until 13 sts remain, A.3 (= 7 sts), finish with 6 band sts. Work the inc sts in stocking st until they can be worked in pattern as shown in A.4. When A.4 has been worked 1 time vertically, work A.5 (= 57 sts) over A.4. After all inc are done there are 305-325-349-369-405-437 sts on needle. Piece measures approx. 14-15-16-17-18-19 cm. Continue with pattern and stocking st as before AT THE SAME TIME work as follows on next row from RS: Work 6 band sts, A.2 as before, 33-36-40-44-51-57 sts in stocking st (= front piece), insert the next 66-70-74-76-80-84 sts on a stitch holder for sleeve, cast on 6-6-6-8-8-8 sts under sleeve (insert marker in the middle of the new sts), work the next 81-87-95-103-117-129 sts (= back piece) as before, slip the next 66-70-74-76-80-84 sts on a stitch holder for sleeve, cast on 6-6-6-8-8-8 sts under sleeve (insert a marker in the middle of the new sts), 33-36-40-44-51-57 sts in stocking st (= front piece), A.3 as before, finish with 6 band sts = 185-197-213-233-261-285 sts remain on needle. Insert 1 marker in piece, NOW MEASURE PIECE FROM HERE. Continue with pattern and stocking st over the remaining sts. When piece measures 3 cm, dec 1 st on each side of each markers in the side (= 4 sts dec) - READ DECREASE TIP! Repeat dec every 2½-4-4-4-4-4 cm 5-3-3-3-3-3 more times = 161-181-197-217-245-269 sts. Work as before until piece measures 18-19-20-21-22-23 cm. When A.5 has been worked 1 time vertically, work in stocking st over all sts. Then inc 1 st on each side of each markers in the sides (= 4 sts inc) - READ INCREASE TIP! Repeat inc every 2 cm 8-7-7-7-7-7 more times = 197-213-229-249-277-301 sts. When piece measures 40-41-42-43-44-45 cm (adjust so that next row is from RS), switch to circular needle size 3.5 mm. Then work as follows: 6 band sts, work A.6 (= 2 sts) until 7 sts remain, 1 st in stocking st and 6 band sts. When A.6 has been worked 1 time vertically, cast off. SLEEVE: Worked in the round on double pointed needles. Insert 1 marker in piece, NOW MEASURE PIECE FROM HERE. Slip sts from stitch holder back on double pointed needles size 4 mm and cast on 6-6-6-8-8-8 new sts under sleeve (insert a marker in the middle of the new sts) = 72-76-80-84-88-92 sts - see KNITTING TIP. Work in stocking st. When piece measures 3 cm, dec 1 st on each side of marker mid under sleeve (= 2 sts dec), repeat dec every 2-1½-1½-1½-1-1 cm 12-13-14-15-17-18 more times = 46-48-50-52-52-54 sts. When piece measures 32-32-32-31-31-31 cm (shorter measurements in the larger sizes because of wider shoulders), switch to double pointed needle size 3.5 mm. Work A.6. Cast off when A.6 has been worked 1 time vertically. Work the other sleeve the same way. ASSEMBLY: Sew the opening under the sleeves. Sew on buttons, button in eyelet row for band sts. Fasten the top button in neck on left band in first eyelet row, skip 2 eyelet rows, fasten the next button, then fasten the other button in every other eyelet row. |
|||||||||||||||||||
Diagram explanations |
|||||||||||||||||||
|
|||||||||||||||||||
|
|||||||||||||||||||
|
|||||||||||||||||||
|
|||||||||||||||||||
|
|||||||||||||||||||
Have you finished this pattern?Tag your pictures with #dropspattern #peachmacaroonsweater or submit them to the #dropsfan gallery. Do you need help with this pattern?You'll find 25 tutorial videos, a Comments/Questions area and more by visiting the pattern on garnstudio.com. © 1982-2025 DROPS Design A/S. We reserve all rights. This document, including all its sub-sections, has copyrights. Read more about what you can do with our patterns at the bottom of each pattern on our site. |
|||||||||||||||||||


With over 40 years in knitting and crochet design, DROPS Design offers one of the most extensive collections of free patterns on the internet - translated to 17 languages. As of today we count 314 catalogues and 11822 patterns translated into English (UK/cm).
We work hard to bring you the best knitting and crochet have to offer, inspiration and advice as well as great quality yarns at incredible prices! Would you like to use our patterns for other than personal use? You can read what you are allowed to do in the Copyright text at the bottom of all our patterns. Happy crafting!
Post a comment to pattern DROPS 160-23
We would love to hear what you have to say about this pattern!
If you want to leave a question, please make sure you select the correct category in the form below, to speed up the answering process. Required fields are marked *.