
Popular categories
Looking for a yarn?


Comments / Questions (34)
![]() Heather Eeles wrote:
Heather Eeles wrote:
When sewing in the sleeves, how do I treat the cast off stitches on the body? Are they part of the sleeve top seam or part of the sleeve side seam? I want to work the sleeves "top down" so I need to know if I must include the cast off stitches when I pick up for the sleeves.
28.04.2016 - 15:38DROPS Design answered:
Dear Mrs Edes, when sewing the sleeve in the pattern, the top of the sleeve will be sewn to the sts cast off for armholes. Happy knitting!
28.04.2016 - 17:49
![]() Karin wrote:
Karin wrote:
Hej! Varför bli det olika antal maskor kvar för axeln på bak resp . framstycket?
01.12.2015 - 11:56DROPS Design answered:
Hej Karin, Ja det bør være samme maskeantal både foran og bagpå. Vi skal se på den og lave en rettelse, men du kan sikkert selv justere det så længe. Tak for info!
02.12.2015 - 11:37
![]() Chantal wrote:
Chantal wrote:
Est-il possible de trocoter le devant et le dos ensemble sur une aiguille circulaire, au lieu des les faire séparément? Je tricote depuis longtemps mais c'est mon premier chandail.
21.07.2015 - 19:42DROPS Design answered:
Bonjour Chantal, c'est tout à fait possible, toutefois, quand la styliste a écrit le modèle ainsi, il est souvent préférable de suivre les indications (plus simple à suivre et moins de risque d'erreurs pour les motifs). Bon tricot!
27.07.2015 - 16:24
![]() Christine Blanlot wrote:
Christine Blanlot wrote:
Bonjour, Puis je tricoter ce modèle avec deux aiguilles à tricoter : je naime pas les aiguilles circulaires ? Merci de votre réponse. Cordialement. Christine
24.02.2015 - 19:40DROPS Design answered:
Bonjour Mme Blanlot, on tricote ici chaque pièce en allers et retours sur aiguille circulaire pour avoir suffisamment de place pour y loger toutes les mailles. Vous pouvez ainsi utiliser des aiguilles droites, vos mailles seront juste plus serrées, pensez à bien conserver la bonne tension. Bon tricot!
25.02.2015 - 09:18
![]() Lenya wrote:
Lenya wrote:
..das sollte nicht "gut" sondern "kurz" heißen - Entschuldigung!
19.02.2015 - 16:52
![]() Lenya wrote:
Lenya wrote:
Der Pullover ist wunderschön geworden. Aber der untere Saum rollt sich nach außen und das obwohl ich alles genau nach Anleitung gestrickt habe. Was kann ich jetzt noch dagegen tun? Und noch eine kleine Anmerkung: die Ärmel sind wirklich sehr gut (das sieht man auch beim Bild sehr gut) - ich habe sie einige Reihen länger gestrickt.
19.02.2015 - 16:51DROPS Design answered:
Sie können den Pulli bzw. den unteren Rand anfeuchten und mit Stecknadeln festgesteckt trocknen lassen, oder den Pulli/unteren Rand unter feuchten Tüchern trocknen lassen, dann sollte sich nichts mehr rollen. Es ist nicht ungewöhnlich, dass das passiert, je nachdem, wie fest man strickt. Und schön, dass Ihnen der Pulli so gut gelungen ist!
20.02.2015 - 16:02
![]() Liss wrote:
Liss wrote:
Jeg har problemer med diagrammerne på s. 4! Det ser superenkelt ud - men vender det på hovedet? eller er det spejlvendt? Umiddelbart kan jeg ikke få er V-mønster som på billedet... Kan jeg få det uddybet?
06.01.2015 - 22:48DROPS Design answered:
Hej Liss. Du skal strikke först A.2 ("spidsen" mod höjre) og saa A.1 ("spidsen" mod venstre), saa faar du ogsaa v-mönstret som du ser paa billedet.
07.01.2015 - 15:34
![]() France wrote:
France wrote:
(À 21 cm de hauteur totale, tricoter ainsi sur l'endroit: 1 m lis au point mousse, 45-49-53-58-64-70 m jersey, A.2, A.1, 45-49-53-58-64-70 m jersey, terminer par 1 m lis au point mousse.) Je ne comprends pas pourquoi on commence par A2 puis A1, ça me donne un motif en "V" à l'envers. Ne faudrait-il pas faire A1 puis A2? Merci de votre aide
19.12.2014 - 22:16France answered:
Je vous ai récemment écrit (19.12.2014). Ne prenez pas la peine de répondre à ma question, j'ai réalisé mon erreur. La séquence est bien A2 - A1. Merci
21.12.2014 - 23:48
![]() Nicole wrote:
Nicole wrote:
Ich komme mit der Größe nicht klar! Könnt ihr mir sagen , welcher deutscher Größe die angegebene Größe M entspricht. Ich hab 40/42 und hab L angefangen zu Stricken, aber das erscheint mir sehr weit. Danke für die Antwort
02.10.2014 - 15:13DROPS Design answered:
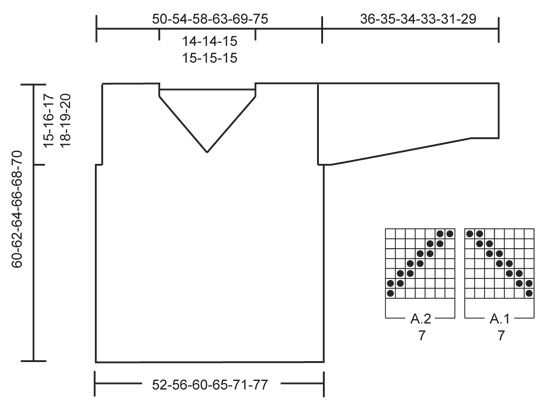
Liebe Nicole, der Pullover fällt recht luftig und locker. Die Maße finden Sie, wenn Sie dem Hinweis oben im Kopf hinter den Größenangaben folgen: "Siehe Maße im Diagramm". In der Schnittzeichnung sind nämlich alle relevanten Maße eingetragen, sodass Sie die zu Ihren Maßen am besten passende Größe auswählen können.
06.10.2014 - 09:00
![]() Christine Jost wrote:
Christine Jost wrote:
Just looking
28.09.2014 - 00:58
|
|||||||
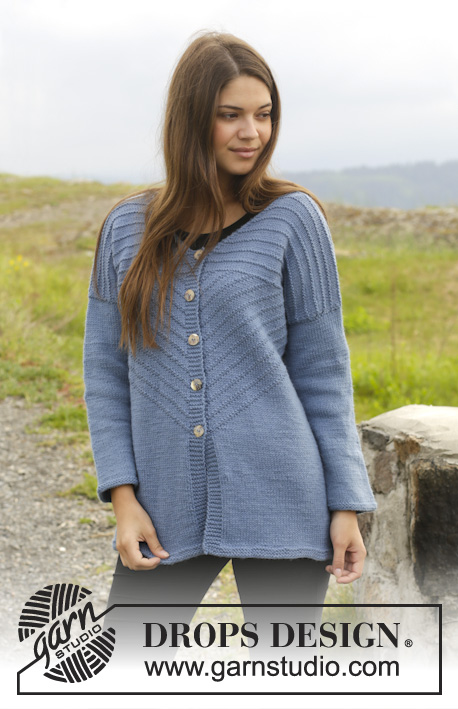
Lazy Sunday Afternoon#lazysundayafternoonsweater |
|||||||
|
|
|||||||
Knitted DROPS jumper in garter st with textured pattern in ”Lima” or "Belle". Size: S - XXXL.
DROPS 158-9 |
|||||||
|
GARTER ST (back and forth on needle): K all rows. 1 ridge = 2 rows K. PATTERN: See diagrams A.1-A.2. The diagrams show all rows in pattern seen from RS. When A.1 has been worked 1 time vertically, continue displacement of P sts 1 st towards the left side of piece (seen from RS) on every row all the way to edge st in left side of piece. AT THE SAME TIME beg 1 new repetition vertically every 7th row. When A.2 has been worked 1 time vertically, continue displacement of P sts 1 st towards the right side of piece (seen from RS) on every row all the way to edge st in right side of piece. AT THE SAME TIME beg 1 new repetition vertically every 7th row. PATTERN 1: Row 1: K from WS. Row 2: K from RS. Row 3: P from WS. Row 4: K from RS. Row 5: P from WS. Row 6: K from RS. Repeat rows 1-6. DECREASE TIP (applies to neck dec): Dec inside 2 sts in garter st. All dec are done from RS! Dec before 2 sts as follows: K 2 tog. Dec as follows after 2 sts: Slip 1 st as if to K, K 1, psso. ---------------------------------------------------------- BACK PIECE: Worked back and forth on circular needle. Cast on 106-114-122-132-144-156 sts (incl 1 edge st in each side) on circular needle size 4 mm with Lima or Belle. Work 3 ridges in GARTER ST - see explanation above. Switch to circular needle size 4.5 mm. Work in stocking st with 1 edge st in garter st in each side. Work edge sts in garter st until finished measurements. When piece measures 21 cm, work as follows from RS: 1 edge st in garter st, 45-49-53-58-64-70 sts in stocking st, A.2, A.1, 45-49-53-58-64-70 sts in stocking st, finish with 1 edge st in garter st. Continue displacement of A.1/A.2 – READ PATTERN - until piece measures 45-46-47-48-49-50 cm, adjust so that next row is from WS. Then work PATTERN 1 – see explanation above, AT THE SAME TIME cast off 2 sts in each side of piece on the next 2 rows = 102-110-118-128-140-152 sts. Repeat pattern 1 until finished measurements. When piece measures 57-59-61-63-65-67 cm, work 1 ridge in garter st over the middle 32-32-34-34-36-36 sts (= 35-39-42-47-52-58 sts on each side), work the other sts as before. Then cast off the middle 28-28-30-30-32-32 sts in garter st and finish each shoulder separately (= 37-41-44-49-54-60 sts on each shoulder). Continue the 2 edge sts towards the neck in garter st. Cast off when piece measures 60-62-64-66-68-70 cm. FRONT PIECE: Worked back and forth on circular needle. Cast on and work as back piece. When piece measures 47-49-50-52-53-55 cm, work 1 ridge in garter st over the middle 6 sts (= 48-52-56-61-67-73 sts on each side), work the other sts as before. Then cast off the middle 2 sts in garter st and finish each shoulder separately (= 50-54-58-63-69-75 sts on each shoulder). Continue the 2 edge sts towards the neck in garter st. On next row from RS dec 1 st for neck inside the 2 edge sts - read DECREASE TIP, repeat dec every row from RS 12-12-13-13-14-14 more times = 37-41-44-49-54-60 sts remain on the shoulder. Cast off when piece measures 60-62-64-66-68-70 cm. SLEEVE: Worked back and forth on circular needle. Cast on 48-50-52-54-54-56 sts (incl 1 edge st in each side) on circular needle size 4 mm with Lima or Belle. Work 2 ridges. Switch to circular needle size 4.5 mm and work in stocking st with 1 edge st in garter st in each side of piece. When piece measures 7 cm, inc inside 1 edge st in each side of piece. Repeat inc every 4-3½-3-2½-2-1½ cm 6-7-8-9-11-12 more times = 62-66-70-74-78-82 sts. Work in stocking st until piece measures 36-35-34-33-31-29 cm (shorter measurements in the larger sizes because of wider shoulders). Cast off. Knit another sleeve. ASSEMBLY: Sew the shoulder seams. Sew in sleeves. Sew the sleeve and side seams inside 1 edge st. |
|||||||
Diagram explanations |
|||||||
|
|||||||
 |
|||||||
Have you finished this pattern?Tag your pictures with #dropspattern #lazysundayafternoonsweater or submit them to the #dropsfan gallery. Do you need help with this pattern?You'll find 20 tutorial videos, a Comments/Questions area and more by visiting the pattern on garnstudio.com. © 1982-2026 DROPS Design A/S. We reserve all rights. This document, including all its sub-sections, has copyrights. Read more about what you can do with our patterns at the bottom of each pattern on our site. |
|||||||


With over 40 years in knitting and crochet design, DROPS Design offers one of the most extensive collections of free patterns on the internet - translated to 17 languages. As of today we count 324 catalogues and 12290 patterns translated into English (UK/cm). 12290
We work hard to bring you the best knitting and crochet have to offer, inspiration and advice as well as great quality yarns at incredible prices! Would you like to use our patterns for other than personal use? You can read what you are allowed to do in the Copyright text at the bottom of all our patterns. Happy crafting!
Post a comment to pattern DROPS 158-9
We would love to hear what you have to say about this pattern!
If you want to leave a question, please make sure you select the correct category in the form below, to speed up the answering process. Required fields are marked *.