
Popular categories
Looking for a yarn?


Comments / Questions (25)
![]() Elisabeth wrote:
Elisabeth wrote:
Bonjour, Merci pour votre réponse, mais je n'ai toujours pas compris (pardon d'être particulièrement obtuse aujourd'hui). Pouvez-vs me détailler la marche à suivre pour le premier rang svp ? Merci d'avance.
10.05.2016 - 13:44DROPS Design answered:
Bonjour Elisabeth, les augmentations sont différentes pour toutes les tailles mais les premières sont identiques: au 1er tour, augmentez 1 m avant chaque A.1 et 1 m après chaque A.1 = 8 augmentations, 2 pour chaque manche et 2 pour le dos + 2 pour le devant. Au tour suivant, augmentez seulement 2 m dans chaque manche: 1 m après le A.1 avant la manche + 1 m avant le A.1 après la manche. Continuez ainsi en suivant bien les indications de votre taille. Il peut être utile de noter les augm. pour s'y retrouver. Bon tricot!
10.05.2016 - 16:09
![]() Elisabeth wrote:
Elisabeth wrote:
Bonjour, pouvez-vous svp m'expliquer où placer les augmentations. Il est écrit "de chaque côté de A1 à chaque raglan", mais je ne vois pas où cela les place. Il y a un marqueur au tout début du tour avant la première maille qui est l'une des 4 m de A1, puis 1m end, puis 4 m de A1, puis un marqueur puis les m du devant, etc. Où et combien de mailles à ajouter ? Je suis bêtement bloquée au tout début du pull, c'est rageant :-)) Merci d'avance pour vos conseils.
09.05.2016 - 18:56DROPS Design answered:
Bonjour Elisabeth, pour le raglan, on va augmenter à un rythme différent pour les manches et pour le dos et le devant, chaque augmentation se fait dans la partie qui la concerne, soit pour les manches, augmentez après le A.1 avant la manche et avant le A.1 après la manche. Pour le dos/le devant, augmentez après le A.1 au début du dos/devant et avant le A.1 à la fin du dos/devant. On va augmenter 8 m au total quand on augmente à chaque A.1, ou 4 m quand on n'augmente que sur les manches. Bon tricot!
10.05.2016 - 09:13
![]() Madeleine wrote:
Madeleine wrote:
Hvordan er denne genseren i størrelsen? Stor/liten?
24.04.2016 - 18:23DROPS Design answered:
Hej Madeleine. Se maalskitsen nederst med maal og laes lidt mere her om hvordan du vaelger den rette störrelse
25.04.2016 - 12:42
![]() Viki wrote:
Viki wrote:
Még valami, ha a rizsminta helyett csak simát kötnék az egyik oldalon és fordítottat a másikon akkor lehet h jobban ki tudnám venni, hogy hol kell szaporítanom?
10.03.2016 - 10:04DROPS Design answered:
Kedves Viki! A rizsmintának és a harisnyakötésnek mások az arányai, a vastagsága, a mérete, ezért nem javasoljuk, hogy behelyettesítse. A Raglánvonalat 2 egyenesen futó S szemből álló oszlop hangsúlyozza ki, így néhány sor után könnyen és jól látható a szaporítások helye, de ez a jelölőkkel még könnyebben átlátható.
06.11.2016 - 15:31Viki wrote:
Kedves Drops! Kezdő kötő vagyok, kicsit nehezen megy a minta olvasás még. A segítségüket szeretném kérni. Odáig megvagyok, hogy elhelyezem a jelőlőket, de a szaporítást nem értem. Az A1 minta (fordított-sima-sima-fordított) ez a raglán vonal és amit a kettő közé egy sima szemet kötöttem abból lesz az ujja? És a A1 minta melletti szemeket kell szaporítani vagy a fordítottat az A1 minta szélén? Köszönöm a magyarázatot előre is! Nagyon szeretném ezt elkészíteni:)
09.03.2016 - 17:39DROPS Design answered:
Kedves Viki! Az ujja az A.1 minták közötti 1 szemből alakul ki a szaporításokkal. Az A.1 minta maga 1 F, 2 S, 1 F szemből áll emellett, tehát a szélső F szem mellett kell szaporítani.
06.11.2016 - 15:29
![]() Kari wrote:
Kari wrote:
Hei jeg skjønner ikke hvordan jeg øker til erme og hvordan man strikker a1. "Sett et merke, A.1 (= 4 m), 1 r, A.1 (= erme)" Spørsmål: Er et erme da kun siste 4 masker, eller går ermet over 9 masker? Øker jeg på begge sider av merkene? Blir det ingen strikkede masker mellom økningene når jeg skal øke både på bol og erme? Takk
16.12.2015 - 19:30DROPS Design answered:
Hej Kari, A.1 = raglanovergangene (2 foran og 2 bagpå). Du tager ud på hver side af A.1 ifølge opskriften, de masker du tager ud strikkes med i perlestrik på ærmerne og på for og bagstykkerne løbende. God fornøjelse!
17.12.2015 - 08:40
![]() Leila wrote:
Leila wrote:
Welke maat draagt het model op de foto?
10.09.2015 - 21:23DROPS Design answered:
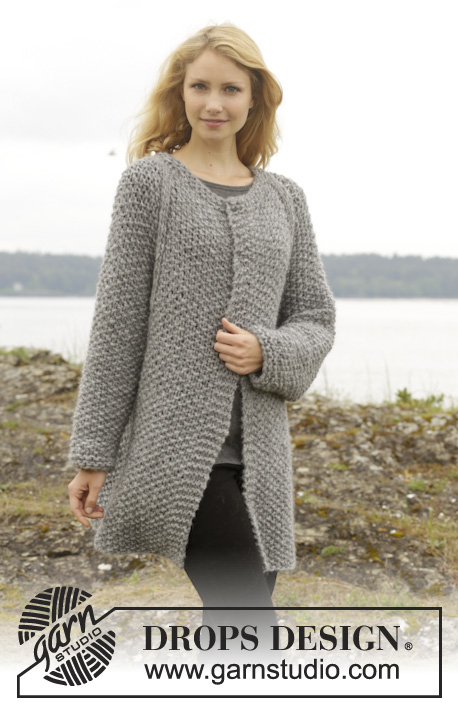
Hoi Laila. De model draagt de kleinste maat (S). Om zeker van de afmetingen te zijn - en welke maat je wilt maken, kijk op de maattekening onderaan het patroon.
11.09.2015 - 13:43
![]() Laelia wrote:
Laelia wrote:
Bonjour, si je veux le tricoté en Peak, dois-je prendre 400g comme le Cloud ou 600g comme l'Esquimo, pour la taille S ?
26.01.2015 - 11:47DROPS Design answered:
Bonjour Laelia, cliquez ici pour calculer la quantité nécessaire dans une qualité alternative. Bon tricot!
26.01.2015 - 17:06
![]() Sarah wrote:
Sarah wrote:
Hallo, ich bin eine strickanfängerin und möchte gerne den tollen Pulli probieren nachdem ich langsam keine Schals und Mützen mehr sehen kann :) leider bin ich nicht geübt in strickanleitungen lesen und verstehen schon nicht wo ich die ersten vier markierer anbringen soll. Kann mir jm Helfen? Vielen lieben Dank!
26.12.2014 - 22:22DROPS Design answered:
Sie halten sich einfach genau an die Reihenfolge in der Anleitung. Die Markierer befinden sich immer direkt vor und bzw. nach den beiden A.1, die dazwischen liegen. Sie beginnen die Rd damit, dass Sie 1 Markierer anbringen, dann folgt A.1, 1 M re, A.1, dann der nächste Markierer etc. Die Markierer sind dazu da, um die Stellen zu erkennen, an denen Sie die Raglanzunahmen machen.
29.12.2014 - 09:58
![]() Marianne wrote:
Marianne wrote:
Bør ikke bolen ha et oddetalls antall masker for at d skal bli perlestrikk og ikke vrangbord?
30.11.2014 - 20:50DROPS Design answered:
Hei Marianne. Nej, det behöves ikke. Du skal sörge for at strikke vr over r og r over vrang naar du starter paa en ny omgang, saa skal perlestrikken nok gaa fint.
01.12.2014 - 14:43
|
|||||||
Day After Day#dayafterdaysweater |
|||||||
|
|
|||||||
Knitted DROPS jumper with moss st and raglan, worked top down in "Cloud" or "Snow". Size: S - XXXL.
DROPS 157-27 |
|||||||
|
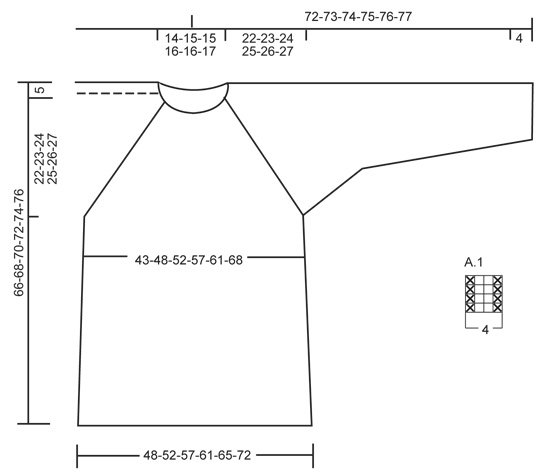
MEASURING TIP: Because of the weight of the yarn all measurements must be done by holding the piece up otherwise the garment will be too long when worn. GARTER ST (back and forth on needle): K all rows. 1 ridge = 2 rows K. GARTER ST (in the round on circular needle): * K 1 round and P 1 round *, repeat from *-*. 1 ridge = 2 rounds. PATTERN: See diagram A.1. The diagram shows all rows in pattern seen from RS. MOSS ST: Row/Round 1: * K 1, P 1 *, repeat from *-*. Row/Round 2: K over P and P over K. Repeat 2nd row/round. RAGLAN: Inc for raglan by working a YO on each side of A.1 in every raglan. On next round work YO twisted (i.e. work in back loop of st instead of front) to avoid holes. NOTE: Work the new sts in moss st. INCREASE TIP: Inc 1 st by making a YO. On next round work YO twisted (i.e. work in back loop of st instead of front) to avoid holes. NOTE: Work the new sts in moss st. DECREASE TIP: Dec inside 1 edge st in garter st in each side. Dec as follows after 1 edge st in garter st: K 2 tog. Dec as follows before 1 edge st in garter st and 2 sts in moss st: Slip 1 st as if to K, K 1, psso, 1 edge st in garter st. ---------------------------------------------------------- JUMPER: Worked top down in the round on circular needle. Cast on 44-48-52-56-60-64 sts on circular needle size 10 mm with Cloud or Snow. Work 1 round in stocking st AT THE SAME TIME inc 10 sts evenly = 54-58-62-66-70-74 sts. Now insert 4 markers in the piece, beg from raglan sts on the right side at the back: Insert a marker, A.1 (= 4 sts), K 1, A.1 (= sleeve), insert a marker, 18-20-22-24-26-28 sts MOSS ST – see explanation above (= front piece), insert a marker, A.1, K 1, A.1 (= sleeve), insert a marker, 18-20-22-24-26-28 sts in moss st (= back piece). Continue like this AT THE SAME TIME on next round beg inc for RAGLAN – see explanation above! NOTE! Inc differently on body and sleeves. REMEMBER THE KNITTING TENSION! RAGLAN BODY: Inc every other round 2-3-4-5-6-8 times, every 4th round 1-1-1-2-2-3 times and every 6th round 4-4-4-3-3-2 times. There are 32-36-40-44-48-54 sts on front and back piece. RAGLAN SLEEVE: Inc every round 3-4-4-5-5-6 times, every other round 7-7-8-8-9-9 times and every 4th round 4 times in all sizes. There are 37-39-41-43-45-47 sts for each sleeve. When all inc are done there are 138-150-162-174-186-202 sts on round. Piece measures 27-29-31-33-35-37 cm - READ MEASURING TIP. Now slip the first 37-39-41-43-45-47 sts on a stitch holder for sleeve, cast on 7 new sts under sleeve, work the next 32-36-40-44-48-54 sts (= front piece), slip the next 37-39-41-43-45-47 sts on a stitch holder for sleeve, cast on 7 new sts under sleeve, work the remaining 32-36-40-44-48-54 sts (= back piece). BODY: There are now 78-86-94-102-110-122 sts for body. Continue with moss st over the next 3 sts, P 1 (= the side), insert a marker in this st, moss st over the next 38-42-46-50-54-60 sts, P 1 (= the side), insert a marker in this st, moss st over the remaining 38-42-46-50-54-60 sts on round. NOW MEASURE THE PIECE FROM HERE. When piece measures 7 cm, inc 1 st on each side of P sts with markers in each side - READ INCREASE TIP. Repeat inc when piece measures 22-23-24-25-26-27 cm = 86-94-102-110-118-130 sts. Continue to work until piece measures 66-68-70-72-74-76 cm in total - remember MEASURING TIP. Cast off with K over K and P over P. SLEEVE: The sleeve is worked back and forth on circular needle. Slip the 37-39-41-43-45-47 sts from stitch holder back on circular needle size 10 mm. Now continue moss st over all sts. Cast on 4 sts at the end of the next 2 rows = 45-47-49-51-53-55 sts. NOTE: Work the new sts in moss st with 1 edge st in garter st in each side. On next row dec 1 st in each side of piece - Read DECREASE TIP! Repeat dec on every row from RS 4 more times = 35-37-39-41-43-45 sts. Then dec every 4½-3½-3½-3-3-3 cm 6-7-7-8-9-9 times = 23-23-25-25-25-27 sts. When sleeve measures 39-38-38-38-38-37 cm from the new sts under sleeves - remember MEASURING TIP - switch to circular needle size 9 mm. Work 2 ridges in GARTER ST - see explanation above. Cast off. Work the other sleeve the same way. ASSEMBLY: Sew underarm seams inside 1 edge st in garter st. Sew tog the openings under the sleeves. Cut the yarn and fasten. NECK EDGE: Pick up 44-48-52-56-60-64 sts (= 1 st in every st in cast-on edge) around the neck on needle size 9 mm with Cloud or Snow. Work 1 ridge AT THE SAME TIME adjust no of sts to 48-50-50-52-52-54. Work 2 ridges. Cast off. |
|||||||
Diagram explanations |
|||||||
|
|||||||
 |
|||||||
Have you finished this pattern?Tag your pictures with #dropspattern #dayafterdaysweater or submit them to the #dropsfan gallery. Do you need help with this pattern?You'll find 25 tutorial videos, a Comments/Questions area and more by visiting the pattern on garnstudio.com. © 1982-2026 DROPS Design A/S. We reserve all rights. This document, including all its sub-sections, has copyrights. Read more about what you can do with our patterns at the bottom of each pattern on our site. |
|||||||


With over 40 years in knitting and crochet design, DROPS Design offers one of the most extensive collections of free patterns on the internet - translated to 17 languages. As of today we count 324 catalogues and 12290 patterns translated into English (UK/cm). 12290
We work hard to bring you the best knitting and crochet have to offer, inspiration and advice as well as great quality yarns at incredible prices! Would you like to use our patterns for other than personal use? You can read what you are allowed to do in the Copyright text at the bottom of all our patterns. Happy crafting!
Post a comment to pattern DROPS 157-27
We would love to hear what you have to say about this pattern!
If you want to leave a question, please make sure you select the correct category in the form below, to speed up the answering process. Required fields are marked *.