
Popular categories
Looking for a yarn?


Comments / Questions (25)
![]() Avril McKoy wrote:
Avril McKoy wrote:
Hello, I am a little confused when doing the raglan increase. For sleeves, each side of raglan meaning increasing by 4 stitches per sleeve each increase? And for body 4 stitches? In total per round of increase? Thanks ☺️
28.10.2023 - 15:19DROPS Design answered:
Dear Avril, as explained in RAGLAN, you increase 1 stitch on each side of A.1. Even though A.1 is in the sleeves, the increases are divided into the parts as follows: Before the first A.1, the increase will go for the right side of the back, after the first A.1 and before the second A.1 the increases are for the right sleeve. After the second A.1 and before the 3rd A.1 the increases are for the front piece. After the 3rd A.1 and before the 4th A.1 the increases are for the left sleeve. After the 4th A.1, the last increase is for the back piece. So, when you increase for the sleeves or for the body you work the increases indicated above for the body or the sleeves. Happy knitting!
29.10.2023 - 20:33Barbara wrote:
Hello, Iam working this pattern with two strands air and my gauge is as requested. I have finished the raglan part on size XL after 38 rows, my problem is that it is 28cm instead of 33cm. Thank you
27.11.2018 - 23:38DROPS Design answered:
Dear Barbara, for raglan sweater it is very important to have the proper gauge for not only the stitchcount, but also for the rows as well. If you knit to few rows the shoulder / yoke will be too short. You can compensate for this, if, at regular intrewalls insert a round without increases at the yoke. I hope this helps. Happy Knitting!
28.11.2018 - 03:45
![]() Anne Olsen wrote:
Anne Olsen wrote:
Jeg forstår ikke hvor ofte jeg skal øke. Hver 2. omg. 4 ganger (jeg skal strikke L), men bare 1. gang den 4. omg. og igjen 4. ganger på hver 6. omg. Skal jeg da etter hver bare øke hver 2. og 6. når jeg har økt den 4. omg. én gang?
20.03.2017 - 21:18DROPS Design answered:
Hej Anne. Först öker du i hver 2. omg 4 ganger (paa bolen) og först naar du er faerdig gaar du videre med at öke i hver 4. omg (1 gang) og til sidst i hver 6. omg (4 ganger). Husk at samtidig öker du ogsaa paa ermerne de antal gange som din str siger.
21.03.2017 - 14:49
![]() Marianne wrote:
Marianne wrote:
Mijn vraag lijkt niet geplaatst te zijn, ik probeer het nog eens. In het gedeelte " lijf" moet een markeerder geplaatst worden in de averechte steek. Moet deze steek over het hele deel vanaf de oksel tot de onderkant averecht gebreid blijven worden? Zodat een soort averechte "naad" ontstaat? Of moet deze, nadat de markeerder is geplaatst, in het gerstekorrelpatroon worden meegebreid?
21.10.2016 - 13:27DROPS Design answered:
Hoi. Jawel :) Zie mijn antwoord hieronder.
21.10.2016 - 15:05
![]() Marianne wrote:
Marianne wrote:
Ik begrijp dat ik een markeerder moet plaatsen bovenaan de zijkant, in de oksel, in een averechte steek. Maar moet ik die averechte steek blijven breien in de volgende toeren? Ofwel: ontstaat er een soort zijnaad met een averechte steek? Of wordt het in de volgende toeren gewoon meegenomen in de gerstekorrel?
21.10.2016 - 12:51DROPS Design answered:
Hoi Marianne. Je breit deze st steeds av - je krijgt dan een "lijn" in de zijkanten. Je breit de st NIET in gerstekorrel
21.10.2016 - 15:04Shilpa wrote:
Thanks for your speedy reply! Just to clarify, when you say 'at the same time', doesn't that mean some of the increase rounds will have 12 increases? Or do the sleeve increases start after the all the body increases are complete? And, if there are 8/increase row as you've mentioned, doesn't that mean the stitch count for the sleeves is too low? Thanks!
23.06.2016 - 00:22DROPS Design answered:
Dear Shilpa, all raglan inc are done when working yoke, but you will not inc on every inc round on all pieces, ie in larger size, you will inc on first round: 2 sts on each sleeve only (= every round = 4 sts inc), then on next round, you will inc 2 sts in all pieces (= every other round in body and every round in sleeve = 8 sts inc), repeat these 2 rounds a total of 3 times = you have inc 6 times every round on sleeves and 3 times every other round on body. ie you will inc sometimes only on sleeve (= + 4 sts inc on round), only on body (= + 4 sts inc on round) and on each pieces (= +8 sts inc on round). Happy knitting!
23.06.2016 - 08:55Shilpa wrote:
Hello! I'm knitting the XXXL with 10ply on 8.0mm and am confused by the increases. Increases are by 4 stitches only (NOT 8), the difference is where these increases go, correct? This creates 47st per sleeve (38 from sleeve increases and 9 from 2xA1 with k in between), but then the A1 section creates a straight stripe for a long portion, unlike the picture. I've been increasing 8/round, which seems to create more shoulder space, and matches the picture, but doesn't add up. Help, please!
22.06.2016 - 14:52DROPS Design answered:
Dear Shilpa, you inc for raglan either 4 sts (when inc only in sleeve or only in body) or 8 sts (when inc both in body and sleeve), ie in larger size, you will inc 8 times every other round, 3 times every 4th round and 2 times every 6th round, and at the same time, you inc for sleeve 6 times every round, 9 times every other round and 4 times every round. Increase are made before A.1 (when inc at beg of piece) or after A.1 (when inc at the end of piece). Happy knitting!
22.06.2016 - 15:00
![]() Elisabeth wrote:
Elisabeth wrote:
Merci infiniment de votre patience et de vos conseils. Cette fois, j'ai compris ! Bonne journée.
11.05.2016 - 15:55
![]() Elisabeth wrote:
Elisabeth wrote:
Bonjour, Je tricote la taille XXL. Les manches se situeront autour de la maille endroit entre les deux A1, non ? Je me rapproche du cas désespéré :-)
11.05.2016 - 14:12DROPS Design answered:
Bonjour Elisabeth, la m end tricotée au tout 1er tour, entre chaque A.1 correspond effectivement aux manches. En taille XXL, tricotez 5 fois: 1 tour avec 8 augm = 1 avant + 1 après chaque A.1 (= augm manches, dos et devant) et 1 tour avec 4 augm = 1 m après le A.1 de chaque manche + 1 m avant le A.1 de chaque manche) - Au 6ème tour, pas d'augm. Au 7ème tour, augmentez 8 m (= manches, dos et devant) et ainsi de suite. Bon tricot!
11.05.2016 - 15:49
![]() Elisabeth wrote:
Elisabeth wrote:
Bonjour, Une toute dernière question, svp : au premier tour, je commence par une augmentation avant le premier marqueur, si j'ai bien compris ? Merci encore de votre patience. Bien cordialement.
11.05.2016 - 10:27DROPS Design answered:
Bonjour Elisabeth, les augmentations se font après le marqueur (le marqueur doit être et rester après A.1) et après le marqueur (le marqueur doit être et rester avant A.1) quand on augmente 2 m au total dans chaque pièce. Ainsi, vous augmentez 2 m entre chaque motif de A.1 (soit pour les manches, soit pour le dos/le devant) - notez bien les augmentations à faire pour votre taille, vous n'augmenterez pas pour chaque pièce à chaque fois. Indiquez moi la taille que vous réalisez pour plus de détail. Bon tricot!
11.05.2016 - 11:51
|
|||||||
Day After Day#dayafterdaysweater |
|||||||
|
|
|||||||
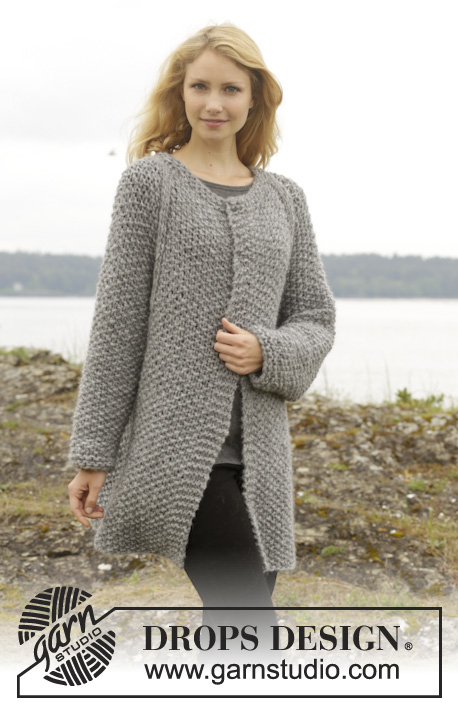
Knitted DROPS jumper with moss st and raglan, worked top down in "Cloud" or "Snow". Size: S - XXXL.
DROPS 157-27 |
|||||||
|
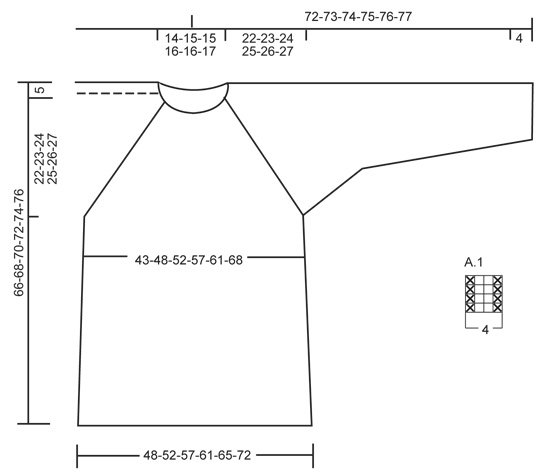
MEASURING TIP: Because of the weight of the yarn all measurements must be done by holding the piece up otherwise the garment will be too long when worn. GARTER ST (back and forth on needle): K all rows. 1 ridge = 2 rows K. GARTER ST (in the round on circular needle): * K 1 round and P 1 round *, repeat from *-*. 1 ridge = 2 rounds. PATTERN: See diagram A.1. The diagram shows all rows in pattern seen from RS. MOSS ST: Row/Round 1: * K 1, P 1 *, repeat from *-*. Row/Round 2: K over P and P over K. Repeat 2nd row/round. RAGLAN: Inc for raglan by working a YO on each side of A.1 in every raglan. On next round work YO twisted (i.e. work in back loop of st instead of front) to avoid holes. NOTE: Work the new sts in moss st. INCREASE TIP: Inc 1 st by making a YO. On next round work YO twisted (i.e. work in back loop of st instead of front) to avoid holes. NOTE: Work the new sts in moss st. DECREASE TIP: Dec inside 1 edge st in garter st in each side. Dec as follows after 1 edge st in garter st: K 2 tog. Dec as follows before 1 edge st in garter st and 2 sts in moss st: Slip 1 st as if to K, K 1, psso, 1 edge st in garter st. ---------------------------------------------------------- JUMPER: Worked top down in the round on circular needle. Cast on 44-48-52-56-60-64 sts on circular needle size 10 mm with Cloud or Snow. Work 1 round in stocking st AT THE SAME TIME inc 10 sts evenly = 54-58-62-66-70-74 sts. Now insert 4 markers in the piece, beg from raglan sts on the right side at the back: Insert a marker, A.1 (= 4 sts), K 1, A.1 (= sleeve), insert a marker, 18-20-22-24-26-28 sts MOSS ST – see explanation above (= front piece), insert a marker, A.1, K 1, A.1 (= sleeve), insert a marker, 18-20-22-24-26-28 sts in moss st (= back piece). Continue like this AT THE SAME TIME on next round beg inc for RAGLAN – see explanation above! NOTE! Inc differently on body and sleeves. REMEMBER THE KNITTING TENSION! RAGLAN BODY: Inc every other round 2-3-4-5-6-8 times, every 4th round 1-1-1-2-2-3 times and every 6th round 4-4-4-3-3-2 times. There are 32-36-40-44-48-54 sts on front and back piece. RAGLAN SLEEVE: Inc every round 3-4-4-5-5-6 times, every other round 7-7-8-8-9-9 times and every 4th round 4 times in all sizes. There are 37-39-41-43-45-47 sts for each sleeve. When all inc are done there are 138-150-162-174-186-202 sts on round. Piece measures 27-29-31-33-35-37 cm - READ MEASURING TIP. Now slip the first 37-39-41-43-45-47 sts on a stitch holder for sleeve, cast on 7 new sts under sleeve, work the next 32-36-40-44-48-54 sts (= front piece), slip the next 37-39-41-43-45-47 sts on a stitch holder for sleeve, cast on 7 new sts under sleeve, work the remaining 32-36-40-44-48-54 sts (= back piece). BODY: There are now 78-86-94-102-110-122 sts for body. Continue with moss st over the next 3 sts, P 1 (= the side), insert a marker in this st, moss st over the next 38-42-46-50-54-60 sts, P 1 (= the side), insert a marker in this st, moss st over the remaining 38-42-46-50-54-60 sts on round. NOW MEASURE THE PIECE FROM HERE. When piece measures 7 cm, inc 1 st on each side of P sts with markers in each side - READ INCREASE TIP. Repeat inc when piece measures 22-23-24-25-26-27 cm = 86-94-102-110-118-130 sts. Continue to work until piece measures 66-68-70-72-74-76 cm in total - remember MEASURING TIP. Cast off with K over K and P over P. SLEEVE: The sleeve is worked back and forth on circular needle. Slip the 37-39-41-43-45-47 sts from stitch holder back on circular needle size 10 mm. Now continue moss st over all sts. Cast on 4 sts at the end of the next 2 rows = 45-47-49-51-53-55 sts. NOTE: Work the new sts in moss st with 1 edge st in garter st in each side. On next row dec 1 st in each side of piece - Read DECREASE TIP! Repeat dec on every row from RS 4 more times = 35-37-39-41-43-45 sts. Then dec every 4½-3½-3½-3-3-3 cm 6-7-7-8-9-9 times = 23-23-25-25-25-27 sts. When sleeve measures 39-38-38-38-38-37 cm from the new sts under sleeves - remember MEASURING TIP - switch to circular needle size 9 mm. Work 2 ridges in GARTER ST - see explanation above. Cast off. Work the other sleeve the same way. ASSEMBLY: Sew underarm seams inside 1 edge st in garter st. Sew tog the openings under the sleeves. Cut the yarn and fasten. NECK EDGE: Pick up 44-48-52-56-60-64 sts (= 1 st in every st in cast-on edge) around the neck on needle size 9 mm with Cloud or Snow. Work 1 ridge AT THE SAME TIME adjust no of sts to 48-50-50-52-52-54. Work 2 ridges. Cast off. |
|||||||
Diagram explanations |
|||||||
|
|||||||
 |
|||||||
Have you finished this pattern?Tag your pictures with #dropspattern #dayafterdaysweater or submit them to the #dropsfan gallery. Do you need help with this pattern?You'll find 25 tutorial videos, a Comments/Questions area and more by visiting the pattern on garnstudio.com. © 1982-2026 DROPS Design A/S. We reserve all rights. This document, including all its sub-sections, has copyrights. Read more about what you can do with our patterns at the bottom of each pattern on our site. |
|||||||


With over 40 years in knitting and crochet design, DROPS Design offers one of the most extensive collections of free patterns on the internet - translated to 17 languages. As of today we count 324 catalogues and 12290 patterns translated into English (UK/cm). 12290
We work hard to bring you the best knitting and crochet have to offer, inspiration and advice as well as great quality yarns at incredible prices! Would you like to use our patterns for other than personal use? You can read what you are allowed to do in the Copyright text at the bottom of all our patterns. Happy crafting!
Post a comment to pattern DROPS 157-27
We would love to hear what you have to say about this pattern!
If you want to leave a question, please make sure you select the correct category in the form below, to speed up the answering process. Required fields are marked *.