
Popular categories
Looking for a yarn?


Comments / Questions (8)
![]() Aleksandra wrote:
Aleksandra wrote:
If the edge stitches are to be repeated on each side, does that mean that when knitting on the right side it’s 2 knit 1 purl then 1 purl 2 knit, and on the left side - 2 purl 1 knit then 1 knit 2 purl? Or do I go along with the right side on both sides?
17.12.2025 - 00:29DROPS Design answered:
Hi Aleksandra, right side: beg of row: K 2, P 1; end of row: P 1, K 2. Wrong side: beg of row: P 2, K 1; end of row: K 1, P 2. Happy knitting!
23.12.2025 - 23:35
![]() Odette wrote:
Odette wrote:
Pour le tour de cou, pour la partie en aller-retour, je ne comprends pas la fréquence de répétions des diminutions.
08.09.2025 - 01:11DROPS Design answered:
Bonjour Odette, lorsque vous continuez en allers et retours, vous allez diminuer ainsi: *tricotez 2 rangs en diminuant 1 maille de chaque côté (1 rang sur l'endroit, 1 rang sur l'envers), tricotez 1 rang sans diminuer), répétez ces 3 rangs, de (à) jusqu'à ce qu'il ne reste que 8 mailles. Bon tricot!
11.09.2025 - 12:21
![]() Annett Gohr wrote:
Annett Gohr wrote:
Zum ersten Mal, dass ich mit einer Anleitung von Drops nicht klarkomme. Stirnband: Nach dem Anschlag eine Reihe li strickenn? Wäre das eine Rückreihe? Was bis zum * für Randmaschen? Wie die drei Randbortenmaschen in der li Rückreihe abstricken? Vielen Dank! Es wartet voller Ungeduld Annett
22.10.2020 - 17:31DROPS Design answered:
Liebe Frau Gohr, ich sehe keine Reihe links nach dem Anschlag, vermisse ich etwas? Sie schlagen 6 M an, stricken 4 Reihen glatt rechts (= 1. Reihe = Hinreihe), bei der nächsten Reihen (= 5. Reihe = Hinreihe), nehmen Sie 2 Maschen beidseitig von den 2 mittleren Maschen zu, dann stricken Sie 3 Reihen glatt re und dann so: (2 M re, 1 M li), 1 Umschlag 2 M glatt re, 1 Umschlag, (1 M li, 2 M re) und so noch 3 x zunehmen. Kann das hilfen?
23.10.2020 - 08:55
![]() Margunn wrote:
Margunn wrote:
Hei! Takk! Men jeg skjønner ikke helt!har jo åtte masker.. Først strikker jeg 2m rett og en m vrang.. Deretter 1 kast og to m glattstrikk(som står er midtm. Men d er de jo ikke..hvertfall ikke på min pinne) også står d 1 kast og tre kantmasker. Men når jeg kommer til kantmasker har jeg jo bRe en maske igjen?
21.10.2015 - 18:30
![]() Margunn Nordli wrote:
Margunn Nordli wrote:
Hva menes med kantmaske? Er det meningen å strikke kantmaske tre ganger når d står * 3 Kantm? Eller bare en gang?
20.10.2015 - 16:55DROPS Design answered:
Hej. Kantmaskor är de 3 maskor de stickar på varje sida, de stickas så här: KANTM: Starten av p fra retten: 2 m rett, 1 m vrang. Slutten av p fra retten: 1 m vrang, 2 m rett. Varje maska stickas bara en gång (stjärnan betyder att du ska upprepa det som står mellan stjärnorna - se beskrivningen). Lycka till!
21.10.2015 - 14:11
![]() Roberta wrote:
Roberta wrote:
Grazie, ho capito e in realtà, già finito il lavoro...molto bello!! grazie ancora per la disponibilità Roberta
21.11.2014 - 10:58
![]() Roberta wrote:
Roberta wrote:
Salve, io sto facendo lo scaldacollo. Ho intrecciato 20 maglie...per la 21° devo tagliare il filo? Dopo come faccio a continuare il lavoro? non l'ho mai fatto,non c'è un video che spiega come fare? Grazie, spero che possiate aiutarmi, non so più andare avanti!!! Roberta
20.11.2014 - 19:17DROPS Design answered:
Buonasera Roberta, deve intrecciare 21 maglie senza tagliare il filo, e poi proseguire con il lavoro. Ci riscriva se non è chiaro. Buon lavoro!!
20.11.2014 - 22:21
![]() Anni Larsen wrote:
Anni Larsen wrote:
Dejlig lun model
16.06.2014 - 01:22
|
|
Idaho#idahoset |
|
 |
 |
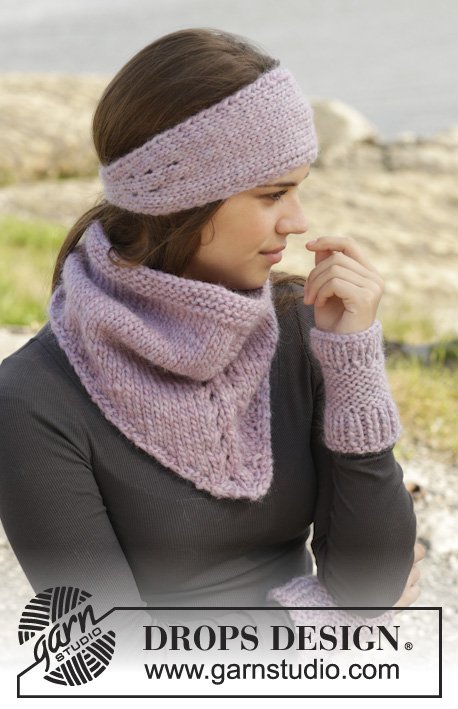
Knitted DROPS neck warmer, head band and wrist warmers in ”Snow”.
DROPS 156-50 |
|
|
GARTER ST (in the round on circular needle): * K 1 round and P 1 round *, repeat from *-*. 1 ridge = 2 rounds. GARTER ST (back and forth on needle): K all rows. 1 ridge = 2 rows K. LACE PATTERN: K 2 tog, 1 YO, K 2, 1 YO, slip 1 st as if to K, K 1, psso. Repeat on every other row from RS. EDGE ST: Beg of row from RS: K 2, P 1. End of row from RS: P 1, K 2. INCREASE INFO: Inc by making a YO, on next row work YO in stocking st to make holes. DECREASE INFO (head band): Work until 2 sts remain before mid st: 1 YO, K 3 tog, slip 1 st as if to K, K 2 tog, psso over last st, make a YO. On next row work YO in stocking st to make holes. ---------------------------------------------------------- NECK WARMER: The piece is worked top down. Cast on 71-81 sts on circular needle size 6 mm with Snow. Work 3 ridges in GARTER ST in the round - see explanation above. Then work in stocking st. REMEMBER THE KNITTING TENSION! When piece measures 16-19 cm, work the next 2 rounds as follows: * K 1, P 1 *, repeat from *-* over the next 21-23 sts, K 25-29, insert 1 marker (= mid front), K the last 25-29. Work next round as follows: Cast off the first 21-23 sts with K over K and P over P = 50-58 sts on needle. Now work back and forth on circular needle as follows: Work 2 sts in garter st, stocking st until 3 sts remain before marker, work LACE PATTERN (= 6 sts) – see explanation above, work until 2 sts remain on row, 2 sts in garter st - AT THE SAME TIME dec 1 st in each side of piece by K 2 tog inside 2 sts in garter st, repeat dec the next 2 rows, work 1 row without dec, continue like this until 8 sts remain on row. Work 1 ridge, cast off. ---------------------------------------------------------- HEAD BAND: Work back and forth. Cast on 6 sts on needle size 6 mm with Snow. Work 4 rows in stocking st. On next row inc 2 sts by making a YO on each side of the 2 middle sts (on next row P YOs twisted to avoid holes) = 8 sts. Work 3 rows in stocking st. Work next row as follows: * 3 EDGE STS - see explanation above, 1 YO, 2 sts in stocking st (= mid st), 1 YO, 3 edge sts * - READ INCREASE INFO = 10 sts. Repeat from *-* 3 more times on every 4th row = 16 sts. Continue in stocking st with 3 edge sts in each side. REMEMBER THE KNITTING TENSION! When piece measures 37-41 cm, dec 1 st on each side of the 2 middle sts - READ DECREASE INFO. Repeat dec every 4th row, 3 more times = 8 sts. Work 3 rows in stocking st. On next row, dec 1 st on each side of the 2 middle sts by K 2 tog = 6 sts. Work 4 rows in stocking st, cast off and cut the yarn - keep some yarn for assembly. Piece measures approx. 49-53 cm. ASSEMBLY: Sew tog cast-on and cast-off edge, cut and fasten the yarn. ---------------------------------------------------------- WRIST WARMER: Worked back and forth on needle. Cast on 24-26 sts on needle size 6 mm with Snow. K 1 row, then work rib = K 1/P 1. When piece measures 4 cm, work in GARTER ST - see explanation above AT THE SAME TIME on 1st row from RS dec 4 sts evenly = 20-22 sts. REMEMBER THE KNITTING TENSION! When piece measures 10-11 cm - adjust so that next row is worked from RS, K 1 row AT THE SAME TIME inc 4 sts evenly = 24-26 sts. Work rib = K 1/P 1 for 3 cm, cast off. ASSEMBLY: Sew tog wrist warmer in the side in outer loops of edge sts to avoid a chunky seam. Knit wrist warmer the same way. |
|
Have you finished this pattern?Tag your pictures with #dropspattern #idahoset or submit them to the #dropsfan gallery. Do you need help with this pattern?You'll find 24 tutorial videos, a Comments/Questions area and more by visiting the pattern on garnstudio.com. © 1982-2026 DROPS Design A/S. We reserve all rights. This document, including all its sub-sections, has copyrights. Read more about what you can do with our patterns at the bottom of each pattern on our site. |
|


With over 40 years in knitting and crochet design, DROPS Design offers one of the most extensive collections of free patterns on the internet - translated to 17 languages. As of today we count 324 catalogues and 12290 patterns translated into English (UK/cm). 12290
We work hard to bring you the best knitting and crochet have to offer, inspiration and advice as well as great quality yarns at incredible prices! Would you like to use our patterns for other than personal use? You can read what you are allowed to do in the Copyright text at the bottom of all our patterns. Happy crafting!
Post a comment to pattern DROPS 156-50
We would love to hear what you have to say about this pattern!
If you want to leave a question, please make sure you select the correct category in the form below, to speed up the answering process. Required fields are marked *.