
Popular categories
Looking for a yarn?


Comments / Questions (46)
![]() Li wrote:
Li wrote:
Farbe 79 ist einfach die schönste ..
18.03.2024 - 05:03
![]() Catia wrote:
Catia wrote:
Ciao, quante volte va ripetuto lo schema A1 sto facendo la taglia l. Grazie
17.03.2024 - 21:31DROPS Design answered:
Buonasera Catia, deve lavorare A.1 su tutte le maglie. Buon lavoro!
17.03.2024 - 22:08
![]() Claudia wrote:
Claudia wrote:
En la repeticiones del diagrama para el cuerpo, tambien se tejen los aumentos en las 6ª , 9ª y 11ª ? Gracias
03.04.2023 - 15:16DROPS Design answered:
Hola Claudia, en la segunda repetición de A.2 disminuyes en las filas 6 y 9 y en la tercera repetición de A.2 aumentas en la fila 6.
06.04.2023 - 23:57
![]() Theres wrote:
Theres wrote:
Hej! Det står "nerifrån och upp" i tags (nyckelord). Det är fel.
26.08.2022 - 19:28
![]() Name wrote:
Name wrote:
Hi! Where is the gauge information?
16.07.2021 - 20:17DROPS Design answered:
Dear Name, you will find the gauge information in the header, together with the crochet hook size suggested and below the amount of yarn required in each size - make sure you are reading the appropriate English terminology (US- and UK- have different crochet terminology) - click on the scroll down menu below the photo if required. Happy crocheting!
19.07.2021 - 09:30
![]() Josiane GUILLAUME wrote:
Josiane GUILLAUME wrote:
Bonjour Quelles sont les mesures correspondantes aux tailles indiquées? S M L XL etc en vous remerciant
09.04.2021 - 01:43DROPS Design answered:
Bonjour Mme Guillaume, mesurez un vêtement analogue que vous avez et dont vous aimez la forme et comparez ces mesures à celles du schéma en bas de page, c'est le meilleur moyen de trouver la bonne taille. Retrouvez plus d'infos ici. Bon crochet!
09.04.2021 - 07:51
![]() Dina wrote:
Dina wrote:
Ik heb een vraag gesteld nog geen andwoord. Gekregen
28.07.2020 - 21:32
![]() Dina wrote:
Dina wrote:
Hoi ik kom er niet uit ik ben bij toer a2 dat heb ik een keer gehaakt mot ik die toer drie keer herhAlen d Dan verder er St Art bij de makeerders mederen dat begrijp. Ik niet groete de dina
26.07.2020 - 14:07DROPS Design answered:
Dag Dina,
Je haakt A.2 inderdaad 3 keer in de hoogte en daarnaast meerder je bij de markeerdraden in elke 6e en 9e toer in het telpatroon.
02.08.2020 - 20:02
![]() CraftyTash wrote:
CraftyTash wrote:
Does working back and forth mean turning your work and working on the other side or does it mean cutting the yarn and starting again?
23.07.2019 - 20:55DROPS Design answered:
Dear CraftyTash, you dont have to cut yarn, just turn and work on the other side (so you have right and wrong side of garment). Happy crocheting!
23.07.2019 - 23:17
![]() CraftyTash wrote:
CraftyTash wrote:
I am making a size S. I have placed my stitch markers in position and ready to start A1. First Q: I understand that A1 is the pattern I will follow but I can\\\'t see how many rows are needed. Is it just the 6 rows then move on to A2? Second Q: Am I increasing either side of every stitch marker? Third Q: Am I increasing on every row?
23.07.2019 - 19:59
|
||||||||||
Darling Please#darlingpleasecardigan |
||||||||||
 |
 |
|||||||||
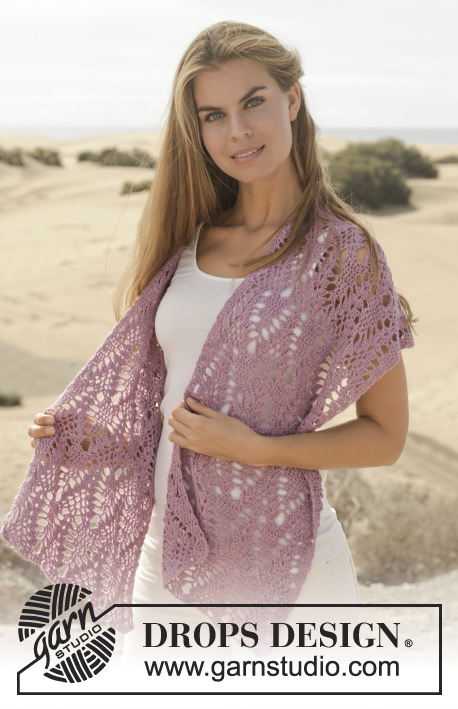
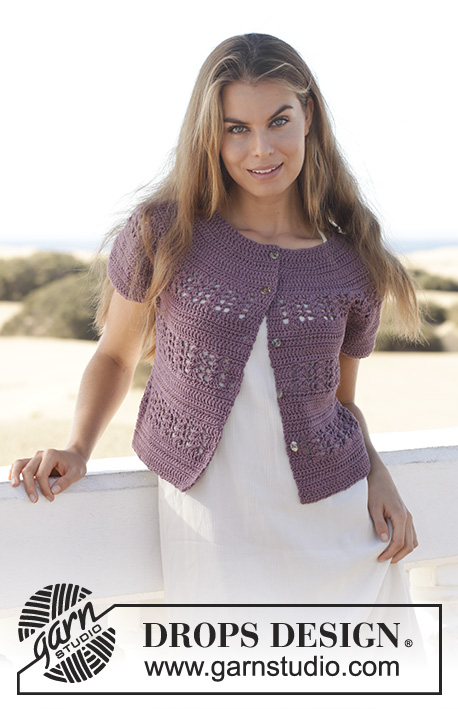
Crochet DROPS jacket with lace pattern and round yoke in ”Muskat”. Size: S - XXXL.
DROPS 154-37 |
||||||||||
|
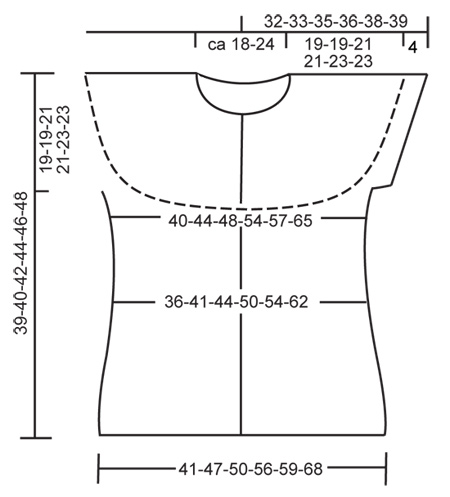
CROCHET INFO: Replace first dc on every dc row with 1 ch. Replace first tr on every tr row with 3 ch. PATTERN: See diagrams A.1 and A.2. INCREASE TIP: Inc by working 2 sts in 1 st, first on the one side of all markers on row, next time on the other side of all markers on row, continue inc like this alternately before and after markers. DECREASE TIP: Dec 1 st by working 2 sts tog. Work 2 dc tog as follows: Insert hook in first st and pull yarn through, insert hook in next st and pull yarn through, make 1 YO and pull yarn through all 3 loops on hook. Work 2 tr tog as follows: Work 1 tr in first st but wait with last pull through, work 1 tr in next st but on last pull through, pull yarn through all 3 loops on hook. ---------------------------------------------------------- BODY: The piece is worked top down. Worked back and forth from mid front. Work 101-107-115-122-130-135 ch (incl 1 ch to turn with) on hook size 4 mm with Muskat. Work next row as follows: 1 dc in 2nd ch, 1 dc in each of the next 4-5-3-5-3-3 ch, * skip 1 ch, 1 dc in each of the next 4 ch *, repeat from *-* the entire row = 82-87-93-99-105-109 dc (first dc = 1 ch) – READ CROCHET INFO! Insert 19-20-21-23-24-26 markers in the piece as follows: First marker after 5-6-7-6-7-5 sts, then insert 18-19-20-22-23-25 markers 4 sts apart, after last marker there are 5-5-6-5-6-4 sts. Work back and forth according to diagram A.1 - AT THE SAME TIME on next row inc 1 st at all markers – READ INCREASE TIP! Repeat inc every other row 2-4-3-3-1-2 more times, then every 3rd row 2-1-1-1-2-3 times and every 4th row 0-0-1-1-2-1 times = 177-207-219-237-249-291 sts. REMEMBER THE CROCHET TENSION! Continue to work A.2 as follows: 1 tr in each of the first 4 sts (= band), a over the next 7 sts, then A.2B until 10 sts remain, A.2C over the next 6 dc and 1 tr in each of the last 4 dc (= band). Work diagram A.2 1 time vertically – NOTE: On the first 4 rows work the first and the last 4 sts in each side in tr, then work the pattern as before. Inc at the markers as before on 6th and 9th row in diagram. On next to last row (= 11th row) inc 16-8-6-8-18-8 sts evenly (do not inc over the first and last 4 band sts) = 231-255-267-291-315-351 sts. Work last row in A.2 as follows: 33-38-41-45-48-56 dc (= front piece), 8 ch (= under sleeve/armhole), skip 53-56-56-59-65-68 tr (to be used for sleeve later), work 59-67-73-83-89-103 dc (= back piece), 8 ch (= under sleeve/armhole), skip 53-56-56-59-65-68 tr (to be used for sleeve later) and work 33-38-41-45-48-56 dc (= front piece). There are now 141-159-171-189-201-231 sts in total on body. Remove all the markers on yoke. Beg on 1st row in A.2 again and work a, b and c the same way as last time (every ch under sleeve = 1 dc) - the first and last 4 sts in each side = bands, only work these in tr on the first 4 rows, then in pattern as before. Continue A.2 - AT THE SAME TIME on 6th row in A.2 dec 6 sts evenly (but do not dec over bands) - SEE DECREASE TIP. Repeat dec on 9th row = 129-147-159-177-189-219 sts. The third time repetition is worked, inc 12 sts evenly on 6th row (do not inc over band sts) = 141-159-171-189-201-231 sts. After repetition is worked for the third time totally, piece measures approx. 20 cm from armhole and down. Size S is now finished. Continue with diagram A.1 for 0-1-1-3-3-5 cm, i.e. until piece measures 20-21-21-23-23-25 cm from armhole and down. Fasten off. SLEEVE: To get the same texture as on body, work back and forth. There are 61-64-64-67-73-76 sts in total on sleeve (incl the 8 ch worked under armhole on body). Beg by working diagram A.1 in the 5th ch mid under sleeve worked for armhole on body. Work 3 rows of A.1. Fasten off. Work the other sleeve the same way. ASSEMBLY: Sew sleeve seams edge to edge to avoid a chunky seam. Sew on buttons evenly down on left band – top button should be 1 cm from the top. Button through sts on right band. |
||||||||||
Diagram explanations |
||||||||||
|
||||||||||
 |
||||||||||
 |
||||||||||
Have you finished this pattern?Tag your pictures with #dropspattern #darlingpleasecardigan or submit them to the #dropsfan gallery. Do you need help with this pattern?You'll find 11 tutorial videos, a Comments/Questions area and more by visiting the pattern on garnstudio.com. © 1982-2026 DROPS Design A/S. We reserve all rights. This document, including all its sub-sections, has copyrights. Read more about what you can do with our patterns at the bottom of each pattern on our site. |
||||||||||


With over 40 years in knitting and crochet design, DROPS Design offers one of the most extensive collections of free patterns on the internet - translated to 17 languages. As of today we count 325 catalogues and 12298 patterns translated into English (UK/cm). 12298
We work hard to bring you the best knitting and crochet have to offer, inspiration and advice as well as great quality yarns at incredible prices! Would you like to use our patterns for other than personal use? You can read what you are allowed to do in the Copyright text at the bottom of all our patterns. Happy crafting!
Post a comment to pattern DROPS 154-37
We would love to hear what you have to say about this pattern!
If you want to leave a question, please make sure you select the correct category in the form below, to speed up the answering process. Required fields are marked *.