
Popular categories
Looking for a yarn?


Comments / Questions (27)
![]() Barbara wrote:
Barbara wrote:
Hallo,ich stricke gerade das tolle Tuch. Ich bin fast fertig, es fehlen nur noch die letzten 10 Zacken der Bordüre. Um so größer war mein Entsetzen, als die Wolle "Delight" aufgebraucht war. Ich hatte 150 g bestellt und mußte nun leider noch nachbestellen. Ich weiß nicht, woran es liegt. Maschenprobe, Maße etc. stimmen mit der Anleitung überein. hat jemand schon ähnliche Erfahrungen gemacht? Oder sollte die Anleitung einfach auf 200 g geändert werden? ! Liebe Grüße Barbara
11.04.2014 - 16:35DROPS Design answered:
Liebe Barbara, wir haben Ihren Kommentar an die Designabteilung weitergeleitet. Sollten noch mehr Rückmeldungen über zu knappe Materialangaben eintreffen, werden wir die Menge anpassen. Es tut uns Leid, das sie Unannehmlichkeiten hatten.
14.04.2014 - 08:48
![]() Donatella wrote:
Donatella wrote:
Bellissimo modello,ho acquistato il filato ho avviato i punti necessari leggendo le spiegazioni mi sono bloccata,nella prima parte quando dice che si lavora a strisce gli aumenti vengono fatti solo sulle maglie prima dei segnapunti mentre le 105 maglie centrali si lavorano sempre a maglia rasata ?e gli aumenti vanno fatti solo sul diritto del lavoro ?grazie aspetto un vostro aiuto
24.03.2014 - 14:45DROPS Design answered:
Buongiorno Donatella, gli aumenti sono spiegati nel 3° f del motivo a pizzo, sono sempre sul diritto del lavoro e deve seguire attentamente la spiegazione. Buon lavoro!!
24.03.2014 - 15:24
![]() Svenja wrote:
Svenja wrote:
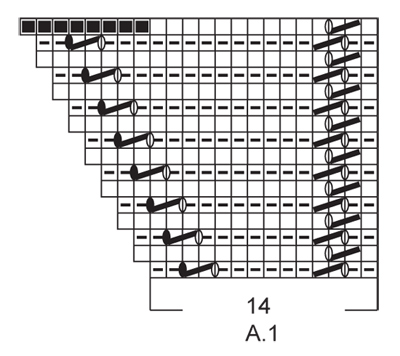
Hallo, ich hatte schon beim stellen der Frage gewusst das Sie mich nicht verstehen. Das Diagramm ist falsch, das heißt die letzte Reihe. Wenn man erst 8 M abk. und dann über die restlichen 14 M strickt, kommt man so aus das man weiter Bordüren stricken kann. Arbeitet man nach dem Diagramm geht es nicht auf. LG Svenja
17.03.2014 - 15:08DROPS Design answered:
Liebe Svenja, das Diagramm ist etwas ungewohnt dargestellt, da es mit einer Rück-R beginnt, der Trick besteht darin, das Diagramm diesmal "in umgekehrter Richtung" zu lesen. D.h. Sie lesen die 1. R (Rück-R) von rechts nach links, nicht wie üblich von links nach rechts, und die nächste Hin-R dafür von links nach rechts. Der rechte Rand im Diagramm ist der Rand, der an das Tuch gestrickt wird. Dann passt es auch mit dem Abketten.
18.03.2014 - 11:04
![]() Svenja wrote:
Svenja wrote:
Hallo, ich habe Probleme mit der Bordüre. Wenn ich A1 einmal gestrickt habe, sieht es bei mir so aus: Rechte Nadel 14 M dann 8 abgekettete M, 1 M von der der Faden ab geht. Linke Nadel sind die M vom Tuch. Wie stricke ich denn jetzt die zweite Bordüre? Hab schon ein paar Sachen probiert aber es will noch nicht klink machen. LG Svenja
14.03.2014 - 21:26DROPS Design answered:
Liebe Svenja, die letzte M der Hin-R der Bordüre wird ja mit dem Tuch zusammengestrickt, dann beginnen Sie wieder mit der 1. R des Diagramms (14 M, Rück-R).
17.03.2014 - 12:45
![]() Merja wrote:
Merja wrote:
Beautiful! I will knit this one!
24.01.2014 - 17:38
![]() Valérie wrote:
Valérie wrote:
Très belles couleurs
20.01.2014 - 23:46
![]() Karin wrote:
Karin wrote:
Hvor er diagram A6?
16.01.2014 - 11:00DROPS Design answered:
Hei Karin. Der skal selvfölgelig staa A.1 (der er kun ét diagram til dette mönster). Vi retter og tak for henvendelsen.
16.01.2014 - 13:01
![]() CATHERINE VALLEE wrote:
CATHERINE VALLEE wrote:
Choix des couleurs judicieux, j'aime également beaucoup ce modèle qui fait jeune
10.01.2014 - 20:37
![]() Allie wrote:
Allie wrote:
Congratulations to the design team! This is one the most colorful and intricate designs. How clever!!
06.01.2014 - 19:52
![]() Olga Kotalová wrote:
Olga Kotalová wrote:
I tento si s potěšením upletu pro sebe nebo někoho milého.
25.12.2013 - 14:59
|
|||||||||||||||||||
Sierra#sierrashawl |
|||||||||||||||||||
|
|
|||||||||||||||||||
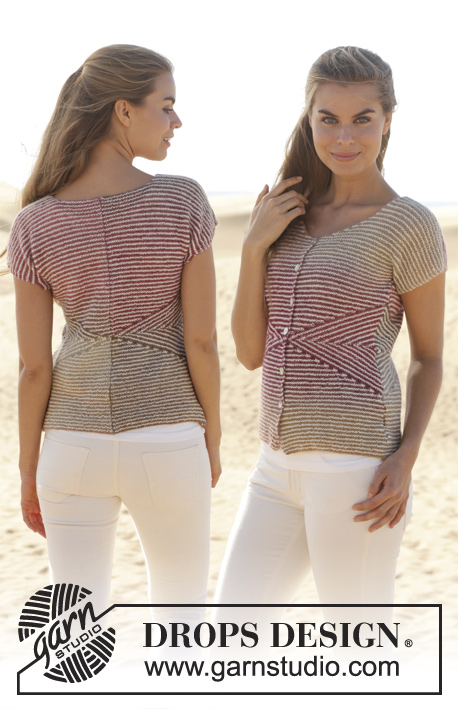
Knitted DROPS shawl with stripes and lace pattern in "Fabel" and "Delight".
DROPS 155-9 |
|||||||||||||||||||
|
GARTER ST (back and forth on needle): K all rows. 1 ridge = 2 rows K. PATTERN: See diagram A.1. The diagram shows all rows in pattern seen from RS. INCREASE TIP: Inc 1 st from RS by making 1 YO. NOTE: Do not work YO twisted on next row, make a small hole. LACE PATTERN: Row 1 (= RS): K all sts. Row 2 (= WS): P all sts. Row 3 (= RS): Work 2 edge sts in garter st, 1 YO (= 1 st inc), * K 2 tog, 1 YO *, repeat from *-* until 2 sts remain before 1st marker, K 1, 1 YO (= 1 st inc), K 1, then work * K 2 tog, 1 YO *, repeat from *-* until 1 st remains before 2nd marker, K 2 (markers is between these sts), 1 YO (= 1 st inc), * K 2 tog, 1 YO *, repeat from *-* until 3 sts remain, K 1, 1 YO (= 1 st inc), finish with 2 edge sts in garter st. Row 4 (= WS): P all sts. PATTERN 1: * 1 ridge (= 2 rows), LACE PATTERN (= 4 rows) – see explanation above *, repeat from *-*. STRIPES: 1 ridge with Delight (= 2 rows) LACE PATTERN – see explanation above - with Fabel (= 4 rows) 1 ridge with Delight (= 2 rows) 2 rows in stocking st with Fabel 2 rows in stocking st with Delight 2 rows in stocking st with Fabel 2 rows in stocking st with Delight 2 rows in stocking st with Fabel 2 rows in stocking st with Delight 2 rows in stocking st with Fabel ---------------------------------------------------------- SHAWL: Worked back and forth in STRIPES - see explanation above - on circular needle to make room for all the sts. Cast on 113 sts on circular needle size 4 mm with Delight. Insert 1 marker after 4 sts in each side of shawl (= 105 sts between markers) and move markers upwards when working. Work as follows from RS: 2 edge sts in GARTER ST - see explanation above, 1 YO, K 1, 1 YO, K 1, work this st in stocking st until finished measurements, (1st marker), K the next 105 sts, (2nd marker), K 1, 1 YO, K 1, 1 YO, finish with 2 edge sts in garter st. Work stripes in stocking st with 2 edge sts in garter st in each side AT THE SAME TIME inc – read INCREASE TIP above, 1 st inside 2 edge sts in garter st in each side of piece and inc 1 st before 1st marker and 1 st after 2nd marker on every row from RS (= 4 sts inc on every row from RS). NOTE: Inc sts are explained on 3rd row in lace pattern. Work the inc sts in the pattern. Continue working and inc this way until 6 repetitions with stripes have been worked in total = 136 sts before 1st marker, 105 sts in the middle and 136 sts after 2nd marker = 377 sts on needle (66 inc in total). Piece measures approx. 36 cm measured in knitting direction along one of the markers. Then work with Fabel and PATTERN 1 – see explanation above, with 2 edge sts in garter st in each side AT THE SAME TIME continue inc as before on every row from RS. Work the inc sts in the pattern. Continue working and inc this way until 4 repetitions of PATTERN 1 have been worked in total = 160 sts before 1st marker, 105 sts in the middle and 160 sts after 2nd marker (78 inc in total) = 425 sts on needle. Then K 1 row from RS with Delight as follows: Work 2 edge sts in garter st, * 1 YO, K 1 *, repeat from *-* 4 more times (= 5 sts inc), work until 5 sts remain before 1st marker, then work as follows * 1 YO, K 1 *, repeat from *-* 9 more times (= 10 sts inc), work 52 sts in stocking st, 1 YO (= 1 st inc), work in stocking st until 5 sts remain before 2nd marker, then work * 1 YO, K 1 *, repeat from *-* 9 more times (= 10 sts inc), work in stocking st until 7 sts remain on row, * 1 YO, K 1 *, repeat from *-* 4 more times (= 5 sts inc), finish with 2 edge sts in garter st. K 1 row from WS, K YOs from previous row twisted to avoid holes = 456 sts on needle. Piece measures approx. 42 cm measured in knitting direction along one of the markers. Then work the edge of shawl. EDGE: Do not turn piece, but cast on 14 new sts with Delight for shawl edge from WS. Turn piece, K 1 row over the 14 new sts. Turn piece. Then work according to diagram A.1 over these sts from WS (1st row in diagram = WS). NOTE! On every row from RS work last st tog with next free st from shawl – this way the shawl edge is worked tog and fastened on shawl. On next row slip 1st st as if to P. Continue working A.1 along the entire edge of shawl = 57 tips along edge. Loosely cast off. SHAPING: Place the piece in lukewarm water until it is soaking wet. Carefully squeeze out the water - do not twist. Then roll the piece in a towel and squeeze to remove more water - the piece will now only be moist. Place piece on a carpet or mattress. Leave to dry. Repeat the process when the garment has been washed. |
|||||||||||||||||||
Diagram explanations |
|||||||||||||||||||
|
|||||||||||||||||||
 |
|||||||||||||||||||
Have you finished this pattern?Tag your pictures with #dropspattern #sierrashawl or submit them to the #dropsfan gallery. Do you need help with this pattern?You'll find 21 tutorial videos, a Comments/Questions area and more by visiting the pattern on garnstudio.com. © 1982-2026 DROPS Design A/S. We reserve all rights. This document, including all its sub-sections, has copyrights. Read more about what you can do with our patterns at the bottom of each pattern on our site. |
|||||||||||||||||||


With over 40 years in knitting and crochet design, DROPS Design offers one of the most extensive collections of free patterns on the internet - translated to 17 languages. As of today we count 324 catalogues and 12290 patterns translated into English (UK/cm). 12290
We work hard to bring you the best knitting and crochet have to offer, inspiration and advice as well as great quality yarns at incredible prices! Would you like to use our patterns for other than personal use? You can read what you are allowed to do in the Copyright text at the bottom of all our patterns. Happy crafting!
Post a comment to pattern DROPS 155-9
We would love to hear what you have to say about this pattern!
If you want to leave a question, please make sure you select the correct category in the form below, to speed up the answering process. Required fields are marked *.