
Popular categories
Looking for a yarn?


Comments / Questions (35)
![]() Karin Nordrik wrote:
Karin Nordrik wrote:
Hei, den fantastiske luen, og jeg bommer allerede i de første 11 omg. Har for mange masker i hver omg. Jeg har lest hekleinfo og beg med lm og hopper over første fm. Avslutter med kjm i lm Føler jeg skjønner alt riktig. Har prøvd om og om igjen. Hva gjør jeg feil? Mvh Karin
30.10.2014 - 00:24
![]() Fanny wrote:
Fanny wrote:
Bonjour, serait-il possible de réaliser ce modèle pour une petite fille de 3 mois en sachant que son tour de tête est de 41cm.
31.08.2014 - 09:35DROPS Design answered:
Bonjour Fanny, vous pouvez réaliser ce modèle en plus petit en ajustant vos augmentations et le nombre de mailles au tour de tête souhaité. Bon crochet!
01.09.2014 - 10:38
![]() Pavlína wrote:
Pavlína wrote:
Dobrý den, prosím o radu, z návodu jsme nepochopila jak uháčkovat 12 nevím kde přesně ještě přidávat a u 18 řady, vím co znamená ujímání ale nevím kde přesně mám KS ujímat? děkuji za odpověď.
22.04.2014 - 19:02DROPS Design answered:
Dobrý den, Pavlíno. Místa si určíte sama rozpočtem - mezi přidáváním/ujímáním musí být cca stejně velké rozestupy. Vydělte celkový počet ok v řadě počtem ok, která potřebujete ujmout/přidat. Např. 11. kr.ř.=66 ok. Ve 12. kr.ř. mám 2 oka přidat. 66:2=33 - do každého 33. uháčkuji 2 KS. Při ujímání bych sháčkovala každé dané a předchozí oko (tj. 32. s 33.). Hodně zdaru! Hana
24.04.2014 - 11:52
![]() Anne Kristin Borrmann wrote:
Anne Kristin Borrmann wrote:
Hallo! Ich bin Häkelanfänger und habe eine Frage. Was bedeutet dieser Satz: "Weiter in Hin-und Rück-R über die mittleren14-16-16 M vorne (d.h. auf der anderen Seite des Rd-Beginns) den Schirm arbeiten." Wenn ich die Runden mit einer Kettmasche schließe, dann habe ich das Problem, dass die Naht sich immer mehr verschiebt. Wie kann ich sie gerade bekommen? Herzlichen Dank
13.03.2014 - 11:25DROPS Design answered:
Liebe Ann Kristin, wenn Sie Häkelanfängerin sind, empfehle ich Ihnen zum lernen, sich möglichst viele unserer Videotutorials anzuschauen (und nachzuarbeiten). Den Schirm muss man in die andere Richtung der Lm-Kette häkeln (auf der ersten Seite der Lm -Kette ist ja schon die Mütze).
14.03.2014 - 12:58
![]() Jabba wrote:
Jabba wrote:
Ich habe diese Mütze für meine zweijährige Tochter gehäkelt - was soll ich sagen, sie ist wunderschön!! :-) Das Resultat sieht etwas anders aus als das Foto, der Schirm ist kürzer. Aber das gibt der Mütze einen Look im 20-er-Jahrestil und gefällt mir noch viel besser. Die Anleitung ist leicht verständlich und das Garn "Nepal" kann ich nur empfehlen, es lässt sich sehr gut verarbeiten, sieht gut aus und fühlt sich wunderbar an.
18.02.2014 - 10:55
![]() Claudia wrote:
Claudia wrote:
Non è possibile avere un video per fare la visiera? ho visto che c'è anche il video di un fiore che però non è quello del cappello. secondo me mancano dei giri nella visiera, viene troppo piccola, almeno la metà rispetto al vs modello. grazie claudia
10.02.2014 - 23:33DROPS Design answered:
Buongiorno Claudia. Se la visiera che ottiene è troppo piccola, può eventualmente provare a lavorare qualche riga in più come le righe 3 e 4 della visiera. In alternativa, e per avere una visiera più rigida, può lavorare le righe della visiera con 2 capi del filato Nepal e con un uncinetto di dimensione adeguata. Buon lavoro!
11.02.2014 - 13:20
![]() Claudia wrote:
Claudia wrote:
Buongiorno, io non riesco a fare la visiera, mi sembra che con le vostre indicazioni venga troppo corta, mentre nella foto la visiera e' bella grande. Non capisco dov'è l'errore. Comunque complimenti per il,sito, e' molto bello. Grazie Claudia
08.02.2014 - 22:40DROPS Design answered:
Buongiorno Claudia, se ha seguito esattamente le indicazioni del modello la visiera dovrebbe venire come nella foto. Ci dica qual è il punto che le crea problemi. Buon lavoro!!
10.02.2014 - 14:03
![]() Zanne wrote:
Zanne wrote:
Det er altså slet ikke nok med 100 gr til den største str - mangler endnu 2 cm til jeg skal lave skyggen og er allerede tør for garn. Og jeg overholder alle mål og det hele.
12.12.2013 - 21:28
![]() Monique wrote:
Monique wrote:
Hoe gaat de overgang van de muts naar de klep. Hecht ik eerst de draad af aan het einde van de muts en start ik opnieuw bij de klep, of haak ik een half rondje door en start dan met de klep ?
27.11.2013 - 15:32DROPS Design answered:
Hoi Monique. Ik zou de draad hechten en opnieuw beginnen. Haak je een half rondje door worden de zijkanten niet gelijk. Veel plezier verder.
28.11.2013 - 14:48Elaheh wrote:
I need futher help
20.10.2013 - 19:27DROPS Design answered:
Dear Elaheh, for any assistance, please contact the store where you bought the yarn. If you buy DROPS yarn you are guaranteed to receive assistance from our retailers. Happy crocheting!
21.10.2013 - 11:43
|
|
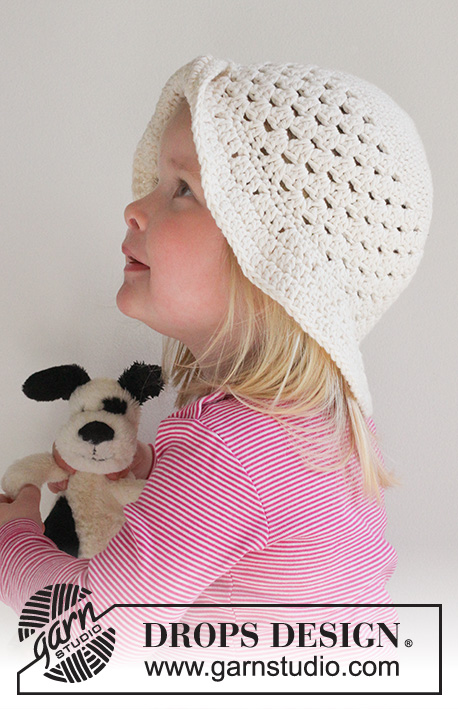
Miss Spring#missspringhat |
|
 |
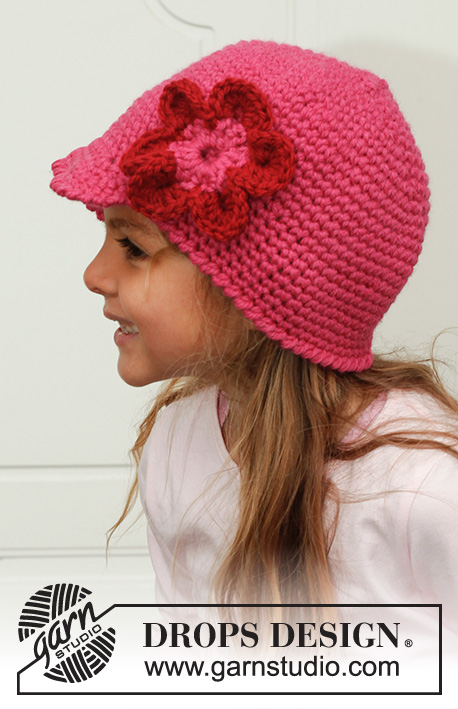 |
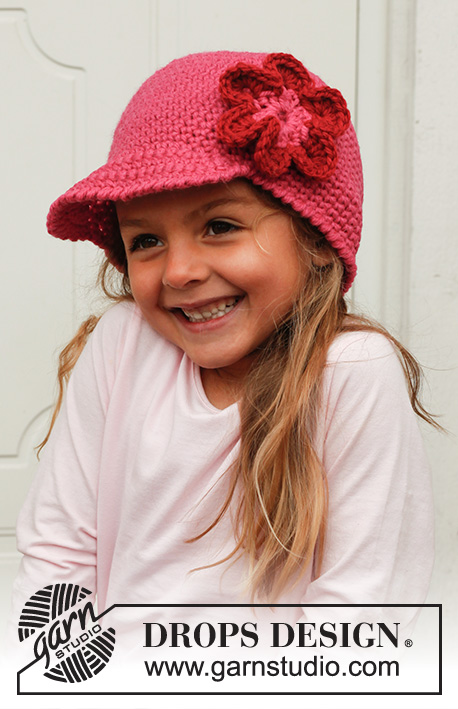
Crochet cap for children in DROPS Nepal.
DROPS Children 24-16 |
|
|
US/UK: This pattern is in US English. There are different crochet terms in British and US English. Conversion - see page 4. CROCHET INFO: Replace first sc on every round with 1 ch. Finish every round with 1 sl st in ch from beg of round. DECREASE TIP: * Insert hook in next st, get yarn *, repeat from *-* one more time, make a YO and pull yarn through all 3 sts on hook. REVERS CROCHET: Work as sc but backwards. I.e. crochet around from left to right ---------------------------------------------------------- CAP: Read US/UK above! Ch 4 on hook size 6 mm / J/10 with Nepal and form a ring with 1 sl st in 1st ch. ROUND 1: Work 6 sc in ch-ring. READ CROCHET INFO! ROUND 2: 2 sc in every sc = 12 sc. REMEMBER THE CROCHET TENSION/GAUGE! ROUND 3: * 1 sc in first sc, 2 sc in next sc *, repeat from *-* = 18 sc. ROUND 4: * 1 sc in each of the first 2 sc, 2 sc in next sc *, repeat from *-* = 24 sc. ROUND 5: * 1 sc in each of the first 3 sc, 2 sc in next sc *, repeat from *-* = 30 sc. ROUND 6: * 1 sc in each of the first 4 sc, 2 sc in next sc *, repeat from *-* = 36 sc. ROUND 7: * 1 sc in each of the first 5 sc, 2 sc in next sc *, repeat from *-* = 42 sc. ROUND 8: * 1 sc in each of the first 6 sc, 2 sc in next sc *, repeat from *-* = 48 sc. ROUND 9: * 1 sc in each of the first 7 sc, 2 sc in next sc *, repeat from *-* = 54 sc. ROUND 10: * 1 sc in each of the first 8 sc, 2 sc in next sc *, repeat from *-* = 60 sc. ROUND 11: * 1 sc in each of the first 9 sc, 2 sc in next sc *, repeat from *-* = 66 sc. ROUND 12: Work 1 sc in every sc while at the same time inc 0-2-6 sc evenly = 66-68-72 sc. ROUND 13-17: 1 sc in every sc. ROUND 18: Work 1 sc in every sc while at the same time dec 5-4-5 sc evenly = 61-64-67 sc - READ DECREASE TIP. Continue with 1 sc in every sc until hat measures 16-17-18 cm / 6 1/4"-6 3/4"-7". BRIM: Then work brim over the middle 14-16-16 sts at the front (i.e. in opposite side of beg of round) at follows: ROW 1: Work 1 sc in every sc. Turn piece. ROW 2: Work ch 1, 2 sc in first sc, 1 sc in each of the next 12-14-14 sc and 2 sc in last sc = 16-18-18 sc. Turn piece. ROW 3: Work ch 1, 3 sc in first sc, 1 sc in every sc until last sc, 3 sc in last sc, 1 sl st in the next free sc from hat edge to fasten the brim for hat = 20-22-22 sc. Turn piece. ROW 4: Work ch 1, 3 sc in first sc, 1 sc in every sc until last sc, 3 sc in last sc, 1 sl st in the next free sc from hat edge as on row 3 = 24-26-26 sc. Turn piece. ROUND 5: Work ch 1, 1 sc in every sc over the entire brim and continue around the entire hat. ROUND 6: Work REVERSE CROCHET – see explanation above, around the entire hat and the brim. Fasten off. CROCHET FLOWER: Ch 6 on hook size 6 mm / J/10 with cerise and form a ring with 1 sl st in first ch. ROUND 1: ch 2 (= first hdc), 2 hdc in ch-ring, * ch 5, 1 sc in last hdc made, 3 hdc in ch-ring *, repeat from *-* a total of 5 times and finish with 5 ch and 1 sl st in 2nd ch from beg of round = 6 ch-spaces with 3 hdc between each. Fasten off. ROUND 2: Switch to red. Work 1 sc in the middle of the first 3 hdc on round, * 10 dc in ch-space, skip 1 hdc, 1 sc in next hdc, skip 1 hdc *, repeat from *-* the entire round and finish with 1 sl st in first sc from beg of round. Fasten off. Sew the flower to the side of the cap. |
|
Have you finished this pattern?Tag your pictures with #dropspattern #missspringhat or submit them to the #dropsfan gallery. Do you need help with this pattern?You'll find 9 tutorial videos, a Comments/Questions area and more by visiting the pattern on garnstudio.com. © 1982-2026 DROPS Design A/S. We reserve all rights. This document, including all its sub-sections, has copyrights. Read more about what you can do with our patterns at the bottom of each pattern on our site. |
|


With over 40 years in knitting and crochet design, DROPS Design offers one of the most extensive collections of free patterns on the internet - translated to 17 languages. As of today we count 324 catalogues and 12290 patterns translated into English (UK/cm). 12290
We work hard to bring you the best knitting and crochet have to offer, inspiration and advice as well as great quality yarns at incredible prices! Would you like to use our patterns for other than personal use? You can read what you are allowed to do in the Copyright text at the bottom of all our patterns. Happy crafting!
Post a comment to pattern DROPS Children 24-16
We would love to hear what you have to say about this pattern!
If you want to leave a question, please make sure you select the correct category in the form below, to speed up the answering process. Required fields are marked *.