
Popular categories
Looking for a yarn?


Comments / Questions (194)
![]() Mary wrote:
Mary wrote:
Hi, I'm at the part where I fasten off and put a marker on the shoulder then work tr-groups over collar. I don't understand what this means. Also, continuing til collar is 3 1/8 in from marker on shoulder. Assembly is confusing. And I'm hoping I don't run out of yarn.
24.04.2026 - 00:11DROPS Design answered:
Dear Mary, look at this video, even if it's a knitted piece, the technique will be the same: you work the front band stitches on each front piece separately and then sew them together then along neck on back piece. Hope this can help. Happy crocheting!
24.04.2026 - 09:14
![]() Siggal wrote:
Siggal wrote:
Hi, I'm having trouble understanding the instructions for the right front piece: when it say's to work on the outermost tr groups on the shoulder- are those the one closest to the back piece or the one farthest away from the back piece?
24.05.2025 - 19:19DROPS Design answered:
Dear Siggal, outermost refers to those tr groups that are farthest away from the neck. So you work over the tr groups closest to the arm/side. This is the same as in the back; you work over the tr groups closest to the side: "do not work over the middle 4-3-4-3-3-4 tr-groups". Happy crochetting!
25.05.2025 - 13:21
![]() Helen Sykes wrote:
Helen Sykes wrote:
Given up on this pattern at row 4. Basically a 5 stitch pattern - skip 4 and crochet in stitch 5. 28 patterns for my size : 28x5 =140 leaving me with 6 yet the pattern says I should have 5 … basic error and I am very experienced in crochet (and maths!) Very disappointed.
10.03.2025 - 23:04DROPS Design answered:
Dear Mrs Sykes, to get the number of stitches work for your size work as follows: start with the first 6 sts A.1, then repeat the 5 next stitches until 10 stitches remain (26 times) and finish with the last 10 sts = that way you will have 28 repeats and 1 treble (US English) on each side. Happy crocheting
12.03.2025 - 10:33
![]() Ines Micheli wrote:
Ines Micheli wrote:
Bonjour Que veut dire mc dans le diagramme Merci
27.02.2025 - 20:12DROPS Design answered:
Bonjour Mme Micheli, voici la signification des abréviations de ce modèle: mc= maille coulée; ml = maille en l'air; ms = maille serrée; B = bride et DB = double-bride. Bon crochet!
28.02.2025 - 09:29
![]() Anja Nieuwenhuijse wrote:
Anja Nieuwenhuijse wrote:
Goedenavond, ik ben bezig met dit gilet. Nu ik bij de splitsing aangekomen ben mis ik hoe ik de toer moet eindigen bij bv het rugpand. Bij het patroon staat vermeld, starten met 5 lossen en eindigen met 1 Lisse en dubbelstokje. Moet dit nu ook en waar steek ik dan in? Ik hoop dat u antwoord hebt. Met vriendelijke groet, Anja Nieuwenhuijse
01.02.2025 - 21:24DROPS Design answered:
Dag Anja,
Je eindigt inderdaad met een losse en een dubbel stokje en je steekt het stokje in de 2 lossen die tussen de stokjes van de vorige toer zitten.
15.02.2025 - 11:39
![]() Ellen wrote:
Ellen wrote:
Die Anleitung für den Kragen bei Weste Leona kann ich nicht nachvollziehen. Es wäre vorteilhaft, wenn es dafür auch ein Video - häkeln - geben würde. Die Beschreibung ist sehr schwer zu verstehen. Ich habe alle beiden Vorterteile gehäkelt und komme nun gedanklich und optisch - Weste liegt vor mir - einfach nicht weiter. Wäre für eine Hilfe sehr dankbar.
22.11.2024 - 09:55
![]() Bea wrote:
Bea wrote:
Very pretty Thankyou Bea
12.09.2024 - 21:48
![]() Sonja wrote:
Sonja wrote:
Die Anleitung ist generell nicht sehr einfach, aber die Beschreibung zum Kragen ist absolut unverständlich, weil es nicht mal kein Bild dazu gibt.
26.08.2023 - 17:50DROPS Design answered:
Liebe Sonja, für den Kragen häkeln Sie nur die ersten Doppelstäbchen-Gruppen bis dieses Teil 8 oder 10 cm misst, dieses Bändchen häkeln Sie genauso bei beiden Vorderteilen, dann sind sie beide zusammen angenäht (letzte Reihe zusammen), und dann am Halsausschnitt bei dem Rückenteil nähen. In diesem Video zeigen wir, wie so ein Schalkragen gestrickt wird, vielleicht kann es Ihnen helfen. Viel Spaß beim häkeln!
28.08.2023 - 14:00
![]() Angelika Berndt wrote:
Angelika Berndt wrote:
Weiß nicht wieviel Luftmaschen ich für das rechte Westentasche anschauen soll. Danke
18.04.2023 - 18:49DROPS Design answered:
Liebe Frau Berndt, die Weste wird von unten nach oben in einem Stück bis Armlöcher gehäkelt, je nach der Größe häkeln Sie 189 bis 287 Luftmaschen (= 126 bis 191 fM nach der 1. Reihe) dann häkeln Sie die Diagramme wie erklärt bis die Arbeit für die Armlöcher geteilt wird, und jedes Teil wird dann bis zur Schulter separat fertig gehäkelt. Viel Spaß beim häkeln!
19.04.2023 - 07:48
![]() Angelika Berndt wrote:
Angelika Berndt wrote:
Komme mit der Anleitung der Weste für linkes und rechtes Vorderteil nicht klar. Weil keine Maschenanzahl zur Aufnahme da bei steht. Soll ich die Hälfte vom Rückenteil aufnehmen ? Oder Danke Mfg. Angelika
18.04.2023 - 16:32DROPS Design answered:
Liebe Frau Berndt, Rückenteil wird über die mittleren 10-11-12-13-15-16 D-Stb-Gruppen gehäkelt, und jedes Vorderteil über die beidseitigen 5-6-6-7-8-8 D-Stb-Gruppen. In die 2 grösseren Größe wird man für Armausschnitt abnehmen, aber nicht in die anderen Größen; dh häkeln Sie wie erklärt unter RÜCKENTEIL, dann RECHTES VORDERTEIL:; und LINKES VORDERTEIL: . Sollte ich Ihre Frage misverstehen, können Sie vielleicht dann mehr sagen, was Sie hier meinen? Danke im voraus für Ihr Verständnis. Viel Spaß beim häkeln!
18.04.2023 - 16:49
|
||||||||||||||||
Leona#leonavest |
||||||||||||||||
 |
 |
|||||||||||||||
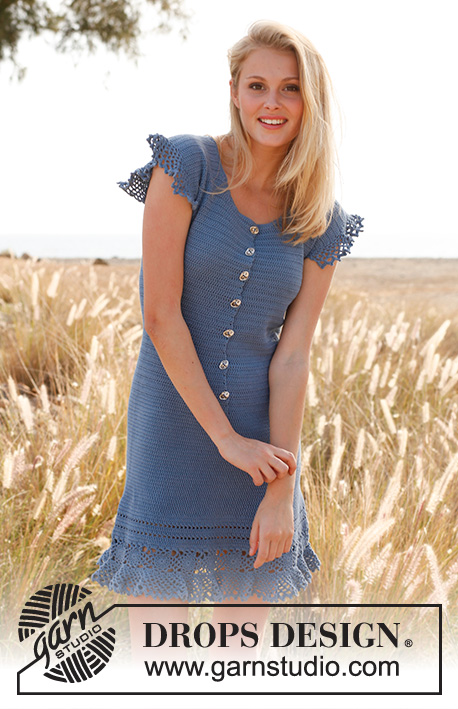
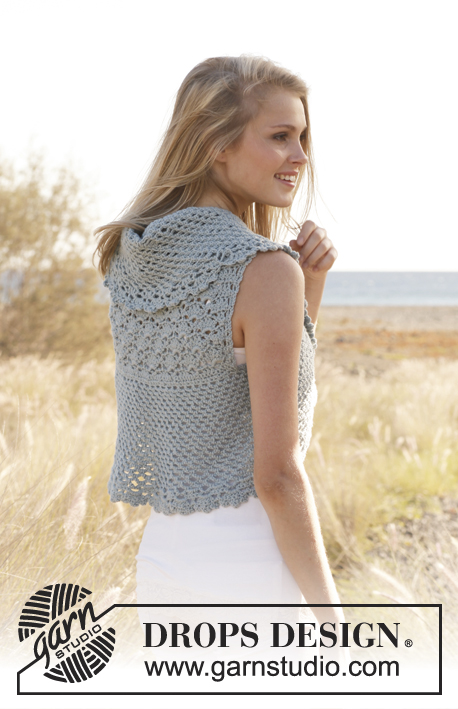
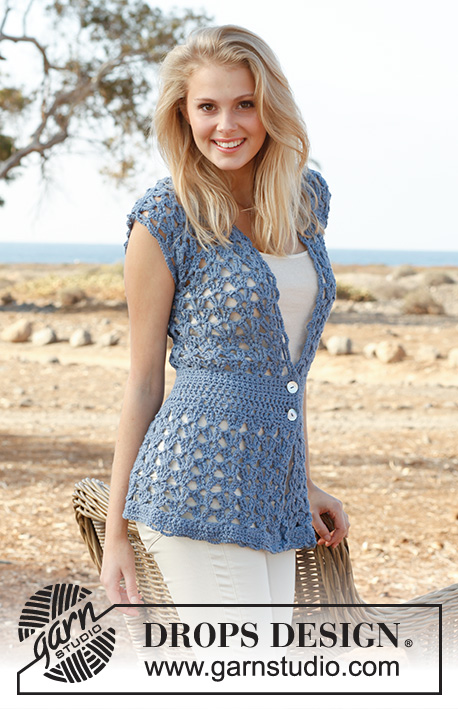
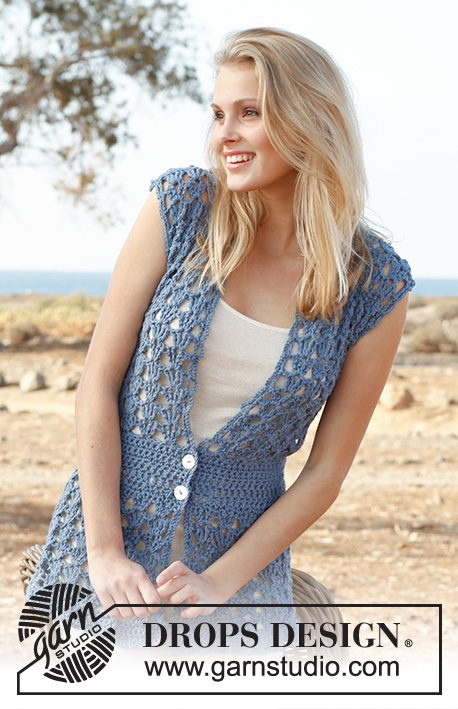
Crochet DROPS vest with fan pattern in ”Paris”. Size S-XXXL.
DROPS 145-4 |
||||||||||||||||
|
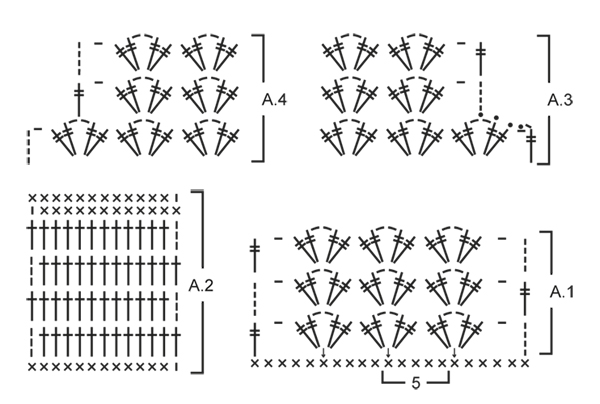
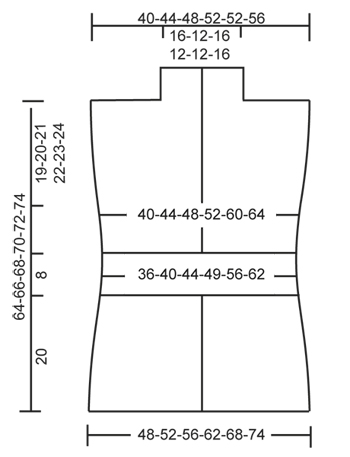
PATTERN: See diagrams A.1 and A.2 (diagrams A.3 and A.4 show dec for armhole in size XXL + XXXL). INCREASE TIP: Inc 1 dc by working 2 dc in same st. DECREASE TIP (dec 1 dc): Work 1 dc but wait with last pull through (= 2 sts on hook), then work next dc but on last pull through, pull thread through all sts on hook = 1 dc dec. ---------------------------------------------------------- VEST: Worked back and forth from mid front. Work 189-204-219-242-264-287 ch on hook size 6 mm with Paris, turn. ROW 1: 1 dc in 2nd ch from hook, * skip 1 ch, 1 dc in each of the next 2 ch *, repeat from *-* until 4-4-4-3-4-3 ch remain, skip next ch and finish with 1 dc in each of the last 3-3-3-2-3-2 ch = 126-136-146-161-176-191 dc on row, turn piece. ROW 2: 1 ch, then work 1 dc in every dc from previous row = 126-136-146-161-176-191 dc, turn piece. ROW 3: Work as 2nd row. ROW 4: Then work pattern according to diagram A.1, i.e. work 5 ch (= 1 dtr + 1 ch), * skip 4 dc, in next dc work 2 dtr + 2 ch + 2 dtr *, repeat from *-* until 5 dc remain, skip 4 dc and finish with 1 ch and 1 dtr in last dc = 24-26-28-31-34-37 dtr-groups, turn piece. ROW 5: 5 ch, in ch-loop in every dtr-group work 2 dtr + 2 ch + 2 dtr, finish row with 1 ch and 1 dtr in 4th ch on beg of previous row = 24-26-28-31-34-37 dtr-groups, turn piece. Repeat 5th row until piece measures approx. 16 cm. Work next row as follows: 4 ch (= 1 dtr), in ch-loop in the middle of every dtr-group work 2 dtr + 1 ch (instead of 2 ch) + 2 dtr, finish row with 1 dtr in 4th ch from beg of previous row = 24-26-28-31-34-37 dtr-groups, turn piece. Work 1 ch, 1 dc in same st, then work 1 dc in every dtr the entire row, finish with 1 dc in 4th ch from beg of previous row, turn piece = 98-106-114-126-138-150 dc. Continue to work as follows: ROW 1: Work pattern according to diagram A.2, i.e. work 1 ch, then work 1 dc in every dc the entire row AT THE SAME TIME dec 18-18-18-18-14-14 dc evenly – READ DECREASE TIP = 80-88-96-108-124-136 dc, turn piece. ROW 2: 3 ch (= 1 tr), then work 1 tr in every dc the entire row = 80-88-96-108-124-136 tr on row. ROW 3-5: Work as 2nd row = 80-88-96-108-124-136 tr. ROW 6: Work 1 dc in every tr AT THE SAME TIME adjust no of sts as follows: Size S + M + L + XL + XXL: Inc 5-9-5-5-5 dc evenly – READ INCREASE TIP. Size XXXL: Dec 3 sts evenly – READ DECREASE TIP = 85-97-101-113-129-133 dc, turn piece. ROW 7: 1 ch, 1 dc in same st, then work 1 dc in every dc from previous row = 85-97-101-113-129-133 dc, turn piece. ROW 8: 5 ch, * skip 3 dc, in next dc work 2 dtr + 2 ch + 2 dtr *, repeat from *-* until 4 dc remain on row, skip 3 dc and finish with 1 ch and 1 dtr in last dc on row = 20-23-24-27-31-32 dtr-groups on row, turn piece. ROW 9: Then work pattern according to diagram A.1 again, i.e. work 5 ch, in ch-loop in the middle of every dtr-group work 2 dtr + 2 ch + 2 dtr, finish row with 1 ch and 1 dtr in 4th ch on beg of previous row = 20-23-24-27-31-32 dtr-group. Repeat 9th row upwards. AT THE SAME TIME when piece measures 45-46-47-48-49-50 cm, divide for markers as follows: Insert 1 marker after 5-6-6-7-8-8 dtr-groups in from each side (= 10-11-12-13-15-16 dtr-groups between markers on back piece). Finish each part separately. BACK PIECE: = 10-11-12-13-15-16 dtr-groups. Continue back and forth with dtr-groups as shown in A.1. AT THE SAME TIME on 1st row dec for armholes in each side in size XXL + XXXL as follows: Dec 1 dtr-group on beg of row as shown in A.3, work as before until 1 dtr-group remains on row, finish row as shown in A.4 (do not dec in the other sizes) = 10-11-12-13-13-14 dtr-groups remain on row. Continue pattern back and forth until 1 row remains before piece measures 64-66-68-70-72-74 cm. Now work 1 row with dtr-groups only over the outermost 3-4-4-5-5-5 dtr-groups in the one side of piece: 5 ch, * in ch-loop in the middle of next dtr-group work 2 dtr + 2 ch + 2 dtr *, repeat from *-* 3-4-4-5-5-5 times in total, finish with 1 dtr in last dtr in same dtr-group, turn piece. Now work 1 row dc as follows: 1 ch, 1 dc in same st, * 1 dc in each of the first 2 dtr, 1 dc in ch-loop in the middle of dtr-group, 1 dc in each of the next 2 dtr *, repeat from *-* 3-4-4-5-5-5 times in total, finish with 1 dc in last ch and 1 dc in 4th ch from beg of previous row = 18-23-23-28-28-28 dc on row. Cut and fasten the thread. Repeat on the other shoulder (i.e. do not work over the middle 4-3-4-3-3-4 dtr-groups = neck.) RIGHT FRONT PIECE: = 5-6-6-7-8-8 dtr-groups. Continue back and forth with dtr-groups as on back piece. AT THE SAME TIME on 1st row dec for armhole in the side in size XXL + XXXL as shown in A.4 (do not dec in the other sizes) = 5-6-6-7-7-7 dtr-groups. Continue pattern back and forth until piece measures approx. 64-66-68-70-72-74 cm – adjust so that same no of rows with dtr-groups has been worked as on back piece. Now work 1 row dc as on back piece only over the outermost 3-4-4-5-5-5 dtr-groups on shoulder (i.e. do not work over the 2 dtr-groups towards the neck = collar) = 18-23-23-28-28-28 dc. Cut and fasten the thread. Insert 1 marker on the shoulder. Now work dtr-groups back and forth over collar as follows: 5 ch, in ch-loop in first dtr-group work 2 dtr + 2 ch + 2 dtr, in ch-loop in next dtr-group work 2 dtr + 2 ch + 2 dtr, work 1 ch and finish with 1 dtr in last dtr in same dtr-group. Continue back and forth like this until collar measures approx. 10-8-10-8-8-10 cm from marker on shoulder. Then work 1 row dc as follows: 1 ch, 1 dc in same st, 1 dc in next ch, 1 dc in each of the first 2 dtr, 1 dc in ch-loop in the middle of dtr-group, 1 dc in each of the next 2 dtr *, repeat from *-* 2 times in total, finish with 1 dc in last ch and 1 dc in 4th ch from beg of previous row = 14 dc, cut the thread. LEFT FRONT PIECE: Work as right front piece but reversed. When dec for armhole in size XXL + XXXL, dec 1 dtr-group as shown in A.3. ASSEMBLY: Sew shoulder seams edge to edge to avoid a chunky seam. Sew collar tog mid back (sew edge to edge) and sew it on to neck line at the back of neck. Sew on buttons on right front piece – see picture. Button through the crochet edge explained below. CROCHET EDGE: Work a finishing edge around the entire opening on vest and around both armholes as follows: 1 dc in first st, * 5 ch, skip approx. 2½ cm, 1 dc in next st/loop *, repeat from *-* the entire round and finish with 5 ch and 1 sl st in dc from beg of round. |
||||||||||||||||
Diagram explanations |
||||||||||||||||
|
||||||||||||||||
 |
||||||||||||||||
 |
||||||||||||||||
Have you finished this pattern?Tag your pictures with #dropspattern #leonavest or submit them to the #dropsfan gallery. Do you need help with this pattern?You'll find 8 tutorial videos, a Comments/Questions area and more by visiting the pattern on garnstudio.com. © 1982-2026 DROPS Design A/S. We reserve all rights. This document, including all its sub-sections, has copyrights. Read more about what you can do with our patterns at the bottom of each pattern on our site. |
||||||||||||||||


With over 40 years in knitting and crochet design, DROPS Design offers one of the most extensive collections of free patterns on the internet - translated to 17 languages. As of today we count 324 catalogues and 12290 patterns translated into English (UK/cm). 12290
We work hard to bring you the best knitting and crochet have to offer, inspiration and advice as well as great quality yarns at incredible prices! Would you like to use our patterns for other than personal use? You can read what you are allowed to do in the Copyright text at the bottom of all our patterns. Happy crafting!
Post a comment to pattern DROPS 145-4
We would love to hear what you have to say about this pattern!
If you want to leave a question, please make sure you select the correct category in the form below, to speed up the answering process. Required fields are marked *.