
Popular categories
Looking for a yarn?


Comments / Questions (196)
![]() Karen Bredenhann wrote:
Karen Bredenhann wrote:
What type of wool is this, eg DK, chunky, Aran? This brand of wool is not available in South Africa and I need to know the thickness so I can search for the closest substitute. Thank you so much.
17.06.2019 - 20:05DROPS Design answered:
Dear Mrs Bredenhann, you will find all informations about our yarns here and find all DROPS stores shipping worldwide here 18.06.2019 - 08:32
![]() Corinna wrote:
Corinna wrote:
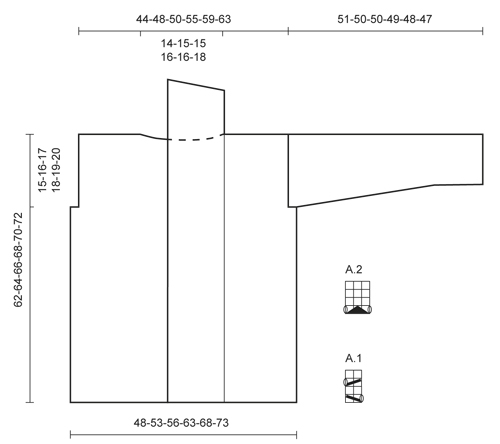
Liebes DROPS Team, Leider haben Sie meine Frage damit nicht beantwortet. Dass das Rückenteil 56cm hat sehe ich. Ich möchte wissen welche Breite das Vorderteil hat oder die Gesamtbreite, da die Jacke ja in einem gestrickt wird. Vielen Dank Corinna
30.05.2019 - 08:07DROPS Design answered:
Liebe Corinna, die Breite gilt ja nur für die Breite der Jacke (mehr Maßen haben wir nicht) - wenn die Jacke flach liegt - wenn sie getragen wird, sieht es aus ungefär wie im Foto. Hier lesen Sie mehr über Maßen. Viel Spaß beim stricken!
31.05.2019 - 09:25
![]() Corinna wrote:
Corinna wrote:
Hallo, wieviel cm hat die Jacke über die gesamte Breite in L? Die Schemazeichnung sagt 56cm für das Rückenteil. Wie breit ist ein Vorderteil? Vielen Dank.
24.05.2019 - 22:59DROPS Design answered:
Liebe Corinna, in L ist die Breite 56 cm, und die Länge ist 66 cm. Hier lesen Sie mehr über die Maßskizze. Viel Spaß beim stricken!
27.05.2019 - 13:22
![]() Giuliana wrote:
Giuliana wrote:
Vorrei sapere se posso lavorare con ferri normali e non circolari?
19.05.2019 - 15:41DROPS Design answered:
Buongiorno Giuliana. Il cardigan è lavorato avanti e indietro, può quindi essere lavorato con i ferri dritti. I ferri circolari vengono suggeriti per via nel numero elevato di maglie. Potrebbe essere utile lavorare il dietro separatamente dai davanti. Per un aiuto più personalizzato, può rivolgersi al suo rivenditore Drops di fiducia. Buon lavoro!
19.05.2019 - 16:12
![]() Elke wrote:
Elke wrote:
Hallo, benutze ich wenn ich das Modell Nathalie mit dem Garn Paris stricke trotzdem Nadelstärke 6? Andere Modelle mit dem Garn Paris werden mit Nadelstärke 5 gestrickt. Grüße Elke
08.04.2019 - 12:36DROPS Design answered:
Liebe Elke, hier muss Ihre Maschenprobe 16 M x 20 R glatt rechts sein, dh Sie brauchen Nadelgröße 6 oder die Nadelgröße anpassen, damit die Maschenprobe stimmt. Mit Nadeln 5 mm bekommt man normaleweise 17 M x 22 Reihe. Viel Spaß beim stricken!
08.04.2019 - 14:02Meghavarshini wrote:
Reply to question: Dear Mrs Meghavarshini, piece is worked bottom up in one piece up to armholes starting on mid front. The 170 sts include the front band sts worked in lace pattern on each side. You will have 76 sts for back piece (= approx. 48 cm) and 47 sts for each front piece. Happy knitting! Surely you mean 70sts? 76sts is for size M
17.08.2018 - 12:02DROPS Design answered:
Dear Mrs Meghavarshini, you have 76 sts for the back piece between markers and 70 sts for back piece after the sts for armholes have been cast off (size S). Happy knitting!
17.08.2018 - 14:51Meghavarshini wrote:
Hello. I noticed that the measurements for the size small are 96cm. According to the tension mentioned here, that should be about 153-154 stitches. But I see that the CO instructions are for 170 stitches. How do the extra stitches help? Do they make the pattern more roomy, account for shrinkage, or serve some other purpose?
16.08.2018 - 19:56DROPS Design answered:
Dear Mrs Meghavarshini, piece is worked bottom up in one piece up to armholes starting on mid front. The 170 sts include the front band sts worked in lace pattern on each side. You will have 76 sts for back piece (= approx. 48 cm) and 47 sts for each front piece. Happy knitting!
17.08.2018 - 11:08Stanislava wrote:
Dobrý deň, z plánu neviem vycitat aká je šírka trupu v cm pri veľkosti L. Ďakujem za potvrdenie
15.04.2018 - 18:00DROPS Design answered:
Dobrý den, Stanislavo, šířka trupu u velikosti L je 56 cm, obvod (zadní díl + přední díly) je 112 cm, ale légy na předních dílech se překrývají. Tyto míry berte jako orientační - svetr je ležérní, volný. Hodně zdaru!
11.06.2018 - 20:39
![]() Stanka wrote:
Stanka wrote:
Dobrý deň, z plánu neviem vycitat aká je šírka trupu pri veľkosti L.
15.04.2018 - 14:31
![]() Nancy wrote:
Nancy wrote:
Pattern A2 are there 3 stockentette rows after the slip 1 st as if to K, K 2 tog, psso row? Also, the garter hem keeps flipping up. Is there anything, short of starting over, to get it to stay flat? Thanks
12.09.2017 - 00:24DROPS Design answered:
Dear Nancy, it's correct about A.2, diagram is worked over 3 sts and 4 rows: 1 row with holes, 3 rows stockinette. When jacket is done, you can block it to make it flat with pins. Happy knitting!
12.09.2017 - 08:39
|
||||||||||||||||
Nathalie#nathaliecardigan |
||||||||||||||||
 |
 |
|||||||||||||||
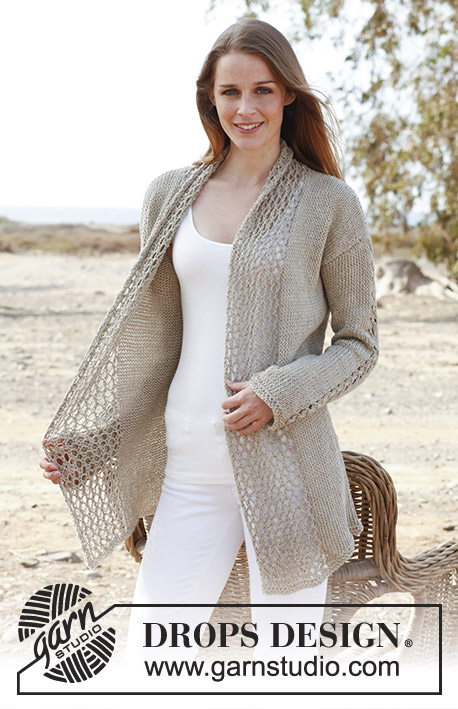
Knitted DROPS jacket in "Bomull Lin" or "Paris". Size: S - XXXL.
DROPS 146-1 |
||||||||||||||||
|
GARTER ST: K back and forth on all rows. 1 ridge = 2 rows K. PATTERN: See diagrams A.1 and A.2. Diagrams show all rows in 1 pattern repetition seen from RS. INCREASE TIP: Inc 1 st by making 1 YO, on next row work YO twisted (i.e. work in the back loop of st instead front) to avoid holes. -------------------------------------------------------- BODY: Worked back and forth on circular needle from mid front. Loosely cast on 170-184-196-218-234-248 sts on circular needle size 6 mm with Bomull-Lin. Work 4 rows in garter st - read explanation above. Work next row (= RS) as follows: 1 edge st in garter st, work A.1 9-9-9-10-10-10 times in total (= 19-19-19-21-21-21 sts on right band), work in stocking st until 19-19-19-21-21-21 sts remain, work A.1 9-9-9-10-10-10 times in total, finish with 1 edge st in garter st (= 19-19-19-21-21-21 sts on left band). Continue with A.1 on band in each side and in stocking st over the middle sts. REMEMBER THE KNITTING TENSION! When piece measures 47-48-49-50-51-52 cm, insert 2 markers; 47-50-53-59-63-66 sts in from each side (= 76-84-90-100-108-116 sts between markers on back piece). On next row cast off 3-4-5-6-7-8 sts for armholes on each side of both markers (= 6-8-10-12-14-16 cast off sts in each side). Now divide the piece and finish each part separately. BACK PIECE: = 70-76-80-88-94-100 sts. Continue in stocking st with 1 edge st in garter st in each side until piece measures 60-62-64-66-68-70 cm. Then cast off the middle 20-22-22-24-24-26 sts for neck and finish each shoulder separately. Continue to cast off 1 st on next row from neck = 24-26-28-31-34-36 sts remain on the shoulder. Cast off when piece measures 62-64-66-68-70-72 cm. LEFT FRONT PIECE: = 44-46-48-53-56-58 sts. Continue in stocking st with 1 edge st in garter st in the side and 19-19-19-21-21-21 band sts mid front until piece measures 62-64-66-68-70-72 cm. On beg of next row from RS cast off the first 24-26-28-31-34-36 sts for shoulder = 20-20-20-22-22-22 sts remain on band. Continue with A.1 with 1 edge st in garter st in each side until band measures 9-10-10-10-10-11 cm from shoulder. At the beg of the next 3 rows from RS cast off the first 5 sts = 5-5-5-7-7-7 sts remain. Loosely cast off these sts on next row from RS. RIGHT FRONT PIECE: Work as left front piece but reversed. SLEEVE: Worked back and forth on needle. Loosely cast on 35-37-39-39-41-43 sts and work 4 rows in garter st. Work next row (= RS) as follows: 1 edge st in garter st, K 15-16-17-17-18-19, work A.2 over the next 3 sts, K 15-16-17-17-18-19, finish with 1 edge st in garter st. Continue in stocking st with A.2 over the middle 3 sts until finished measurements. When piece measures 8 cm, inc 1 st inside 1 edge st in each side - Read INCREASE TIP above. Repeat inc every 6½-5½-4½-4-3½-3½ cm 6-7-8-9-10-10 more times (7-8-9-10-11-11 times in total) = 49-53-57-59-63-65 sts. When piece measures 49-48-47-45-44-42 cm, insert a marker in each side of sleeve (for assembly). When piece measures 51-50-50-49-48-47 cm (shorter measurements in the larger sizes because of broader shoulder width), loosely cast off all sts. ASSEMBLY: Sew shoulder seams inside cast off edges. Sew cast off edge on bands tog, WS against WS. Sew bands along neckline in the back of neck. Sew in sleeves, sew sleeve seams inside 1 edge st - NOTE: The section worked after the marker at the top of sleeve, should fit the cast off for armhole. |
||||||||||||||||
Diagram explanations |
||||||||||||||||
|
||||||||||||||||
 |
||||||||||||||||
Have you finished this pattern?Tag your pictures with #dropspattern #nathaliecardigan or submit them to the #dropsfan gallery. Do you need help with this pattern?You'll find 24 tutorial videos, a Comments/Questions area and more by visiting the pattern on garnstudio.com. © 1982-2026 DROPS Design A/S. We reserve all rights. This document, including all its sub-sections, has copyrights. Read more about what you can do with our patterns at the bottom of each pattern on our site. |
||||||||||||||||


With over 40 years in knitting and crochet design, DROPS Design offers one of the most extensive collections of free patterns on the internet - translated to 17 languages. As of today we count 325 catalogues and 12298 patterns translated into English (UK/cm). 12298
We work hard to bring you the best knitting and crochet have to offer, inspiration and advice as well as great quality yarns at incredible prices! Would you like to use our patterns for other than personal use? You can read what you are allowed to do in the Copyright text at the bottom of all our patterns. Happy crafting!
Post a comment to pattern DROPS 146-1
We would love to hear what you have to say about this pattern!
If you want to leave a question, please make sure you select the correct category in the form below, to speed up the answering process. Required fields are marked *.