
Popular categories
Looking for a yarn?


Comments / Questions (196)
![]() Kathie wrote:
Kathie wrote:
And confirming - for the right and left band sections of A1, I should always count off 19 stitches, correct? Thx.
27.05.2024 - 16:32DROPS Design answered:
Dear Kathie, yes, since in the pattern for each decrease there is an accompaniying yarnover, the stitchnumber of the patterned band will not change. Happy Knitting!
27.05.2024 - 18:50
![]() Kathie wrote:
Kathie wrote:
Wow thank you for the quick reply! Very much appreciated! Kindly, Kathie
26.05.2024 - 20:17
![]() Kathie wrote:
Kathie wrote:
Question: I have done the 4 rows in garter stitch. Now ready for the sentence “ Work next row”…. I don’t understand how to do the A1 pattern. I understand the stitches needed, but how? Is one row all “slip 1 st as if to K, K1, psso” then the next row all K2 tog? And why is there a blank row (of two squares) in the A1 diagram? Finally, the little circle in the A1 diagram — does that mean I need to 1 YO in between 2 sts? Thanks for your help!
26.05.2024 - 19:47DROPS Design answered:
Dear Kathie, A one, is one row is *SSK, YO*, second row (the "blank row") is purl, the 3d row is *YO K2TOG*, 4th row is purl. It would be helpful, if you spend a little time with THIS tutorial on how to read knitting diagrams. Happy Knitting!
26.05.2024 - 19:59
![]() France wrote:
France wrote:
DEVANT GAUCHE = 48 m. Continuer jersey avec 1 m lis au point mousse sur le côté et 19 m de bordure jusqu'à 66 cm. Au rang suivant, rabattre les 28 premières m pour l'épaule =20 m de bordure. Continuer A.1 jusqu'à ce que la bordure mesure 10 cm à partir de l'épaule. Je ne comprends pas (Au début des 3 rgs suiv sur l'end.,rabattre les 5 premières m = il reste 5m.) On rabat seulement côté épaule pas au début de la bordure ?
18.05.2024 - 02:18DROPS Design answered:
Bonjour France, tout à fait, lorsque l'on a tricoté la bordure sur 10 cm, on va rabattre au début de chacun des 3 rangs suivants sur l'endroit (pour le devant gauche, ce sont les rangs qui commencent par le devant/côté épaule et qui se terminent par le côté encolure); autrement dit, vous rabattez 3 fois 5 mailles tous les 2 rangs (tous les rangs sur l'endroit). Le col sera ainsi plus joli. Bon tricot!
21.05.2024 - 12:12
![]() Colleen wrote:
Colleen wrote:
For the A.1 band: I placed a stitch marker at 19 stitches on both sides of the back. I am knitting the stockinette stitch between. The A.1 pattern are decreases, right? It doesn't look like the band decreases in the pic. So I moved the stitch marker so that the band stays the same and now I'm using up 19 stitches in between the bands. Is that correct? I love that pattern, but the instructions are very confusing.
29.07.2023 - 04:08DROPS Design answered:
Hi Colleen, diagram A.1 has the same number of stitches. There are decreases in A.1 but they are always compensated by yarn overs. Put your marker before/after 19 stitches for the front bands to make sure you do diagram right. Happy knitting!
29.07.2023 - 11:15
![]() Lena wrote:
Lena wrote:
Sorry Fann dom 😜👍
01.06.2023 - 11:01
![]() Lena wrote:
Lena wrote:
Var är diagrammen till tröjan 🤬
01.06.2023 - 10:29DROPS Design answered:
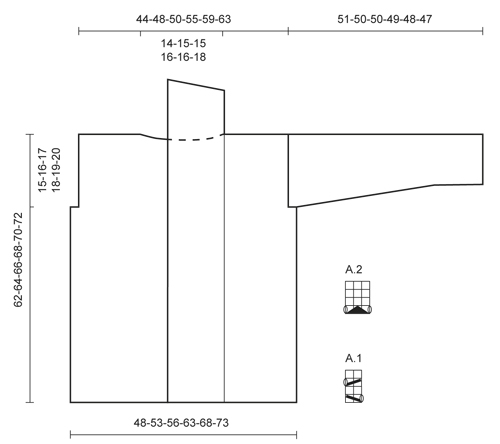
Hej Lena, du finder diagrammerne til højre for måleskitsen nederst i opskriften :)
01.06.2023 - 15:03
![]() Sabine Weiss wrote:
Sabine Weiss wrote:
Hallo den Rückenteil muss ich den 2x stricken. Bin ein bisschen überfordert. Und dann bei den Rumpfteil wen der fertig ist den oder die Teile zusammenstricken. Lg Sabine
07.04.2023 - 17:14DROPS Design answered:
Liebe Sabine. Zuerst wird das Rumpfteil (Rücken und Vorderteil) bis zu den Armausschnitten gestrickt, dann werden Vorder- und Rückseite getrennt gehäkelt, bis die Maße beendet sind. Viel Spass beim stricken
09.04.2023 - 12:02
![]() Michelle wrote:
Michelle wrote:
Where are the charts for this pattern? I've bought the wool but the pattern no longer has the charts for the lace work!! It mentions A1 & A2 at the top then gives the key further down but then jumps to the dimensions diagram. Please can you provide the charts asap Thanks
18.01.2023 - 17:59DROPS Design answered:
Dear Michelle, you will find diagrams A.1 and A.2 on the right side of measurement chart, below the sleeve, they are small diagrams over 2 sts and 4 rows for A.1 and 3 sts and 4 rows for A.2. Happy knitting!
19.01.2023 - 10:08
![]() Seila wrote:
Seila wrote:
Salve ho fatto il campione seguendo il diagramma A1, ma ho notato che la lavorazione risulta differente rispetto alla foto della modella che indossa il maglione. Sembrerebbe un punto rete, mentre a me viene un punto regolare a file.... Dove sbaglio?
18.05.2022 - 19:51DROPS Design answered:
Buonasera Seila, cosa intende per punto regolare? Ha provato a bloccare il lavoro per aprire bene il punto? Buon lavoro!
18.05.2022 - 22:20
|
||||||||||||||||
Nathalie#nathaliecardigan |
||||||||||||||||
 |
 |
|||||||||||||||
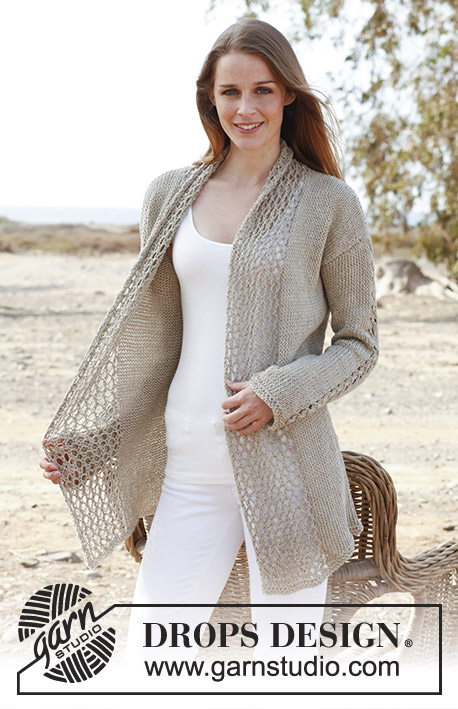
Knitted DROPS jacket in "Bomull Lin" or "Paris". Size: S - XXXL.
DROPS 146-1 |
||||||||||||||||
|
GARTER ST: K back and forth on all rows. 1 ridge = 2 rows K. PATTERN: See diagrams A.1 and A.2. Diagrams show all rows in 1 pattern repetition seen from RS. INCREASE TIP: Inc 1 st by making 1 YO, on next row work YO twisted (i.e. work in the back loop of st instead front) to avoid holes. -------------------------------------------------------- BODY: Worked back and forth on circular needle from mid front. Loosely cast on 170-184-196-218-234-248 sts on circular needle size 6 mm with Bomull-Lin. Work 4 rows in garter st - read explanation above. Work next row (= RS) as follows: 1 edge st in garter st, work A.1 9-9-9-10-10-10 times in total (= 19-19-19-21-21-21 sts on right band), work in stocking st until 19-19-19-21-21-21 sts remain, work A.1 9-9-9-10-10-10 times in total, finish with 1 edge st in garter st (= 19-19-19-21-21-21 sts on left band). Continue with A.1 on band in each side and in stocking st over the middle sts. REMEMBER THE KNITTING TENSION! When piece measures 47-48-49-50-51-52 cm, insert 2 markers; 47-50-53-59-63-66 sts in from each side (= 76-84-90-100-108-116 sts between markers on back piece). On next row cast off 3-4-5-6-7-8 sts for armholes on each side of both markers (= 6-8-10-12-14-16 cast off sts in each side). Now divide the piece and finish each part separately. BACK PIECE: = 70-76-80-88-94-100 sts. Continue in stocking st with 1 edge st in garter st in each side until piece measures 60-62-64-66-68-70 cm. Then cast off the middle 20-22-22-24-24-26 sts for neck and finish each shoulder separately. Continue to cast off 1 st on next row from neck = 24-26-28-31-34-36 sts remain on the shoulder. Cast off when piece measures 62-64-66-68-70-72 cm. LEFT FRONT PIECE: = 44-46-48-53-56-58 sts. Continue in stocking st with 1 edge st in garter st in the side and 19-19-19-21-21-21 band sts mid front until piece measures 62-64-66-68-70-72 cm. On beg of next row from RS cast off the first 24-26-28-31-34-36 sts for shoulder = 20-20-20-22-22-22 sts remain on band. Continue with A.1 with 1 edge st in garter st in each side until band measures 9-10-10-10-10-11 cm from shoulder. At the beg of the next 3 rows from RS cast off the first 5 sts = 5-5-5-7-7-7 sts remain. Loosely cast off these sts on next row from RS. RIGHT FRONT PIECE: Work as left front piece but reversed. SLEEVE: Worked back and forth on needle. Loosely cast on 35-37-39-39-41-43 sts and work 4 rows in garter st. Work next row (= RS) as follows: 1 edge st in garter st, K 15-16-17-17-18-19, work A.2 over the next 3 sts, K 15-16-17-17-18-19, finish with 1 edge st in garter st. Continue in stocking st with A.2 over the middle 3 sts until finished measurements. When piece measures 8 cm, inc 1 st inside 1 edge st in each side - Read INCREASE TIP above. Repeat inc every 6½-5½-4½-4-3½-3½ cm 6-7-8-9-10-10 more times (7-8-9-10-11-11 times in total) = 49-53-57-59-63-65 sts. When piece measures 49-48-47-45-44-42 cm, insert a marker in each side of sleeve (for assembly). When piece measures 51-50-50-49-48-47 cm (shorter measurements in the larger sizes because of broader shoulder width), loosely cast off all sts. ASSEMBLY: Sew shoulder seams inside cast off edges. Sew cast off edge on bands tog, WS against WS. Sew bands along neckline in the back of neck. Sew in sleeves, sew sleeve seams inside 1 edge st - NOTE: The section worked after the marker at the top of sleeve, should fit the cast off for armhole. |
||||||||||||||||
Diagram explanations |
||||||||||||||||
|
||||||||||||||||
 |
||||||||||||||||
Have you finished this pattern?Tag your pictures with #dropspattern #nathaliecardigan or submit them to the #dropsfan gallery. Do you need help with this pattern?You'll find 24 tutorial videos, a Comments/Questions area and more by visiting the pattern on garnstudio.com. © 1982-2026 DROPS Design A/S. We reserve all rights. This document, including all its sub-sections, has copyrights. Read more about what you can do with our patterns at the bottom of each pattern on our site. |
||||||||||||||||


With over 40 years in knitting and crochet design, DROPS Design offers one of the most extensive collections of free patterns on the internet - translated to 17 languages. As of today we count 325 catalogues and 12298 patterns translated into English (UK/cm). 12298
We work hard to bring you the best knitting and crochet have to offer, inspiration and advice as well as great quality yarns at incredible prices! Would you like to use our patterns for other than personal use? You can read what you are allowed to do in the Copyright text at the bottom of all our patterns. Happy crafting!
Post a comment to pattern DROPS 146-1
We would love to hear what you have to say about this pattern!
If you want to leave a question, please make sure you select the correct category in the form below, to speed up the answering process. Required fields are marked *.