
Popular categories
Looking for a yarn?


Comments / Questions (89)
![]() Brigitte Beier wrote:
Brigitte Beier wrote:
Da heisst es am Anfang.....damit der Pullover im Nacken höher wird ...... 8 M. nach der Markierung stricken, wenden, den Faden fest anziehen und 16 M. zurückstricken. Sind damit verkürzte Reihen gemeint ? Also den Faden VOR die Masche legen, es entsteht eine Doppelmasche ? Ich möchte es hinten gar nicht so hoch hab en, lieber vorn etwas tiefer als hinten. Ist das damit gemeint ? Vielen Dank.
23.02.2023 - 11:41DROPS Design answered:
Liebe Frau Beier, ja genau, verkürzten Reihen werden hier gestrickt, dieses Video zeigt, wie solche verkürzten Reihen gestrickt werden - gerne können Sie auch mit dem sog. Doppemmasche stricken. Es sind insgesamt 8 verkürzten Reihen = ca 3 cm hoch. Veil Spaß beim stricken!
23.02.2023 - 14:36
![]() Hannelore wrote:
Hannelore wrote:
Vielen Dank für die schnelle Antwort. Ich war mir nur unsicher, weil in der Anleitung steht: in der nächsten Runde die Umschläge rechts verschränkt Stricken. VG
20.10.2022 - 14:32
![]() Hannelore wrote:
Hannelore wrote:
Die Zunahme habe ich verstanden, aber wie werden die Maschen in das Perlmuster integriert? Wie stricke ich vor und nach der Markierung weiter? Das Muster ist dann nicht fortlaufend, oder habe ich einen Denkfehler?
20.10.2022 - 09:13DROPS Design answered:
Liebe Hannelore, das Muster soll sich in der Breite vergrössern, dh die Zunahme vor dem Perlmuster stricken Sie wie die vorrige Masche : wenn Sie 2 rechte Maschen am Anfang stricken sollen, wird die Zunahme davor links gestrickt, und die Zunahme vor den Raglanmaschen stricken Sie wie ein neues Muster: wenn Sie mit 2 rechte Maschen enden, wird die Zunahme links gestrickt. Viel Spaß beim stricken!
20.10.2022 - 10:16
![]() Martine BERTRAND wrote:
Martine BERTRAND wrote:
Bonjour, sur le modèle Paulina, je n'arrive pas a faire ma ré-hausse pour l'encolure dos. Y a t il une technique spéciale , car ce n'est pas beau ça me fait un trou! faut il tricoter ou non la 1ere maille au rang retour? Merci pour votre réponse, votre aide nous est toujours très précieuse. MB
15.08.2022 - 16:05DROPS Design answered:
Bonjour Mme Bertrand, vous pouvez serrer la 1ère maille au début du rang, comme dans la technique de base des rangs raccourcis ou bien utiliser la technique des mailles enveloppées: sur l'endroit et sur l'envers. Bon tricot!
16.08.2022 - 08:14
![]() Linn Thörnvall wrote:
Linn Thörnvall wrote:
Hejsan! Jag har precis börjat sticka detta fantastiska mönster. Jag har gjort första ökningen till raglan men där har jag fastnat. Det står att jag ska "upprepa ökningen på varje v 7 ggr" men jag får inte ihop det med hur ökningstipset är. Där ska jag göra 1 omslag, sticka 2 rm (markören sitter mitt emellan dessa m) och sedan göra 1 omslag. Hur går det ihop när jag ska göra så på varje varv? Kan man sticka ett omslag tillsammans med en annan maska? Mvh, Linn
04.07.2022 - 21:58DROPS Design answered:
Hej Linn, jo det stemmer, men du skall inte sticka dom tillsammans. När du är på nästa varv, stickar du omsaget vridet räta och sedan gör du ett nytt omslag, dvs att omslaget alltid skall vara på varje sida om de 2 räta maskor :)
05.07.2022 - 08:52
![]() Gerda Højer wrote:
Gerda Højer wrote:
Jeg har strikket denne model i str. 7/8, hvor I angiver 350 g , men selv om jeg strikkede i den angivne garntype, måtte jeg bestille 1 nøgle garn mere, dvs 400 g. I skulle måske rette garnmængden til 400 g
18.11.2021 - 14:30
![]() Marion wrote:
Marion wrote:
Hallo, ik brei maat 9/10 jaar.Ik heb een probleem met het aantal steken voor de mouw:dus in het begin heb ik 34 st voor voor-en rugpand, daarna 14 st voor de mouwen.Dit geteld tussen de markeerders.Daarna moet ik elke naald 10x 1 st meerderen en nog eens 14x elke 2e naald. Dat zijn in totaal 20+ 28 st totaal tussen de markeerders.Ik spreek over het mouwgedeelte. Bij het voltooien van de meerderingen, moet ik tussen de markeerders 64 st op een draad zetten, ik kom echter aan 62 st : 14+20+28
06.11.2021 - 08:11DROPS Design answered:
Dag Marion,
Je maakt eerst een meerdering voor de raglan op iedere naald zoals uitgelegd, dan herhaal je het meerderen op elk e naald 10 keer, dus in totaal 11 keer, daarna meerder je om de naald 14 keer. Het zijn dus 14+22+28 steken.
11.11.2021 - 07:53
![]() Marion wrote:
Marion wrote:
Hallo! Bij het eerste deel A1 breien: de 8 á 9 cm breien , gemeten van middenvoor, is dit inclusief de halsboord? Dank u voor het antwoorden.
02.11.2021 - 10:20DROPS Design answered:
Dag Marion,
Ja, dit is inclusief de halsboord, dus vanaf de opzetrand.
02.11.2021 - 17:06
![]() Silvia wrote:
Silvia wrote:
Danke für Ihre Antwort. Wie das mit dem Diagramm funktioniert, ist mir durchaus bekannt. Ich bin jedoch irritiert von den Maßen. Diese sind doch viel zu groß? Wenn ich einen handelsüblichen Pullover meiner Tochter in Gr. 128 ausmesse, erhalte ich eine einfache Brustweite von 34 cm. Das wäre noch kleiner als die Angabe für 3-4 Jahre hier. Und in die größte Größe hier würde sogar ich reinpassen. Für eine Info wäre ich dankbar!
03.09.2021 - 08:11
![]() Silvia wrote:
Silvia wrote:
Hallo! Gibt es irgendwo Zentimeter-Maße zu diesem Pullover? Ich bin unschlüssig, welche Größe ich meiner sehr schmalen Tochter stricken soll und würde mich gerne an den Maßen orientieren. Vielen Dank!
02.09.2021 - 17:51DROPS Design answered:
Liebe Silvia, messen Sie einen ähnlichen Pullover sie hat und gerne trägt, und vergleichen Sie diese Maßen mit den in der Skizze, so finden Sie die beste passende Größe - hier lesen Sie mehr. Viel Spaß beim stricken!
03.09.2021 - 07:17
|
|||||||
Paulina#paulinasweater |
|||||||
|
|
|||||||
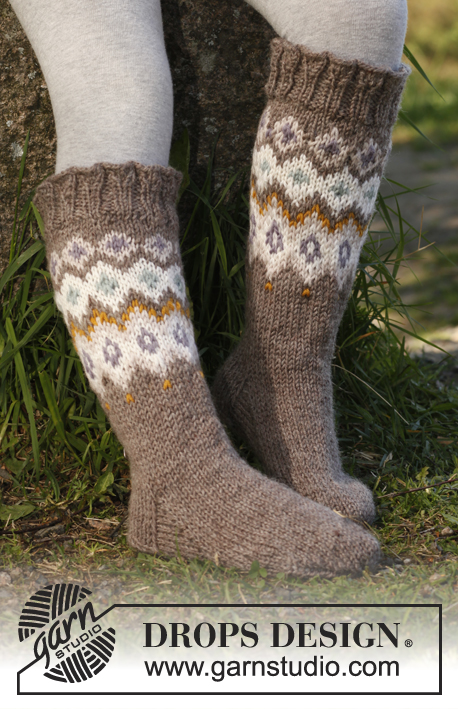
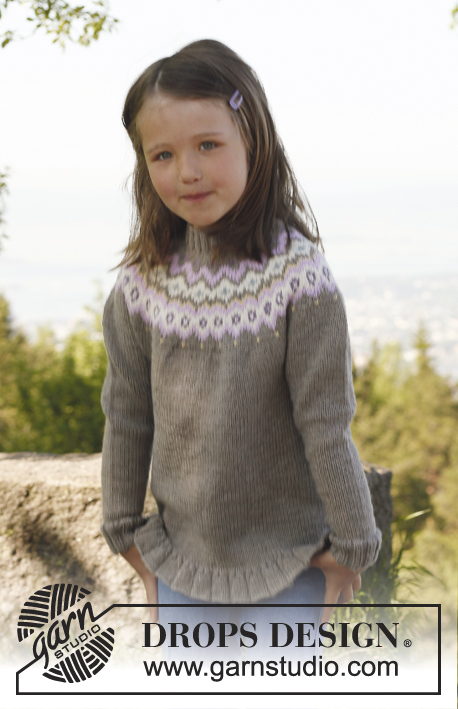
Knitted jumper with raglan, worked top down in DROPS Merino Extra Fine. Size children 3 to 12 years.
DROPS Children 23-7 |
|||||||
|
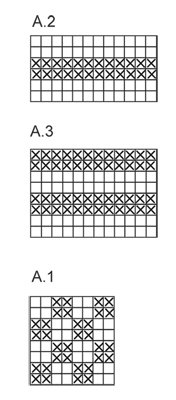
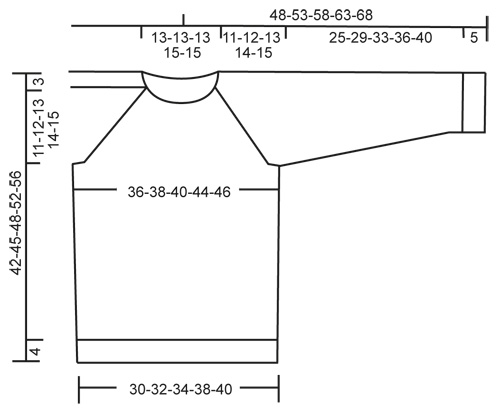
INCREASE TIP (applies to raglan): Work until 1 st remain before marker: Make 1 YO, K 2 sts (marker is in the middle of these sts), make 1 YO. On next round K YOs twisted (i.e. work in back loop of st instead of front) to avoid holes. Work the inc sts in the pattern. PATTERN: See diagrams A.1, A.2 and A.3. Diagrams show pattern from RS. DECREASE TIP (applies to body and sleeves): Work until 2 sts remain before marker, K 2 tog, marker, and K 2 twisted tog (i.e. work in back loop of st instead of front). -------------------------------------------------------- JUMPER: Worked in the round, top down. YOKE: Cast on 84-84-84-92-92 sts on a short circular needle size 3 mm with Merino Extra Fine. Insert a marker at beg of round (= mid back). K 1 round. Then work rib = K 2/P 2 for 3 cm. Then work an elevation in back of neck as follows (continue in rib): Work 8 sts past marker, turn, tighten thread and work 16 sts back, turn, tighten thread and work 24 sts, turn, continue by working 8 sts more on every turn until a total of 64 sts have been worked, turn and work 1 round until marker mid back again. READ ALL OF THE FOLLOWING SECTION BEFORE CONTINUING! Switch to circular needle size 4 mm and work 1 round in stocking st while at the same time inc 4 sts evenly = 88-88-88-96-96 sts. Now insert 4 new markers (for raglan) as follows: Work 15-15-15-17-17 sts from marker mid back, insert 1st marker here (at the same time remove marker mid back), work 14 sts more (= sleeve), insert 2nd marker, work 30-30-30-34-34 sts (= front piece) and insert 3rd marker, work 14 sts (= sleeve), insert 4th marker and work until 1st marker again (there are 30-30-30-34-34 sts between markers on back piece). Work A-1, AT THE SAME TIME on 1st round, inc 1 st on each side of the 4 markers for raglan (= 8 inc) - SEE INCREASE TIP! Repeat inc every round 7-7-9-10-11 more times and then every other round 11-13-13-14-15 times = 240-256-272-296-312 sts on needle. AT THE SAME TIME when piece measures 8-8-8-9-9 cm from mid front, work A.2 1 time vertically, then work A.1 again. After all inc, work next round as follows: Work until 1st marker. Slip the 52-56-60-64-68 sts between 1st and 2nd marker on a stitch holder, cast on 8 new sts over stitch holder, work until 3rd marker, slip the 52-56-60-64-68 sts between 3rd and 4th marker on a stitch holder, cast on 8 new sts over stitch holder, work until 1st marker again = 152-160-168-184-192 sts on needle. BODY: Continue in A.1 – AT THE SAME TIME insert a marker in the middle of the 8 new sts in each side. When piece measures 3 cm from where sleeve sts were put on a stitch holder, work A-3 1 time vertically, then continue in stocking st. AT THE SAME TIME when 4 cm have been worked from where sleeve sts were slipped on a stitch holder, dec 1 st on each side of the markers in the sides – SEE DECREASE TIP! Repeat dec every 3-4-4-5-5 cm 4 more times = 132-140-148-164-172 sts. Continue to work until piece measures 38-41-44-48-52 cm from shoulder. Work 1 round while AT THE SAME TIME inc 4 sts evenly = 136-144-152-168-176 sts. Switch to circular needle size 3 mm and work rib = K 2/P 2 for 4 cm. LOOSELY cast off with K over K and P over P. Piece measures approx. 42-45-48-52-56 cm from shoulder. SLEEVE: Slip sts from one stitch holder on double pointed needles size 4 mm and in addition cast on 8 new sts under sleeve = 60-64-68-72-76 sts. Insert a marker mid under sleeve (i.e. in the middle of the 8 new sts). NOW MEASURE PIECE FROM HERE! Continue with A.1 until piece measures 3 cm from marker, now work A.3 1 time vertically, then work in stocking st. AT THE SAME TIME when 1 cm of A.3 has been worked, dec 1 st on each side of marker – SEE DECREASE TIP! Repeat dec every 4-3-4-4-3½ cm 5-7-7-7-9 more times = 48-48-52-56-56 sts. Continue to work until sleeve measures 25-29-33-36-40 cm. Switch to double pointed needles size 3 mm and work rib = K 2/P 2 for 5 cm. Then LOOSELY cast off with K over K and P over P. Work the other sleeve the same way. ASSEMBLY: Sew the openings under the sleeves. |
|||||||
Diagram explanations |
|||||||
|
|||||||
 |
|||||||
 |
|||||||
Have you finished this pattern?Tag your pictures with #dropspattern #paulinasweater or submit them to the #dropsfan gallery. Do you need help with this pattern?You'll find 11 tutorial videos, a Comments/Questions area and more by visiting the pattern on garnstudio.com. © 1982-2026 DROPS Design A/S. We reserve all rights. This document, including all its sub-sections, has copyrights. Read more about what you can do with our patterns at the bottom of each pattern on our site. |
|||||||


With over 40 years in knitting and crochet design, DROPS Design offers one of the most extensive collections of free patterns on the internet - translated to 17 languages. As of today we count 324 catalogues and 12245 patterns translated into English (UK/cm). 12245
We work hard to bring you the best knitting and crochet have to offer, inspiration and advice as well as great quality yarns at incredible prices! Would you like to use our patterns for other than personal use? You can read what you are allowed to do in the Copyright text at the bottom of all our patterns. Happy crafting!
Post a comment to pattern DROPS Children 23-7
We would love to hear what you have to say about this pattern!
If you want to leave a question, please make sure you select the correct category in the form below, to speed up the answering process. Required fields are marked *.