
Popular categories
Looking for a yarn?


Comments / Questions (89)
![]() France wrote:
France wrote:
Merci de m’avoir répondu. Malheureusement je comprends vos explications mais ça s’avère impossible de réaliser le deuxième rang en se fiant à celles ci. Ça ne concorde pas pour la continuité du motif. Est ce possible qu’il y ait une erreur dans ce patron. Merci
19.02.2026 - 14:56DROPS Design answered:
Bonjour France, après les mailles du raglan, au début des manches, du dos et du devant, vous allez tricoter la nouvelle maille comme la maille précédente du diagramme: si vous commencez par 2 m end, les 2 premières augmentations seront des m env, puis 2 m end et ainsi de suite; à la fin du dos, devant, manches, si vous terminez par 2 m env, les 2 premières augm. seront des m end, puis 2 m env et ainsi de suite. Bon tricot!
20.02.2026 - 07:40
![]() France wrote:
France wrote:
Quels point doit on tricoter lorsque l’on fait des augmentations raglan. On donne la directive point de fantaisie mais Je trouve très compliqué d’agencer quand on travaille la grille point de fantaisie.
16.02.2026 - 22:25DROPS Design answered:
Bonjour France, les augmentations du raglan doivent être incorporées au point fantaisie, ainsi, tricotez la comme la maille précédente du diagramme (lisez le diagramme de droite à gauche) après les mailles du raglan, au début du dos, devant et des manches, et à la fin du dos, du devant et des manches, tricotez les augmentations comme la maille suivante du diagramme. Le motif va ainsi s'élargir sur les côtés. Bon tricot!
17.02.2026 - 15:28
![]() Lone wrote:
Lone wrote:
Jeg strikker str 134/140. Jeg kan ikke få maskeantallet til at passe efter udtagningerne når jeg skal dele krop og ærmer, mine udtagninger er først 10 gange og så 14 gange, jeg har 288 masker opskriften siger 296 masker ??
29.11.2025 - 12:02DROPS Design answered:
Hei Lone. Første økning er forklart i oppskriften (=8 økte masker) = 96+8 = 104 masker. Så står det at økningen skal gjenta 10 ganger til = 8 x 10 = 80 økte masker = 104 + 80 = 184 masker. Så skal det økes 14 ganger til = 8 masker x 14 ganger = 112 masker. 184 masker + 112 masker = 296 masker, som det stå i oppskriften. mvh DROPS Design
01.12.2025 - 14:27
![]() Jessica wrote:
Jessica wrote:
Goedendag, Ik brei de trui voor 9/10 jaar en ben bezig met het lijf. Ik moet nu tot 48 cm door breien vanaf de schouders gemeten. Is dat inclusief de boord er bij?
30.10.2025 - 21:08DROPS Design answered:
Dag Jessica,
Ja, dat is inclusief de boord. Je meet altijd vanaf de opzetrand tenzij anders aangegeven.
01.11.2025 - 15:01
![]() Boulan Evelyne wrote:
Boulan Evelyne wrote:
Désolé mais ce n'est pas ce qui est écrit. 4 aug avant la pose des marqueurs. Relisez votre modèle.
10.10.2025 - 18:17DROPS Design answered:
Bonjour Mme Boulan, je cite à nouveau, en soulignant le nombre d'augmentations: Tricoter A-1, EN MÊME TEMPS au 1er tour, augmenter 1 m de chaque côté des 4 marqueurs pour le raglan(= 8 augmentations) - VOIR AUGMENTATIONS ! Répéter ces augmentations encore 7-7-9-10-11 foistous les tours et 11-13-13-14-15 fois tous les 2 tours, donc en taille 9/10 ans: 1 fois + 10 + 14 = 25 fois au total. Bon tricot!
15.10.2025 - 07:27
![]() Évelyne wrote:
Évelyne wrote:
Il est indiqué d'aug 4 m au 92 m départ. Ça fait bien 96. Puis on dit d'augmentation 10 fois + 14 fois = 24 fous 8 m. Y a erreur.
09.10.2025 - 16:13DROPS Design answered:
Bonjour Évelyne, vous augmentez d'abord 1 fois de chaque côté des 4 marqueurs puis, je cite: encore 10 fois tous les tours et 14 fois tous les 2 tours = on obtient 296 mailles soit: 1+10+14=25 fois et pas seulement 24. Bon tricot!
10.10.2025 - 08:01
![]() Boulan wrote:
Boulan wrote:
Sur le modèle Paulina je fais la taille 9/10 ans, de 92 m +4 =96 m puis aug 10 fois 8 m = 80 m puis 14 fois 8 m = 112 m. Total 288 m et non 296 m comme mentionné es-ce une erreur ??
09.10.2025 - 09:10DROPS Design answered:
Bonjour Mme Boulan, en taille 9/10 ans, on va augmenter 25 fois 8 mailles au total (d'abord 1 fois comme indiqué puis encore 10 fois tous les tours et enfin14 fois tous les 2 tours), on aura ainsi: 96+(25x8)=296 mailles. Bon tricot!
09.10.2025 - 15:59
![]() Carole wrote:
Carole wrote:
Je suis plutôt débutante dans le tricot et je voulais savoir à partir d'où mesurer les 8 cm de "EN MÊME TEMPS, à 8 cm de hauteur à partir du milieu devant"? Est-ce a partir du début du col sur le devant (toute la hauteur du tricot jusqu'à present sur le devant) ou a partir du bas du col? Merci beaucoup!
08.10.2025 - 09:31DROPS Design answered:
Bonjour Carole, mesurez au milieu du devant, à partir du rang de montage, autrement dit, avec les côtes du col. Bon tricot!
08.10.2025 - 16:27
![]() REINE MARIE wrote:
REINE MARIE wrote:
Un grand merci beaucoup je vais voir .Bonne soirée
25.03.2025 - 17:56
![]() REINE MARIE wrote:
REINE MARIE wrote:
Bonjour ,merci pour votre message mais c\'est dommage,il me semblait que ce modèle pouvez exister pour femme aussi ,il est tellement joli et plait beaucoup .Si par hasard ,je faisais le modèle homme en taille( S) ,en faisant moins grand en hauteur pourrait peut être marcher ? Merci de votre conseil .Bonne après-midi
25.03.2025 - 15:43DROPS Design answered:
Bonjour Reine Marie, fort probablement, dans ce point de la FAQ modèles nous expliquons comment adapter un modèle femme pour homme, vous pourrez suivre un modèle homme pour femme en ajustant simplement les longueurs (basez-vous sur un pull dont elle aime la forme). Bon tricot!
25.03.2025 - 15:52
|
|||||||
Paulina#paulinasweater |
|||||||
|
|
|||||||
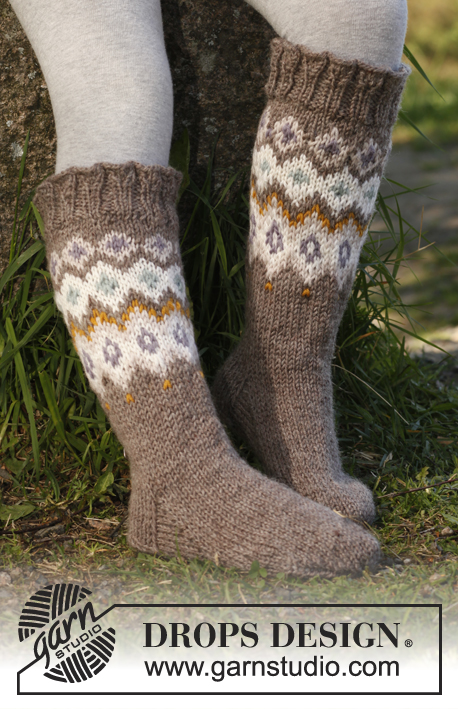
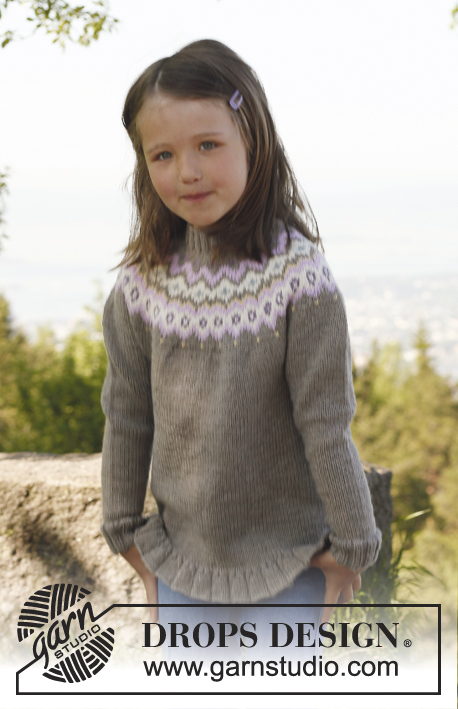
Knitted jumper with raglan, worked top down in DROPS Merino Extra Fine. Size children 3 to 12 years.
DROPS Children 23-7 |
|||||||
|
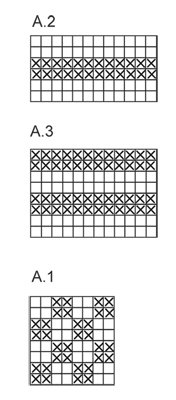
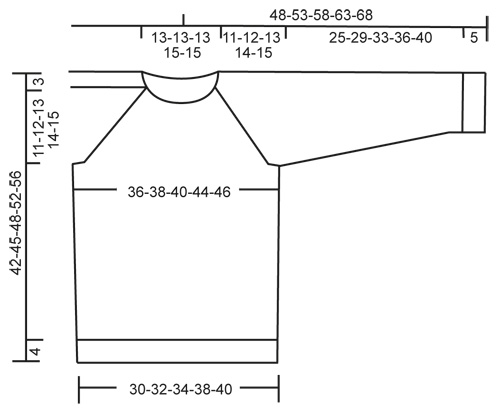
INCREASE TIP (applies to raglan): Work until 1 st remain before marker: Make 1 YO, K 2 sts (marker is in the middle of these sts), make 1 YO. On next round K YOs twisted (i.e. work in back loop of st instead of front) to avoid holes. Work the inc sts in the pattern. PATTERN: See diagrams A.1, A.2 and A.3. Diagrams show pattern from RS. DECREASE TIP (applies to body and sleeves): Work until 2 sts remain before marker, K 2 tog, marker, and K 2 twisted tog (i.e. work in back loop of st instead of front). -------------------------------------------------------- JUMPER: Worked in the round, top down. YOKE: Cast on 84-84-84-92-92 sts on a short circular needle size 3 mm with Merino Extra Fine. Insert a marker at beg of round (= mid back). K 1 round. Then work rib = K 2/P 2 for 3 cm. Then work an elevation in back of neck as follows (continue in rib): Work 8 sts past marker, turn, tighten thread and work 16 sts back, turn, tighten thread and work 24 sts, turn, continue by working 8 sts more on every turn until a total of 64 sts have been worked, turn and work 1 round until marker mid back again. READ ALL OF THE FOLLOWING SECTION BEFORE CONTINUING! Switch to circular needle size 4 mm and work 1 round in stocking st while at the same time inc 4 sts evenly = 88-88-88-96-96 sts. Now insert 4 new markers (for raglan) as follows: Work 15-15-15-17-17 sts from marker mid back, insert 1st marker here (at the same time remove marker mid back), work 14 sts more (= sleeve), insert 2nd marker, work 30-30-30-34-34 sts (= front piece) and insert 3rd marker, work 14 sts (= sleeve), insert 4th marker and work until 1st marker again (there are 30-30-30-34-34 sts between markers on back piece). Work A-1, AT THE SAME TIME on 1st round, inc 1 st on each side of the 4 markers for raglan (= 8 inc) - SEE INCREASE TIP! Repeat inc every round 7-7-9-10-11 more times and then every other round 11-13-13-14-15 times = 240-256-272-296-312 sts on needle. AT THE SAME TIME when piece measures 8-8-8-9-9 cm from mid front, work A.2 1 time vertically, then work A.1 again. After all inc, work next round as follows: Work until 1st marker. Slip the 52-56-60-64-68 sts between 1st and 2nd marker on a stitch holder, cast on 8 new sts over stitch holder, work until 3rd marker, slip the 52-56-60-64-68 sts between 3rd and 4th marker on a stitch holder, cast on 8 new sts over stitch holder, work until 1st marker again = 152-160-168-184-192 sts on needle. BODY: Continue in A.1 – AT THE SAME TIME insert a marker in the middle of the 8 new sts in each side. When piece measures 3 cm from where sleeve sts were put on a stitch holder, work A-3 1 time vertically, then continue in stocking st. AT THE SAME TIME when 4 cm have been worked from where sleeve sts were slipped on a stitch holder, dec 1 st on each side of the markers in the sides – SEE DECREASE TIP! Repeat dec every 3-4-4-5-5 cm 4 more times = 132-140-148-164-172 sts. Continue to work until piece measures 38-41-44-48-52 cm from shoulder. Work 1 round while AT THE SAME TIME inc 4 sts evenly = 136-144-152-168-176 sts. Switch to circular needle size 3 mm and work rib = K 2/P 2 for 4 cm. LOOSELY cast off with K over K and P over P. Piece measures approx. 42-45-48-52-56 cm from shoulder. SLEEVE: Slip sts from one stitch holder on double pointed needles size 4 mm and in addition cast on 8 new sts under sleeve = 60-64-68-72-76 sts. Insert a marker mid under sleeve (i.e. in the middle of the 8 new sts). NOW MEASURE PIECE FROM HERE! Continue with A.1 until piece measures 3 cm from marker, now work A.3 1 time vertically, then work in stocking st. AT THE SAME TIME when 1 cm of A.3 has been worked, dec 1 st on each side of marker – SEE DECREASE TIP! Repeat dec every 4-3-4-4-3½ cm 5-7-7-7-9 more times = 48-48-52-56-56 sts. Continue to work until sleeve measures 25-29-33-36-40 cm. Switch to double pointed needles size 3 mm and work rib = K 2/P 2 for 5 cm. Then LOOSELY cast off with K over K and P over P. Work the other sleeve the same way. ASSEMBLY: Sew the openings under the sleeves. |
|||||||
Diagram explanations |
|||||||
|
|||||||
 |
|||||||
 |
|||||||
Have you finished this pattern?Tag your pictures with #dropspattern #paulinasweater or submit them to the #dropsfan gallery. Do you need help with this pattern?You'll find 11 tutorial videos, a Comments/Questions area and more by visiting the pattern on garnstudio.com. © 1982-2026 DROPS Design A/S. We reserve all rights. This document, including all its sub-sections, has copyrights. Read more about what you can do with our patterns at the bottom of each pattern on our site. |
|||||||


With over 40 years in knitting and crochet design, DROPS Design offers one of the most extensive collections of free patterns on the internet - translated to 17 languages. As of today we count 324 catalogues and 12245 patterns translated into English (UK/cm). 12245
We work hard to bring you the best knitting and crochet have to offer, inspiration and advice as well as great quality yarns at incredible prices! Would you like to use our patterns for other than personal use? You can read what you are allowed to do in the Copyright text at the bottom of all our patterns. Happy crafting!
Post a comment to pattern DROPS Children 23-7
We would love to hear what you have to say about this pattern!
If you want to leave a question, please make sure you select the correct category in the form below, to speed up the answering process. Required fields are marked *.