
Popular categories
Looking for a yarn?


Comments / Questions (26)
![]() Rosalee wrote:
Rosalee wrote:
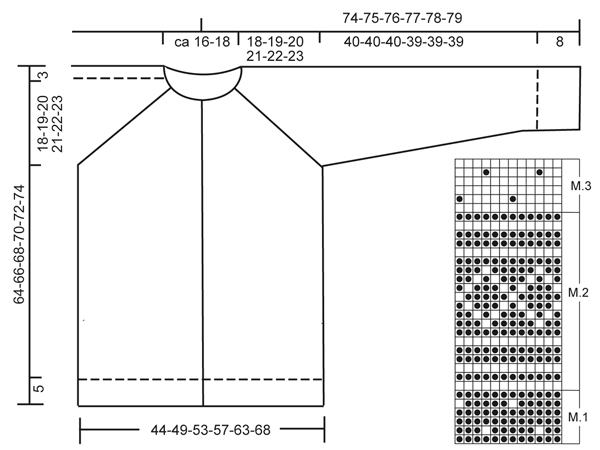
Hi When decreasing in the yoke (diagram M.3 ) do you have to work deceased sts into the pattern. Kind Regards Rosalee
23.10.2019 - 12:55DROPS Design answered:
Dear Rosalee, you can work the decrease in pattern, so that there will be 2 sts in white for the raglan line, or then work the decrease stitches in white, so that there will be 4 sts in white for the raglan line. Happy knitting!
23.10.2019 - 13:25
![]() Rosalee wrote:
Rosalee wrote:
Hi sorry for all the questions, On the 2nd row(purl) when i get to the end I only have 2 sts where I should have 4 (3 purl) & 1K working on 203 plus x2 edge sts = 205. Also are edge sts worked all the way up, if so dose it mean I knit them but don’t include them in the pattern. Thanks
30.08.2019 - 01:18DROPS Design answered:
Dear Rosalee, you will work M.1 over the 205 stitches as follows: 1 edge st in garter st, repeat the 12 sts in M.1 a total of 16 times then work the first 11 stitches in M.1, 1 edge st in garter stitch - work the edge stitches K on every row with the background colour. From WS, 1 edge st, work first M.1 starting on the 2nd st on the left side towards the right, then repeat the 12 sts in M.1 from the left towards the right and finish with K1 (= edge st). Happy knitting!
30.08.2019 - 09:44
![]() Rosalee wrote:
Rosalee wrote:
When reading chart is it read right to left and when knitting edge (K1) is this 1 stitch included in the pattern but as knit stitch if doing a purl row.
29.08.2019 - 10:04DROPS Design answered:
Dear Rosalee, the edge stitches are not included in the diagram, work 1 edge stitch in garter stitch, repeat M.1 (= from the right towards the left from RS and from the right towards the left from WS) and finish with 1 edge stitch in garter stitch. Happy knitting!
29.08.2019 - 10:55
![]() Rosalee wrote:
Rosalee wrote:
What is meant in sleeve.. Insert marker mid under sleeve??
27.08.2019 - 10:26DROPS Design answered:
Dear Rosalee, you insert a marker between the last stitch on round and the first stitch of the round, this will be mid under sleeve. Happy knitting!
27.08.2019 - 12:37
![]() Barbara wrote:
Barbara wrote:
Moin ich würde die jacke gerne in runden stricken und dann aufschneiden.was hälten sie davon?
09.10.2018 - 20:45DROPS Design answered:
Liebe Barbara, wenn Sie daran gewöhnt sind, die "Steek-Technik" zu stricken, können Sie wahrscheinlich dieses Modell so anpassen. Viel Spaß beim stricken!
10.10.2018 - 09:37
![]() Anne Burucoa wrote:
Anne Burucoa wrote:
Bonjour, peut-on tricoter ce modèle avec du fil de catégorie C?
21.12.2016 - 21:08DROPS Design answered:
Bonjour Mme Burucoa, DROPS Merino Extra Fine appartient au groupe B de nos fils, si vous voulez tricoter avec un fil du groupe C, il vaut mieux regarder un autre modèle de cette catégorie - voir équivalences. Bon tricot!
22.12.2016 - 09:37
![]() Laila Rugland wrote:
Laila Rugland wrote:
Kjmepe fin jakke som æ vil strikke ..
05.02.2012 - 23:03
![]() DROPS Design NL wrote:
DROPS Design NL wrote:
Zit er geen verkooppunt in uw buurt, dan kunt u ook bellen met één van onze overige verkooppunten. Heeft u verder een vraag over het patroon, dan graag duidelijker aangeven waar uw probleem zit. Waar ziet u A en B?
16.01.2012 - 12:22
![]() Wilma Stege wrote:
Wilma Stege wrote:
Deze vest zou ik het wit-donkerblauw willen breien, maar het patroon komt moeilijk (beknopt?)over. Ik woon in Amsterdam en daar is niemand die deze wol, welke nu in de uitverkoop is, verkoopt. Of waar ik naartoe kan gaan voor persoonlijke hulp.Daarnaast las ik iets van een A-B. Uiteraard wil ik graag dat mijn wol prima in orde is. Tenminste, dit begreep ik van het verschil tussen A en B. Hopelijk helpt u mij verder, Met vriendelijke groet, Wilma Stege
14.01.2012 - 21:37Magda wrote:
Schoen, moechte gerne nachmachen. Wird sowas moeglich. Weis ich nicht, wie es hier funktioniert.
01.07.2011 - 09:30
|
|||||||
Nordic Beauty Cardigan#nordicbeautycardigan |
|||||||
|
|
|||||||
Knitted DROPS jacket with raglan and Norwegian pattern in ”Merino Extra Fine”. Size: S to XXXL.
DROPS 131-37 |
|||||||
|
PATTERN: See diagrams M.1, M.2 and M.3 - all diagrams are worked in stocking st. RAGLAN: Dec for raglan on each side of the 4 markers. Dec as follows from RS: Work until 3 sts remain before marker, K 2 tog, K 2 (marker is between these 2 sts), K 2 twisted tog (i.e. work in back loop of st instead of front to avoid holes). Dec as follows from WS: Work until 3 sts remain before marker, P 2 twisted tog (i.e. work in back loop of sts instead of front), P 2 (marker is between these 2 sts), P 2 tog. -------------------------------------------------------- BODY: Worked back and forth on circular needle from mid front. Cast on 220-240-260-280-308-340 sts on circular needle size 3 mm with black. Work rib as follows (seen from RS): 1 edge st which is worked K on all rows, * K 2, P 2 *, repeat from *-* and finish with K 2 and 1 edge st which is worked K on all rows. Continue rib like this for approx. 5 cm (adjust so that next row is from RS). Switch to circular needle size 4 mm. K 1 row while at the same time dec 33-35-37-39-43-51 sts evenly (K approx. every 6th and 7th st tog) = 187-205-223-241-265-289 sts. Continue with diagram M.1 (2nd row = WS) and 1 edge st in each side as before. REMEMBER THE KNITTING TENSION! When piece measures approx. 36-37-38-39-40-41 cm (adjust after 1 whole repetition of diagram M.1), work diagram M.2 one time vertically – AT THE SAME TIME on last row in diagram M.2 (= RS), cast off for armholes. This is done as follows: Work 43-47-52-56-62-69 sts, cast off 8 sts for armhole, work 85-95-103-113-125-135 sts, cast off 8 sts for armhole, work the rest of row (= 43-47-52-56-62-69 sts). Piece measures approx. 43-44-45-46-47-48 cm. Put piece aside and work the sleeves. SLEEVE: Worked in the round on double pointed needles. Cast on 56-56-60-64-64-68 sts on double pointed needles size 3 mm with black. Work rib = K 2/P 2 for 8 cm. Switch to double pointed needles size 4 mm and K 1 round while at the same time dec 2-2-6-4-4-2 sts evenly = 54-54-54-60-60-66 sts. Insert a marker mid under sleeve. Then work diagram M.1 upwards. At the same time when piece measures 10-10-10-12-12-12 cm, inc 1 st on each side of marker mid under sleeve. Repeat inc every 10-7-6-5-4-4 rounds a total of 9-12-15-15-18-18 times = 72-78-84-90-96-102 sts – work the inc sts gradually in pattern. When piece measures approx. 41-41-41-40-40-40 cm, inc should be done (adjust after 1 whole repetition of diagram M.1), work diagram M.2 – AT THE SAME TIME on last round of diagram M.2, cast off 8 sts mid under sleeve (i.e. 4 sts on each side of marker) = 64-70-76-82-88-94 sts remain on needle. Now piece measures approx. 48-48-48-47-47-47 cm. Put piece aside and knit another sleeve. YOKE: Slip sleeves on to same circular needle as body where armholes were cast off = 299-329-359-389-425-461 sts. Insert 1 marker in all transitions between sleeves and body (= 4 markers). Continue with diagram M.3 with 1 edge st in each side as before – AT THE SAME TIME on 1st row (= WS), dec 4 sts evenly = 295-325-355-385-421-457 sts. On next row (= RS), beg dec for RAGLAN – see explanation above. Repeat dec on every other row a total of 25 times for all sizes and then on every row: 0-3-6-9-12-15 times. AT THE SAME TIME when piece measures 54-56-58-60-62-64 cm, work next row as follows: Work 8-9-10-11-12-13 sts and slip them on 1 stitch holder, work until 8-9-10-11-12-13 sts remain in the other side, slip these on 1 stitch holder (without working them first). Turn piece, then cast off for neck at beg of every row in each side: 2 sts 2 times and then 1 st in each side until dec for raglan has been worked. After all dec for raglan and neck approx. 65 to 97 sts remain on needle and piece measures approx. 64-66-68-70-72-74 cm up to shoulder. NECK EDGE: Switch to circular needle size 3 mm. Knit up approx. 16-23 sts on each side mid front of neck (incl sts on stitch holders) = approx. 97-143 sts. K 1 row from WS while at the same time adjusting no of sts to 96-100-104-108-112-116. Continue with rib as follows (seen from RS): 1 edge st which is worked K on all rows, * K 2, P 2 *, repeat from *-* and finish with K 2 and 1 edge st which is worked K on all rows. When neck edge measures approx. 3 cm, cast off with K over K and P over P. ASSEMBLY: Sew the openings under the sleeves tog. LEFT FRONT BAND: Knit up (from RS) approx. 120 to 146 sts inside edge st along left front piece on needle size 3 mm with black. K 1 row from WS while at the same time inc evenly to 148-156-164-172-180-188 sts. Then work rib as follows (seen from RS): 1 edge st which is worked K on all rows, * K 2, P 2 *, repeat from *-* and finish with K 2 and 1 edge st which is worked K on all rows. When band measures approx. 4 cm, cast off with K over K and P over P. RIGHT FRONT BAND: Work as left front band, but cast off for 10 button holes evenly after 2 cm. 1 button hole = cast off 1 st, on next row cast on 1 new st over the cast off st. Upper button hole should be approx. 1½ cm from the top, and bottom hole approx. 3 cm from bottom edge. Sew on buttons. |
|||||||
Diagram explanations |
|||||||
|
|||||||
 |
|||||||
Have you finished this pattern?Tag your pictures with #dropspattern #nordicbeautycardigan or submit them to the #dropsfan gallery. Do you need help with this pattern?You'll find 25 tutorial videos, a Comments/Questions area and more by visiting the pattern on garnstudio.com. © 1982-2026 DROPS Design A/S. We reserve all rights. This document, including all its sub-sections, has copyrights. Read more about what you can do with our patterns at the bottom of each pattern on our site. |
|||||||


With over 40 years in knitting and crochet design, DROPS Design offers one of the most extensive collections of free patterns on the internet - translated to 17 languages. As of today we count 324 catalogues and 12291 patterns translated into English (UK/cm). 12291
We work hard to bring you the best knitting and crochet have to offer, inspiration and advice as well as great quality yarns at incredible prices! Would you like to use our patterns for other than personal use? You can read what you are allowed to do in the Copyright text at the bottom of all our patterns. Happy crafting!
Post a comment to pattern DROPS 131-37
We would love to hear what you have to say about this pattern!
If you want to leave a question, please make sure you select the correct category in the form below, to speed up the answering process. Required fields are marked *.