
Popular categories
Looking for a yarn?


Comments / Questions (52)
![]() Ann-Louise Vedelöv wrote:
Ann-Louise Vedelöv wrote:
Undrar om det ska stickas med stickor nr 5 även på själva koftan?
06.05.2023 - 21:38DROPS Design answered:
Hei Ann-Louise Her er det kun på ermene der det strikkes glattstrikk at det skal brukes pinne str. 5, men husk å sjekke hva din strikkefasthet blir i forhold til det som er oppgitt. mvh DROPS Design
08.05.2023 - 13:45
![]() Le Terrier wrote:
Le Terrier wrote:
Bonjour Comment tricoter les manches avec aiguilles droite car je ne sais pas tricoter aiguilles circulaire et double pointe Merci pour votre aide
17.12.2022 - 21:45DROPS Design answered:
Bonjour Mme Le Terrier, dans cette leçon, vous trouverez comment on peut adapter un modèle sur aiguilles droites. Bon tricot!
19.12.2022 - 09:25
![]() Elena Murphy wrote:
Elena Murphy wrote:
Is there an English translation and how do I buy this pattern, please?
15.02.2021 - 18:19DROPS Design answered:
Dear Mrs Murphy, all our patterns are available in English, click on the scroll down menu below the photo and choose the appropriate language (either UK pattern using cm or US pattern with cm and inches). Happy knitting!
16.02.2021 - 10:05
![]() Sisko Ylönen wrote:
Sisko Ylönen wrote:
Hei! Nyt sitten lanka loppui. Jäi 1 ja 1/2 hihaa vaille. Nyt ongelmana lisälangan saaminen. Tilasin jo yhdestä paikasta, mutta tuli ihan väärää lankaa. Harmittaa kovin, kun kuitenkin olen tehnyt lähes kokonaan työn.
04.07.2020 - 13:09DROPS Design answered:
Hei, sinun kannattaa hankkia langat samasta paikasta, josta ostit muut kerät. On tärkeää, että saat ostettua samaan värierään kuuluvia keriä, koska saman värin eri värierien sävyt voivat usein poiketa toisistaan. Jos samaan värjäyserään kuuluvaa lankaa ei enää ole saatavilla, voit neuloa molemmat hihat kokonaisuudessaan toisen värierän sävyllä. Tällöin eri sävyt eivät näy yhtä hyvin.
13.07.2020 - 14:38
![]() Sisko Ylönen wrote:
Sisko Ylönen wrote:
Hei! Ostin tähän ohjeeseen aivan oikeat langat. Kokoon L 800gr. Nyt olen neulonut etu-takakappaleita noin 40cm ja 8 kerä menossa. Jäljellä 8 kerää. Onko totta, että tuo lankamäärä riittää? Olen laskenut, että kainaloihin mennessä on jäljellä enää 4 kerää, jotka pitäisi riittää vielä hihoihinkin ja kaulukseen ja yläosaan. Onko ohjeessa lankamäärä oikein?
27.06.2020 - 13:02DROPS Design answered:
Langanmenekki vaikuttaisi olevan oikea. Olethan tarkistanut neuletiheytesi?
17.11.2020 - 16:49
![]() Nina Papaioannou wrote:
Nina Papaioannou wrote:
Hi! I just read the instructions for knitting this beauty & I do not seem to find the point where I switch from no 4.5 needles to no 5. I pressume I change after M1 is worked vertically, am I right?
31.01.2019 - 14:34DROPS Design answered:
Dear Nina, you use the 5 mm needles on the sleeves, after changing from garter stitch to stockinett stitch. Happy Knitting!
11.02.2019 - 21:03
![]() Deanna Bratcher wrote:
Deanna Bratcher wrote:
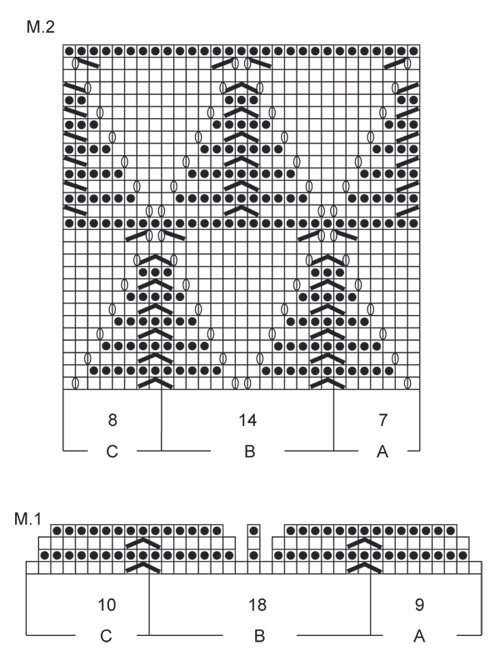
How do I handle the empty spaces in the diagram M.1 for DROPS 130-41 sweater? There is a C B and A section. My problem is not the boxes or dots or slashes or the YO boxes ... It's the area's where there is nothing... At the top of the third K from WS line. Thank you
16.04.2018 - 17:30DROPS Design answered:
Dear Mrs Bratcher, in the 1st and 3rd row in diagrams, you will dec sts (= 1 st will be dec in A and C section, andn 2 sts will be dec in B section), The empty spaces match the decreased sts: On row 2 work only the sts with a black dot = these are the sts you have on needle (= 7 sts in A, 16 sts in B and 8 sts in C). Happy knitting!
17.04.2018 - 08:46
![]() Jette wrote:
Jette wrote:
Hej. Jeg vil gerne vide hvad jeg skal strikke i midten af M.1 B på 2., 3. og 4. række, da der ikke er nogle symboler? Hilsen Jette
09.08.2016 - 13:55DROPS Design answered:
Hej. Det är minskningarna du gjort på tidigare omg så de hoppar du bara över. Lycka till!
11.08.2016 - 10:42
![]() Godelieve Loos wrote:
Godelieve Loos wrote:
Goedenavond ,ik weet niet hoe ik de 2de rij moet breien . Eerst 8 st rechts dan ....en 14 st rechts . Waar de open blokjes op het patroon zijn weet ik niet hoe deze te breien . Help mij want het is een mooi vest . Dank u
16.05.2015 - 22:38DROPS Design answered:
Hoi Loos. Je volgt het patroon: 8 ribbelst, dan 2e rij van de teltekeningen (lees van links naar rechts) en eindigt met 8 ribbelst. De verklaring van de symbolen staat onderaan het patroon.
19.05.2015 - 15:16
![]() Eva Riheim wrote:
Eva Riheim wrote:
Många redan frågat, men jag blir ändå inte klok på mönstret i M1. Hur och var tar jag bort de 4 m som tydligen då skall bort mellan de 8 kantmaskorna och första rapporten? Känns som det saknas en minskning i varje ytterkant på varv 1 och 3. Gör XXL således 305-60=245 (vilket stämmer efter mönstret) medans beskrivning säger det skall vara kvar 241. Var avmaska efter kanten skall minskningen vara?
18.03.2015 - 14:30DROPS Design answered:
Hej Minskningarna sker när du stickar tecknet för ”=lyft 1 m, 2 rm tills, drag den lyfta M över”, då minskas 2 m. På första varvet av M1 stickas det tecknet 16 gånger alltså minskas varvet med 32 m. På tredje varvet stickas det återigen 16 gånger dvs 32 m minskas på det varvet. Minskningarna sker alltså under varv 1 och 3 helt enligt diagram. När du har stickat M1 har du alltså minskat 64 m, 305-64=241. Lycka till!
13.05.2015 - 14:31
|
|||||||||||||||||||
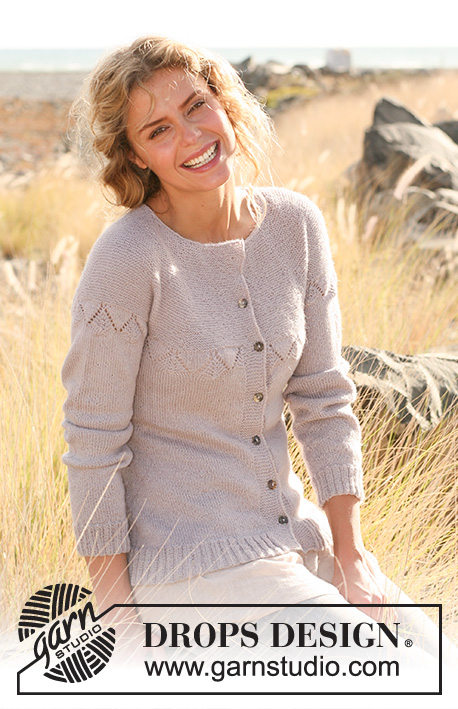
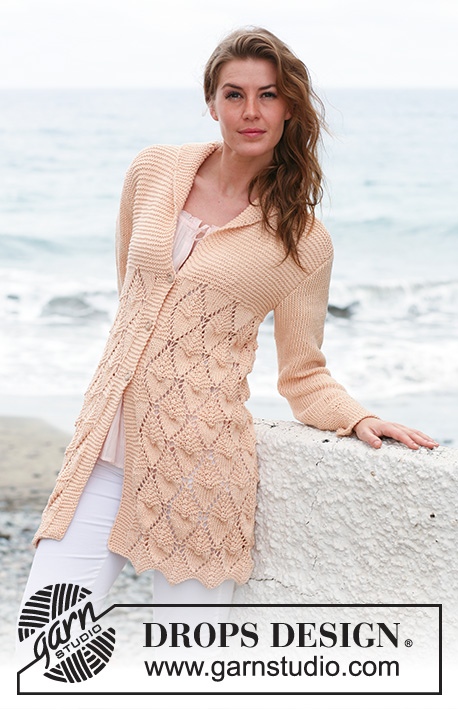
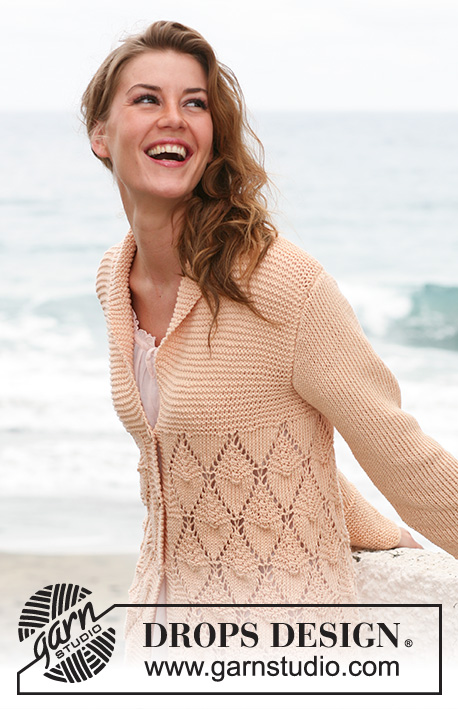
Diamonds Galore#diamondsgalorecardigan |
|||||||||||||||||||
 |
 |
||||||||||||||||||
Knitted DROPS jacket with lace pattern and shawl collar in "Paris". Size S-XXXL.
DROPS 130-41 |
|||||||||||||||||||
|
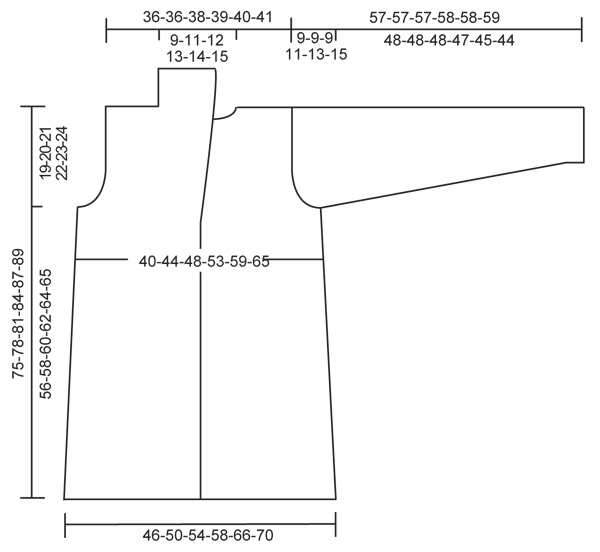
GARTER ST (back and forth on needle): K all rows. GARTER ST (in the round on double pointed needles): 1 ridge = 2 rounds * K 1 round and P 1 round *, repeat from *-*. MEASURING TIP: Because of the weight of the yarn all measurements must be done by holding the piece up otherwise the garment will be too long when worn. KNITTING TIP (applies to band): To keep the band from contracting work short rows over bands as follows: * Work back and forth only over the 8 band sts in garter st *, repeat from *-* after approx. every 16th row. PATTERN: See diagram M.1 and M.2. The diagram shows the pattern from RS. INCREASE TIP: Inc with 1 st by making 1 YO inside the outermost st in each side towards mid front. On next row K YO twisted (i.e. work in back loop of st instead of front) to avoid holes. Work the inc sts in garter st. BUTTON HOLES: Cast off for button holes on right front band. 1 button hole = work 3rd and 4th st from mid front tog, make 1 YO. Cast off for button holes when piece measures: SIZE S: 34, 43 and 52 cm SIZE M: 35, 44 and 53 cm SIZE L: 36, 45 and 54 cm SIZE XL: 35, 45 and 55 cm SIZE XXL: 36, 46 and 56 cm SIZE XXXL: 36, 46 and 56 cm -------------------------------------------------------- JACKET: Worked back and forth on circular needle. READ MEASURING TIP! Cast on 215-233-251-269-305-323 sts on circular needle size 4.5 mm with Paris. Work PATTERN - see explanation above - on 1st row from RS as follows: 8 sts in GARTER ST – see explanation above, M.1A, work M.1B a total of 10-11-12-13-15-16 times, M.1C and finish with 8 sts in garter st. Work band (= the 8 sts in garter st in each side) in garter st until finished measurements. When M.1 has been worked 1 time vertically, 171-185-199-213-241-255 sts on needle. READ KNITTING TIP AND REMEMBER THE KNITTING TENSION! READ ALL OF THE FOLLOWING SECTION BEFORE CONTINUING! Continue to work as follows from RS: 8 band sts, M.2A, work M.2B a total of 10-11-12-13-15-16 times, M.2C and 8 band sts. Continue with this pattern vertically. NOTE! Remember to cast off for BUTTON HOLES - see explanation above. When piece measures 52-53-54-55-56-56 cm, inc 1 st for collar towards mid front in each side - READ INCREASE TIP! Repeat the inc every 6th row a total of 10-11-12-13-14-15 times. AT THE SAME TIME when piece measures approx. 53-54-55-56-57-57 cm (adjust after 1 whole repetition of M.2 and after 1st inc for collar) work in garter st over all sts, while AT THE SAME TIME on 1st row dec 19-21-19-17-25-19 sts evenly = 154-166-182-198-218-238 sts (do not dec over band sts). Insert 2 markers in the piece (after started working in garter st and 1st inc for collar), 43-46-50-54-59-64 sts in from each side (back piece = 68-74-82-90-100-110 sts). When piece measures 56-58-60-62-64-65 cm, cast off 6 sts for armholes in each side (cast off 3 sts on each side of marker). Finish each part separately. BACK PIECE: = 62-68-76-84-94-104 sts. Continue to cast off for armholes at beg of every row in each side as follows: 2 sts 0-1-2-3-5-7 times and 1 st 0-1-2-3-3-3 times = 62-62-64-66-68-70 sts. When piece measures 73-76-79-82-85-87 cm, cast off the middle 14-16-18-20-22-24 sts for neck and finish each shoulder separately. Continue to cast off 1 st on next row from neck = 23-22-22-22-22-22 sts remain on the shoulder. Cast off when piece measures 75-78-81-84-87-89 cm. LEFT FRONT PIECE: Cast off for armhole in the side as on back piece. AT THE SAME TIME continue to inc for collar towards mid front. When all dec and inc are done, there are 49-50-52-54-56-58 sts on needle. When piece measures 75-78-81-84-87-89 cm, cast off the first 23-22-22-22-22-22 sts from RS for shoulder = 26-28-30-32-34-36 sts remain for collar. Work rest of row. Then work short rows over the collar sts as follows (beg from WS): * K back and forth over the outermost 13-14-15-16-17-18 sts towards mid front, K back and forth over all sts *, repeat from *-* until collar measures 7-8-9-9-10-10 cm at the shortest (measured from the shoulder). Cast off. RIGHT FRONT PIECE: Work as left front piece but reversed. SLEEVE: Worked in the round on double pointed needles/circular needle. Cast on 38-40-42-44-46-48 sts on double pointed needles size 4.5 mm with Paris. Work in GARTER ST - see explanation above! Insert a marker at the beg of the round. When piece measures 8 cm, inc 1 st each side of marker. Repeat inc on each side of marker every 4-4-3½-3-2½-2½ cm a total of 9-10-11-12-13-14 times = 56-60-64-68-72-76 sts. AT THE SAME TIME when piece measures 12 cm, switch to double pointed needles size 5 mm. Then continue in stocking st until finished measurements. When piece measures 48-48-48-47-45-44 cm (shorter measurements in the larger sizes because of longer sleeve cap and broader shoulder width) cast off 6 sts mid under sleeve (i.e. 3 sts on each side of marker). Then continue back and forth on circular needle while AT THE SAME TIME casting off for sleeve cap at the beg of row in each side as follows: 2 sts 2-3-3-3-3-3 times, 1 st 4-2-3-4-6-8 times, then cast off 2 sts in each side until piece measures 56-56-56-57-57-58 cm, then cast off 3 sts 1 time in each side. Cast off the remaining sts. ASSEMBLY: Sew the shoulder seams. Sew in sleeves. Sew collar tog mid back and sew in back of neck. Sew the buttons on to the left front band. |
|||||||||||||||||||
Diagram explanations |
|||||||||||||||||||
|
|||||||||||||||||||
 |
|||||||||||||||||||
 |
|||||||||||||||||||
Have you finished this pattern?Tag your pictures with #dropspattern #diamondsgalorecardigan or submit them to the #dropsfan gallery. Do you need help with this pattern?You'll find 21 tutorial videos, a Comments/Questions area and more by visiting the pattern on garnstudio.com. © 1982-2026 DROPS Design A/S. We reserve all rights. This document, including all its sub-sections, has copyrights. Read more about what you can do with our patterns at the bottom of each pattern on our site. |
|||||||||||||||||||


With over 40 years in knitting and crochet design, DROPS Design offers one of the most extensive collections of free patterns on the internet - translated to 17 languages. As of today we count 324 catalogues and 12290 patterns translated into English (UK/cm). 12290
We work hard to bring you the best knitting and crochet have to offer, inspiration and advice as well as great quality yarns at incredible prices! Would you like to use our patterns for other than personal use? You can read what you are allowed to do in the Copyright text at the bottom of all our patterns. Happy crafting!
Post a comment to pattern DROPS 130-41
We would love to hear what you have to say about this pattern!
If you want to leave a question, please make sure you select the correct category in the form below, to speed up the answering process. Required fields are marked *.