
Popular categories
Looking for a yarn?


Comments / Questions (68)
![]() Wanda wrote:
Wanda wrote:
Thank you for sharing this lovely pattern.
13.02.2026 - 21:40
![]() Felicia wrote:
Felicia wrote:
Hallo, ich komme mit dem Rückenteil nicht klar: stricke ich zuerst nur die 14 Abnahmen und fange erst danach mit den Ab- und Zunahmen wie bei den Vorderteilen an? Danke für Ihre Hilfe!
20.08.2020 - 20:57DROPS Design answered:
Liebe Felicia, nach den 14 ersten Abnahmen stricken Sie jetzt die Abanahmen wie zuvor aber jeztz nehmen Sie nach der 1. und vor der 4. Markierung ab (= die Maschenanzahl bleibt jetzt die gleiche), so bekommen Sie das schräglaufende Rippenmuster am Rückenteil. Viel Spaß beim stricken!
21.08.2020 - 08:02
![]() Carmen-Gabriela wrote:
Carmen-Gabriela wrote:
Hallo:) Ein wunderschönes Modell. Leider habe/hatte ich Schwierigkeiten bei rückw.Hals/Schulter. Wird nach dem Abk.f.Hals "M" nach der Rückreihe re. je 2cm re kraus bis zur Schulter gestrickt? Das sieht man auf dem Foto nicht so gut. Insges. ist dann das "V" ca. 4 cm tief. Stimmt das so? Ich habe 2cm in Rippen (ohne Zu-/Abn.) bis zur Schulterabn. gestr. u. mit 1 Kraus-Rippe beendet.
17.02.2020 - 17:43DROPS Design answered:
Liebe Carmen-Gabriela, es sind 2 cm für jeden Schulter und diese 2 cm werden kraus rechts gestrickt (= rechts alle Reihen), nach 54-64 cm stricken Sie 1 Reihe rechts mit Abnahmen, dann die Rückreihe - bei der nächsten Hinreihe ketten Sie die Maschen für den Hals ab und stricken dann die Schulter getrennet. Weiter krausrechts stricken und noch 1 Masche gegen Hals abketten. Nach 2 cm krausrechts ketten Sie die Schultermaschen ab. Viel Spaß beim stricken!
18.02.2020 - 09:44
![]() Annette Sandorff wrote:
Annette Sandorff wrote:
Jeg synes at forkanterne på billedet virker helt anderledes end opskriften lyder. Det ser ikke ud som 9 m retstrik. De virker meget lettere og smallere. Hvordan er forkanten på modellen lavet? Kan man strikke den lidt højere I nakken ved at lukke af til nakken lidt senere, så den bliver lidt mindre bar bagtil. På forhånd tak.
20.01.2018 - 23:50DROPS Design answered:
Hej Annette, jo det er sådan modellen er strikket, husk at ribben trækker sig sammen. Ja du er velkommen til at ændre opskriften, vi har dog ikke mulighed for at justere eller hjælpe dig med det. Held og lykke :)
30.01.2018 - 11:19
![]() Ingrid 1302 wrote:
Ingrid 1302 wrote:
Hallo, ich habe die Größe S für die Vorderteile gestrickt. Passen super, aber beim Rückenteil sind das zuviele Maschen. Der Rücken wird fast doppelt so breit. Ist das ein Druckfehler oder mache ich da irgendetwas falsch?
19.08.2015 - 14:35DROPS Design answered:
Die Maschenzahl müsste passen. Sie entspricht für das Rückenteil in etwa 2 Vorderteilen. Das Rückenteil wird ja in einem Stück gestrickt.
01.09.2015 - 16:39Karen Fournier wrote:
Yes, I did that too. I noticed that there is no waist shaping for the fronts. Maybe that is the problem?
25.03.2015 - 14:04Karen Fournier answered:
Silly me! I see what I did now :( I cast on 139sts and then followed the directions for the smaller size. Everything should work out fine now. Thankyou for your help!
25.03.2015 - 14:21Karen Fournier wrote:
Yes, I did that too. I noticed that there is no waist shaping for the fronts. Maybe that is the problem?
25.03.2015 - 13:25DROPS Design answered:
Dear Mrs Fournier, there is no waist shaping, check that you have decreased 1 st a total of 28 times without inc (before starting again dec/inc), and that you have cast off the correct number of sts on the side for armhole: 127 - 28 - (4+ 17x2 + 1) = 60 sts. Happy knitting!
25.03.2015 - 13:44Karen Fournier wrote:
I'm knitting size xxl and am having trouble with the dec sections for the left and right fronts' armholes. For the neck I stopped inc and continued dec as before. At the same time I did the armhole dec ( bo 4sts, dec 2sts, 17 times and then 1st one time) on every right side row. When all the dec are finished I should only have 60 sts on my needles but I have 77. Am I doing something wrong? Maybe I'm supposed to dec 1 st 18 times and not only once? Could you help me out please? Thanks!
25.03.2015 - 12:15DROPS Design answered:
Dear Mrs Fournier, it looks like you decreased correctly for armhole, did you dec for neck as stated too ? (ie dec 1 st 28 times without increasing), so that you should get: 127 sts - 28 sts dec for neck - armhole (4 + 17x2 + 1) = 60 sts. Happy knitting!
25.03.2015 - 13:18
![]() KarlssonSylvia wrote:
KarlssonSylvia wrote:
Fråga Kan Du förklara hur jag skall göra när jag minskar och ökar för att få resåren att stämma varje varv Tack
07.12.2014 - 10:35
![]() Ginelou wrote:
Ginelou wrote:
I am knitting this lovely pattern. For more options I am knitting it with the short sleeves and will add opera mitts, same yarn, for cooler days.Many thanks for all these wonderful patterns and the soft yarns.
09.04.2013 - 01:01
|
|
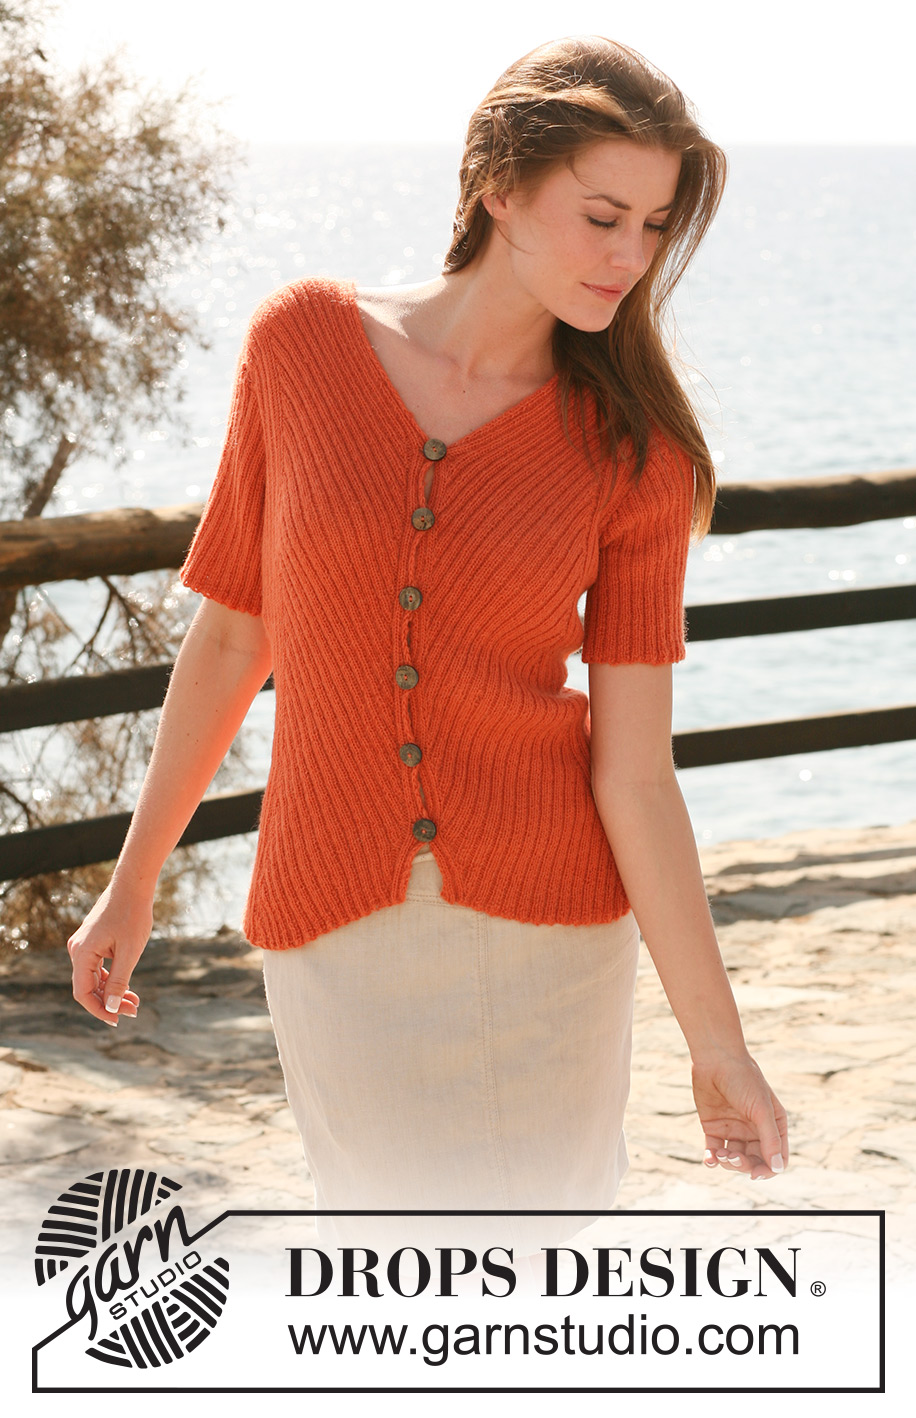
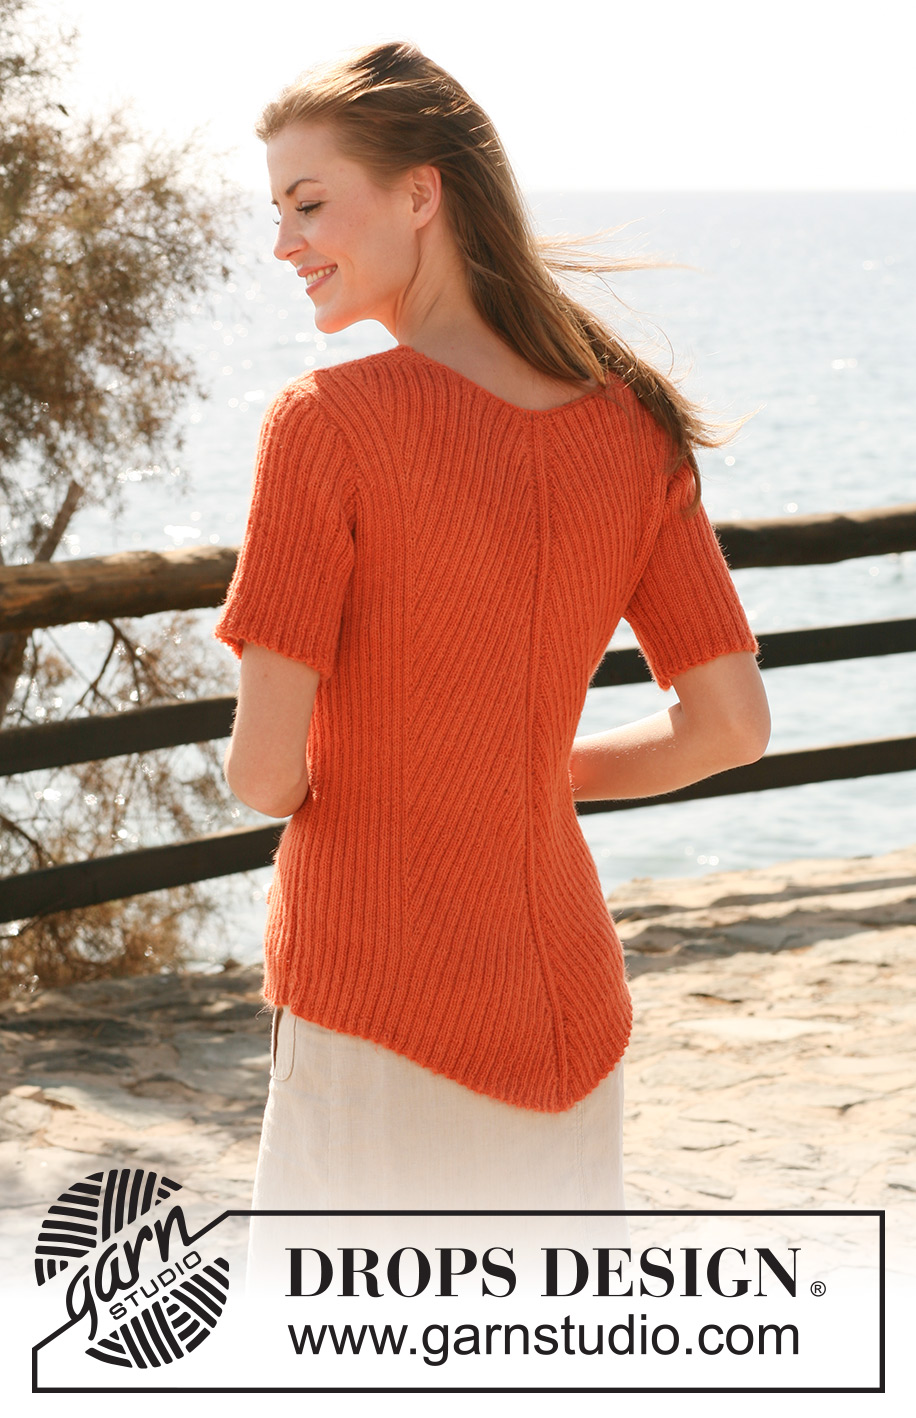
Back To Me#backtomecardigan |
|
 |
 |
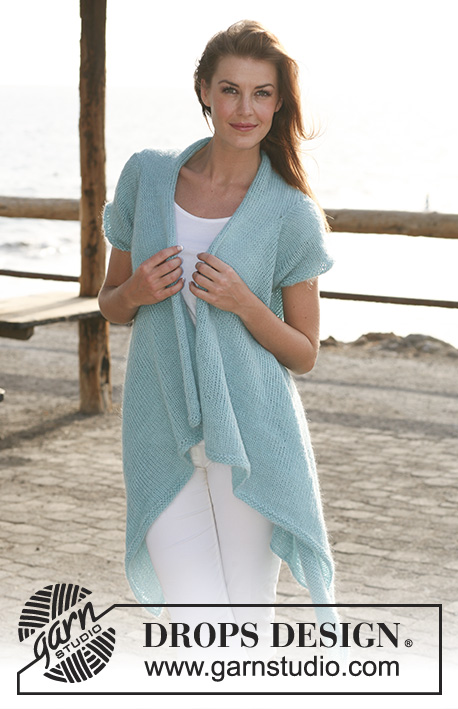
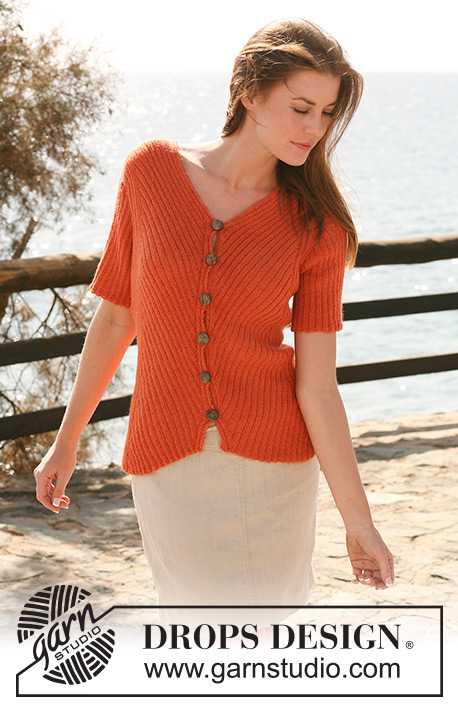
DROPS jacket in rib with short sleeves in ”Alpaca”. Size S-XXXL
DROPS 119-3 |
|
|
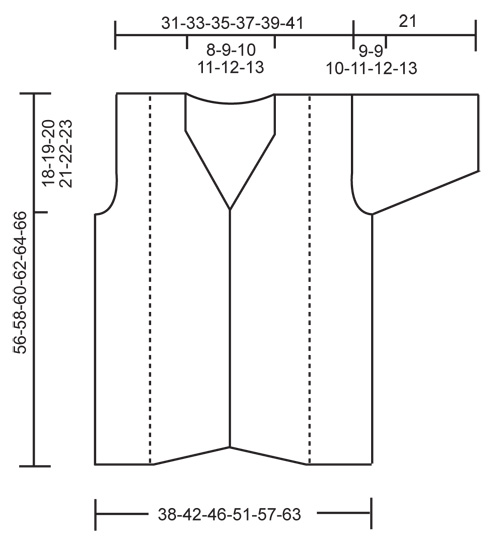
GARTER ST (back and forth on needle): K all rows. BUTTONHOLES: Make buttonholes on right front band. 1 buttonhole = cast off 4th and 5th st from mid front (= P2) and cast on 2 new sts on next row. Make buttonholes when piece measures: SIZE S + M: 6, 12, 18, 24, 30 and 36 cm. SIZE L + XL: 7, 13, 19, 25, 31 and 37 cm. SIZE XXL + XXXL: 7, 13, 20, 26, 33 and 39 cm. -------------------------------------------------------- -------------------------------------------------------- LEFT FRONT PIECE: Cast on 87-95-103-115-127-139 sts (includes 1 edge st at the side and 9 front band sts towards mid front) on needle size 3 mm with Alpaca. Work first row as follows from RS: 1 edge st, K1, * P2, K2 *, repeat from *-* and finish with 1 GARTER ST - see above. Work return row with K over K and P over P. On next row from RS insert 2 markers in piece: marker-1 after 30-34-38-46-54-62 sts and marker-2 after 78-86-94-106-118-130 sts (9 sts after marker-2 = front band). Continue in rib as before. AT THE SAME TIME dec 1 st on every row from RS by P2 tog after marker-1 and inc 1 st on every row from RS by making 1 YO before marker-2. Work YO into back of loop on return row and incorporate inc sts in rib as you go along. When piece measures 37-37-38-38-40-40 cm (measured at the side) shape the neck by continue dec as before but discontinue inc. Do this a total of 20-24-24-28-28-32 times. Now continue with dec and inc inside the 9 front band sts as before. AT THE SAME TIME when piece measures 38-39-40-41-42-43 cm (measured at the side) cast off 4 sts at beg of row from RS for armhole and cast off to shape the armhole at beg of every row from RS: 2 sts 5-7-9-13-17-21 times and 1 st 1 time. When dec are complete work st on armhole in garter st until finished measurements. When all dec for armhole and neck are complete there are 52-52-56-56-60-60 sts on needle. When piece measures 54-56-58-60-62-64 cm K 1 row from RS on all sts, AT THE SAME TIME dec 25-23-26-25-27-27 sts evenly = 27-29-30-31-33-33 sts. Continue in garter st on all sts until piece measures 56-58-60-62-64-66 cm. Cast off loosely. RIGHT FRONT PIECE: Like left front piece, but mirrored. i.e. work first row from RS as follows: 1 GARTER ST - see above, * K2, P2 *, repeat from *-* and finish with K1 and 1 edge st. Insert marker-1 after 9 sts (= front band), and marker-2 after 57-61-65-69-73-77 sts (= 48-52-56-60-64-68 sts between markers). Inc after marker-1 and dec before marker-2. REMEMBER BUTTONHOLES - see above. BACK PIECE: Cast on 190-206-222-246-270-294 sts (includes 1 edge st each side) on needle size 3 mm with Alpaca. Work first row from RS as follows: 1 edge st, K1, * P2, K2 *, repeat from *-* and finish with P2, K1 and 1 edge st. Work return row with K over K and P over P. Insert 4 markers in piece as follows: marker-1 after 30-34-38-46-54-62 sts, marker-2 after 92-100-108-120-132-144 sts, marker-3 after 98-106-114-126-138-150 sts and marker-4 after 160-172-184-200-216-232 sts (= 30-34-38-46-54-62 sts after marker-4) READ ALL OF THE FOLLOWING SECTION BEFORE CONTINUING! Continue in rib as before. AT THE SAME TIME dec 2 sts on every row from RS as follows: P2 tog before marker-2 and P2 tog after marker-3. Repeat this dec a total of 14 times = 162-178-194-218-242-266 sts on needle. Now continue in rib as before and continue dec as before, AT THE SAME TIME also inc 2 sts on every row from RS as follows: Make 1 YO after marker-1 and 1 YO before marker-4. Work YO into back of loop on return row and incorporate inc sts in rib as you go along. Continue like this until piece measures 38-39-40-41-42-43 cm (measured at the side and adjust to front piece). Now cast off 4 sts each side for armhole (NOTE! continue inc/dec as before). Cast off to shape the armhole each side at the beg of every row: 2 sts 5-7-9-13-17-21 times and 1 st 1 time = 132-140-148-156-164-172 sts. When dec are complete work st on armhole in garter st until finished measurements. Continue in rib and dec/inc as before. When piece measures 54-56-58-60-62-64 cm K 1 row from RS on all sts, AT THE SAME TIME dec 58-60-64-68-70-74 sts evenly = 74-80-84-88-94-98 sts. K 1 row from WS and now complete piece in garter st. AT THE SAME TIME on next row cast off the middle 18-20-22-24-26-30 sts for neck and complete each shoulder separately. Cast off 1 st on neckline on next row = 27-29-30-31-33-33 sts left on shoulder. Continue until piece measures 56-58-60-62-64-66 cm and cast off loosely. SLEEVE: Cast on 114-118-122-126-130-134 sts (includes 1 edge st each side) on needle size 3 mm with Alpaca. Work rib K2/ P2 with 1 edge st each side until piece measures 12-12-11-10-9-8 cm (less for the larger sizes because of longer sleeve cap and wider shoulder). Now cast off 5 sts each side and cast off to shape the sleeve cap each side at the beg of every row: 2 sts until piece measures 20 cm, now cast off 5 sts each side 1 time and cast off remaining sts. Piece measures approx 21 cm. ASSEMBLY: Sew shoulder seams. Set in sleeves inside 1 edge st. Sew sleeve and side seams inside 1 edge st. Sew on buttons. |
|
 |
|
Have you finished this pattern?Tag your pictures with #dropspattern #backtomecardigan or submit them to the #dropsfan gallery. Do you need help with this pattern?You'll find 18 tutorial videos, a Comments/Questions area and more by visiting the pattern on garnstudio.com. © 1982-2026 DROPS Design A/S. We reserve all rights. This document, including all its sub-sections, has copyrights. Read more about what you can do with our patterns at the bottom of each pattern on our site. |
|


With over 40 years in knitting and crochet design, DROPS Design offers one of the most extensive collections of free patterns on the internet - translated to 17 languages. As of today we count 324 catalogues and 12290 patterns translated into English (UK/cm). 12290
We work hard to bring you the best knitting and crochet have to offer, inspiration and advice as well as great quality yarns at incredible prices! Would you like to use our patterns for other than personal use? You can read what you are allowed to do in the Copyright text at the bottom of all our patterns. Happy crafting!
Post a comment to pattern DROPS 119-3
We would love to hear what you have to say about this pattern!
If you want to leave a question, please make sure you select the correct category in the form below, to speed up the answering process. Required fields are marked *.