
Popular categories
Looking for a yarn?


Comments / Questions (18)
![]() Patricia wrote:
Patricia wrote:
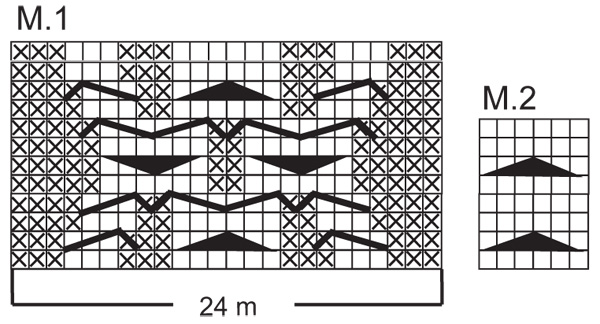
Hallo, Ich arbeite am Stirnband und man soll bis 48cm mithilfe von M1 arbeiten, heißt das, dass ich das Diagramm (12 reihen) ständig wiederhole bis ich bei die ca. 48 cm bin? oder wiederhole ich nur das Munter und lass sozusagen die oberen 2 reihen bzw. die unterste reihe aus? Danke schonmal!
12.11.2025 - 22:29DROPS Design answered:
Liebe Patricia, alle Reihen M.1 sollen wiederholt werden, dh wenn die 12 Reihen M.1 gestrikt sind, dann stricken Sie wieder ab 1. Reihe; Viel Spaß beim Stricken!
21.11.2025 - 15:27
![]() Justyna wrote:
Justyna wrote:
Dzień dobry, w schemacie M.1 wydaje mi się że rząd 12 powinien być symetrycznym odbiciem rzędu 4-tego, żeby wzór poprawnie był kontynuowany.
01.09.2025 - 03:59
![]() Christine wrote:
Christine wrote:
Bonjour, je commence le bandeau du patron 114-4. Juste pour être certaine: sur les deux mailles au point mousse de la lisière, seulement la maille externe est avec 2 fils ? De plus, sur le diagramme le rang 1 du bas est bien endroit (de droite à gauche) et le dernier rang 12, envers (de gauche à droite) ? Merci !
17.01.2025 - 11:31DROPS Design answered:
Bonjour Christine, on tricote 1 maille de chaque côté avec le fil en double et les mailles restantes avec 1 seul fil (ex sur un côté dans cette vidéo. Le 1er rang de M.1 se tricote sur l'envers et se lit donc de gauche à droite, ainsi, les rangs pairs seront sur l'endroit. Ainsi, sur l'envers, le 1er rang de M.1 se tricote ainsi: (cf sur l'envers dans la légende): 3 m end, 3 m env, 3 m end, 6 m env, 3 mend, 3 m env, 3 mend. Et le dernier rang de M.1 (sur l'endroit)= 3 m env, 3 m end, 3 m env, 6 m end, 3 m env, 3 m end, 3 m env. Bon tricot!
17.01.2025 - 13:19
![]() Pia Liukku wrote:
Pia Liukku wrote:
Hei. Neulotaanko M1 kaaviota vasemmalta oikealle ja onko 1 rivi=kierros, vai neulotaanko jokainen rivi ensin oikealta vasemmalle ja sitten uudelleen vasemmalta oikealle nurjalla puolella ? Eli onko yhdessä kuvio osuudessa 12 vai 24 neulottavaa sivua? Kaaviota on hankala tulkita. T. Pia Liukku
05.03.2024 - 16:49
![]() Pia Liukku wrote:
Pia Liukku wrote:
Hei. Aloitetaanko otsapannan neulominen nurjalta puolelta vai oikealta? Vai onko yksi kierros oikea + nurja puoli. Tuleeko mallikerran kummallekin sivuille ulkopuolelle 2 oikeaa silmukkaa? T. Pia Liukku
05.03.2024 - 08:18DROPS Design answered:
Hei, ensimmäinen kerros neulotaan työn nurjalta puolelta. Mallineuleen kummallekin puolelle tulee 2 ainaoikeaa silmukkaa.
05.03.2024 - 17:27
![]() Karin wrote:
Karin wrote:
Vielmals Danke für die schnelle Hilfe, nun kann es losgehen!
15.01.2020 - 11:45
![]() Karin wrote:
Karin wrote:
Die 2 Maschen Krausrippe am Reihenanfang sind im Diagramm nicht dargestellt. Sollen diese beiden Randmaschen mit doppeltem Faden gestrickt werden oder wirklich nur die erste und letzte Masche in jeder Reihe?
14.01.2020 - 18:48DROPS Design answered:
Liebe Karin, die 2 Maschen Krausrippen werden hier mit nur 2 Fäden gestrickt - siehe Video. Viel Spaß beim stricken!
15.01.2020 - 08:50
![]() Karin wrote:
Karin wrote:
Ich finde die Beschreibung des Stirnband Musters kompliziert. Habe ich Recht in der Annahme, dass nur am Anfang in der ersten Vorderseite aus 1 Masche 2 Maschen gestrickt werden und danach entsprechend M1 Chema gestrickt wird ?
14.01.2020 - 18:27DROPS Design answered:
Liebe Karin, ja genau, bei der ersten Hinreihen werden 4 Maschen zugenommen, dann stricken Sie M.1 bei der nächsten Reihe (in M.1 wird die 1. Reihe eine Rückreihe sein = von links nach rechts gelesen). Viel Spaß beim stricken!
15.01.2020 - 08:48
![]() Martina wrote:
Martina wrote:
Ist in dem Diagramm jede Zeile eine Reihe, oder sind nur die Hinreihen angezeigt und die Rückreihen strickt man wie sie erscheinen? Danke und schönen Abend Martina
04.01.2019 - 19:26DROPS Design answered:
Liebe Martina, alle Reihen sind im Diagram gezeigt, wenn Sie sie in Reihen stricken, lesen Sie die Hinreichen rechts nach links und die Rückreihen links nach rechts. Wenn Sie in der Runde stricken, lesen Sie alle Reihen rechts nach links, wie Sie im Diagram gezeigt sind. Viel Spaß beim stricken!
07.01.2019 - 08:37
![]() Patty wrote:
Patty wrote:
Please clarify the M1 chart. If row 1 is the WS- then is row 1 read right to left and row 2 (RS) read left to right? Also- I am using a worsted weight yarn for the headband. Should I adjust my needle size. Thank you
18.09.2018 - 15:06DROPS Design answered:
Dear Patty, when working M.1 back and forth, 1st row and every odd numbered row are worked from the WS = from the left towards the right. Row 2 and every even numbered rows will be worked from the RS = from the right towards the left. This pattern is worked with a tension of 21 sts x 28 rows - with a yarn group B - try our yarn converter to check alternatives. Happy knitting!
18.09.2018 - 15:33
|
|||||||||||||||||||
Alpine Twist#alpinetwistset |
|||||||||||||||||||
 |
 |
||||||||||||||||||
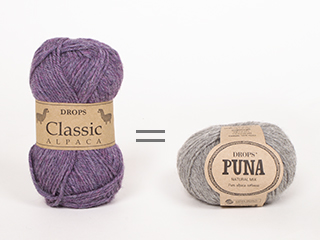
DROPS ear warmer and mittens in ”Classic Alpaca” or "Puna" with cables.
DROPS 114-4 |
|||||||||||||||||||
|
GARTER ST (back and forth on needle): K all rows. PATTERN: See diagram M.1 and M.2. Diagram shows the pattern from RS. EAR WARMER: Worked back and forth on needle. Cast on 24 sts on needle size 4 mm with Classic Alpaca or Puna. K 1 row from WS. NOTE: Work the outermost st each side in double thread throughout – i.e. have an extra ball of yarn and use this only for these sts. Work next row as follows (from RS): 2 GARTER STS – see above, P3, inc 1 st in next st and K both sts, K1, P3, K1, inc 1 st in each of the next 2 sts and K all 4 sts, K1, P3, K1, inc 1 st in next st and K both sts, P3 and 2 garter sts = 28 sts. Continue as follows: 2 garter sts, M.1 (first row = WS) and 2 garter sts. Continue like this until piece measures approx 48 cm, adjust to after the last but one row in M.1 (i.e. row from WS) – measure piece to your head to see if it fits. Work next row as follows from RS: 2 garter sts, P3, K2 tog, K1, P3, K1, K2 tog, K2 tog, K1, P3, K1, K2 tog, P3 and 2 garter sts = 24 sts. K 1 row on all sts from WS and then cast off. Sew tog, edge to edge, mid back -------------------------------------------------------- MITTENS: LEFT MITTEN: Worked in the round on double pointed needles. Cast on 52 sts on double pointed needles size 3.5 mm with Classic Alpaca or Puna. K 1 round. Insert a marker at beg of round. Continue in rib as follows: K6, P3, K3, P3, K6, P3, K3, P3, K6, P3, K3, P4, K3, P3. When piece measures 4 cm change to double pointed needles size 4 mm. Continue as follows: M.2 (= 6 sts), M.1 (= 24 sts), M.2, P3, K3, P4, K3, P3. Continue like this until piece measures 10 cm. On next round make 1 YO in the middle of the M.2 repeat at beg of round, on next round P YO into back of loop – this st = thumb st. Now K the 3 sts each side of thumb st (+ inc sts) on every round. When piece measures 11 cm inc 1 st each side of thumb-st by making 1 YO – on next round YO P into back of loop, and repeat the inc on every 3rd round a total of 5 times (= 11 thumb-sts and 63 sts in total) – P all inc sts for thumb. When piece measures 17 cm slip the 11 thumb-sts on a stitch holder = 52 sts left on needle. Continue in M.2 on the first 6 sts as before (with remaining sts as before). Continue like this until piece measures approx 22 cm – adjust to after 1 full repeat of M.1. Continue in rib as follows: K6, P3, K3, P3, K6, P3, K3, P3, K6, P3, K3, P4, K3, P3. When piece measures 23 cm dec all K6 to K4 = 46 sts. When piece measures 25 cm dec all P3 to P2 = 40 sts. When piece measures 26 cm dec all P4 to P2 = 38 sts. When piece measures 27 cm P tog all P2 to P1 = 31 sts. When piece measures 28 cm K tog all K3 to K2 and all K4 to K2 = 21 sts. Now K2 tog all the way round, cut the thread and pull it through remaining sts, tighten and fasten. Mitten measures approx 29 cm. THUMB: Slip the 11 thumb-sts back on double pointed needles size 4 mm and pick up 3 sts behind thumb gusset = 14 sts. Work stocking st in the round for approx 6 cm, then K2 tog all the way round = 7 sts. Cut the thread and pull it through remaining sts, tighten and fasten. RIGHT MITTEN: Like left mitten, but mirrored, i.e. work thumb gusset in the M.2 repeat on the middle of round instead of in the repeat at beg of round. |
|||||||||||||||||||
Diagram explanations |
|||||||||||||||||||
|
|||||||||||||||||||
 |
|||||||||||||||||||
Have you finished this pattern?Tag your pictures with #dropspattern #alpinetwistset or submit them to the #dropsfan gallery. Do you need help with this pattern?You'll find 23 tutorial videos, a Comments/Questions area and more by visiting the pattern on garnstudio.com. © 1982-2026 DROPS Design A/S. We reserve all rights. This document, including all its sub-sections, has copyrights. Read more about what you can do with our patterns at the bottom of each pattern on our site. |
|||||||||||||||||||


With over 40 years in knitting and crochet design, DROPS Design offers one of the most extensive collections of free patterns on the internet - translated to 17 languages. As of today we count 324 catalogues and 12290 patterns translated into English (UK/cm). 12290
We work hard to bring you the best knitting and crochet have to offer, inspiration and advice as well as great quality yarns at incredible prices! Would you like to use our patterns for other than personal use? You can read what you are allowed to do in the Copyright text at the bottom of all our patterns. Happy crafting!
Post a comment to pattern DROPS 114-4
We would love to hear what you have to say about this pattern!
If you want to leave a question, please make sure you select the correct category in the form below, to speed up the answering process. Required fields are marked *.