
Popular categories
Looking for a yarn?


Comments / Questions (31)
![]() Valen wrote:
Valen wrote:
Como se realiza el aumento en el centro del delantero?
19.04.2026 - 22:22DROPS Design answered:
Hola Valen, en este caso tienes que aumentar montando puntos en cada borde en el centro del delantero. Puedes ver un ejemplo en esta lección
27.04.2026 - 01:42
![]() Eva wrote:
Eva wrote:
Quale metodo è stato usato per gli aumenti sulla parte centrale dei due davanti "aumentare verso il centro davanti, ogni 2 ferri, come segue: 4 m 1 volta, 3 m 1 volta, 2 m 2-2-3-3-3-3 volte e 1 m 3-3-3-3-4-4 volte." Grazie
15.10.2025 - 00:12DROPS Design answered:
Buonasera Eva, può utilizzare la tecnica che preferisce per gli aumenti. Buon lavoro!
15.10.2025 - 00:16
![]() Renee wrote:
Renee wrote:
Merci pour votre réponse rapide bonne journee
09.04.2024 - 15:44
![]() Renee wrote:
Renee wrote:
Bonjour pour la bordure faut il aussi la faire dans le dos car on n a pas une photo du dos Merci
09.04.2024 - 13:30DROPS Design answered:
Bonjour Renée, tout à fait, vous allez relever les mailles tout autour de l'ouverture du gilet, soit: en bas du dos, le long des devants et le long de l'encolure. Bon tricot!
09.04.2024 - 15:29
![]() Berit Lindh wrote:
Berit Lindh wrote:
Jag stickar Bolero107-27 i rekomm. Dropsgarn. Har stickat massor fr era kataloger under åren, o nätet. Aldrig haft problem tidigare, blivit supernöjd. Avmaskn. för ärmhål på ärmarna som vanligt (ärmkulle) 1:a gången avmsk jag exakt efter mönstret. På tok för litet för ärmhålet vid hopsyning. Jag har repat upp, gjort om, slopat sticka ihop 2och2 , men får inte till det. Snälla hjälp mig ! Min svärdotter vill ha just denna ! BL
23.11.2020 - 19:11DROPS Design answered:
Hej Berit, vilken storlek stickar du? Är det ärmkullen som blir for kort? Kanske du skall maska av istället för att sticka ihop maskorna... Se till att maskas löst av. Lycka till !
02.12.2020 - 10:56
![]() Karin Nordvik wrote:
Karin Nordvik wrote:
Lurer på om det er noe som mangler i beskrivelsen av hvordan ermene skal strikkes ?? Det står at man skal strikke m1, men hva med de andre diagrammene ? Ingen forklaring på hva symbolene i diagrammet skal være heller ...
10.04.2018 - 18:29DROPS Design answered:
Hei Karin. Det er bare ett diagram til denne oppskriften (M.1), i tillegg til målskissen. M1 skal gjentas forholdsvis 5 og 6 ganger på omgangen (avhengig av størrelse) , og til arbeidet måler 31 cm. Symbolforklaringen står rett over målskissen. God fornøyelse.
11.04.2018 - 09:25
![]() Monange Sylvie wrote:
Monange Sylvie wrote:
Bonjour y a-t-il des augmentations tout au long des manches je ne vois rien dans ce sens pourtant la la Manche sur le dessin sont bien aller en augmentant merci d'avance pour votre renseignement
30.01.2018 - 23:46DROPS Design answered:
Bonjour Mme Monange, on augmente une seule fois après les côtes, c'est tout, il n'y a pas d'augmentation au milieu sous la manche (le schéma est un format standard). Bon tricot!
31.01.2018 - 08:41
![]() Fay wrote:
Fay wrote:
Is there any way you can make these this one in particular a downloadable PDF? I have a kindle fire and I cant figure a way to download this. I really do like it.
17.11.2017 - 16:24DROPS Design answered:
Dear Fay, our patterns can only be printed, but you can print them with a virtual printer to save them as a PDF. Happy knitting!
17.11.2017 - 16:38
![]() Cindy wrote:
Cindy wrote:
Bonjour, "rabattre pour les emmanchures de chaque côté tous les 2 rangs : 1fois3 m,1 fois 2 m et 4 fois 1 m" à la fin de mon rang je rabat dans le même sens ou sens contraire donc 4 fois 1 m, 1 fois 2 m et 1 fois 3m. Et "augmenter côté milieu devant tous les 2 rangs : 1 fois 4 m, 1 fois 3 m, 2fois 2 m et 3 fois 1 m" que veut dire côté milieu devant? merci
31.01.2017 - 13:32DROPS Design answered:
Bonjour Cindy, pour le dos, rabattez en début de rang de chaque côté (= sur l'endroit puis sur l'envers) ou en début de rang sur l'endroit (devant gauche) / sur l'envers (devant droit): 1 x 3 m, 1 x 2 m et 4 x 1 m. Vous devez avoir 9 m rabattues de chaque côté pour le dos/sur le côté pour chaque devant. le côté milieu devant correspond au côté où sera la bordure devant. Bon tricot!
01.02.2017 - 10:58
![]() Cindy wrote:
Cindy wrote:
Bonjour, petite question en rapport avec cette partie pour les manches " Tricoter 1 rang envers sur l'envers, 1 rang envers sur l'endroit, 1 rang endroit sur l'envers et continuer en suivant M1 avec 1 m lis de chaque côté". Le diagramme comporte 12 mailles alors que moi quand j aurais fait les augmentations j'en aurais 62, comment dois-je faire svp. merci
29.01.2017 - 19:11DROPS Design answered:
Bonjour Cindy, tricotez M.1 ainsi sur les 62 m: 1 m lis, 5 x M.1 (= sur les 60 m suivantes), 1 m lis. Bon tricot!
30.01.2017 - 12:01
|
|||||||||||||
DROPS 107-27 |
|||||||||||||
|
|
|||||||||||||
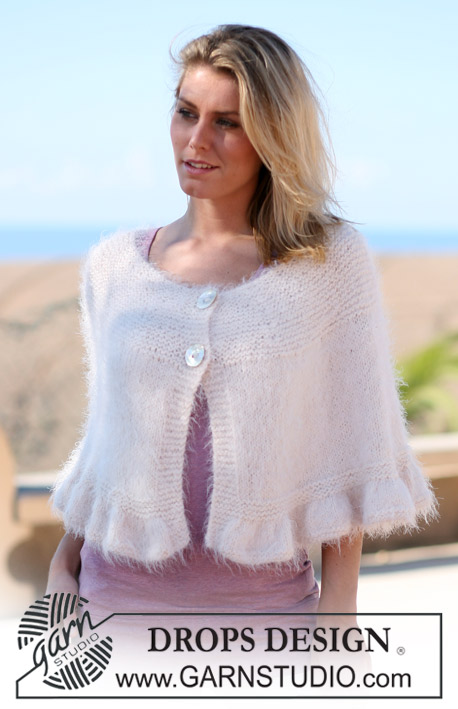
DROPS bolero in “Paris” with puff sleeves in lace pattern. Size S – XXXL
DROPS 107-27 |
|||||||||||||
|
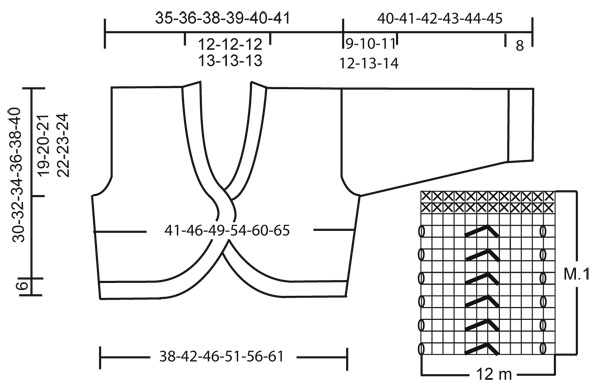
Pattern: See diagram M.1. The diagram shows the pattern from the RS. Back piece: Cast on 66-74-80-88-98-106 sts (incl 1 edge st each side) on needle size 5 mm and work stocking st. At the same time when piece measures 3 cm inc 1 st each side on every 3-3-3-4-4-4 cm a total of 3 times = 72-80-86-94-104-112 sts. When piece measures 11-12-13-14-15-16 cm cast off for armhole each side on every other row: 3 sts 1-1-1-2-2-2 times, 2 sts 0-1-2-2-4-5 times and 1 st 3-4-4-4-4-5 times = 60-62-64-66-68-70 sts. Continue until piece measures 28-30-32-34-36-38 cm and now cast off the middle 18-18-18-20-20-20 sts for neck. Dec 1 st on neckline on next row = 20-21-22-22-23-24 sts left on each shoulder. Cast off when piece measures 30-32-34-36-38-40 cm. Left front piece: Cast on 14-18-19-23-27-31 sts (incl 1 edge st at side) on needle size 5 mm. Read all of the following section before continuing! Work stocking st, at the same time inc towards mid front on every other row: 4 sts 1 time, 3 sts 1 time, 2 sts 2-2-3-3-3-3 times and 1 st 3-3-3-3-4-4 times. At the same time when piece measures 3 cm inc at side as described for back piece. After all inc are complete = 31-35-38-42-47-51 sts on row. When piece measures 11-12-13-14-15-16 cm (from casting on row) cast off for armhole as described for back piece. At the same time dec to shape the neckline towards mid front: 1 st on every 6th row a total of 5-5-5-6-6-6 times. After all dec for armhole and neckline are complete = 20-21-22-22-23-24 sts left on shoulder. Continue until piece measures 30-32-34-36-38-40 cm and cast off. Right front piece: Cast on and work like left front piece, but mirrored. Sleeve: Worked back and forth on needle. Cast on 53-56-59-62-65-68 sts (incl 1 edge st each side) on needle size 4 mm and work 8 cm Rib, P2/K1 (seen from RS) with 1 edge st each side. Change to needle size 5 mm, work 1 row stocking st from RS, at the same time inc 9-6-3-12-9-6 sts evenly = 62-62-62-74-74-74 sts. P 1 row from WS, P 1 row from RS, K 1 row from WS and continue in M.1 with 1 edge st each side. When piece measures 31 cm cast off 3 sts each side for armhole and dec to shape the armhole on every other row: 2 sts 1 time and 1 st 1 time = 50-50-50-62-62-62 sts. Continue in M.1 on the middle 36-36-36-48-48-48 sts and work 7 sts each side in garter st. When piece measures 39-40-41-42-43-44 cm K tog all sts 2 by 2 = 25-25-25-31-31-31 sts. Cast off remaining sts on next row. Assembly: Sew shoulder seams and side seams. Rib border: Pick up approx 279-297-315-333-351-369 sts round the whole opening on circular needle size 4 mm (make sure to pick up enough sts along curves on front pieces, i.e. border not too tight). P 1 round and continue in Rib, P2/K1. When Rib measures 4 cm make 2 buttonholes on right front piece, the top one 2 cm before the beg of neckline dec and the other one approx 3-3-4-4-5-5 cm below. 1 buttonhole = cast off 1 st and cast on 1 new st on return row. Cast off loosely in Rib when border measures 6 cm. Sew sleeve seams inside 1 edge st. Set in sleeves and sew on buttons. |
|||||||||||||
Diagram explanations |
|||||||||||||
|
|||||||||||||
 |
|||||||||||||
Have you finished this pattern?Tag your pictures with #dropspattern or submit them to the #dropsfan gallery. Do you need help with this pattern?You'll find 20 tutorial videos, a Comments/Questions area and more by visiting the pattern on garnstudio.com. © 1982-2026 DROPS Design A/S. We reserve all rights. This document, including all its sub-sections, has copyrights. Read more about what you can do with our patterns at the bottom of each pattern on our site. |
|||||||||||||


With over 40 years in knitting and crochet design, DROPS Design offers one of the most extensive collections of free patterns on the internet - translated to 17 languages. As of today we count 324 catalogues and 12290 patterns translated into English (UK/cm). 12290
We work hard to bring you the best knitting and crochet have to offer, inspiration and advice as well as great quality yarns at incredible prices! Would you like to use our patterns for other than personal use? You can read what you are allowed to do in the Copyright text at the bottom of all our patterns. Happy crafting!
Post a comment to pattern DROPS 107-27
We would love to hear what you have to say about this pattern!
If you want to leave a question, please make sure you select the correct category in the form below, to speed up the answering process. Required fields are marked *.