
Popular categories
Looking for a yarn?


Comments / Questions (30)
![]() Julie wrote:
Julie wrote:
After knitting backwards and forwards for the sleeve head I am trying to work out how to continue the double moss stitch round the remaining stitches back to the centre underarm. If I continue with first row of double moss stitch it means the second row of the stitch starts at the point where the sleeve head starts. Is this correct?
02.05.2026 - 18:18DROPS Design answered:
Dear Julie, yes that's correct but it won't be visible afterwards. Happy knitting!
04.05.2026 - 12:15
![]() Celine wrote:
Celine wrote:
Hei. Jeg får ikke til å strikke diagrammene. Når jeg skal begynne på A1 får jeg ikke til at mønsteret ser ut slik som det gjør på genseren. 1.pinne er fra retten og strikkes vrang, rett, rett, vrang også repeteres det. 2. pinne er fra vrangen og strikkes rett, vrang, vrang, rett og repeteres. 3.pinne er rett, vrang, vrang, rett og 4.pinn er vrang, rett, rett, vrang. Jeg føler alt roter seg til når jeg skal få med de økte maskene i hver side. Hva er det jeg gjør feil?
30.03.2026 - 12:56DROPS Design answered:
Hei Celine. For å få en bedre oversikt, kan du sette 1 maskemarkør i hver side før/etter økningene og så må du tilpasse de økte maskene slik at de vil passe inn i mønstret. Det vil ikke passe 100% hver gang, noen ganger vil det kun være f.eks 1 rett / 1 vrang i høyden (diagrammet viser 2 rett / 2 vrang i høyden). mvh DROPS Design
07.04.2026 - 10:14
![]() Mona wrote:
Mona wrote:
The pattern says to start chart a5 from the 6th stitch, does that apply to all the charts after or is it only for chart a5? thanks for the beautiful pattern!
28.03.2026 - 22:45DROPS Design answered:
Dear Mona, this applies to all diagrams (especially A.5 and A.3) to get a repeat on the right place. Happy knitting!
07.04.2026 - 10:28
![]() Natasha wrote:
Natasha wrote:
I'm working on the left front XS. After working the last 1 stitch into the chart A.1, how do I proceed in the next row? Do I start from the last box of the chart to maintain the pattern? Also, on the right sided rows, the first 3 stitches are knit, do I purl/knit the last/first 3 stitches on the wrong sided rows? When doing the increases, how do I incorporate the increase into the pattern? After knitting 3, do I count the increase as the first stitch of the chart A.1? Please help!
06.03.2026 - 01:20DROPS Design answered:
Hi Natasha, You work the last stitch in A.1 (on the left-hand side of the diagram) then repeat the whole of A.1 (from right to left in the diagram) across the next 28 stitches (A.1 x 7). Yes, the 3 knitted stitches are purled from the wrong side. The increases are worked after the 3 knitted stitches as described under Increase tip-1 at the top of the pattern. For the first 2 increases, the new stitches are purled from the wrong side, then the 3rd increase is knitted from the wrong side, the next 2 increases are purled, etc.. Regards, Drops Team.
06.03.2026 - 06:43
![]() Natasha wrote:
Natasha wrote:
Hi! I’m working on the back piece. I’ve knit till the line where it says ‘insert stitch marker and measure from here. Work A1 (without stockinette)’ but when I work A1 without the stockinette, the pattern distorts. What am I doing wrong? 😭
14.02.2026 - 02:59
![]() Sandra wrote:
Sandra wrote:
Hola. No entiendo en que momento hay que tejer en patrón A2, no hay especificaciones de en que parte comienza el A3, solo que van a la vez. ¿Podríais aclararme esa parte?
30.12.2025 - 20:58DROPS Design answered:
Hola Sandra, primero trabajas las filas 1, 2 y 3 indicadas al principio y las repites cuánto sea necesario para tu talla. Después, trabajar el diagrama A.1 sobre todos los puntos, repitiendo hasta el número de cm necesarios para tu talla. Trabajas el diagrama A.2 1 vez, de abajo arriba, entero. Después trabajas el diagrama A.3 y trabajas los aumentos. Cuando terminas el diagrama A.3 1 vez continúas con el diagrama A.4.
04.01.2026 - 22:44
![]() Stefania wrote:
Stefania wrote:
Hallo; wie ist das gemeint im Rückenteil letzten Abschnitt A.3 damit das Muster symmetrisch wird. Bis 2 Maschen übrig sind…? vielen dank für die schnelle Antwort
02.12.2025 - 12:40DROPS Design answered:
Liebe Stefania, die Maschenanzahl für A.3 ist teilbar durch 12+2, so endet das Muster wie es beginnt. Viel Spaß beim Stricken!
02.12.2025 - 17:22
![]() Lena Björkskog wrote:
Lena Björkskog wrote:
Det här var nog det roligast mönster jag har stickat efter, har ändå stickat en hel del.
19.11.2025 - 15:49
![]() Petra wrote:
Petra wrote:
Ich komme leider beim Ärmel nicht weiter . Das Muster scheint bei den Abnahmen an der unteren Ärmel Mitte bei mir nicht aufzugehen. Ich hab bei den 18 Maschen Stricken die erste abgehobene (Doppel Masche) zu den gestricken mitgezählt. Oder darf ich nach dem wenden die Masche nicht mitzählen und 18 stricken ?
13.11.2025 - 18:11DROPS Design answered:
Liebe Petra, bei der nächsten Reihe / 1. Rückreihe stricken Sie die Maschen wie bei der 2. Reihe A.8, dann wenden und die 3. Reihe A.8 stricken, wenden und die 4. Reihe A.8 stricken, beachten Sie nur, daß das Muster immer übereinander stimmt, dh man soll immer 2 M rechts/2 M links in der Höhe (und verkehr in der Breite) haben. Viel Spaß beim Stricken!
21.11.2025 - 15:30
![]() Heidi wrote:
Heidi wrote:
Weshalb soll man zu Beginn des Bündchens so viele Maschen zunehmen? Wird dann das ganze nicht zu weit?
06.11.2025 - 15:59DROPS Design answered:
Liebe Heidi, die Zunahmen werden gemacht, damit das Bündchen locker fällt, es soll den Pullover nicht zusammenziehen. Da das Rippenmuster generell enger wird als der restliche Pulli, müssen so viele Maschen zugenommen werden, um das auszugleichen. Viel Spaß beim Stricken!
07.11.2025 - 10:34
|
|||||||
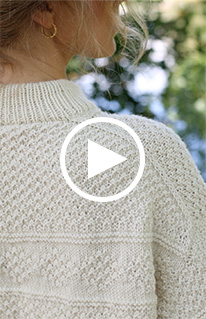
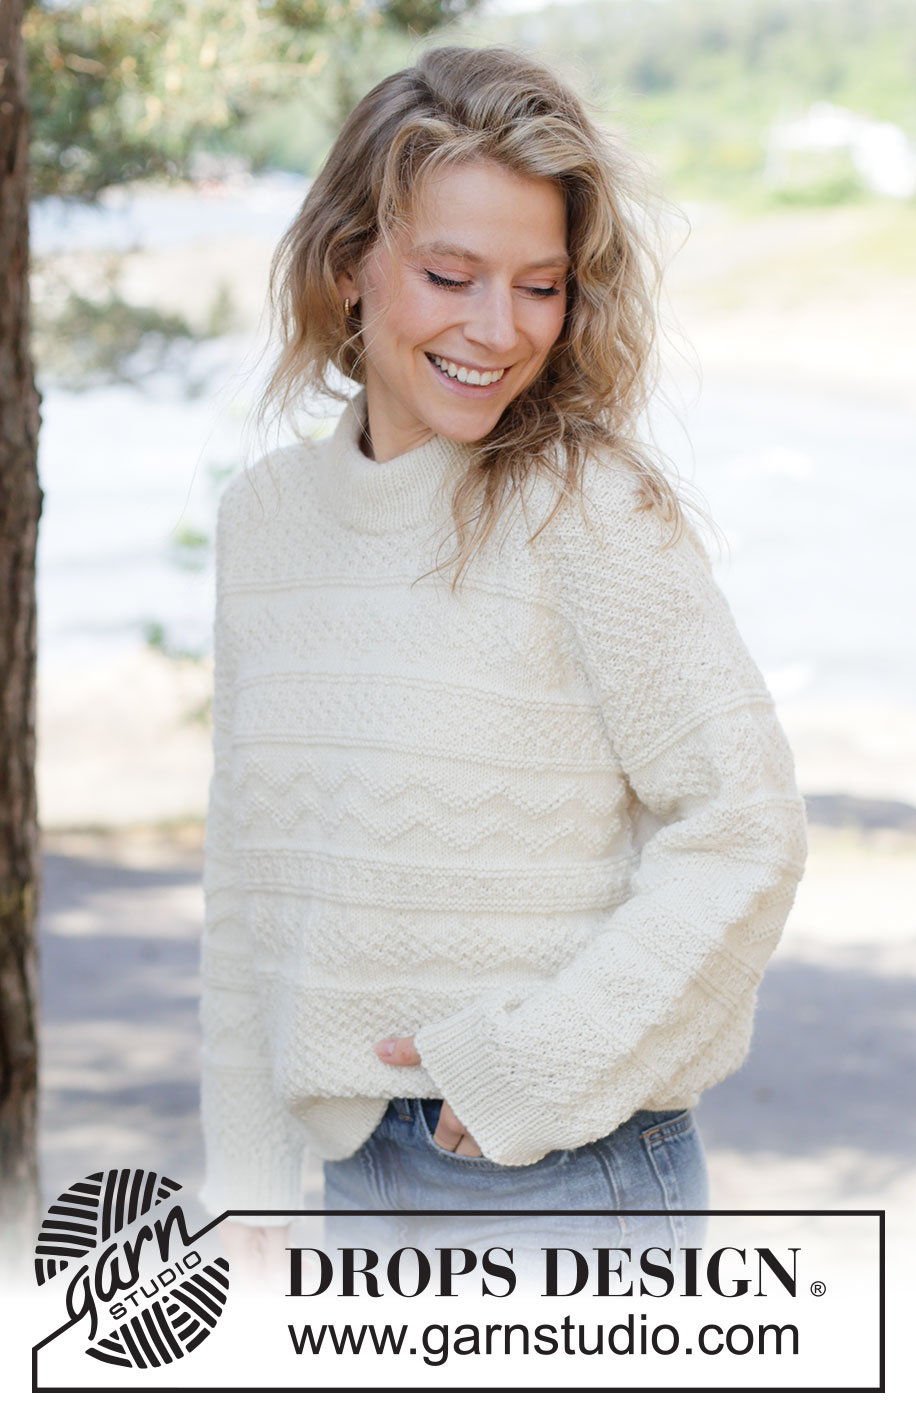
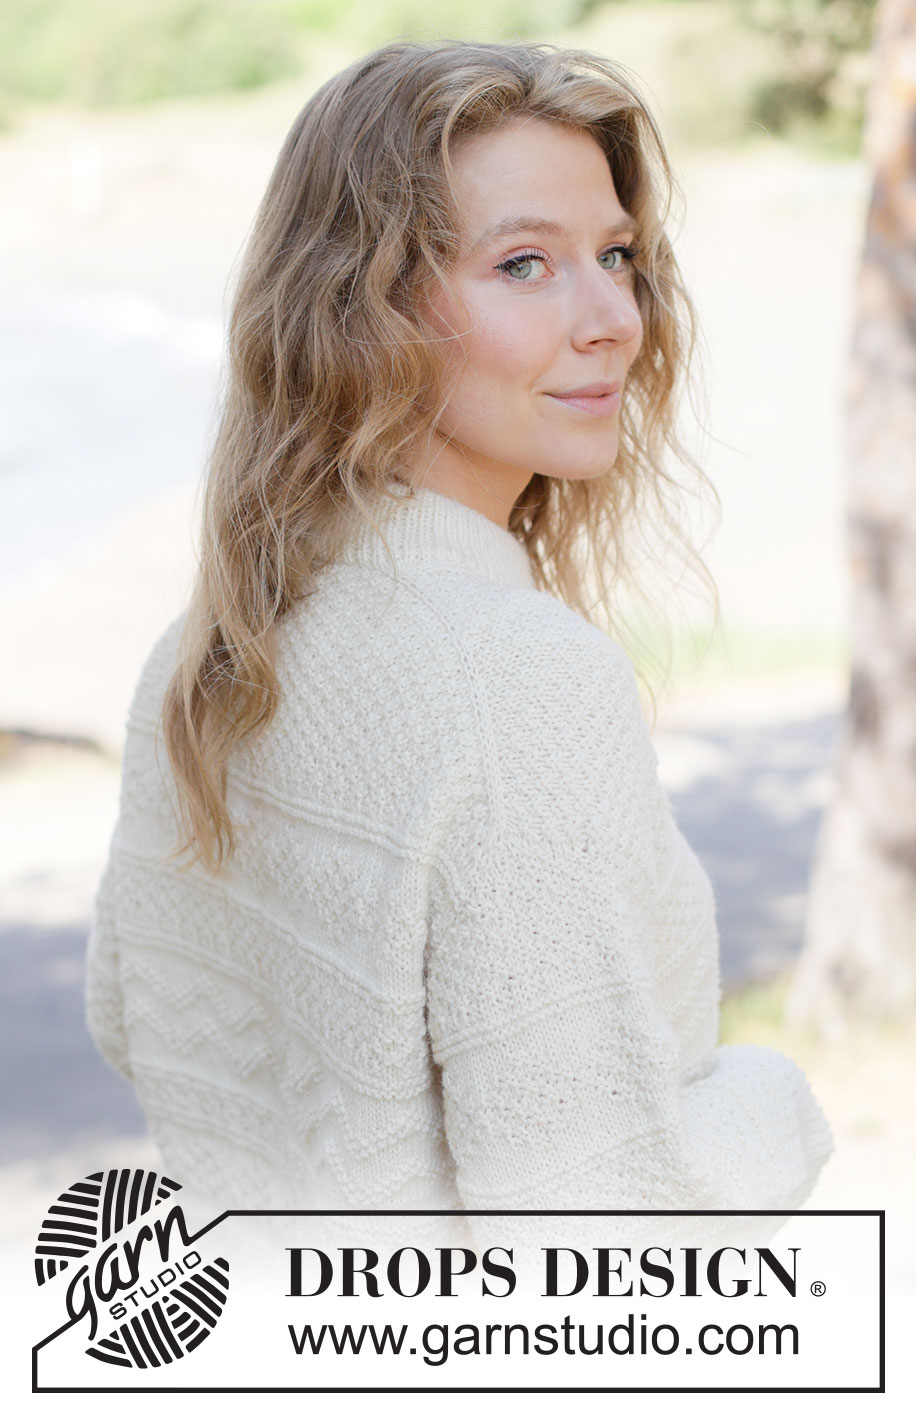
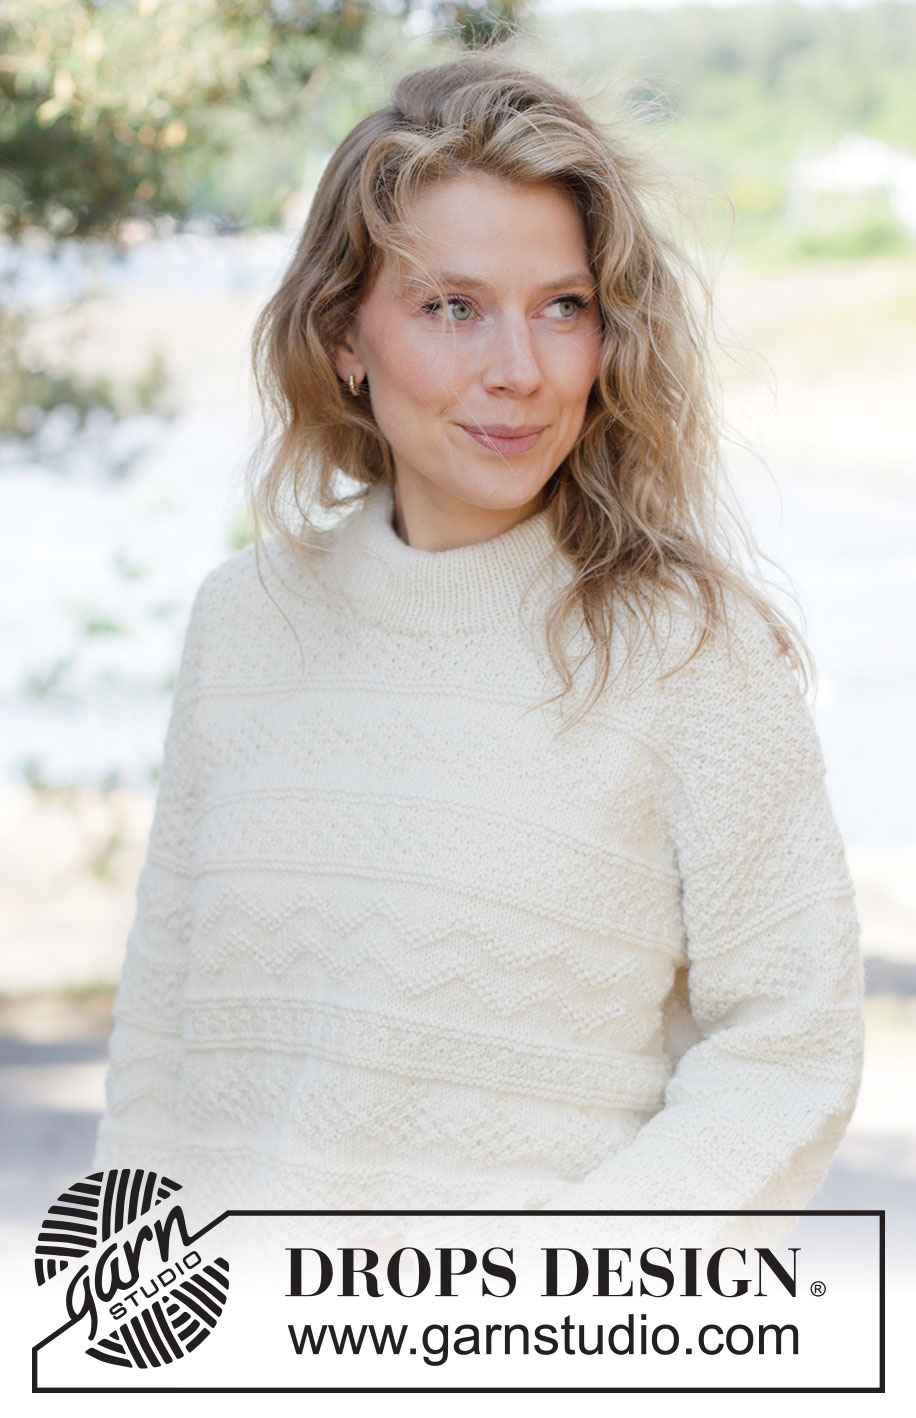
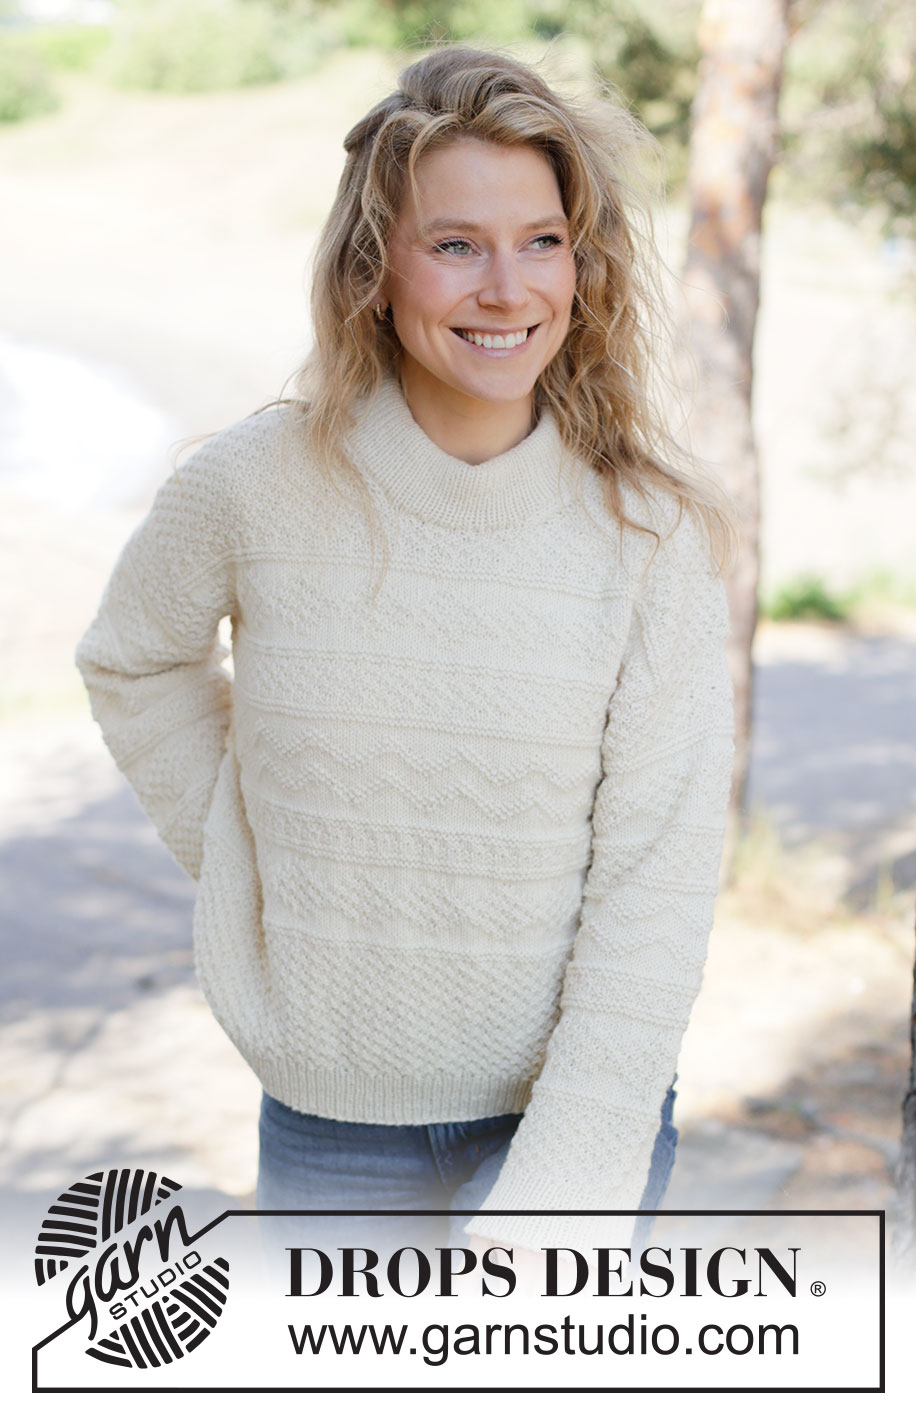
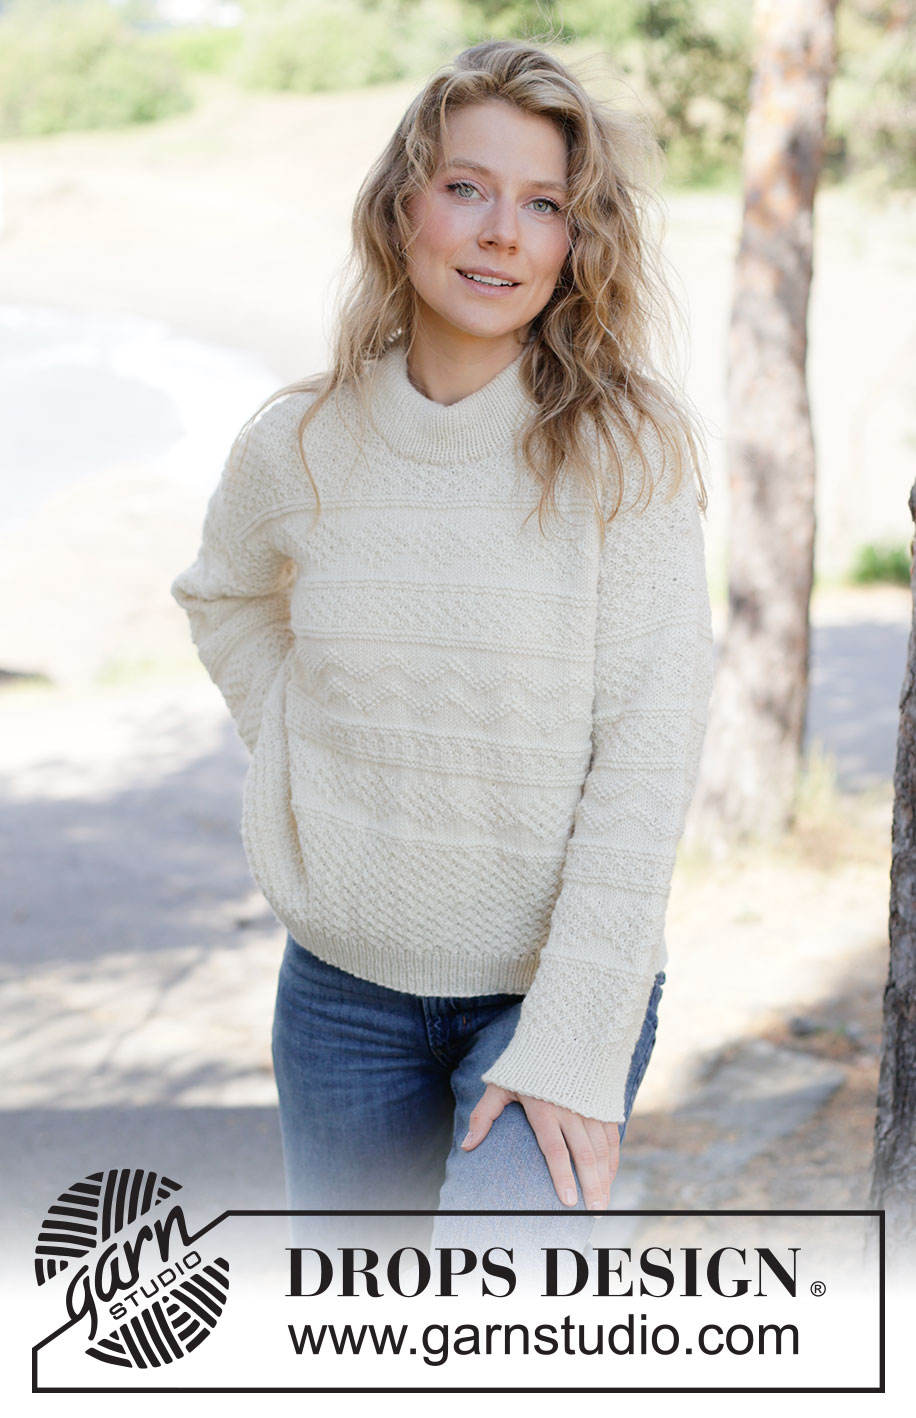
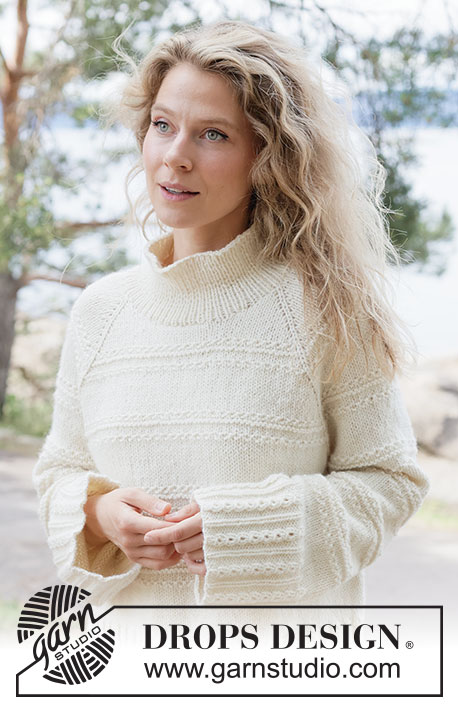
White Echo Sweater#whiteechosweater |
|||||||
 |
 |
||||||
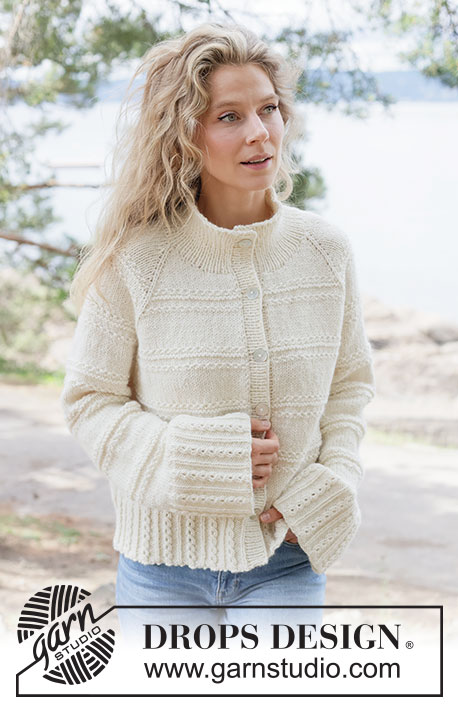
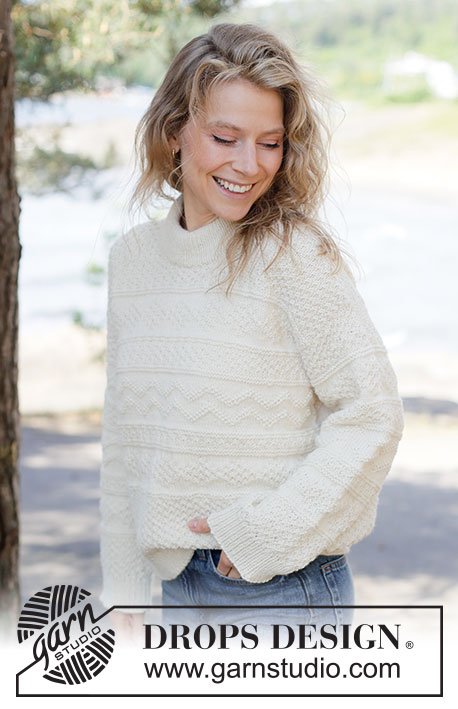
Knitted jumper in DROPS Lima or DROPS Merino Extra Fine. The piece is worked top down with European/diagonal shoulders, relief-pattern and double neck. Sizes XS - XXL.
DROPS 263-1 |
|||||||
|
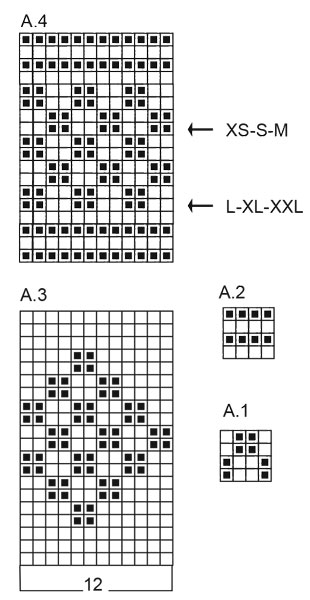
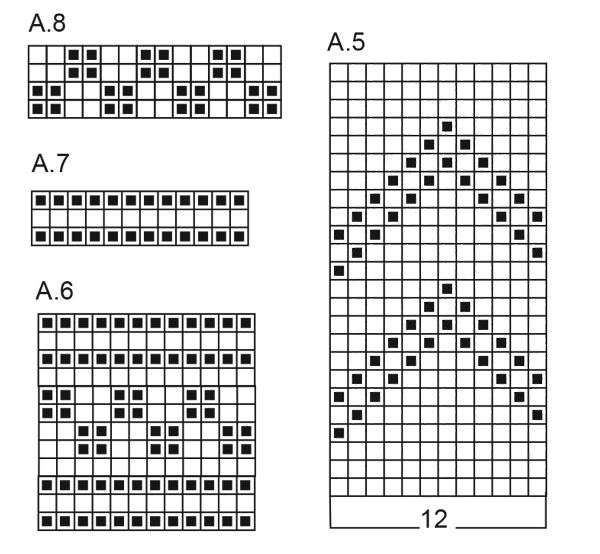
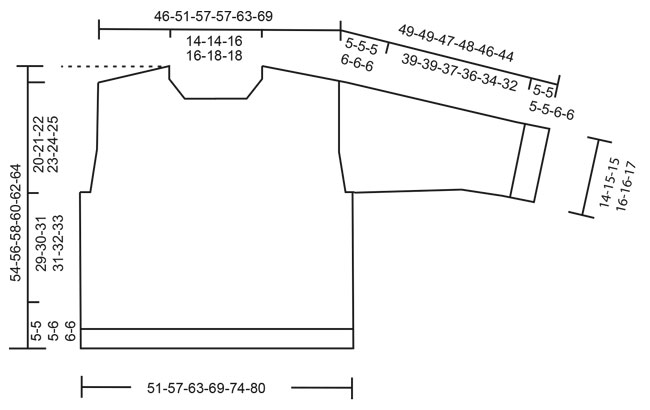
------------------------------------------------------- EXPLANATIONS FOR THE PATTERN: ------------------------------------------------------- PATTERN: See diagrams A.1 to A.8. The diagrams show the pattern from the right side. INCREASE TIP-1: INCREASE 1 STITCH TOWARDS THE LEFT - from RIGHT SIDE: Use left needle to pick up yarn between 2 stitches from row below, pick up yarn from the front and knit in the stitch loop that is on the back of the needle. INCREASE 1 STITCH TOWARDS THE RIGHT - from RIGHT SIDE: Use left needle to pick up yarn between 2 stitches from row below, pick up yarn from the back and knit in the stitch loop that is on the front side of the needle. . INCREASE TIP-2: INCREASE 1 STITCH TOWARDS THE RIGHT - from WRONG SIDE: Use left needle to pick up yarn between 2 stitches from row below, pick up yarn from the back and purl in the stitch loop that is on the front side of the needle. INCREASE 1 STITCH TOWARDS THE LEFT - from WRONG SIDE: Use left needle to pick up yarn between 2 stitches from row below, pick up yarn from the front and purl in the stitch loop that is on the back side of the needle. DECREASE TIP: Decrease 1 stitch on each side of the marker thread as follows: Work until there are 3 stitches left before the marker thread, knit 2 together, knit 2 (marker thread sits between these 2 stitches) slip 1 stitch knit-wise, knit 1 and pass the slipped stitch over the knitted stitch (= 2 stitches decreased). KNITTING TIP: When working short rows, there will be a small hole after each turn. This hole can be closed by tightening the strand or using the technique German Short Rows as follows: Slip the first stitch purl-wise, take the strand over the right needle and tighten well from the back (2 loops on the needle). These loops are worked together on the next row. ------------------------------------------------------- START THE PIECE HERE: ------------------------------------------------------- JUMPER – SHORT OVERVIEW OF THE PIECE: The pattern uses both long and short needles; start with the length which fits the number of stitches and change when necessary. The piece is started back and forth, casting on stitches at the back of the neck and working the back piece top down, while increasing stitches on each side for the shoulders, which become slightly diagonal. The back piece is worked as far as the armholes. The front piece is then worked in 2 sections, knitting up stitches along 1 back shoulder, working pattern and increasing for the neckline. This is repeated on the other shoulder, the 2 front sections are joined when the neckline is finished and worked until the armholes are finished. The front and back pieces are joined on the same circular needle and the body worked in the round Stitches are knitted up around the armholes for the sleeves, which are started back and forth for the sleeve cap, then finished in the round. Stitches are knitted up around the neckline and the neck worked in the round, then folded double to the inside. BACK PIECE: The piece is worked back and forth. Cast on 32-32-36-36-40-40 stitches with circular needle size 4 mm and DROPS Lima or DROPS Merino Extra Fine. ROW 1 (wrong side): Purl. ROW 2 (right side): Read INCREASE TIP-1. Knit 3, increase 1 stitch towards the left, work pattern A.1 until there are 3 stitches left on the row, increase 1 stitch towards the right, knit 3. ROW 3 (wrong side): Read INCREASE TIP-2. Purl 3, increase 1 stitch towards the right, work pattern A.1 until there are 3 stitches left on the row, increase 1 stitch towards the left, purl 3. The increased stitches are worked into pattern A.1 Work ROWS 2 and 3 a total of 16-19-21-21-23-26 times (32-38-42-42-46-52 rows worked) = 96-108-120-120-132-144 stitches. Remember to maintain the knitting tension. Insert 1 marker outermost on one side. The piece is now measured from here! Work pattern across all stitches (no stocking stitches on each side) as follows: Work A.1 until the piece measures 2-2-2-3-4-4 cm from the marker. Work A.2. Work A.3, AT THE SAME TIME on the first row increase 2 stitches evenly spaced = 98-110-122-122-134-146 stitches. (Work A.3 until there are 2 stitches left on the row, then work the first 2 stitches in A.3, so the pattern is symmetrical on both sides). When A.3 is finished, work A.4. (Work A.4 until there are 2 stitches left on the row, then work the first 2 stitches in A.4, so the pattern is symmetrical on both sides). NOTE! When there are 8-8-8-14-14-14 rows left in A.4, increase on each side for the armholes (see arrow in diagram) as follows: INCREASE FOR ARMHOLES: ROW 1 (right side): Remember INCREASE TIP-1. Work 1 stitch, increase 1 stitch towards the left, continue the pattern until there is 1 stitch left, increase 1 stitch towards the right, work 1 stitch. ROW 2 (wrong side): Continue the pattern, the new stitches are worked into the pattern. Work ROWS 1 and 2 a total of 2-2-2-5-5-5 times = 102-114-126-132-144-156 stitches. There are 4 rows left of pattern A.4. Cut the strand and place the stitches on a stitch holder/thread (the piece measures approx. 15-15-15-16-17-17 cm, from the marker, measured down the armhole). Now work the left front piece along the left back shoulder as follows: LEFT FRONT PIECE: Find the left back shoulder as follows: Lay the back piece flat, right side up, with the stitch holder/thread towards you; left side of piece = left shoulder. Start from the right side by the neck on the left back shoulder and knit up 1 stitch in each row worked, inside the outermost stitch, as far as the armhole = 32-38-42-42-46-52 stitches. Insert 1 marker. The front piece is measured from here. Purl 1 row from the wrong side. Work the next row from the right side as follows: Knit 3, work the last 1-3-3-3-3-1 stitches in A.1, work A.1 across the next 28-32-36-36-40-48 stitches. Continue this pattern back and forth until the piece measures 5-5-6-6-7-7 cm, with the next row from the right side. Increase for the neckline as follows: ROW 1 (right side): Remember INCREASE TIP-1. Knit 3, increase 1 stitch towards the left, work to end of row as before. ROW 2 (wrong side): Work pattern as before, finishing with purl 3. Work ROWS 1 and 2 a total of 8-8-8-8-8-8 times (16-16-16-16-16-16 rows worked) = 40-46-50-50-54-60 stitches (with the next row from the right side). The piece measures approx. 11-11-12-12-13-13 cm. Cut the strand and place the stitches on a stitch holder/thread and work the right front piece along the right back shoulder. RIGHT FRONT PIECE: Start from the right side by the armhole on the right back shoulder and knit up 1 stitch in each row worked, inside the outermost stitch, as far as the neck = 32-38-42-42-46-52 stitches. Insert 1 marker. The front piece is measured from here. Purl 1 row from the wrong side. Work the next row from the right side as follows: Work A.1 across the first 28-32-36-36-40-46 stitches, then work the first 1-3-3-3-3-1 stitches in A.1, knit 3. Continue this pattern back and forth until the piece measures 5-5-6-6-7-7 cm, with the next row from the right side. Increase for the neckline as follows: ROW 1 (right side): Work pattern as before until there are 3 stitches left, increase 1 stitch towards the right - remember INCREASE TIP-1, knit 3. ROW 2 (wrong side): Purl 3, work pattern to the end of the row. Work ROWS 1 and 2 a total of 8-8-8-8-8-8 times (16-16-16-16-16-16 rows worked) = 40-46-50-50-54-60 stitches (with the next row from the right side). The piece measures approx. 11-11-12-12-13-13 cm. Now join the 2 front pieces as follows: FRONT PIECE: Starting from the right side, continue pattern A.1 across the 40-46-50-50-54-60 stitches on the right front piece, cast on 16-16-20-20-24-24 stitches for the neckline, continue pattern A.1 across the 40-46-50-50-54-60 stitches on the left front piece = 96-108-120-120-132-144 stitches. Continue A.1 until the piece measures 12-14-16-17-18-20 cm from the marker. Work A.2. Work A.3, AT THE SAME TIME on the first row increase 2 stitches evenly spaced = 98-110-122-122-134-146 stitches. (Work A.3 until there are 2 stitches left on the row, then work the first 2 stitches in A.3, so the pattern is symmetrical on both sides). When A.3 is finished, work A.4. (Work A.4 until there are 2 stitches left on the row, then work the first 2 stitches in A.4, so the pattern is symmetrical on both sides). NOTE! When there are 8-8-8-14-14-14 rows left in A.4, increase on each side for the armholes (see arrow in diagram) as follows: INCREASE FOR ARMHOLES: ROW 1 (right side): Remember INCREASE TIP-1. Work 1 stitch, increase 1 stitch towards the left, continue the pattern until there is 1 stitch left, increase 1 stitch towards the right, work 1 stitch. ROW 2 (wrong side): Continue as before, the new stitches are worked into the pattern. Work ROWS 1 and 2 a total of 2-2-2-5-5-5 times = 102-114-126-132-144-156 stitches. There are 4 rows left of pattern A.4. The piece measures approx. 25-27-29-30-31-33 cm, from the marker. Now join the front and back pieces for the body. The piece is measured from here! BODY: Continue pattern A.4 across the 102-114-126-132-144-156 stitches on the front piece, cast on 6-6-6-12-12-12 stitches (mid-under the sleeve), continue A.4 across the 102-114-126-132-144-156 stitches on the back piece, cast on 6-6-6-12-12-12 stitches (mid-under the sleeve) = 216-240-264-288-312-336 stitches. Working in the round, finish A.4. Cut the strand and begin the next round in the middle of the 6-6-6-12-12-12 cast-on stitches under one sleeve, starting with the 6th stitch in the diagram. Work A.5. Work A.6. Work A.3. Work A.7. Knit 1 round. Work A.1 until the piece measures approx. 29-30-31-31-32-33 cm from the join. Change to circular needle size 3 mm. Work rib (knit 1, purl 1), AT THE SAME TIME increase 22-24-26-28-32-34 stitches evenly on the first round = 238-264-290-316-344-370 stitches. When the rib measures 5-5-5-6-6-6 cm, work Italian cast-off or cast off slightly loosely with rib. The jumper measures approx. 54-56-58-60-62-64 cm, from close to the neck. SLEEVES: The sleeve is worked top down. Lay the piece flat and insert 1 marker at the top of the armhole. (NOTE! This is not the same place as the knitted-up row on the front piece but approx. 5 cm down the front piece). Use circular needle 3 mm. Start in the middle of the cast-on stitches under the sleeve and knit up 88-92-96-104-108-112 stitches around the armhole, with equal numbers of stitches on both sides of the marker. Change to circular needle size 4 mm. Continue the pattern in short rows, back and forth for the sleeve cap (to give the sleeve a better fit), starting from mid-under the sleeve as follows: ROW 1 (right side): Knit to 7 stitches before the marker on top of the shoulder, work A.8, turn – read KNITTING TIP. ROW 2 (wrong side): Work 18-18-18-18-18-18 stitches in double moss stitch as shown in A.1, turn. ROW 3 (right side): Work to 4-4-4-4-4-4 stitches past the previous turn, working in double moss stitch as shown in A.1, turn ROW 4 (wrong side): Work to 4-4-4-4-4-4-4 stitches past the previous turn, working in double moss stitch as shown in A.1, turn. Repeat rows 3 and 4 until you have turned a total of 12-12-12-16-16-16 times (6-6-6-8-8-8 times on each side, with the last row from the wrong side). After the last turn, work back to the beginning of the round (mid-under the sleeve), working in double moss stitch as shown in A.1. Insert 1 marker-thread; it is used when decreasing under the sleeve. Allow it to follow your work onwards. Continue the pattern in the round, AT THE SAME TIME decrease under the sleeve. Read the next 2 sections before continuing. DECREASES: Read DECREASE TIP in explanations above. When the sleeve measures 1-1-1-1-1-1 cm, measured under the sleeve, decrease 2 stitches every 2nd round 3-3-3-3-3-3 times, then decrease 2 stitches every 3-3-2½-2-2-1½ cm 11-12-13-16-17-17 times = 60-62-64-66-68-72 stitches. PATTERN: When you have worked 10 rows of pattern A.1, work A.2. Work A.3 – in this pattern you need to count the stitches so the centre of the pattern is mid-top of sleeve. Use the marker to match the stitch which is mid-top of sleeve to the middle stitch in the diagram. Work A.4. Work A.5 – position the pattern mid-top of sleeve. Work A.6. Work A.3. Work A.7. Continue with A.8 onwards. When the sleeve measures 44-44-42-42-40-38 cm from the shoulder, change to double pointed needles size 3 mm. Work rib (knit 1, purl 1), AT THE SAME TIME increase 6-6-6-6-6-8 stitches evenly on the first round = 66-68-70-72-74-80 stitches. When the rib measures 5-5-5-6-6-6 cm, work Italian cast-off or cast off slightly loosely with rib. The sleeve measures approx. 49-49-47-48-46-44 cm from the shoulder. NECK Use circular needle size 3 mm and DROPS Lima. Start from the right side on one shoulder-line and knit up 90 to 112 stitches inside 1 stitch around the neckline. The stitch count should be divisible by 2. Work rib in the round (knit 1, purl 1) for 9-9-9-11-11-11 cm. Change to circular needle size 4 mm and cast off slightly loosely. Fold the neck double to the inside and sew down. To avoid the neck being tight and rolling outwards, it is important that the seam is elastic. |
|||||||
Diagram explanations |
|||||||
|
|||||||
 |
|||||||
 |
|||||||
 |
|||||||
Have you finished this pattern?Tag your pictures with #dropspattern #whiteechosweater or submit them to the #dropsfan gallery. Do you need help with this pattern?You'll find 37 tutorial videos, a Comments/Questions area and more by visiting the pattern on garnstudio.com. © 1982-2026 DROPS Design A/S. We reserve all rights. This document, including all its sub-sections, has copyrights. Read more about what you can do with our patterns at the bottom of each pattern on our site. |
|||||||


With over 40 years in knitting and crochet design, DROPS Design offers one of the most extensive collections of free patterns on the internet - translated to 17 languages. As of today we count 325 catalogues and 12298 patterns translated into English (UK/cm). 12298
We work hard to bring you the best knitting and crochet have to offer, inspiration and advice as well as great quality yarns at incredible prices! Would you like to use our patterns for other than personal use? You can read what you are allowed to do in the Copyright text at the bottom of all our patterns. Happy crafting!
Post a comment to pattern DROPS 263-1
We would love to hear what you have to say about this pattern!
If you want to leave a question, please make sure you select the correct category in the form below, to speed up the answering process. Required fields are marked *.