
Popular categories
Looking for a yarn?


Comments / Questions (7)
![]() Hilde wrote:
Hilde wrote:
Bonjour n’y a t’il pas une erreur pour les manches. Pourquoi les cm sont plus petits ? Svp voir Tricoter jusqu'à ce que la manche mesure 33-32-30-28-26-25 cm; Merci
13.08.2025 - 11:19DROPS Design answered:
Bonjour Hilde, c'est bien juste ici, les manches sont plus courtes dans les grandes tailles car les épaules sont plus larges. Bon tricot!
13.08.2025 - 14:25
![]() Brisson Hilde wrote:
Brisson Hilde wrote:
Bonjour c’est la premiere fois que je fair un gilet en une pièce et je comprend pas trop le biais épaules pou r le dos. Quand vous dites placer 3 fois 13 mailles en attentes en les tricotant c’est sur 2 rangs ou sur 6 rang ? Merci de votre réponse
10.08.2025 - 11:47DROPS Design answered:
Bonjour Mme Brisson, vous devez mettre en attente les 13 mailles au début de chaque rang à partir de l'emmanchure, 3 fois au total de chaque côté (il y aura ainsi 3x13 m en attente de chaque côté), et, en même temps, à 68 cm de hauteur totale, vous allez rabattre les mailles centrales pour l'encolure, et rabattre 1 maille au début du rang suivant à partir de l'encolure. Dans cette vidéo, nous montrons comment tricoter former le biais des épaules et l'encolure dos avec cette technique (pour un autre modèle, un autre nombre de mailles, mais la technique sera la même). Bon tricot!
11.08.2025 - 07:55
![]() Elisa Granly wrote:
Elisa Granly wrote:
Takk for svar. Videoen hjalp ikke. Jeg tok jakka med til en strikkebutikk. De forsto ikke oppskriften heller. Jeg tenker at den må skrives mer detaljert!
16.11.2024 - 20:51
![]() Elisa Granly wrote:
Elisa Granly wrote:
Hei, Jeg sliter med å forstå hvordan jeg skal strikke skrå skulder. Skal de ti ytterste 10 maskene strikkes en gang, de neste 10 maskene to ganger og maskene nærmest stolpen tre ganger(forstykker)? Jeg ser ikke at det er noen forklaring. Skjønner heller ikke hvordan det skal felles til hals etter skrå skulder er strikket på bakstykke. Fint med raskt svar, slik at arbeidet kan strikkes ferdig🌞
12.11.2024 - 20:46DROPS Design answered:
Hei Elise, Her er lenke til strikking av skråskulder: https://www.garnstudio.com/videos.php?c=knitting-videos-european-shoulder&lang=no Håper det hjelper og god fornøyelse!
15.11.2024 - 07:07
![]() Kathleen Carlson wrote:
Kathleen Carlson wrote:
I'm stuck on the diagonal shoulder (back). I have 111sts and it's too many sts to fit the directions?BACK I have 33sts on each side in thread with 45sts remaining on needle. I believe there should only be 19 sts for NECK??? What am I doing wrong? I'm an expert knitter and can't figure this out. Please help so I can finish this project!
16.07.2023 - 18:58DROPS Design answered:
Dear Kathleen, your number of stitches is correct. On the shoulders you have 33 stitches in threads for each shoulder. AT THE SAME TIME you cast off the 19 middle stitches (but there are more stitches). Then you cast off 1 more stitch from the neck on each side and you should have 12 stitches left on each shoulder. Happy knitting!
17.07.2023 - 14:26
![]() Claudia wrote:
Claudia wrote:
Habe die Jacke gestrickt und sie ist eine Größe größer geworden, obwohl die Maschenprobe in glatt rechts genau passte. :(( Muss diese nicht im Perlmuster sein, da Rechts-Links-Muster meist lockerer ausfallen? Müssen die Blenden-M (+5cm) nicht in der Maßskizze eingerechnet werden? Die Maße sind genau wie beim Pullover! Muss im Rückenteil nach A.2 die Masche, die vorher zugenommen wurde, nicht wieder abgenommen werden, damit A.4 auskommt?
30.05.2023 - 13:31DROPS Design answered:
Liebe Claudia, Diagramme stimmen so und sollte Ihre Maschenprobe glatt rechts stimmen, dann sollten die Breite genauso stimmen, dh die 81-91-101-111-121-131 Maschen vom Rückenteill sollen 48-54-59-65-71-77 cm messen (die Breite glatt rechts muss dieselbe wie im Perlmuster sein). Die Blenden-Maschen gehören zum Vorderteile und kommen nicht mit der Breite dazu. Hoffentlich kann das Ihnen helfen.
30.05.2023 - 16:05
![]() Bente Andersen wrote:
Bente Andersen wrote:
Hvis ribben på for- og bagstykke strikkes som beskrevet i opskriften, strikkes der ret på vrangsiden mellem de 3 m perlestrik. På billedet er der strikket vrang på vrangsiden. Tænker at det er en fejl 😊
11.05.2023 - 11:19
|
|||||||
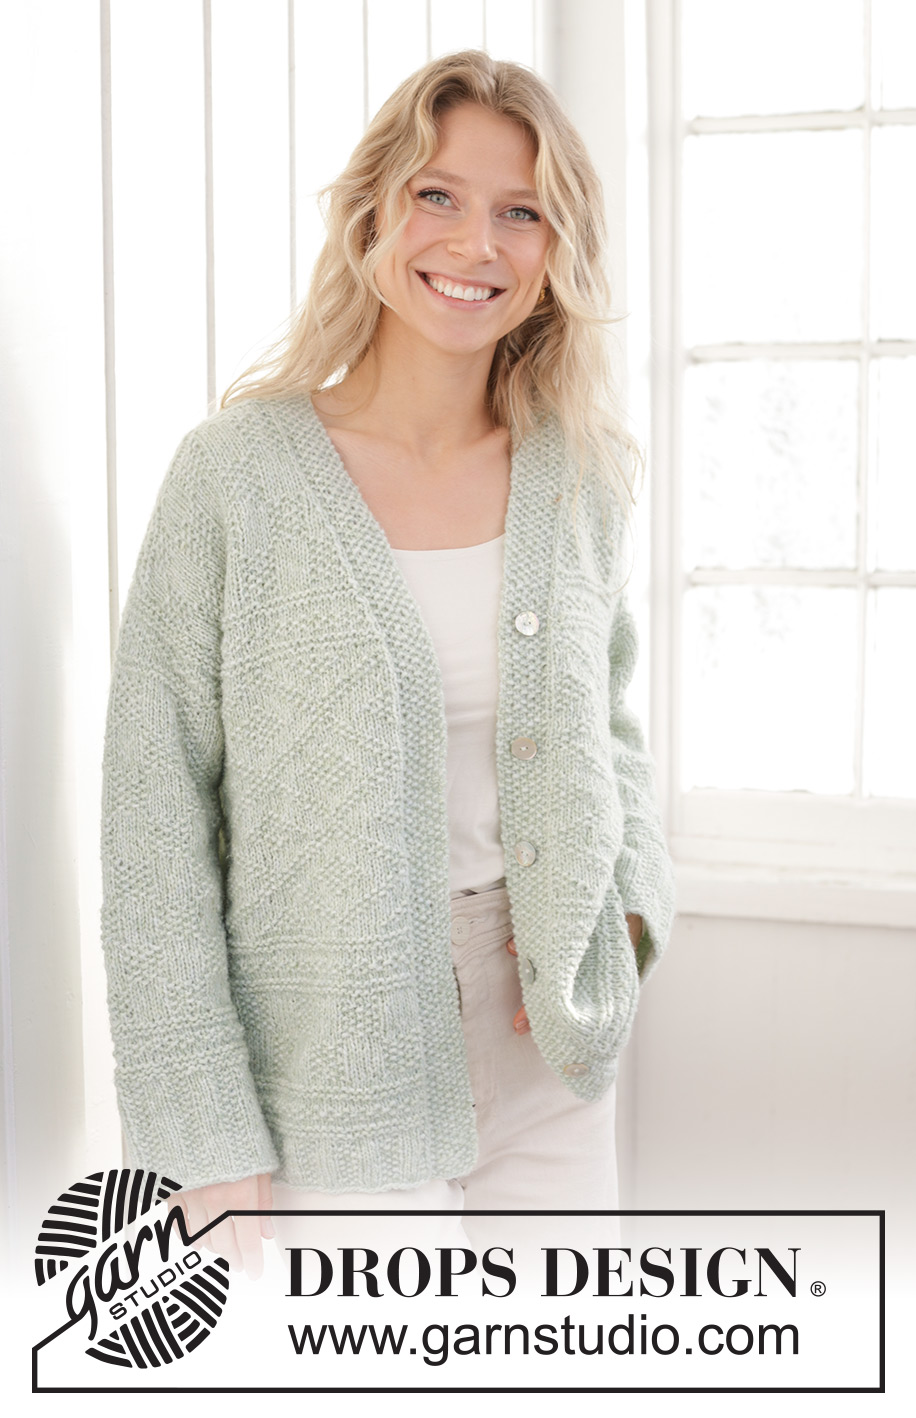
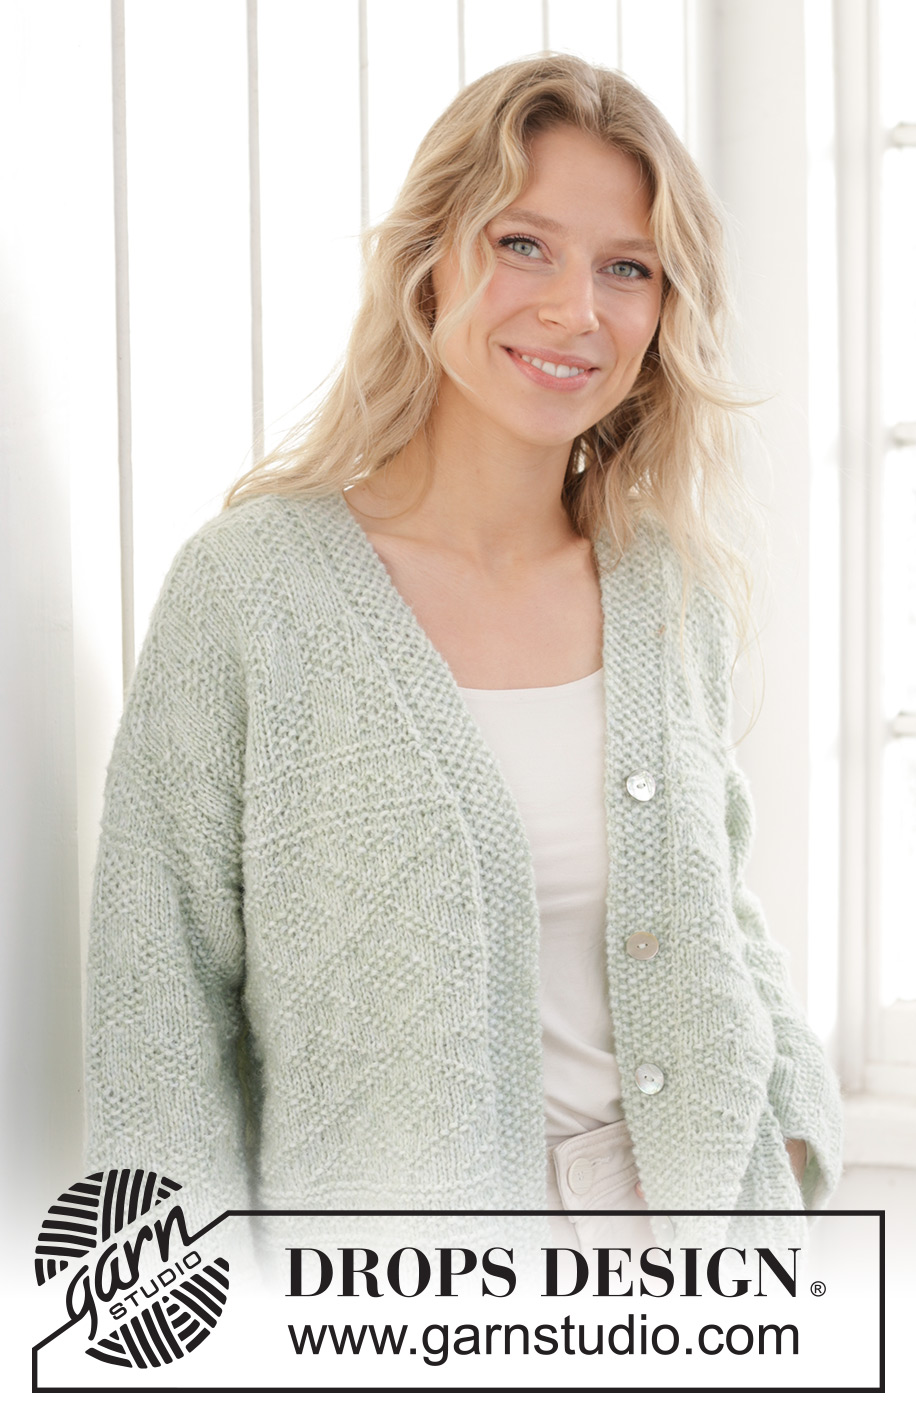
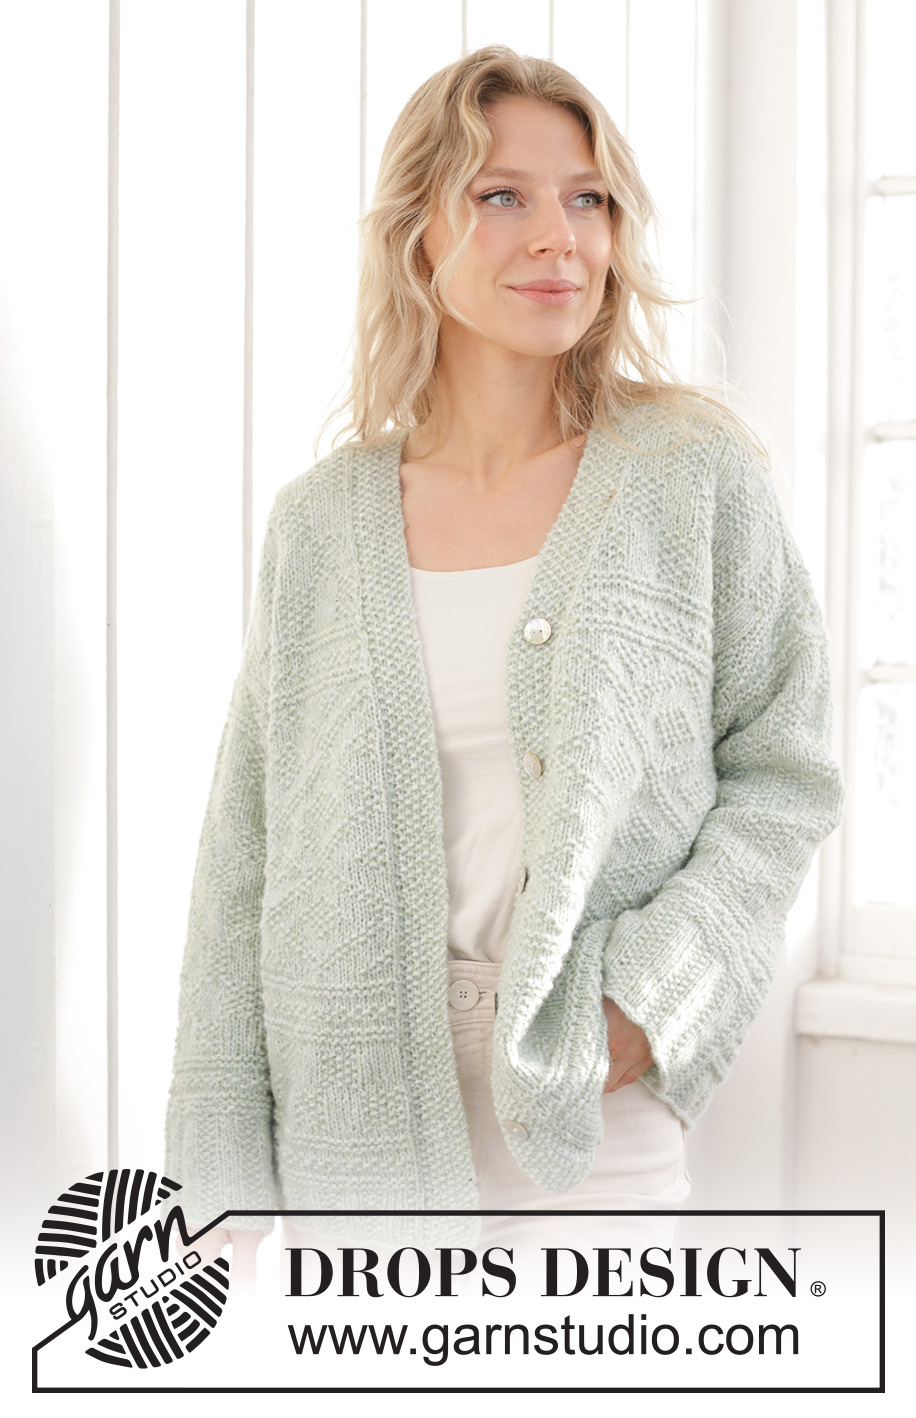
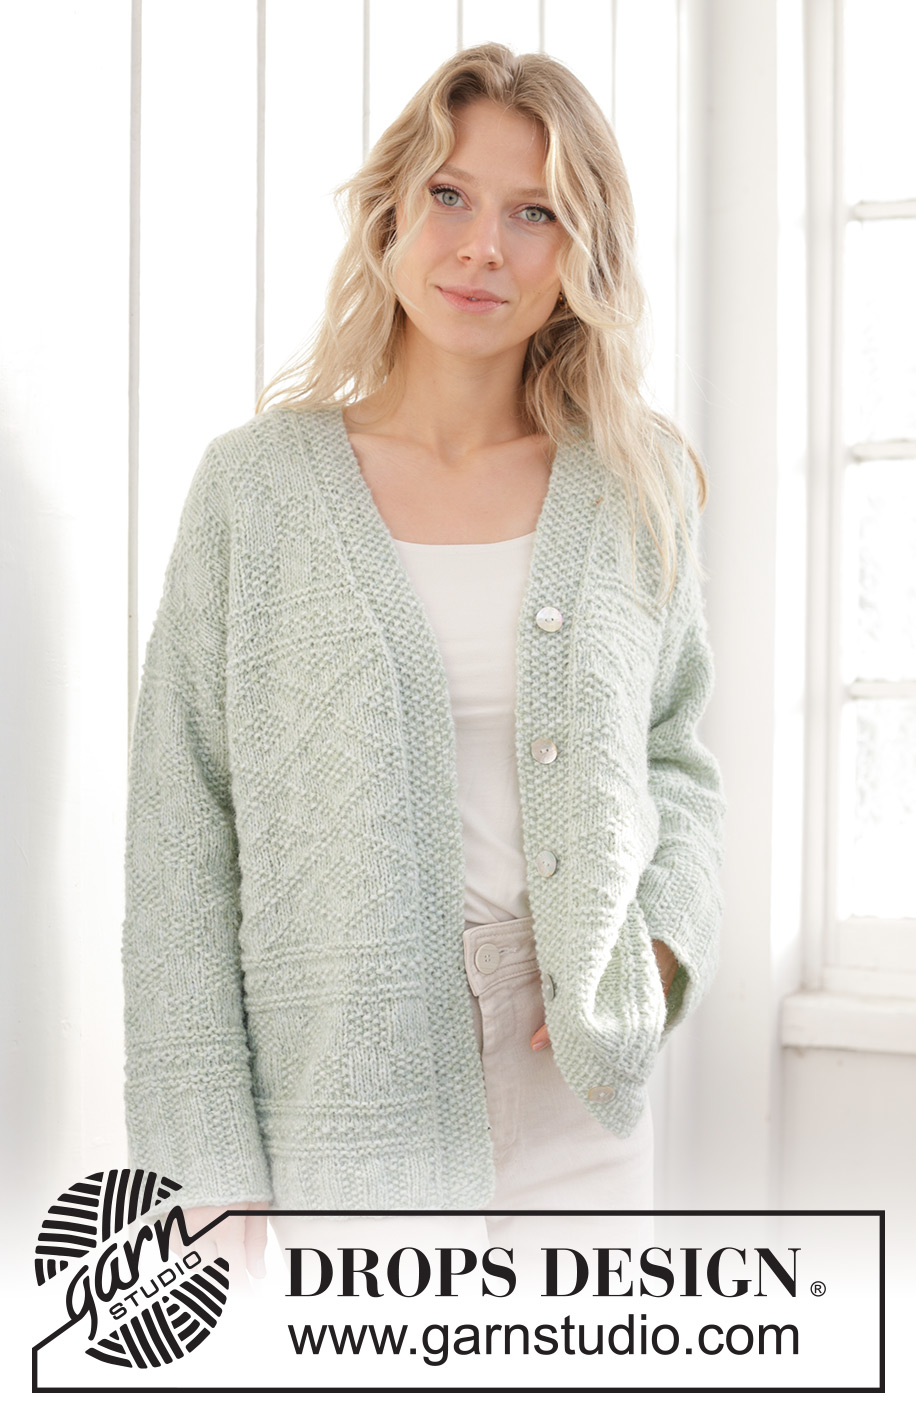
Mint Dream Cardigan#mintdreamcardigan |
|||||||
 |
 |
||||||
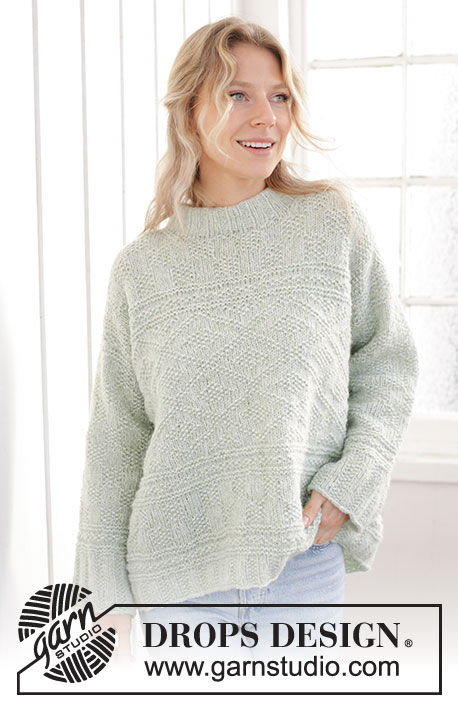
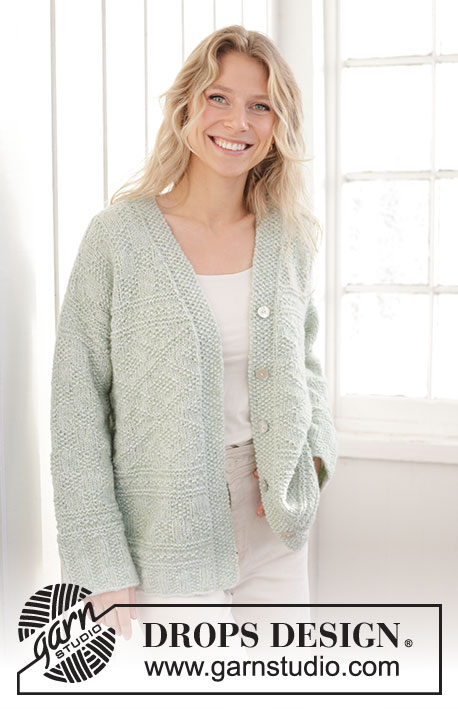
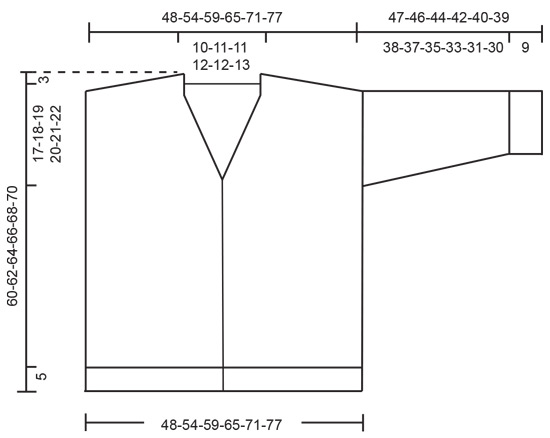
Knitted jacket in DROPS Air. The piece is worked bottom up with relief-pattern, diagonal shoulders and shawl-collar. Sizes XS - XXXL.
DROPS 241-35 |
|||||||
|
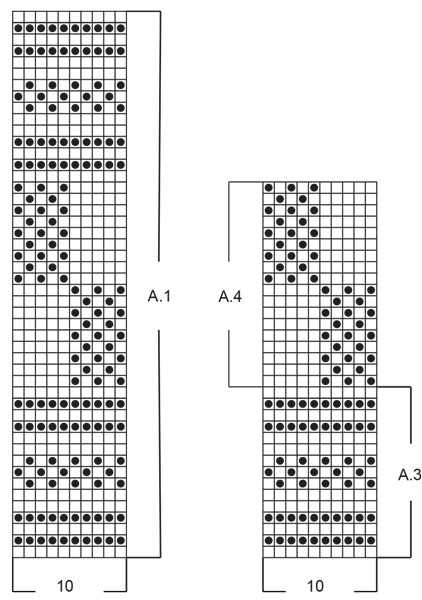
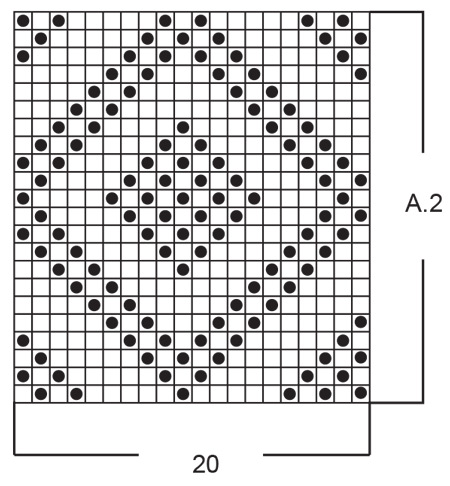
------------------------------------------------------- EXPLANATIONS FOR THE PATTERN: ------------------------------------------------------- MOSS STITCH (worked back and forth): Row 1: * Knit 1 purl 1 *, work from *-*. Row 2: Knit over purl and purl over knit. Repeat row 2 onwards. MOSS STITCH (worked in the round): Round 1: * Knit 1, purl 1 *, work from *-*. Round 2: Knit over purl and purl over knit. Repeat round 2 onwards. PATTERN: See diagrams A.1 to A.4. The diagrams show all rows in the pattern from the right side. DECREASE TIP-1: All decreases are worked from the right side. At the beginning of a row from the neck: Work 7 band stitches in moss stitch, slip 1 stitch as if to knit, knit 1 and pass the slipped stitch over the knitted stitch. Continue with 1 stocking stitch inside the band stitches. At the end of a row towards the neck: Work until there are 9 stitches left, knit 2 together, 7 band stitches in moss stitch. Continue with 1 stocking stitch inside the band stitches. DECREASE TIP-2 (for sleeves): Decrease 1 stitch on either side of the marker-stitch as follows: Work until there are 2 stitches left before the marker-stitch, knit 2 together, knit 1 (marker-stitch), slip 1 stitch as if to knit, knit 1 and pass the slipped stitch over the knitted stitch. BUTTONHOLES: Work the buttonholes on the right band. 1 BUTTONHOLE = knit together the 3rd and 4th stitch from the edge, make 1 yarn over. On the next row knit the yarn over to leave a hole. Work the buttonholes when the piece measures: XS: 8, 16, 24, 32 and 40 cm. S: 9, 17, 25, 33 and 41 cm. M: 8½, 16½, 25, 33½ and 42 cm. L: 9, 17½, 26, 34½ and 43 cm. XL: 8, 17, 26, 35 and 44 cm. XXL/XXXL: 9, 18, 27, 36 and 45 cm. ------------------------------------------------------- START THE PIECE HERE: ------------------------------------------------------- JACKET – SHORT OVERVIEW OF THE PIECE: The body is worked back and forth, bottom up as far as the armholes. The piece is then divided and the back and front pieces finished separately. The sleeves are worked in the round with short circular needle/double pointed needles. BODY: Cast on 195-219-237-261-285-303 stitches with DROPS Air and circular needle size 4 mm. Purl 1 row from the wrong side. Work rib back and forth (row 1 = right side) as follows: 7 band stitches in MOSS STITCH – read description above, 1 stocking stitch, 1 moss stitch * knit 3, 3 moss stitches *, work from *-* until there are 12 stitches left, knit 3, 1 moss stitch, 1 stocking stitch, 7 band stitches in moss stitch. Continue this rib for 5 cm – with the next row from the wrong side. Purl 1 row from wrong side (work the 8 outermost stitches on each side as before) and decrease 19-23-21-25-29-27 stitches evenly spaced = 176-196-216-236-256-276 stitches. Change to circular needle size 5 mm. Work pattern as follows from the right side: 7 band stitches in moss stitch, 1 stocking stitch, work pattern A.1 until there are 8 stitches left, 1 stocking stitch, 7 band stitches in moss stitch. Remember the BUTTONHOLES – read description above and REMEMBER THE KNITTING TENSION! When A.1 is finished, work A.2 as follows: 7 band stitches in moss stitch, 1 stocking stitch, work A.2 and increase 1 stitch over the next 160-180-200-220-240-260 stitches, work the first stitch in A.2 (so the pattern is symmetrical), 1 stocking stitch, 7 band stitches in moss stitch = 177-197-217-237-257-277 stitches. Repeat A.2 in height. When the piece measures 40-41-42-43-44-45 cm, divide for the armholes: Place the outermost 48-53-58-63-68-73 stitches on each side on threads (right and left front pieces) and work the middle 81-91-101-111-121-131 stitches (back piece). BACK PIECE: Continue A.2 until the piece measures 43-43-43-48-48-48 cm (or to desired height, finishing after a half or complete repeat in height). Work A.3. When A.3 is finished repeat A.4 to finished length. When the piece measures 57-59-61-63-65-67 cm work the diagonal shoulders at the same time as casting off for the neck. Read the next 2 paragraphs before continuing! DIAGONAL SHOULDERS: When the piece measures 57-59-61-63-65-67 cm, place stitches on a thread on each row from the side, working them first to avoid having to cut the strand. Place 8-9-10-11-12-13 stitches on the thread 3 times. NECK: When the piece measures 58-60-62-64-66-68 cm cast off the middle 15-17-17-19-19-21 stitches for the neck and finish each shoulder separately. On the next row from the neck cast off 1 stitch. When the diagonal shoulders and casting off for the neck are finished, there are 8-9-11-12-14-15 stitches on the needle. Place all the shoulder stitches (from the thread) back on the needle and knit all 32-36-41-45-50-54 stitches – picking up 1 stitch and working it together with the next stitch in each transition to avoid holes. Knit 2 rows. Cast off with knit. The piece measures approx. 60-62-64-66-68-70 cm measured closest to the neck. Work the other shoulder in the same way. RIGHT FRONT PIECE: = 48-53-58-63-68-73 stitches. Place the stitches from the thread back on circular needle size 5 mm. Continue A.2 until the piece measures 43-43-43-48-48-48 cm – matching the back piece. Now work A.3 at the same time as beginning to decrease for the neck - read DECREASE TIP-1. Read the next section before continuing! Repeat the decrease for the neck, alternately every 2nd and 4th row (always from the right side) a total of 9-10-10-11-11-12 times = 39-43-48-52-57-61 stitches. At the same time, when A.3 is finished, repeat A.4 to finished length. When the piece measures 57-59-61-63-65-67 cm, work the diagonal shoulder as follows: DIAGONAL SHOULDER: Place stitches on a thread on each row from the side, working them first to avoid having to cut the strand. Place 8-9-10-11-12-13 stitches on the thread 3 times. There are 15-16-18-19-21-22 stitches left on the needle. Place the shoulder stitches back on the needle = 39-43-48-52-57-61 stitches. Knit 1 row (band worked as before) - picking up 1 stitch and working it together with the next stitch in each transition to avoid holes. Knit 2 rows (band worked as before). On the next row from the wrong side cast off the 32-36-41-45-50-54 shoulder stitches = 7 stitches on the needle. Continue with moss stitch until the band measures 5-5½-5½-6-6-6½ cm from the shoulder. Cast off. The piece measures 60-62-64-66-68-70 cm measured closest to the neck. LEFT FRONT PIECE: = 48-53-58-63-68-73 stitches. Place the stitches from the other thread back on circular needle size 5 mm. Continue A.2 until the piece measures 43-43-43-48-48-48 cm – matching the back piece. Now work A.3 at the same time as beginning to decrease for the neck. Read the next section before continuing! Repeat the decrease for the neck, alternately every 2nd and 4th row (always from the right side) a total of 9-10-10-11-11-12 times = 39-43-48-52-57-61 stitches. At the same time, when A.3 is finished, repeat A.4 to finished length. When the piece measures 57-59-61-63-65-67 cm, work the diagonal shoulder as follows: DIAGONAL SHOULDER: Place stitches on a thread on each row from the side, working them first to avoid having to cut the strand. Place 8-9-10-11-12-13 stitches on the thread 3 times. There are 15-16-18-19-21-22 stitches left on the needle. Place the shoulder stitches back on the needle = 39-43-48-52-57-61 stitches. Purl 1 row from the wrong side (band worked as before) - picking up 1 stitch and working it together with the next stitch in each transition to avoid holes. Knit 2 rows (band worked as before). On the next row from the right side cast off the 32-36-41-45-50-54 shoulder stitches = 7 stitches on the needle. Continue with moss stitch until the band measures 5-5½-5½-6-6-6½ cm from the shoulder. Cast off. The piece measures 60-62-64-66-68-70 cm measured closest to the neck. ASSEMBLY: Sew the shoulder seams inside the cast-off edges. Sew the bands together mid-back and sew them to the neckline. Sew the buttons onto the left band. SLEEVES: Knit up 57-61-65-69-71-75 stitches with short circular needle size 5 mm, inside 1 stitch around the armhole (stitch-number must be divisible by 2 + 1). Work in the round according to diagram A.3 with 1 stocking stitch mid-under the sleeve (insert a marker-thread in this stitch). NOTE! On the last round in A.3 decrease 1-0-4-3-0-4 stitches evenly spaced = 56-61-61-66-71-71 stitches. When A.3 is finished, repeat A.4 to finished length (marker-stitch worked in stocking stitch as before). When the sleeve measures 6 cm, decrease under the sleeve - read DECREASE TIP-2. Repeat this decrease every 9-5-6-3½-3-3 cm a total of 4-6-5-7-7-7 times = 48-49-51-52-57-57 stitches. Work until the sleeve measures 33-32-30-28-26-25 cm; there is 14 cm left to finished length. Work A.3 (marker-stitch worked in stocking stitch as before) and increase 6-5-3-8-3-3 stitches evenly spaced on the last round = 54-54-54-60-60-60 stitches. Change to double pointed needles size 4 mm. Work rib (knit 3 / 3 moss stitches) for 9 cm. Cast off with knit. Work the other sleeve in the same way. |
|||||||
Diagram explanations |
|||||||
|
|||||||
 |
|||||||
 |
|||||||
 |
|||||||
Have you finished this pattern?Tag your pictures with #dropspattern #mintdreamcardigan or submit them to the #dropsfan gallery. Do you need help with this pattern?You'll find 27 tutorial videos, a Comments/Questions area and more by visiting the pattern on garnstudio.com. © 1982-2026 DROPS Design A/S. We reserve all rights. This document, including all its sub-sections, has copyrights. Read more about what you can do with our patterns at the bottom of each pattern on our site. |
|||||||


With over 40 years in knitting and crochet design, DROPS Design offers one of the most extensive collections of free patterns on the internet - translated to 17 languages. As of today we count 324 catalogues and 12290 patterns translated into English (UK/cm). 12290
We work hard to bring you the best knitting and crochet have to offer, inspiration and advice as well as great quality yarns at incredible prices! Would you like to use our patterns for other than personal use? You can read what you are allowed to do in the Copyright text at the bottom of all our patterns. Happy crafting!
Post a comment to pattern DROPS 241-35
We would love to hear what you have to say about this pattern!
If you want to leave a question, please make sure you select the correct category in the form below, to speed up the answering process. Required fields are marked *.