
Popular categories
Looking for a yarn?


Comments / Questions (93)
![]() Kirsten wrote:
Kirsten wrote:
Mangler der ikke et antal masker, når man starter på bærestykket. Str. S er 120 masker. Men der er kun fordelt 9+37+9+37 =92.
09.04.2026 - 17:26DROPS Design answered:
Hej Kirsten. Du har missat att ta med maskerna i A,1. Du ska sticka såhär: A.1 (=7 masker), A.2 over de næste 9 masker, A.1 (=7 masker), A.2 over de næste 37 masker osv. Mvh DROPS Design
10.04.2026 - 06:59
![]() Wendy wrote:
Wendy wrote:
Das Muster stimmt für die Grösse S nicht ganz. Beispielsweise geht das Perlmuster in der Runde beim Rumpf nicht auf wenn man die Raglanmaschen ferig hat. Ähnlicherweise steht beim Ärmel man müsse erst 3 cm stricken, dann 6x 6cm, dies ergibt 39 cm. Es steht aber auch man sollte weiterstricken bis 35cm erreicht sind und dann mit dem Rippenmuster abschliessen. Ich nehme aber nicht an, dass gedacht ist, im Rippenmuster ebenfalls noch abzunehmen (ist bei den anderen Grössen nicht so).
18.02.2026 - 18:12
![]() Sara wrote:
Sara wrote:
Buongiorno, sto realizzando la taglia L ed ho terminato lo sprone. Non capisco però come devo misurare la lunghezza di 25 cm: dal segnapunti a quale parte? Grazie
18.02.2026 - 12:41DROPS Design answered:
Buonasera Sara i 25 cm si misurano dal segnapunti sul bordo del collo alla parte che sta lavorando. Buon lavoro!
18.02.2026 - 21:17
![]() Béatrice wrote:
Béatrice wrote:
Bonjour, Je tricote ce modèle en taille L et sans rayures. Je suis étonnée car la longueur indiquée pour le dos et devant sous la manche n'est que de 24 cm avant les côtes. C'est très court et cela ne ressemble pas à la photo. Pouvez-vous me dire quelle longueur correspond au modèle en photo ? Merci beaucoup.
01.12.2025 - 08:42DROPS Design answered:
Bonjour Béatrice, c'est probablement une taille M que porte notre modèle, et les mesures sont ainsi correctes: le bas du pull mesure 24 cm + 4 cm de côtes pour une longueur totale de 54 cm à partir de l'épaule. Bon tricot!
01.12.2025 - 11:04
![]() Sarah wrote:
Sarah wrote:
When dividing for the sleeves/body it says to work the first 4 stitches. Is this 4 of the 7 raglan stitches or the first 4 stitches following the raglan increases?
23.10.2025 - 08:54DROPS Design answered:
Hi Sarah, the 4 first stitches worked are 4 first sts of A.1 diagram (4 out of 7 raglan stitches). Happy knitting!
03.11.2025 - 09:28
![]() Anna Mette wrote:
Anna Mette wrote:
Når der står: Omgangens start er i overgangen mellem bagstykke og højre ærme, betyder det så at jeg starter rundpind 3 ved min begyndelse? Det stemmer så ikke med maskeantallet. På forhånd tak! Venlig hilsen Anna Mette
15.10.2025 - 13:32DROPS Design answered:
Hei Anne Mette. Vi skal hjelpe deg så godt vi kan, men fint om du kan opplyse ditt maskeantall (hvilken str. du strikker). mvh DROPS Design
20.10.2025 - 14:24
![]() Anna Mette Degnbol wrote:
Anna Mette Degnbol wrote:
Vedr.: Ensfarvet og begyndelse på bærestykket. Efter rib 4 cm, og skift til rundpind nr. 3, skal første pind så ikke strikkes ret? (perlerib). Kan ikke se det ud af A1 og A2: Venlig hilsen Anna Mette
09.10.2025 - 16:55DROPS Design answered:
Hej Anna Mette. Jo första pind strikkes ret (första rad i diagram A.1/A.2 är kun retmasker). Mvh DROPS Design
10.10.2025 - 06:57
![]() Maarit wrote:
Maarit wrote:
Hur ökar man raglan till 232-16
12.09.2025 - 20:45
![]() Marianne wrote:
Marianne wrote:
Er der fejl i denne opskrift, kan ikke få maskeantallet til at passe på bærestykket Fx 141 op 20+9+41+9+20plus kantmasker 99 plus kantmasker giver ikke 141
08.07.2025 - 11:11
![]() Morera wrote:
Morera wrote:
Je ne comprends pas pour suivre le point fantaisie de la manche lorsque l'on fait les diminutions, merci de m'expliquer
20.06.2025 - 19:14
|
|||||||
Desert Mirage#desertmiragesweater |
|||||||
 |
 |
||||||
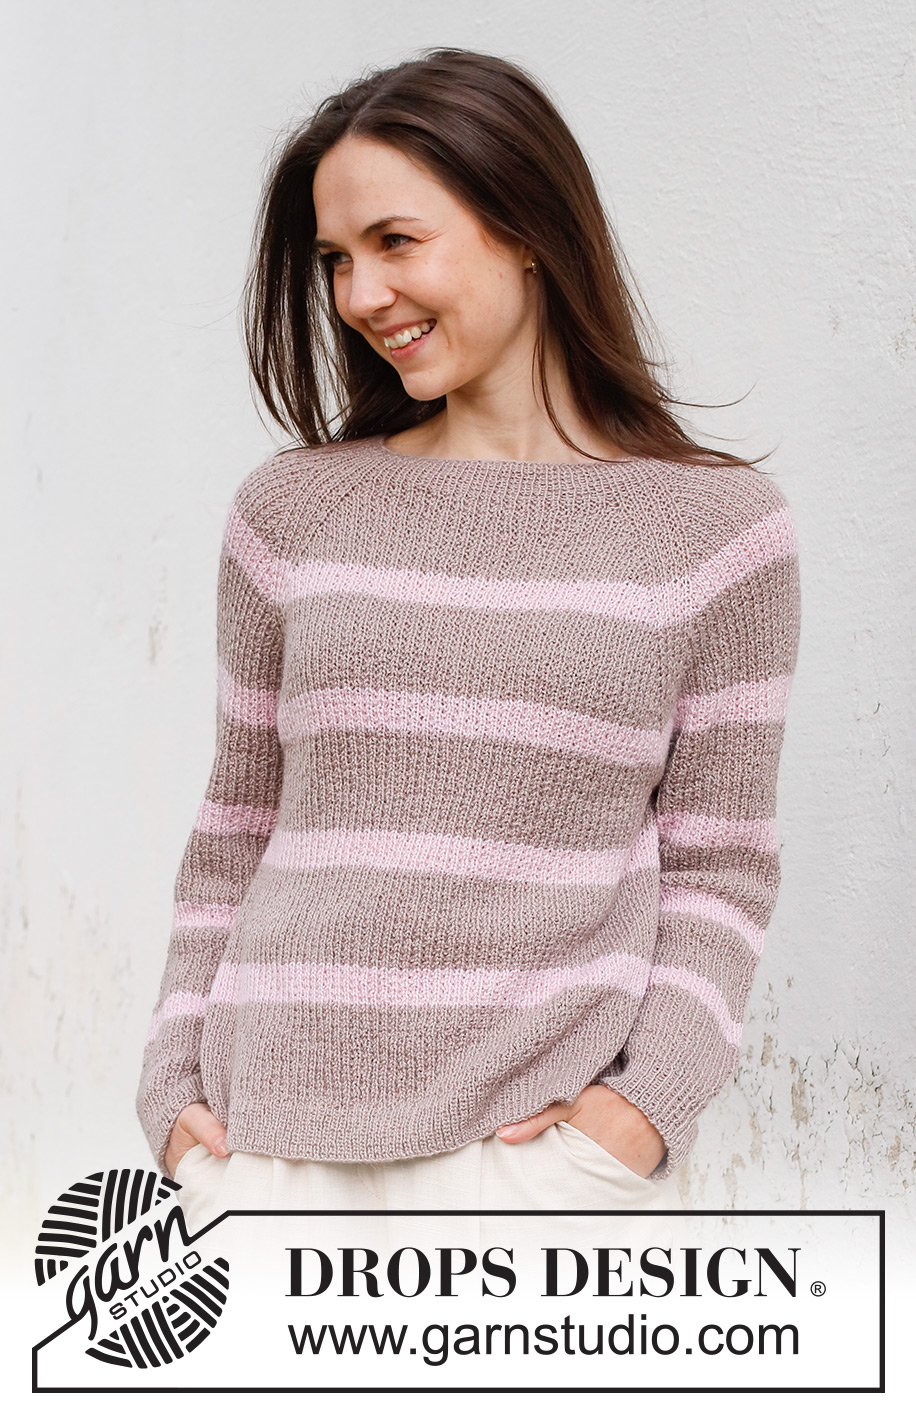
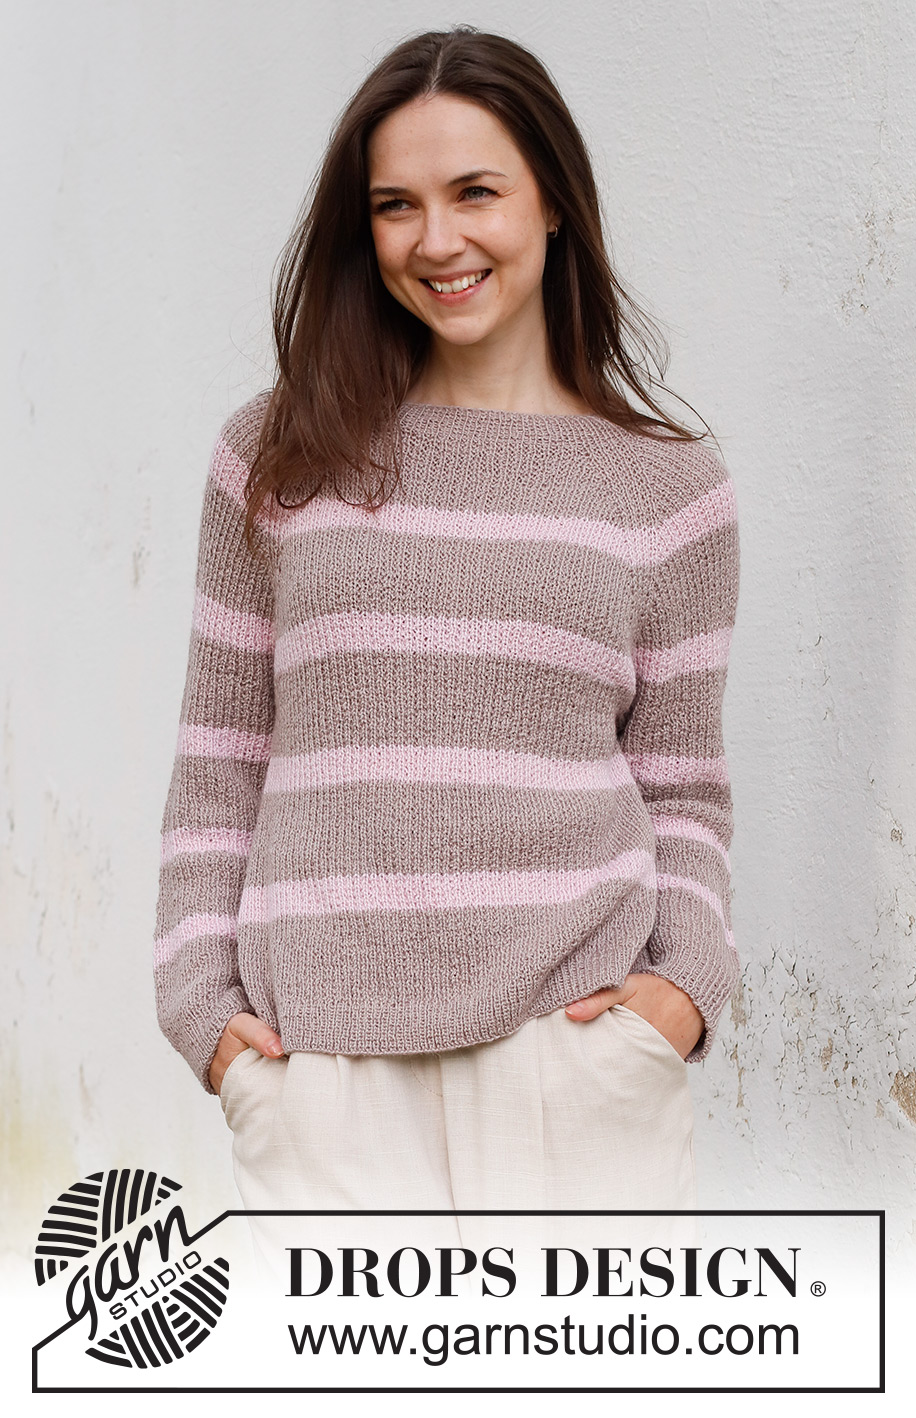
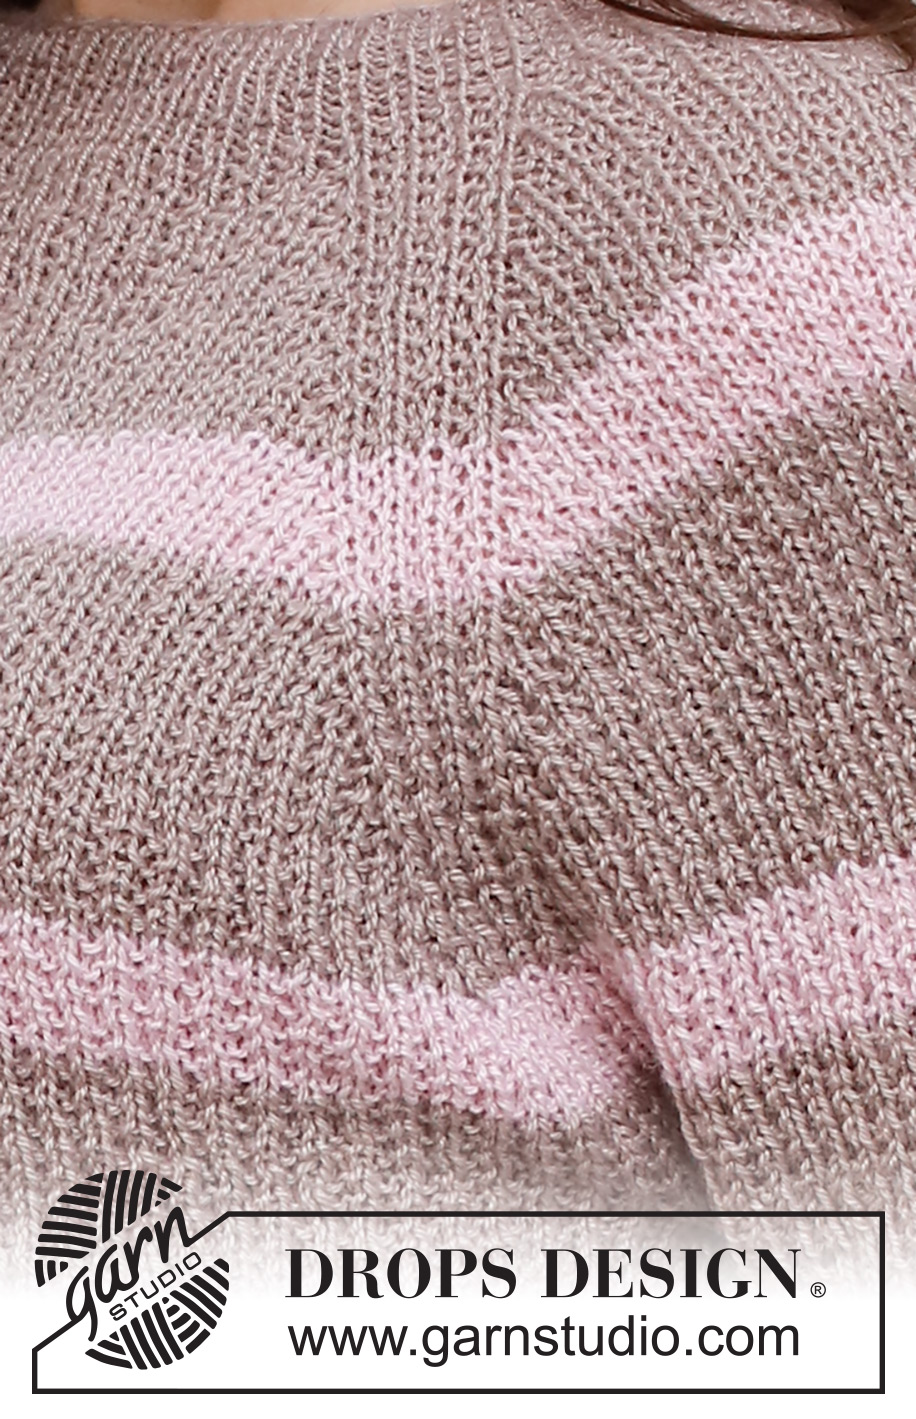
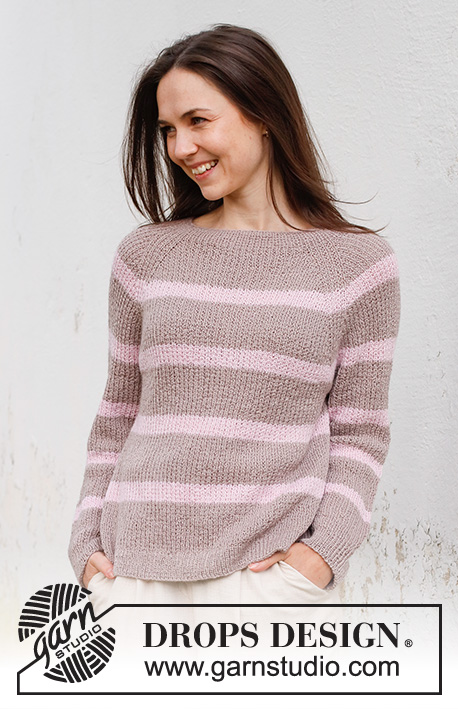
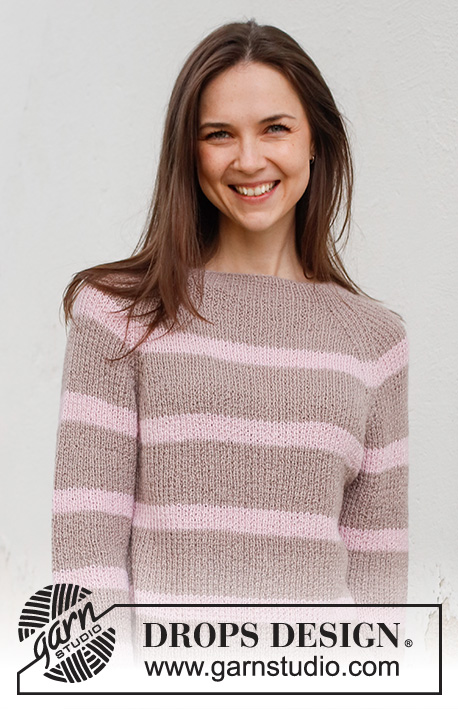
Knitted jumper in DROPS Nord with raglan. Piece is knitted top down with broken rib and stripes. Size: S - XXXL
DROPS 232-16 |
|||||||
|
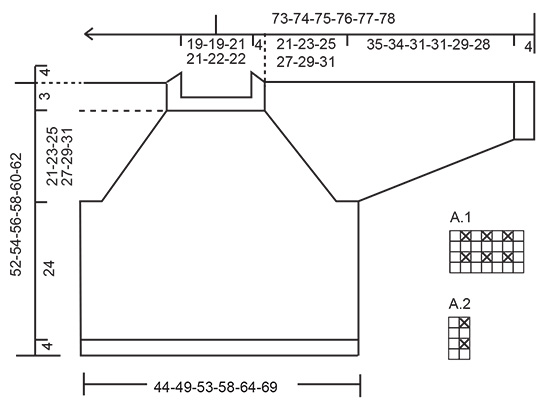
---------------------------------------------------------- EXPLANATION FOR THE PATTERN: ---------------------------------------------------------- PATTERN: See diagrams A.1 and A.2. STRIPES: * Work 7-7-7-8-8-8 cm with colour light beige, work 3 cm with colour powder pink *, work from *-*. RAGLAN: Increase 1 stitch in each side of 7 stitches (= A.1) in every transition between body and sleeves (= 8 stitches increased on round). Increase 1 stitch by making 1 yarn over. On next round work yarn overs twisted to avoid holes. Then work the new stitches in pattern A.2. DECREASE TIP (applies to sleeves): Decrease 1 stitch on each side of marker thread as follows: Work until 3 stitches remain before marker thread and knit 2 together, knit 2 (marker thread is between these 2 stitches), slip 1 stitch knitwise, knit 1, pass slipped stitch over stitch worked. ---------------------------------------------------------- START THE PIECE HERE: ---------------------------------------------------------- JUMPER - SHORT OVERVIEW OF THE PIECE: Neck edge and yoke are worked in the round on circular needle, top down. Now divide yoke for body and sleeves. Work the body in the round on circular needle. Work sleeves in the round on double pointed needles/a short circular needle. NECK EDGE: Cast on 120-120-128-128-136-136 stitches on circular needle size 2.5 mm with colour light beige in DROPS Nord. Knit 1 round. Then work rib (knit 1/purl 1). Work until rib measures 4 cm. Insert 1 marker after approx. 41-41-44-44-46-46 stitches (approx. mid front). Measure yoke from this marker. Work STRIPES - see explanation above. The 4 cm in the neck edge are not counted with the stripes (i.e. work 11-11-11-12-12-12 cm in total with colour light beige before first stripe with colour powder pink). YOKE: The beginning of round is in transition between back piece and right sleeve. Switch to circular needle size 3 mm, and work as follows: A.1, A.2 over the next 9 stitches, A.1, A.2 over the next 37-37-41-41-45-45 stitches, A.1, A.2 over the next 9 stitches, A.1, A.2 over the next 37-37-41-41-45-45 stitches. Continue this pattern, on next round begin increase for RAGLAN – read explanation above (8 stitches increased). Increase like this every other round 26-32-34-40-44-50 times in total = 328-376-400-448-488-536 stitches. REMEMBER THE KNITTING TENSION! Work without increase until piece measures 21-23-25-27-29-31 cm from marker thread. Now divide yoke for body and sleeves: Work the first 4 stitches (back piece), slip the next 67-79-83-95-103-115 stitches on a thread for sleeve and cast on 9-9-11-11-13-13 new stitches on needle (in the side under sleeve), work the next 97-109-117-129-141-153 stitches (front piece), slip the next 67-79-83-95-103-115 stitches on a thread for sleeve and cast on 9-9-11-11-13-13 new stitches on needle (in the side under sleeve), work the next 93-105-113-125-137-149 stitches (back piece). BODY: = 212-236-256-280-308-332 stitches. Work A.2 in the round. Continue with stripes when 4 stripes have been worked in total with colour powder pink, finish the piece with colour light beige. Work until piece measures 24 cm from division. 4 cm remain until finished measurements. Knit 1 round while increasing 46-50-54-58-64-70 stitches evenly = 258-286-310-338-372-402 stitches. Switch to circular needle size 2.5 mm. Work rib (= knit 1/purl 1). Continue rib like this for 4 cm. Cast off. Jumper measures approx. 52-54-56-58-60-62 cm from shoulder and down. SLEEVE: Slip the 67-79-83-95-103-115 stitches from thread in one side of piece back on a short circular needle/double pointed needles size 3 mm, and pick in addition up 1 stitch in each of the 9-9-11-11-13-13 stitches cast on under sleeve = 76-88-94-106-116-128 stitches. Insert a marker thread in the middle of the new stitches. Work pattern as before and continue with stripes. When 5 stripes have been worked in total with colour powder pink, finish the piece with colour light beige. AT THE SAME TIME when piece measures 3-3-3-2-2-3 cm, decrease 2 stitches under sleeve - READ DECREASE TIP. Decrease like this approx. every 6-3-2½-2-1½-1 cm 6-10-10-14-18-22 times in total = 64-68-74-78-80-84 stitches. Continue until piece measures 35-34-31-31-29-28 cm from division. Switch to double pointed needles size 2.5 mm. Work rib (knit 1/purl 1) for 4 cm. Cast off. Sleeve measures approx. 39-38-35-35-33-32 cm from division. Work the other sleeve the same way. |
|||||||
Diagram explanations |
|||||||
|
|||||||
 |
|||||||
Have you finished this pattern?Tag your pictures with #dropspattern #desertmiragesweater or submit them to the #dropsfan gallery. Do you need help with this pattern?You'll find 29 tutorial videos, a Comments/Questions area and more by visiting the pattern on garnstudio.com. © 1982-2026 DROPS Design A/S. We reserve all rights. This document, including all its sub-sections, has copyrights. Read more about what you can do with our patterns at the bottom of each pattern on our site. |
|||||||


With over 40 years in knitting and crochet design, DROPS Design offers one of the most extensive collections of free patterns on the internet - translated to 17 languages. As of today we count 324 catalogues and 12290 patterns translated into English (UK/cm). 12290
We work hard to bring you the best knitting and crochet have to offer, inspiration and advice as well as great quality yarns at incredible prices! Would you like to use our patterns for other than personal use? You can read what you are allowed to do in the Copyright text at the bottom of all our patterns. Happy crafting!
Post a comment to pattern DROPS 232-16
We would love to hear what you have to say about this pattern!
If you want to leave a question, please make sure you select the correct category in the form below, to speed up the answering process. Required fields are marked *.