
Popular categories
Looking for a yarn?


Comments / Questions (16)
![]() Monika wrote:
Monika wrote:
Skal disse toves?
18.12.2025 - 08:26DROPS Design answered:
Hej Monika. Nej, de ska inte tovas. Mvh DROPS design
18.12.2025 - 08:47
![]() Marianne Norman wrote:
Marianne Norman wrote:
Ska jag sticka med två trådar hela vanten? I så fall, varför behövs bara 25 g i ett gar och 50 g i det andra?
09.02.2025 - 10:51DROPS Design answered:
Hej Marianne. Ja du ska sticka hela vanten med 2 trådar. Garnet är olika tungt, 25 g Kidsilk = 210 m, 50 g Alpaca = 167 m. Mvh DROPS Design
10.02.2025 - 11:24
![]() Heidi wrote:
Heidi wrote:
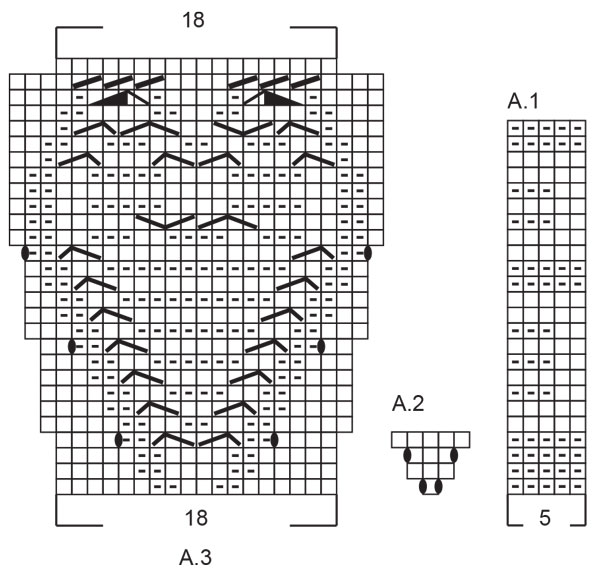
Hvordan strikkes maske nr. 6-9 og 16-19 på linje nr. 26 i diagram A3?
03.12.2024 - 13:01DROPS Design answered:
Hej Heidi, maske 6-9 strikkes: sæt 2 masker på snoningspind foran arbejdet, strik 2 masker ret, og strik 2 masker ret fra snoningspinden. Maske 16-19 strikkes: sæt 2 masker på snoningspind bag arbejdet, strik 2 masker ret og strik 2 masker ret fra snoningspinden :)
04.12.2024 - 14:40
![]() Tina wrote:
Tina wrote:
Die 6 zugenommenen Maschen reichen nicht aus um die Spannung des Herzmusters auszugleichen, muss man nicht stattdessen die Weite vom Handgelenksschaft lassen, damit es nicht über der Handfläche spannt? Mein linker Fäustling passt gerade mal so 😞
13.06.2024 - 19:19DROPS Design answered:
Liebe Tina, stimmt Ihre Maschenprobe? Sie sollen 22 M = 10 cm haben; damit wir der Umfang von Hand ca 18cm in die 1. Größe ; die 6 zugenommen Maschen für den Daumen sind beidseitig gestrickt, so werden insgesamt 13 M für den Daumen stillgelegt + 2 M aufgefassen= 15 M ca 7 cm Umfang für den Daumen. Viel Spaß beim Stricken!
14.06.2024 - 07:32
![]() Sylvie wrote:
Sylvie wrote:
Est-ce que je peux utiliser la méthode magic loop pour faire ces mouffles?
14.01.2022 - 22:30DROPS Design answered:
Bonjour Sylvie, tout à fait, vous pouvez utiliser la technique du magic loop dès lors qu'il n'y a pas assez de mailles pour tricoter sur une aiguille circulaire et/ou que vous ne voulez pas tricoter en rond sur les aiguilles doubles pointes. Bon tricot!
19.01.2022 - 10:23
![]() Céline wrote:
Céline wrote:
Il a erreur dans le diagramme A3 , les explications de pictogramme à faire .selon les notes de la légende nous devons utiliser 4 mailles et sur la grille nous utilisons seulement 3 mailles . À corriger .
06.04.2021 - 01:31DROPS Design answered:
Bonjour Céline, pouvez-vous nous indiquer de quel symbole vous parlez? Sauf erreur de ma part, je compte bien le bon nombre de mailles pour chacun d'eux. Merci!
07.04.2021 - 08:13
![]() Rukhsana wrote:
Rukhsana wrote:
Got it 🤗tusan takk nd v sory for causing too much trouble💐
07.01.2021 - 13:04
![]() Rukhsana wrote:
Rukhsana wrote:
Can you kindly write the exect number of stitches for both mittens to mark thread for A3. On correction site there is just wrote to replace of markerbt not number,i actually want to know the exects stitches number.plz
06.01.2021 - 22:15DROPS Design answered:
Dear Rukhsana, the online pattern has already been edited with correct placement of markers under both left mittens (= Insert a marker thread in the 2nd-3rd stitch on the round (allow it to follow your work onwards; it will be used when working the diagram) and insert a marker in the first stitch on the round (= thumb-marker). and right mitten (= Insert a marker thread in the 22nd-25th stitch on the round (allow it to follow your work onwards; it will be used when working the diagram) and insert a marker in the last stitch on the round (= thumb-marker).. Happy knitting!
07.01.2021 - 10:11
![]() Rukhsana wrote:
Rukhsana wrote:
Then what is the correction?i print the pattren 2 time ‘d both are same .A.3 requir 18 stitches .bt with 2nd stitch i can not make dis☹️Am i doing somethng wrong. (Thumb stitches are not involved in A.3)how can i make then
06.01.2021 - 13:11DROPS Design answered:
Dear Rukhsana, there was a correction on 23/12/2020 - and marker thread should be inserted as explained in the pattern for left/right mittens to work A.3. Happy knitting!
06.01.2021 - 13:32
![]() Rukhsana wrote:
Rukhsana wrote:
Hei, im little confuse for A.3 diagram ,if this is 22nd stitch is start stitch for A.3 on left mitten then which number of stitch is start for A.3 on tight mitten ?plz help me🙏
05.01.2021 - 21:30DROPS Design answered:
Dear Rukhsana, on the left mitten, you start A.3 with the stitch with the marker thread = the 2nd stitch on the round (before increasing for thumb) - on right mitten, the marking thread will be added in the 22nd stitch on the round. Happy knitting!
06.01.2021 - 07:29
|
|||||||||||||||||||||||||||||||
Let it Knit#letitknitmittens |
|||||||||||||||||||||||||||||||
 |
 |
||||||||||||||||||||||||||||||
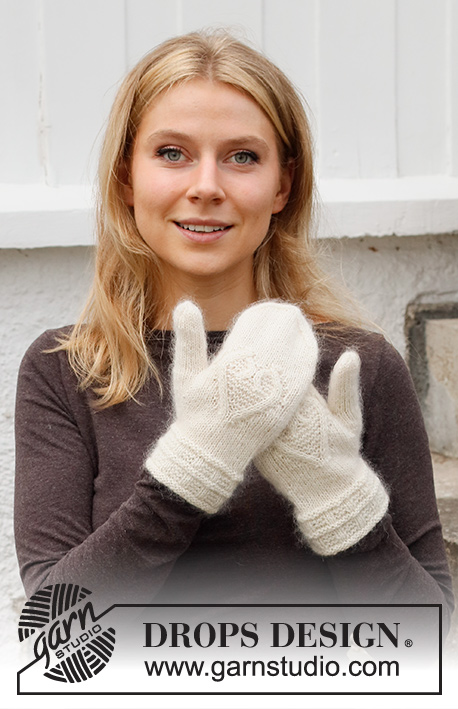
Knitted mittens with cables and hearts in DROPS Alpaca and DROPS Kid-Silk. Theme: Christmas
DROPS 214-62 |
|||||||||||||||||||||||||||||||
|
------------------------------------------------------- EXPLANATIONS FOR THE PATTERN: ------------------------------------------------------- PATTERN: See diagrams A.1, A.2 and A.3. The diagrams show all rows in the pattern from the right side. DECREASE TIP: Start 3 stitches before the marker thread, knit 2 together, knit 2 (marker thread sits between these 2 stitches), slip 1 stitch as if to knit, knit 1 and pass the slipped stitch over the knitted stitch (= 2 stitches decreased). ------------------------------------------------------- START THE PIECE HERE: ------------------------------------------------------- MITTENS – SHORT OVERVIEW OF THE PIECE: The mittens are worked in the round with double pointed needles. LEFT MITTEN: Cast on 45-50 stitches with double pointed needles size 3 mm and 1 strand Alpaca and 1 strand Kid-Silk. Work diagram A.1 in the round. When the diagram has been completed the piece measures approx. 8 cm; the purled section at the beginning will roll inwards so the edge will measure approx. 6 cm when worn. Work 2 rounds of stocking stitch and decrease 5-6 stitches evenly on the first round = 40-44 stitches. THE PIECE IS NOW MEASURED FROM HERE! Insert a marker thread in the 2nd-3rd stitch on the round (allow it to follow your work onwards; it will be used when working the diagram) and insert a marker in the first stitch on the round (= thumb-marker). READ THE WHOLE OF THE NEXT SECTION BEFORE CONTINUING! Continue with stocking stitch and increase for the thumb-gusset on each side of the stitch with the thumb-marker as shown in diagram A.2. Continue to increase a total of 6-7 times = 13-15 stitches for the thumb – AT THE SAME TIME when the piece measures 4-4 cm, work according to diagram A.3 on top of the hand. Start diagram A.3 in the stitch with the marker thread and work stocking stitch over the other stitches (stitches are increased in the diagram because the cable tightens the piece; these stitches are decreased again at the end of the diagram). When the piece measures 6-7 cm from the thumb-marker place the 13-15 thumb-stitches on a thread and cast on 1 new stitch on the needle. Continue with stocking stitch and diagram A.3 as before. When diagram A.3 is finished continue with stocking stitch and there are 40-44 stitches on the round. When the mitten measures 14-15 cm (measured from the edge; there is approx. 4 cm left to finished length – try the mitten on and work to desired length). Insert 1 marker in each side of piece so that pattern A.3 is placed in the middle between the markers and with 20-22 stitches between the markers. On the next round decrease 1 stitch on each side of both marker threads – read DECREASE TIP (= 4 stitches decreased). Decrease like this every 2nd round a total of 4-3 times and then every round a total of 5-7 times = 4-4 stitches left on the needles. Cut and pull both strands through the remaining stitches. Tighten and fasten well on the inside of the mitten. The mitten measures approx. 18-19 cm (and approx. 24-25 cm with the edge). THUMB: Place the 13-15 thumb-stitches from the thread back on double pointed needles size 3 mm and knit up 2 stitches at the back of the thumb = 15-17 stitches. Work stocking stitch in the round until the thumb measures 5½-6½ cm on the inside (try the mitten on and work to desired length – there is ½ cm left to finished length). Knit 2 rounds where all stitches are knitted together 2 and 2 on both rounds = 4-5 stitches left. Cut and pull both strands through the remaining stitches. Tighten and fasten well. RIGHT MITTEN: Cast on and work as for the left mitten, but the marker thread for diagram A.3 and the thumb-marker are inserted as follows: Insert a marker thread in the 22nd-25th stitch on the round (allow it to follow your work onwards; it will be used when working the diagram) and insert a marker in the last stitch on the round (= thumb-marker). |
|||||||||||||||||||||||||||||||
Diagram explanations |
|||||||||||||||||||||||||||||||
|
|||||||||||||||||||||||||||||||
 |
|||||||||||||||||||||||||||||||
Have you finished this pattern?Tag your pictures with #dropspattern #letitknitmittens or submit them to the #dropsfan gallery. Do you need help with this pattern?You'll find 22 tutorial videos, a Comments/Questions area and more by visiting the pattern on garnstudio.com. © 1982-2026 DROPS Design A/S. We reserve all rights. This document, including all its sub-sections, has copyrights. Read more about what you can do with our patterns at the bottom of each pattern on our site. |
|||||||||||||||||||||||||||||||


With over 40 years in knitting and crochet design, DROPS Design offers one of the most extensive collections of free patterns on the internet - translated to 17 languages. As of today we count 324 catalogues and 12290 patterns translated into English (UK/cm). 12290
We work hard to bring you the best knitting and crochet have to offer, inspiration and advice as well as great quality yarns at incredible prices! Would you like to use our patterns for other than personal use? You can read what you are allowed to do in the Copyright text at the bottom of all our patterns. Happy crafting!
Post a comment to pattern DROPS 214-62
We would love to hear what you have to say about this pattern!
If you want to leave a question, please make sure you select the correct category in the form below, to speed up the answering process. Required fields are marked *.