


Komentáře / Otázky (15)
![]() Marianne Norman napsala:
Marianne Norman napsala:
Ska jag sticka med två trådar hela vanten? I så fall, varför behövs bara 25 g i ett gar och 50 g i det andra?
09.02.2025 - 10:51Odpověď DROPS Design :
Hej Marianne. Ja du ska sticka hela vanten med 2 trådar. Garnet är olika tungt, 25 g Kidsilk = 210 m, 50 g Alpaca = 167 m. Mvh DROPS Design
10.02.2025 - 11:24
![]() Heidi napsala:
Heidi napsala:
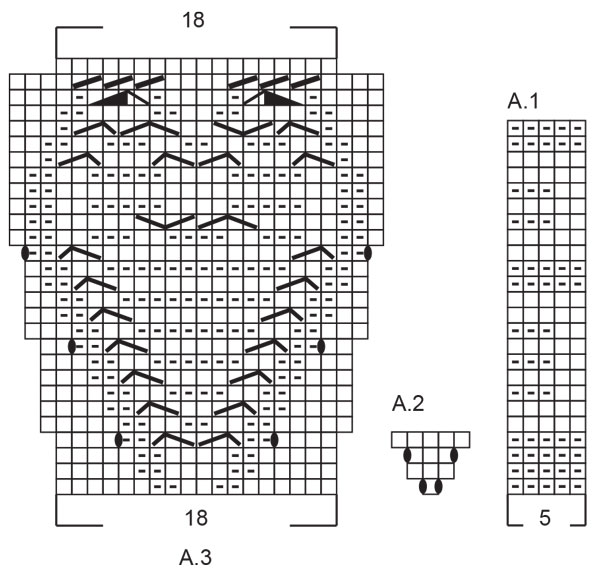
Hvordan strikkes maske nr. 6-9 og 16-19 på linje nr. 26 i diagram A3?
03.12.2024 - 13:01Odpověď DROPS Design :
Hej Heidi, maske 6-9 strikkes: sæt 2 masker på snoningspind foran arbejdet, strik 2 masker ret, og strik 2 masker ret fra snoningspinden. Maske 16-19 strikkes: sæt 2 masker på snoningspind bag arbejdet, strik 2 masker ret og strik 2 masker ret fra snoningspinden :)
04.12.2024 - 14:40
![]() Tina napsala:
Tina napsala:
Die 6 zugenommenen Maschen reichen nicht aus um die Spannung des Herzmusters auszugleichen, muss man nicht stattdessen die Weite vom Handgelenksschaft lassen, damit es nicht über der Handfläche spannt? Mein linker Fäustling passt gerade mal so 😞
13.06.2024 - 19:19Odpověď DROPS Design :
Liebe Tina, stimmt Ihre Maschenprobe? Sie sollen 22 M = 10 cm haben; damit wir der Umfang von Hand ca 18cm in die 1. Größe ; die 6 zugenommen Maschen für den Daumen sind beidseitig gestrickt, so werden insgesamt 13 M für den Daumen stillgelegt + 2 M aufgefassen= 15 M ca 7 cm Umfang für den Daumen. Viel Spaß beim Stricken!
14.06.2024 - 07:32
![]() Sylvie napsala:
Sylvie napsala:
Est-ce que je peux utiliser la méthode magic loop pour faire ces mouffles?
14.01.2022 - 22:30Odpověď DROPS Design :
Bonjour Sylvie, tout à fait, vous pouvez utiliser la technique du magic loop dès lors qu'il n'y a pas assez de mailles pour tricoter sur une aiguille circulaire et/ou que vous ne voulez pas tricoter en rond sur les aiguilles doubles pointes. Bon tricot!
19.01.2022 - 10:23
![]() Céline napsala:
Céline napsala:
Il a erreur dans le diagramme A3 , les explications de pictogramme à faire .selon les notes de la légende nous devons utiliser 4 mailles et sur la grille nous utilisons seulement 3 mailles . À corriger .
06.04.2021 - 01:31Odpověď DROPS Design :
Bonjour Céline, pouvez-vous nous indiquer de quel symbole vous parlez? Sauf erreur de ma part, je compte bien le bon nombre de mailles pour chacun d'eux. Merci!
07.04.2021 - 08:13
![]() Rukhsana napsala:
Rukhsana napsala:
Got it 🤗tusan takk nd v sory for causing too much trouble💐
07.01.2021 - 13:04
![]() Rukhsana napsala:
Rukhsana napsala:
Can you kindly write the exect number of stitches for both mittens to mark thread for A3. On correction site there is just wrote to replace of markerbt not number,i actually want to know the exects stitches number.plz
06.01.2021 - 22:15Odpověď DROPS Design :
Dear Rukhsana, the online pattern has already been edited with correct placement of markers under both left mittens (= Insert a marker thread in the 2nd-3rd stitch on the round (allow it to follow your work onwards; it will be used when working the diagram) and insert a marker in the first stitch on the round (= thumb-marker). and right mitten (= Insert a marker thread in the 22nd-25th stitch on the round (allow it to follow your work onwards; it will be used when working the diagram) and insert a marker in the last stitch on the round (= thumb-marker).. Happy knitting!
07.01.2021 - 10:11
![]() Rukhsana napsala:
Rukhsana napsala:
Then what is the correction?i print the pattren 2 time ‘d both are same .A.3 requir 18 stitches .bt with 2nd stitch i can not make dis☹️Am i doing somethng wrong. (Thumb stitches are not involved in A.3)how can i make then
06.01.2021 - 13:11Odpověď DROPS Design :
Dear Rukhsana, there was a correction on 23/12/2020 - and marker thread should be inserted as explained in the pattern for left/right mittens to work A.3. Happy knitting!
06.01.2021 - 13:32
![]() Rukhsana napsala:
Rukhsana napsala:
Hei, im little confuse for A.3 diagram ,if this is 22nd stitch is start stitch for A.3 on left mitten then which number of stitch is start for A.3 on tight mitten ?plz help me🙏
05.01.2021 - 21:30Odpověď DROPS Design :
Dear Rukhsana, on the left mitten, you start A.3 with the stitch with the marker thread = the 2nd stitch on the round (before increasing for thumb) - on right mitten, the marking thread will be added in the 22nd stitch on the round. Happy knitting!
06.01.2021 - 07:29
![]() Rukhsana napsala:
Rukhsana napsala:
Where can i find the correct (correction)pattren update
04.01.2021 - 15:15Odpověď DROPS Design :
Dear Rukhsana, if you printed the pattern before the correction, click on the red link at the end of writte pattern, if you printed the pattern after the correction, the online pattern is then already updated. Happy knitting
05.01.2021 - 10:50
|
|||||||||||||||||||||||||||||||
Let it Knit#letitknitmittens |
|||||||||||||||||||||||||||||||
 |
 |
||||||||||||||||||||||||||||||
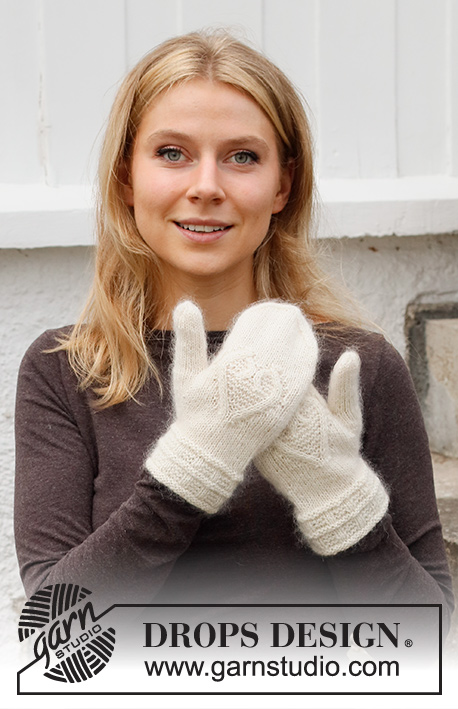
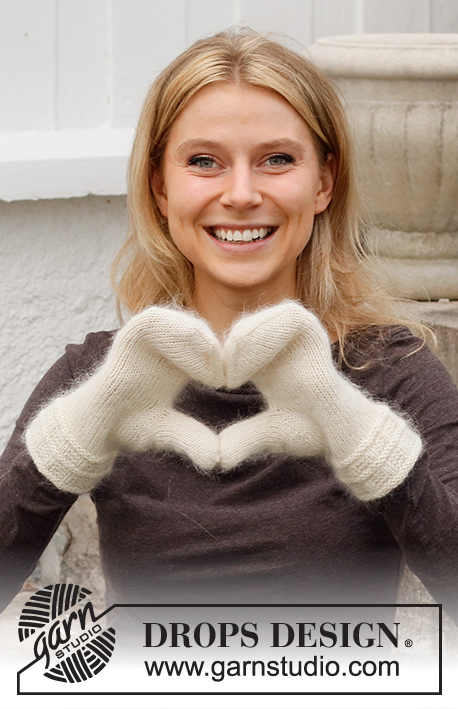
Rukavice – palčáky s copánky a srdíčkem pletené z příze DROPS Alpaca a DROPS Kid-Silk. Motiv: Vánoce.
DROPS 214-62 |
|||||||||||||||||||||||||||||||
|
------------------------------------------------------- VYSVĚTLIVKY: ------------------------------------------------------- VZOR: Viz schémata A.1, A.2 a A.3. Zobrazeny jsou všechny řady vzoru, nahlížené z lícové strany. TIP - UJÍMÁNÍ: Začínáme 3 oka před značkou: 2 oka spleteme hladce, 2 oka upleteme hladce (značka leží mezi nimi), 1 oko sejmeme hladce, 1 upleteme hladce a sejmuté přes ně přetáhneme (= ujmeme 2 oka). ------------------------------------------------------- POPIS PRÁCE: ------------------------------------------------------- RUKAVICE – JAK BUDEME POSTUPOVAT: Pleteme v kruhových řadách na ponožkových jehlicích. LEVÁ RUKAVICE: Na ponožkové jehlice č.3 nahodíme 1 vláknem příze Alpaca a 1 vláknem příze Kid-Silk (= dvojitou přízí) 45-50 ok a pleteme v kruhových řadách podle schématu A.1. Po dokončení celé sekvence vzoru dle schématu (na výšku) měří díl asi 8 cm; počáteční část pletená obrace se stočí dovnitř, takže lem ve výsledku měří asi 6 cm. Upleteme 2 kruhové řady hladce a SOUČASNĚ ujmeme v 1. z nich rovnoměrně 5-6 ok = 40-44 ok. NYNÍ MĚŘÍME DÍL OD TOHOTO MÍSTA! Nyní si označíme 4.-6. oko v kruhové řadě (tuto značku snímáme vždy do aktuálně pletené kruhové řady; využijeme ji při pletení vzoru), druhou značkou označíme poslední oko v kruhové řadě (= značka pro palec). NEŽ BUDETE PLÉST DÁL, PŘEČTĚTE SI POZORNĚ CELÝ NÁSLEDUJÍCÍ POPIS! Pleteme lícovým žerzejem a SOUČASNĚ začneme tvarovat klínek pro palec – na obou stranách značky pro palec přidáme 1 oko podle schématu A.2. Takto přidáváme celkem 6-7x = 13-15 ok palce – SOUČASNĚ ve výši 4-4 cm pleteme na horní straně rukavice vzor podle schématu A.3. Vzor začínáme u označeného oka, ostatní oka pleteme lícovým žerzejem (ve schématu je zaznačeno přidání ok – to proto, že copánkový vzor pleteninu stahuje; tato oka na konci vzoru opět ujmeme). Ve výši 6-7 cm od značky pro palec odložíme 13-15 ok palce na pomocnou jehlici a nahodíme 1 oko nové. Pleteme v kruhových řadách lícovým žerzejem a vzorem A.3 jako dříve. Po dokončení celé sekvence vzoru A.3 pleteme dál lícovým žerzejem a v kruhové řadě máme 40-44 ok. Když rukavice měří 14-15 cm (měřeno od lemu, do výsledných rozměrů nám zbývá doplést asi 4 cm výšky – rukavici si můžete vyzkoušet a míry upravit), označíme si boky rukavice tak, že vzor A.3 leží uprostřed mezi značkami a dlaň tvoří 20-22 ok. V následující kruhové řadě ujmeme na obou stranách obou značek 1 oko – viz TIP - UJÍMÁNÍ (= ujmeme 4 oka). Toto ujímání opakujeme v každé 2. kruhové řadě, celkem 4-3x, pak ujímáme v každé kruhové řadě, celkem 5-7x = na jehlicích zbývají 4-4 oka. Obě příze odstřihneme, protáhneme zbylými oky, stáhneme a zapošijeme. Rukavice měří asi 18-19 cm (asi 24-25 cm včetně lemu). PALEC: Odložených 13-15 ok palce vrátíme z pomocné jehlice zpět na ponožkové jehlice č.3 a navíc k nim nabereme 2 oka z okraje za palcem = 15-17 ok. Pleteme v kruhových řadách lícovým žerzejem. Když je palec vysoký 5,5-6,5 cm (měřeno podél vnitřní strany palce; rukavici si můžete vyzkoušet a naměřit vhodnou výšku, do výsledných rozměrů nám zbývá doplést asi 0,5 cm výšky), spleteme v každé z následujících 2 kruhových řad vždy každá 2 oka hladce = zbývá 4-5 ok. Obě příze odstřihneme, protáhneme zbylými oky, stáhneme a zapošijeme. PRAVÁ RUKAVICE: Nahodíme a pleteme stejně jako levou rukavici, jen zrcadlově převrácenou – značku pro vyznačení vzoru A.3 a značku pro palec umístíme takto: jednu značku vložíme do 1. oka v kruhové řadě (tuto značku snímáme vždy do aktuálně pletené kruhové řady; využijeme ji při pletení vzoru), druhou značkou si označíme 22.-24. oko v kruhové řadě (= značka pro palec). |
|||||||||||||||||||||||||||||||
Vysvětlivky ke schématu |
|||||||||||||||||||||||||||||||
|
|||||||||||||||||||||||||||||||
|
|||||||||||||||||||||||||||||||
Dokončili jste tento model?Pak označte své fotky tagem #dropspattern #letitknitmittens nebo je pošlete do galerie #dropsfan. Potřebujete s tímto návodem poradit?Otevřete-li si návod na stránce garnstudio.com, najdete tam 22 výukových video-ukázek, Komentáře/Dotazy a další užitečné informace. © 1982-2025 DROPS Design A/S. Vyhrazujeme si veškerá práva. Tento dokument, včetně všech jeho dílčích částí, podléhá autorským právům. Podrobnější komentář k možnostem užití našich návodů najdete dole pod každým návodem na našich stránkách. |
|||||||||||||||||||||||||||||||


V oblasti pletené a háčkované módy působí DROPS Design více než 40 let. Díky tomu vám můžeme nabídnout jednu z nejrozsáhlejších kolekcí modelů s bezplatnými návody dostupnými na internetu - navíc v 17 jazycích. K dnešnímu dni máme na 314 katalogů a 11822 návodů celkem - z nich je už 7048 dostupných v [češtině].
Přidejte komentář k návodu DROPS 214-62
Rádi bychom věděli, co si o tomto modelu myslíte!
Pokud se chcete na něco zeptat, dbejte prosím na to, abyste ve formuláři níže vybrali správnou kategorii - díky tomu se dříve dozvíte, co potřebujete vědět. Povinná pole jsou označena *.