
Popular categories
Looking for a yarn?


Comments / Questions (5)
![]() Jess wrote:
Jess wrote:
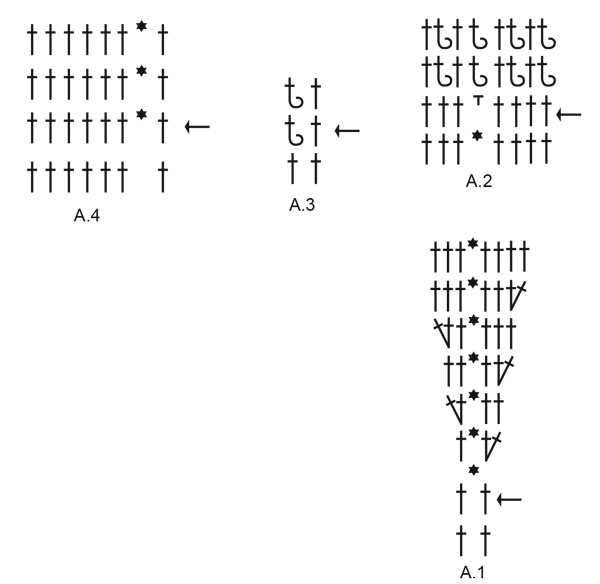
Hi, can you please explain how to get from round 1 of A1 (the round with the arrow of only double crochets) to round 2 of A1 (the round with only the * or the loop stitches)?
14.04.2022 - 10:38DROPS Design answered:
Dear Jess, the first round consists of double crochets and in round 2 you repeat the whole round: Work 10 chain stitches, work 1 slip stitch in the first of these 10 chain stitches to make a chain stitch loop and tighten yarn somewhat before continuing. You start the 2nd round with 3 chain stitches, which substitute 1 dc. Happy crochetting!
14.04.2022 - 19:17
![]() Madde wrote:
Madde wrote:
Hei. Er tegnforklaringen til relieffmaske riktig? "1 fastmaske om den siste luftmaskeløkken. Denne fastmasken holder luftmaskeløkkene sammen slik at de ikke løsner" Forklaringen er lik som tegnforklaringen for fastmasken rett over.
14.11.2021 - 13:31DROPS Design answered:
Hej Madde. Tack för info, det hade blivit fel där och det är nu rättat! Mvh DROPS Design
16.11.2021 - 08:54
![]() Catherine Anciant wrote:
Catherine Anciant wrote:
Bonjour, je ne comprens pas comment passer du rang 1 de A1 au rang 2 -les 9 ronds de mailles-, Ni comment passer du rang 2 au rang 3 : 2 brides dans une bride, un rond de mailles, une bride (9 fois). Merci pour votre aide.
12.02.2021 - 13:30DROPS Design answered:
Bonjour Mme Anciant, crochetez le 2ème tour de A.1 ainsi: *2 b dans la 1ère b, 1 rond de mailles en l'air, 1 b dans la b suivante*, et répétez de *-* tout le tour en plaçant les ronds de mailles en l'air sur l'endroit. Continuez ainsi en augmentant dans chaque A.1 comme le montre le diag. Au 3ème tour, crochetez: *1 b dans chaque b, 1 rond de mailles en l'air, 2 b dans la b suivante*, répétez aussi de *-* tout le tour. Avez-vous pensé à regarder cette vidéo? Elle montre, pour un autre modèle, comment crocheter ces boucles/ronds de mailles en l'air, avec les brides entre chaque. Bon crochet!
12.02.2021 - 13:49
![]() Catherine Anciant wrote:
Catherine Anciant wrote:
Un grand merci pour votre réponse express et fort utile car j'ai très bien compris comment procéder. Je ne suis pas une habituée du crochet, et encore moins des diagrammes, c'est pourquoi , sans aide, j'ai beaucoup de difficulté à comprendre. je sollicite encore votre aide pour A4 : Est-ce que la bride avant les 10 mailles en l'air représente la 1ère maille du rang ?Est ce qu'on pique dans la maille suivante pour faire les mailles en l'air , Merci pour votre aide.
09.02.2021 - 13:19DROPS Design answered:
Bonjour Mme Anciant, A.4 va se crocheter sur 7 mailles (= 7 brides), mais dans le diagramme, le rang sous celui avec la flèche a un espace entre la 1ère et la 2ème bride pour laisser la place de l''étoile (= les ronds de mailles en l'air) aux rangs suivants. Autrement dit, répétez bien le diagramme: *1 bride, 10 mailles en l'air, 1 maille coulée dans la 1ère maille en l'air, 7 brides* et répétez de *-* tout le tour. - 11 fois en taille S/M et 12 fois en taille M/L (= 77-84 mailles). Bon crochet!
09.02.2021 - 15:35
![]() Catherine Anciant wrote:
Catherine Anciant wrote:
Bonjour, Je ne comprends pas le terme AUTOUR dans l'explication de la double bride en relief ainsi que pour la maille serrée "autour des mailles en rond. Merci de me donner des précisions pour que je puisse faire ce point.
09.02.2021 - 08:28DROPS Design answered:
Bonjour Mme Anciant, cette vidéo pourra probablement vous aider, elle montre comment crocheter une bride en relief, en la crochetant autour de la maille du rang précédent et celle-ci comment faire la torsade à boucle du bonnet. Bon crochet!
09.02.2021 - 09:08
|
|||||||||||||||||||
Whispering Wind#whisperingwindset |
|||||||||||||||||||
 |
 |
||||||||||||||||||
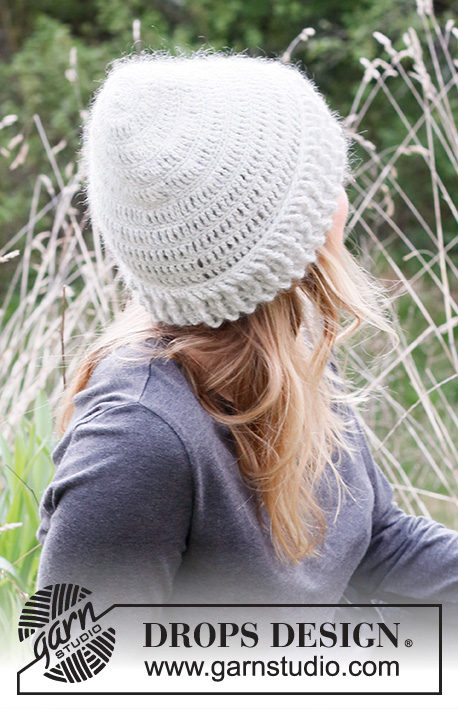
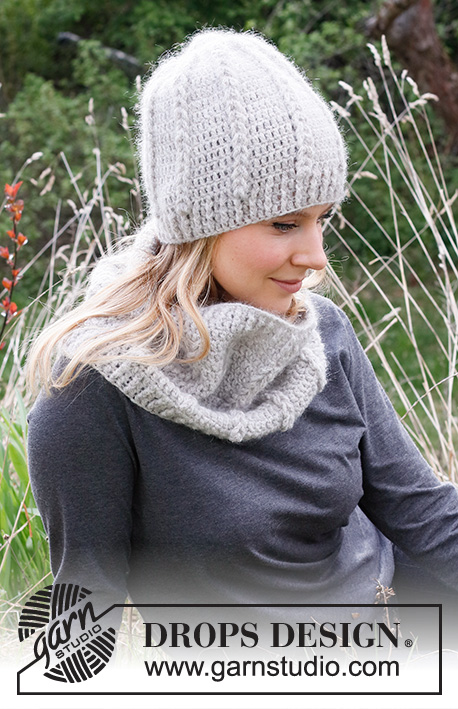
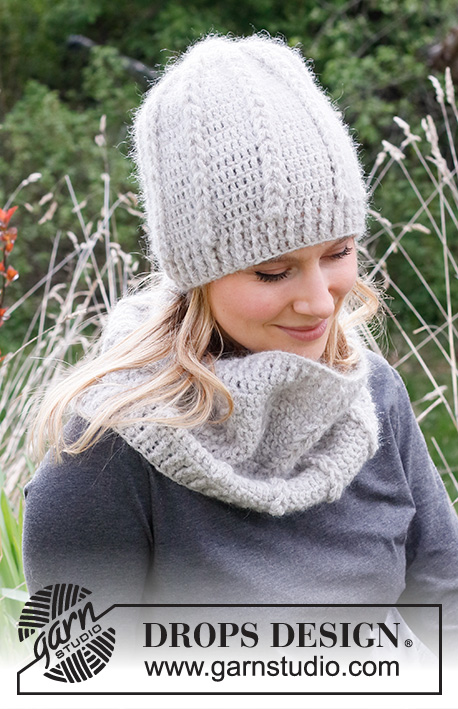
Crocheted hat and neck warmer in DROPS Sky and DROPS Kid-Silk. Piece is crocheted with loop - cables and relief stitches.
DROPS 214-45 |
|||||||||||||||||||
|
------------------------------------------------------- EXPLANATION FOR THE PATTERN: ------------------------------------------------------- CROCHET TIP FOR CHAIN STITCH: If you work at the end of crochet hook the chain stitch will often be too tight. 1 chain stitch should be just as long as 1 treble crochet is wide. CROCHET INFORMATION: At beginning of every round with treble crochets, work 3 chain stitches, these chain stitches do not replace 1st treble crochet. Finish round with 1 slip stitch in 3rd chain stitch at beginning of round. DECREASE TIP: * Make 1 yarn over, insert hook in next stitch, get yarn, make 1 yarn over and pull yarn through the first 2 loops on hook *, repeat from *-* 2 times in total, make 1 yarn over and pull yarn through all 3 loops on hook (= 1 stitch decreased). PATTERN: Hat: See diagrams A.1 and A.2. Neck warmer: See diagrams A.3 and A.4. ------------------------------------------------------- START THE PIECE HERE: ------------------------------------------------------- HAT - SHORT OVERVIEW OF THE GARMENT: Work in the round top down. HAT: Work 4 chain stitches - read CROCHET TIP FOR CHAIN STITCH, on hook size 4.5 mm with 1 strand Sky and 1 strand Kid-Silk (= 2 strands), and form a ring with 1 slip stitch in first chain stitch made. Work in the round as follows: ROUND 1: Work 3 chain stitches – read CROCHET INFO, then work 11 treble crochets around chain stitch ring. ROUND 2: Work * 1 treble crochet in next treble crochet, 2 treble crochets in each of the next 2 treble crochet *, work from *-* until 2 treble crochets remain, work 1 treble crochet in next stitch, 2 treble crochets in last stitch = 18 treble crochets. REMEMBER THE CROCHET TENSION! Begin round with arrow in diagram and work A.1 in the round (= 9 repetitions) - remember CROCHET INFORMATION. When A.1 has been worked, there are 63 treble crochets on round and 9 vertical lines with chain stitch loops. Continue in the round with pattern as shown on last round in A.1 until hat measures approx. 22 cm measured from centre mid on top of hat (approx. 4 cm remain until finished measurements). Now work chain stitch loops vertically together into loop - cables as follows: Insert hook from right side in 1st chain stitch loop at the top hat, pull 2nd chain stitch loop through 1st chain stitch loop, insert hook in 2nd chain stitch loop and pull 3rd chain stitch loop through 2nd chain stitch loop. Continue like this downward until all chain stitch loops have been crocheted together. Repeat at each of the remaining lines with chain stitch loops. Now work A.2 over each repetition of A.1. When A.2 has been worked, repeat last round in A.2 until hat measures 26 cm in total (= approx. 4 rounds with relief stitches). Cut and fasten the yarn. ------------------------------------------------------- NECK WARMER - SHORT SUMMARY OF PIECE: Work in the round top down. NECK WARMER: Work 78-84 chain stitches - read CROCHET TIP FOR CHAIN STITCH, on hook size 5 mm with 1 strand Sky and 1 strand Kid-Silk (= 2 strands) and form a ring with 1 slip stitch in first chain stitch made. Work 1 round with 1 treble crochet in every chain stitch - read CROCHET INFORMATION. Then work A.3. When A.3 has been worked vertically, work A.4 in the round, at the same time at the end of first round of A.4 work as follows in size S/M: When 2-0 stitches remain at the end of first round, work the last 2 treble crochets together - read DECREASE TIP (this only applies to size S/M) = 77-84 stitches. REMEMBER THE CROCHET TENSION! Continue like this until neck measures approx. 21-23 cm. Now work chain stitch loops vertically together to not unravel: Insert hook from right side in 1st chain stitch loop at the top towards neck, pull 2nd chain stitch loop through 1st chain stitch loop, insert hook in 2nd chain stitch loop and pull 3rd chain stitch loop through 2nd chain stitch loop. Continue like this downward until all chain stitch loops have been crocheted together. Work next round as follows: Work 1 treble crochet in every treble crochet and 1 double crochet around each of the bottom chain stitch loops worked together so not to unravel = 88-96 stitches. Work 1 round with 1 treble crochet in every stitch, then work A.3. When A.3 is done, fasten off. Neck warmer measures approx. 25-27 cm. |
|||||||||||||||||||
Diagram explanations |
|||||||||||||||||||
|
|||||||||||||||||||
 |
|||||||||||||||||||
Have you finished this pattern?Tag your pictures with #dropspattern #whisperingwindset or submit them to the #dropsfan gallery. Do you need help with this pattern?You'll find 11 tutorial videos, a Comments/Questions area and more by visiting the pattern on garnstudio.com. © 1982-2026 DROPS Design A/S. We reserve all rights. This document, including all its sub-sections, has copyrights. Read more about what you can do with our patterns at the bottom of each pattern on our site. |
|||||||||||||||||||


With over 40 years in knitting and crochet design, DROPS Design offers one of the most extensive collections of free patterns on the internet - translated to 17 languages. As of today we count 324 catalogues and 12290 patterns translated into English (UK/cm). 12290
We work hard to bring you the best knitting and crochet have to offer, inspiration and advice as well as great quality yarns at incredible prices! Would you like to use our patterns for other than personal use? You can read what you are allowed to do in the Copyright text at the bottom of all our patterns. Happy crafting!
Post a comment to pattern DROPS 214-45
We would love to hear what you have to say about this pattern!
If you want to leave a question, please make sure you select the correct category in the form below, to speed up the answering process. Required fields are marked *.