
Popular categories
Looking for a yarn?


Comments / Questions (17)
![]() Adriana wrote:
Adriana wrote:
Holaaa!! Consulta: a que le llaman extra fine cuando hablan del grosor del hilado?. Muchas gracias.
09.01.2021 - 01:35DROPS Design answered:
Hola Adriana. Merino Extra Fine es una forma especial del hilo (cable spun). Normalmente es para agujas de 4-5 mm y 50 gr = aprox. 105 m. Estos hilos parecen voluminosos, pero al trabajar la labor tienen una textura bastante fina.
10.01.2021 - 12:21
![]() Nicole wrote:
Nicole wrote:
Would love to see this as a pullover or cardigan pattern
09.11.2020 - 07:17
![]() Birgitte wrote:
Birgitte wrote:
Jeg er begyndt på denne, men synes ikke mine snoninger bliver som på billedet. Er det mig der har misforstået noget eller er der fejl i diagrammet?
11.10.2020 - 21:17DROPS Design answered:
Hej Birgitte, starter du diagrammet i nederste højre hjørne og strikker opad? For at kunne sammenligne er du nødt til at vende dit arbejde om, så den vender samme vej som på billedet (da du strikker halsen ovenfra og ned). God fornøjelse!
12.10.2020 - 15:43
![]() Annarosa wrote:
Annarosa wrote:
Mi piace molto questo scaldacollo che scalda anche le spalle
07.06.2020 - 12:17
![]() Eva wrote:
Eva wrote:
Shield maiden
06.06.2020 - 15:57
![]() Knitter wrote:
Knitter wrote:
I love this as it is! Usually these kind of garments leave shoulders cold, but this seems like a perfect solution.
05.06.2020 - 23:21
![]() Dawn Wynne wrote:
Dawn Wynne wrote:
I'd love this as a jumper pattern!
04.06.2020 - 13:02
|
||||||||||||||||||||||
Elegant Emerald#elegantemeraldneckwarmer |
||||||||||||||||||||||
 |
 |
|||||||||||||||||||||
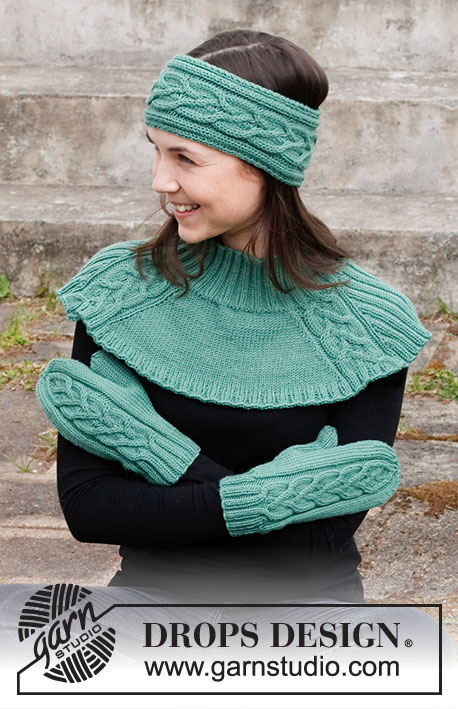
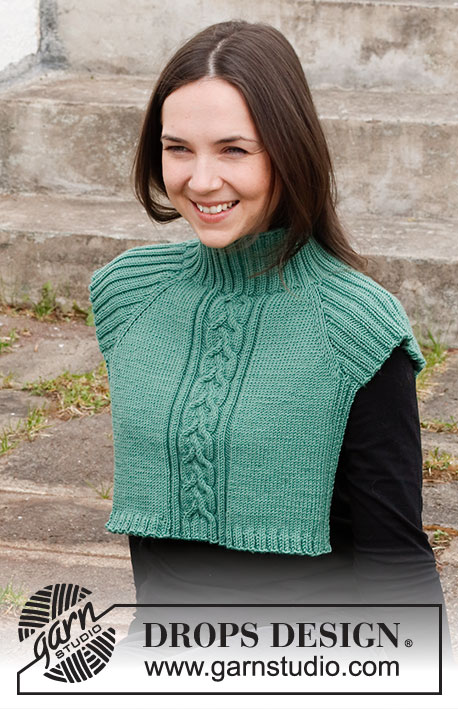
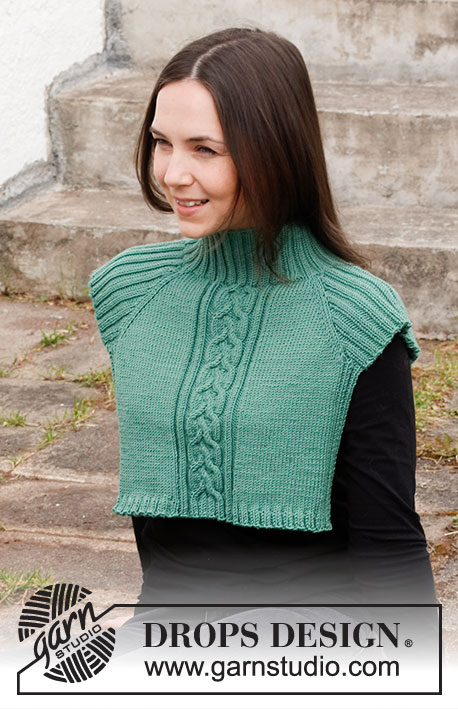
Knitted neck warmer in DROPS Merino Extra Fine. The piece is worked top down with raglan and cables. Sizes S - XXXL.
DROPS 214-36 |
||||||||||||||||||||||
|
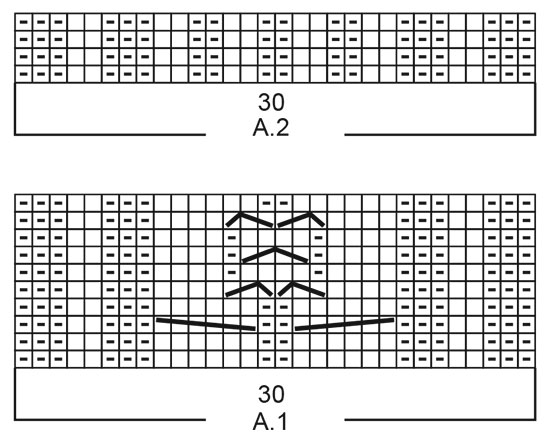
------------------------------------------------------- EXPLANATIONS FOR THE PATTERN: ------------------------------------------------------- RIDGE/GARTER STITCH (worked back and forth): Knit all rows. 1 ridge in height = Knit 2 rows. PATTERN: See diagrams A.1 and A.2. INCREASE TIP (evenly spaced): To work out how to increase evenly, count the total number of stitches on the needle (e.g. 44 stitches) and divide by the number of increases to be made (e.g. 4) = 11. In this example, increase by making 1 yarn over after each 11th stitch. On the next row/round work the yarn overs twisted to avoid holes. RAGLAN: Increase 1 stitch on each side of the marker threads in each transition between body and shoulders (8 stitches increased on each increase-round): Work until there is 1 stitch left before marker thread, 1 yarn over, knit 2 (marker thread sits between these 2 stitches), 1 yarn over (= 2 stitches increased). On the next row work the yarn overs twisted to avoid holes. Then the new stitches are worked in stocking stitch on the front and back pieces, and in rib on the shoulders (= knit 2, purl 2). CASTING-OFF TIP: To avoid the cast-off edge being tight you can cast off with a larger size needle. If the edge is still tight, make 1 yarn over after approx. each 4th stitch at the same time as casting off; the yarn overs are cast off as normal stitches. ------------------------------------------------------- START THE PIECE HERE: ------------------------------------------------------- NECK WARMER – SHORT OVERVIEW OF THE PIECE: The neck and yoke are worked in the round with circular needle, top down. The yoke is divided for the front/back pieces and shoulders. Then stitches are knitted up along the shoulder-edges and the front and back pieces finished separately, back and forth. NECK: Cast on 124-132-132 stitches with circular needle size 3 mm and Merino Extra Fine. Knit 1 round. Then work rib (= knit 2, purl 2) in the round for 8 cm. The next round is worked as follows: Knit 2, then knit 44-44-44 and at the same time increase 4 stitches evenly spaced over these stitches – read INCREASE TIP, knit 18-22-22, knit 44-44-44 and at the same time increase 4 stitches evenly spaced over these stitches, knit 16-20-20 = 132-140-140 stitches. Change to circular needle size 4 mm. Knit 1 round. Insert 1 marker after the 26th stitch on the round (= mid back), the yoke is measured from this marker! YOKE: Now insert 4 marker threads as follows: Knit 1 and insert the first marker thread after this stitch (= transition between left shoulder and back piece – this is now the beginning of the round). Insert the other 3 marker threads without working the stitches as follows: Skip the next 50-50-50 stitches, insert a marker thread here (= transition between back piece and right shoulder), skip the next 16-20-20 stitches, insert a marker thread here (= transition between right shoulder and front piece), skip the next 50-50-50 stitches, insert a marker thread here (= transition between front piece and left shoulder), there are 16-20-20 stitches left on the round after the last marker thread. Now work pattern as follows: * Knit 1, make 1 yarn over, knit 9-9-9, work A.1 over the next 30 stitches, knit 9-9-9, make 1 yarn over, knit 2 (marker thread is between these 2 stitches), make 1 yarn over, work rib (purl 2, knit 2) over the next 12-16-16 stitches, purl 2, make 1 yarn over, knit 1, (marker thread here) *, work from *-* 1 more time = 8 stitches increased for RAGLAN – read description above. Continue this pattern in the round and increase to raglan every 2nd round a total of 15-15-19 times = 252-260-292 stitches. REMEMBER THE KNITTING TENSION! When all the increases are finished the piece measures approx. 11-11-14 cm from the marker by the neck. If the piece is shorter than this, continue working to the correct length – make sure you finish after an odd row in A.1. The next round is worked as follows: Work as before over the first 81-81-89 stitches and place these stitches on a thread (= back piece), work the next 44-48-56 stitches and place these on a thread (= right shoulder), work the next 82-82-90 stitches and place these on a thread (= front piece), work the next 44-48-56 stitches (= left shoulder) and leave these stitches on the needle. Move the last stitch onto the thread with the stitches for the back piece (= 82-82-90 stitches on the back piece). The raglan lines are now on the front/back pieces. All sections are finished separately, back and forth. LEFT SHOULDER: = 44-48-56 stitches. Work rib back and forth as before with 1 edge stitch in GARTER STITCH – read description above, on each side. After working 8 rows cast off with knit over knit and purl over purl. RIGHT SHOULDER: Work in the same way as the right shoulder. FRONT PIECE: Start from the right side with circular needle size 4 mm and Merino Extra Fine, and knit up 8 stitches in each edge stitch along the side of the right shoulder (the 8 rows of rib), work the 82-82-90 stitches from the thread for the front piece as before, knit up 8 stitches in each edge stitch along the side of the left shoulder (the 8 rows of rib) = 98-98-106 stitches. Work the next row from the wrong side as follows: Purl 2, knit 2, purl 2, knit 2, pattern as before over the next 82-82-90 stitches, knit 2, purl 2, knit 2, purl 2. Continue back and forth like this; i.e. pattern as before with 8 stitches in rib on either side (the outermost 2 stitches are in stocking stitch to allow the edges to roll inwards). Continue like this until the piece measures approx. 18-18-18 cm from the division (where stitches were knitted up on each side) – adjust to finish after row 4 in A.1. Now increase 8-8-8 stitches evenly spaced – read INCREASE TIP, on each side of A.1 (do not increase over the ribbed sections) = 114-114-122 stitches. Change to circular needle size 3 mm and work 1 row back with knit over knit and purl over purl. Now work from the right side as follows: Rib as before over the first 8 stitches and (= knit 2, purl 2) over the next 34-34-38 stitches, work A.2 over A.1, rib (= knit 2, purl 2) over the next 34-34-38 stitches and rib as before over the last stitches. Continue this rib for a total of 4 rows. Cast off with knit over knit and purl over purl – read CASTING-OFF TIP. The neck warmer measures 34-35-38 cm from the shoulder down. BACK PIECE: Work in the same way as the front piece. |
||||||||||||||||||||||
Diagram explanations |
||||||||||||||||||||||
|
||||||||||||||||||||||
 |
||||||||||||||||||||||
Have you finished this pattern?Tag your pictures with #dropspattern #elegantemeraldneckwarmer or submit them to the #dropsfan gallery. Do you need help with this pattern?You'll find 24 tutorial videos, a Comments/Questions area and more by visiting the pattern on garnstudio.com. © 1982-2026 DROPS Design A/S. We reserve all rights. This document, including all its sub-sections, has copyrights. Read more about what you can do with our patterns at the bottom of each pattern on our site. |
||||||||||||||||||||||


With over 40 years in knitting and crochet design, DROPS Design offers one of the most extensive collections of free patterns on the internet - translated to 17 languages. As of today we count 324 catalogues and 12290 patterns translated into English (UK/cm). 12290
We work hard to bring you the best knitting and crochet have to offer, inspiration and advice as well as great quality yarns at incredible prices! Would you like to use our patterns for other than personal use? You can read what you are allowed to do in the Copyright text at the bottom of all our patterns. Happy crafting!
Post a comment to pattern DROPS 214-36
We would love to hear what you have to say about this pattern!
If you want to leave a question, please make sure you select the correct category in the form below, to speed up the answering process. Required fields are marked *.