
Popular categories
Looking for a yarn?


Comments / Questions (75)
![]() Linda wrote:
Linda wrote:
Where r the sizes?
29.04.2026 - 13:38DROPS Design answered:
Dear Linda, you will find the sizes on the top of the pattern page under tab "Pattern", hier from XS to XXL; read how to find your size here. Happy knitting!
29.04.2026 - 16:27
![]() Monika wrote:
Monika wrote:
Hallo, ich würde diesen Pulli sehr gerne stricken, aber ich komme einfach nicht mit den Diagrammen 1 und 3 zurecht: wenn ich auf der einen Seite der drei linken Maschen eine Masche zunehme und in der nächsten Runde die 3 linken Maschen um eine Stelle versetze, habe ich doch nicht nur 3 rechte Maschen, sondern 4, weil an der anderen Seite habe ich ja eine glatte Kante vor dem mittleren Muster. Ich hoffe, ich habe mich nicht zu kompliziert ausgedrückt und Sie können mir weiterhelfen.
24.02.2026 - 17:50DROPS Design answered:
Liebe Monika, richtig, die Anzahl an rechten Maschen erhöht sich, aber das ist doch in den Diagrammen auch eingezeichnet. In der Reihe nach der Zunahme ist es eine rechte Masche mehr. Viel Spaß beim Weiterstricken!
24.02.2026 - 17:54
![]() Luhaib wrote:
Luhaib wrote:
Hi again, so you mean I slip the first stitches from left needle to right without working? It says in my size I start on 4th stitch, but when we reached the marker stitch we already worked the first stitch as part of the 2 stitches to knit at end of A3. So do I count from that 4 stitches not to work or 3? It’s so confusing 🫤
05.11.2025 - 10:08
![]() Luhaib wrote:
Luhaib wrote:
Hi, I’m in the first round of yoke.. what does (make 1 yarn over, begin on 5th-5th-4th-4th-3rd-3rd stitch in A.4 ) mean? What we do in 2nd, 3rd stitch? How we work those? Can you clarify please. Thanks.
04.11.2025 - 23:18DROPS Design answered:
Hi Luhaib, You knit 1, then make 1 yarn over (wind the yarn around the right needle to give you an extra stitch on the next round), then you begin the pattern, working the first row in each diagram across the correct number of stitches for your size. When it comes to A.4, (so the diagram fits on the round) you begin on the correct stitch for your size on the row (do not work the first stitches) before making 1 yarn over and knitting 1. All this is repeated once more on the round. On the next round, the yarn overs are knitted twisted (insert the right needle through the back loop) to avoid holes . Hope this helps. Regards, Drops Team.
05.11.2025 - 06:42
![]() Ivette Samne wrote:
Ivette Samne wrote:
Hola, soy Ivette, tengo una duda, los diagramas se leen de arriba hacia abajo ¿cierto? la otra duda es, cuando dice que se colocan los marcardores sin trabajar, quiere decir que solo paso puntos y coloco marcadores ¿sin tejer?Muchas gracias, lindo patrón
26.11.2024 - 16:57
![]() Jollyb wrote:
Jollyb wrote:
Je suis juste après le col, merci
15.10.2024 - 11:14
![]() Jollyb wrote:
Jollyb wrote:
Bonjour, c'est la taille xs, merci
15.10.2024 - 10:53DROPS Design answered:
Merci :) Tricotez vos 120 mailles ainsi: *1 m end, (1 jeté), A.1 (= 5 m), A.2 (35 m), A.3 (5 m), (jeté), 2 m end, (jeté), A.4 (= 11 m: commencez par les 5 dernières mailles de A.4, tricotez ensuite les 6 premières mailles de A.4, ainsi le diagramme sera centré comme on le souhaite), (jeté), 1 m end*, soit: 1+5+35+5+2+11+1= 60 m, répétez de *à*=120 m. Bon tricot!
15.10.2024 - 13:12
![]() Jollyb wrote:
Jollyb wrote:
Bonjour, malgré les commentaires, je n'arrive pas à faire correspondre le nombre de mailles avec A4 j ai 120 mailles donc 60 diviser par deux. La séquence est 1m end et un jete a1 (5) a2 (35) a3(5) jete et deux m end et 1 jete A4 (12) et un jete et 1 m end ce qui fait 61 (sans compter les jetés) donc si je fais que 8 mailles de A4 je vais à la fin du tour avoir des mailles en trop environ 6. Pourriez vous m aider ? Merci
14.10.2024 - 16:51DROPS Design answered:
Bonjour Jollyb, pouvez-vous nous indiquer la taille que vous tricotez et à quel niveau précis vous en êtes? J'avoue ne pas retrouver vos chiffres dans les explications, désolée et merci pour votre compréhension.
15.10.2024 - 09:27
![]() Rhoda wrote:
Rhoda wrote:
I needed an explanation as from the rib how do you divide as into the diagrams. to place 23 stitches midback, where ? And then to incorporate the actual pattern explanation is my difficulty. By the time rib is finished, it is at the back, it doesnt balance. If feel like not explaining properly , don't bother replying
01.06.2024 - 20:40DROPS Design answered:
Dear Rhoda, after you have worked the rib and the ridge, just insert a marker after 23 stitches from beg of round. This marker will be then used to measure yoke from. Work then pattern just as described under YOKE inserting markers for raglan and working diagrams/increasing for raglan as described for your size. Happy knitting!
03.06.2024 - 08:36
![]() Rhoda wrote:
Rhoda wrote:
Do you have a video showing how to knit the patterns A.1,A.2,A.3 after the neck rib? I don`t understand the concept at all. what does it mean to begin on 5th stitch in A.4?
31.05.2024 - 06:35DROPS Design answered:
Dear Rhoda, we don't have any specific video to these diagrams, but in this lesson we show how to read diagrams; to get A.4 placed as desired, you will start the diagram with the stated stitch, so 5th in your size, this means work the diagram A.4 from the 5th stitch to the end towards the right (8 sts) then work the first 3 sts in diagram (new repeat in width) = you have now worked 11 sts in A.4, then incorporate the new stitches increased in the pattern. Happy knitting!
31.05.2024 - 07:53
|
|||||||||||||||||||||||||||||||||||||
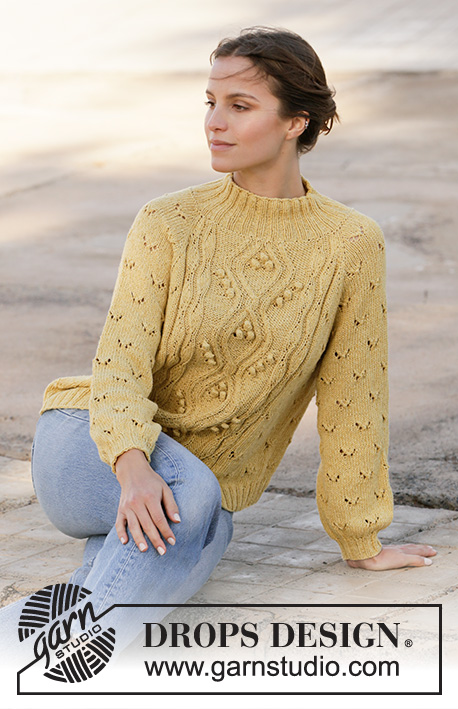
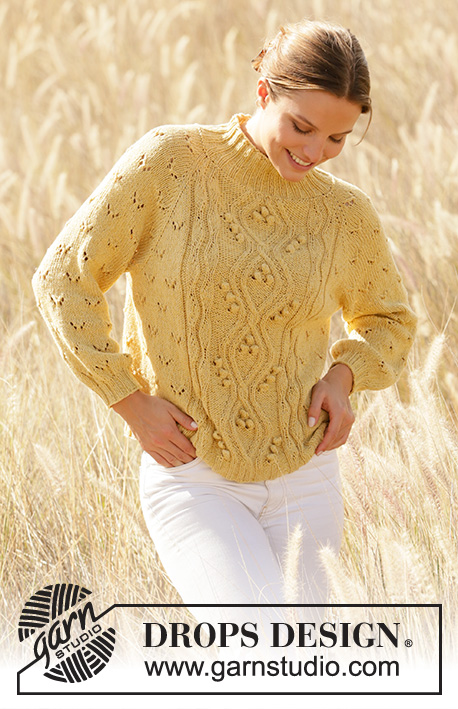
Golden Moments#goldenmomentssweater |
|||||||||||||||||||||||||||||||||||||
 |
 |
||||||||||||||||||||||||||||||||||||
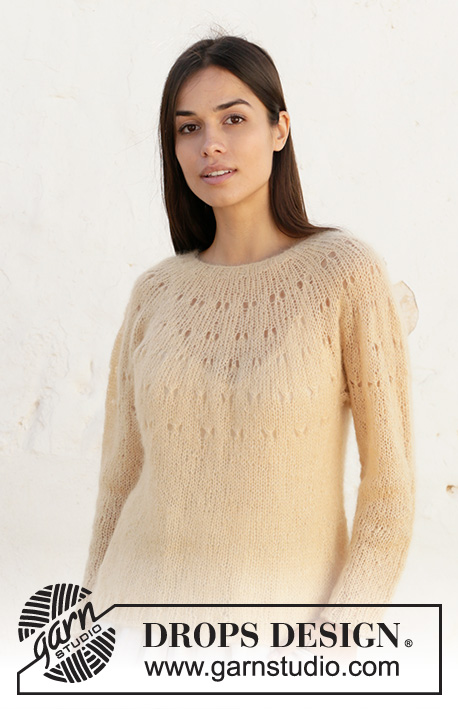
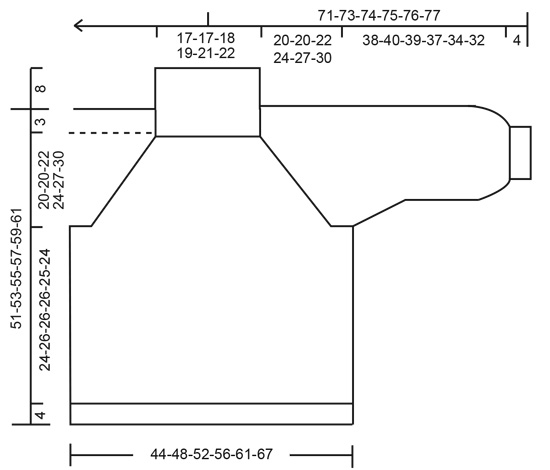
Knitted jumper with raglan in DROPS Belle. Piece is knitted top down with lace pattern, cables and bobbles. Size XS–XXL.
DROPS 213-16 |
|||||||||||||||||||||||||||||||||||||
|
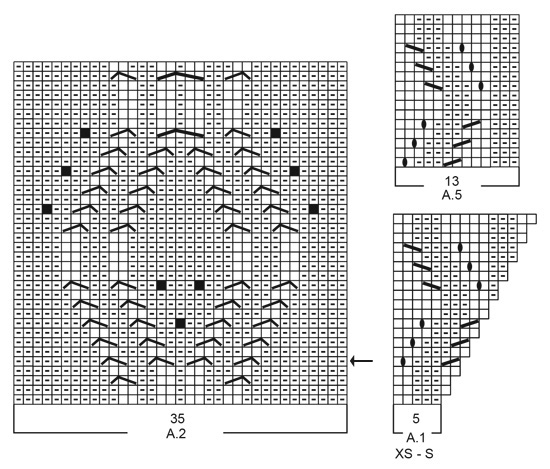
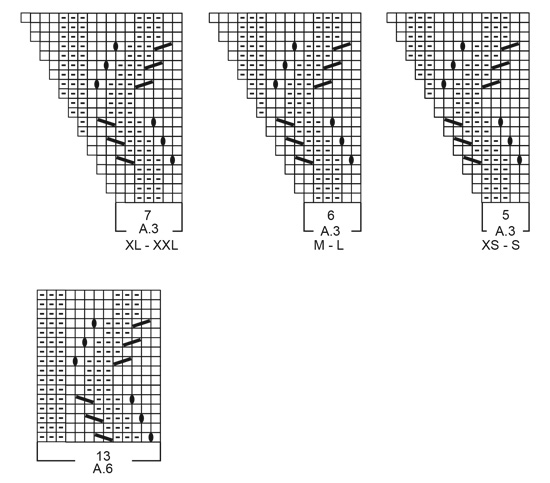
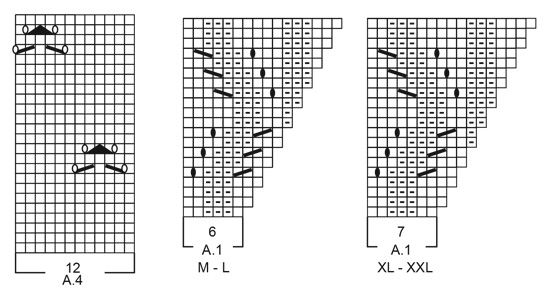
---------------------------------------------------------- EXPLANATION FOR THE PATTERN: ---------------------------------------------------------- PATTERN: See diagrams A.1 to A.6. Choose diagram for your size (applies to A.1 and A.3). INCREASE/DECREASE TIP (evenly): To calculate how to increase/decrease evenly, use the total number of stitches on row (e.g. 92 stitches) , divide stitches by number of increases/decreases to be done (e.g. 28) = 3.2. In this example increase by making 1 yarn over after approx. 3rd stitch. On next round work yarn overs twisted to avoid holes. To decrease in this example knit approx. every 2nd and 3rd stitch together. RAGLAN: Increase 1 stitch on each side of marker thread as follows: Work until 1 stitch remains before marker thread, make 1 yarn over, knit 2, (marker thread is between these stitches), make 1 yarn over. On next round knit yarn overs twisted to avoid holes. Then work the new stitches in pattern. DECREASE TIP (applies to sleeves): If the lace pattern and decrease are on the same round, adjust so that decrease is on next round. Decrease 1 stitch on each side of marker thread as follows: Work until 3 stitches remain before marker thread and knit 2 together, knit 2 (marker thread is between these stitches), slip 1 stitch knitwise, knit 1, pass slipped stitch over stitch worked. CAST-OFF TIP: To avoid a tight cast-off edge you may use a larger needle size. If this also is too tight, work a 1 yarn over after approx. every 4th stitch while casting off (cast off yarn overs as regular stitches). ---------------------------------------------------------- START THE PIECE HERE: ---------------------------------------------------------- JUMPER - SHORT OVERVIEW OF THE PIECE: Neck edge and yoke are worked in the round on circular needle, top down. Now divide yoke for body and sleeves. Body is worked in the round on circular needle, top down. Work sleeves in the round on double pointed needles/short circular needle, top down. NECK EDGE: Cast on 92-92-96-100-108-112 stitches on circular needle size 3.5 mm with Belle. Knit 1 round. Then work rib (= knit 2/purl 2) in the round for 8 cm. When rib is done, knit 1 round while increasing 28-28-32-28-28-24 stitches evenly - read DECREASE/INCREASE TIP = 120-120-128-128-136-136 stitches. Purl 1 round and knit 1 round. Switch to circular needle size 4.5 mm. Insert 1 marker after approx. 23-23-24-24-25-25 stitches (= approx. mid back on back piece), measure yoke from this marker! YOKE: Now insert 4 marker threads in the piece without working: Insert first marker thread at the beginning of round (= in transition between left sleeve and back piece), insert next marker thread after 47-47-49-49-51-51 stitches (= in transition between back piece and right sleeve), insert next marker thread after 13-13-15-15-17-17 stitches (= in transition between right sleeve and front piece), insert next marker thread after 47-47-49-49-51-51 stitches (= in transition between front piece and left sleeve), 13-13-15-15-17-17 stitches remain on round after last marker thread. Now work pattern – choose diagram for your size, as follows: * Knit 1, make 1 yarn over, A.1 over the next 5-5-6-6-7-7 stitches, A.2 over the next 35 stitches, A.3 over the next 5-5-6-6-7-7 stitches, make 1 yarn over, knit 2 (marker thread is in the middle of these 2 stitches), make 1 yarn over, begin on 5th-5th-4th-4th-3rd-3rd stitch in A.4 and work the next 11-11-13-13-15-15 stitches, make 1 yarn over, knit 1 *, work from *-* 1 more time on round. 8 stitches have been increased for RAGLAN - read explanation above. Continue pattern like this and increase every other round 22-26-29-31-35-39 times in total = 296-328-360-376-416-448 stitches, at the same time work pattern as follows: REMEMBER THE KNITTING TENSION! Pattern for front and back piece: When A.1 and A.3 have been worked vertically, work A.5 over the last 13 stitches in A.1 and A.6 over the first 13 stitches in A.3, work the remaining stitches towards each raglan in stocking stitch until 16 increases have been worked for raglan. Then when beginning 3rd lace pattern vertically on sleeves (i.e. on 33rd round on yoke), work lace pattern (A.4) the same way as on sleeves. I.e. there should always be 1-1-2-2-3-3 knit stitches between yarn over in lace pattern and increase for raglan. When increasing more stitches for raglan, work as many whole lace pattern as there is room for. Pattern sleeves: On sleeves repeat A.4 vertically and work as many lace patterns as there is room for in width. There should always be 1-1-2-2-3-3 knit stitches between yarn over in lace pattern and increase for raglan. When all increases for raglan are done, piece measures approx. 17-20-22-24-27-30 cm from marker. In size XS continue with pattern (without increases for raglan) until piece measures 20 cm from marker. If the piece is shorter than 20-22-24-27-30 cm in size S, M, L, XL and XXL continue pattern (without increases for raglan) until correct measurements. Work next round as follows: Work first 91-99-107-111-121-129 stitches (= back piece), slip the next 57-65-73-77-87-95 stitches on a stitch holder for sleeve, cast on 8-8-8-12-12-16 new stitches on needle (= in the side under sleeve), work the next 91-99-107-111-121-129 stitches (= front piece), slip the next 57-65-73-77-87-95 stitches on a stitch holder for sleeve, cast on 8-8-8-12-12-16 new stitches on needle (in the side under sleeve). Cut the yarn. Now finish body and sleeves separately. NOW MEASURE PIECE FROM HERE! BODY: = 198-214-230-246-266-290 stitches. Insert 1 marker thread in each side, in the middle of the new stitches cast-on in the side under the sleeves (= 4-4-4-6-6-8 new stitches on each side of marker thread). Begin round in one side. Continue in the round with pattern as before and work as many repetition with lace pattern as there is room for towards each side (lace patterns should fit on top of each other the same way as earlier in piece). Work the remaining stitches that do not fit lace pattern towards each side in stocking stitch (= 6-4-2-6-5-5 stitches between marker thread in the side and the outermost yarn over in lace pattern towards the side). Continue in the round like this until piece measures approx. 24-26-26-26-25-24 cm - adjust to finish after 1st, 2nd round, 14th-18th round or 30th-34th round in A.2. Work next round as follows: * Knit the first 19-23-27-31-36-42 stitches and increase at the same time 6-6-6-8-9-9 stitches evenly, knit over knit and purl over purl over the next 61 stitches, knit the next 19-23-27-31-36-42 stitches and increase at the same time 6-6-6-8-9-9 stitches evenly, work from *-* 1 more time on round = 222-238-254-278-302-326 stitches. Knit the first 25-29-33-39-45-51 stitches on round. Insert a marker thread here. This is now the beginning of round. Now work rib. There are 2 variants for rib over the 61 stitches in pattern. If you finish after 1st, 2nd or 30th-34th round in A.2 work rib-1, and if you finished after 14th-18th round in A.2 work rib-2. Rib-1: * Knit over knit and purl over purl over the first 18 stitches, knit 2, knit over knit and purl over purl over the next 21 stitches, knit 2, knit over knit and purl over purl over the next 18 stitches, (knit 2/2 purl) over the next 50-58-66-78-90-102 stitches *, work from *-* 1 more time on round. Rib-2: * Knit over knit and purl over purl over the first 61 stitches, (knit 2/2 purl) over the next 50-58-66-78-90-102 stitches *, work from *-* 1 more time on round. Continue like this until rib measures approx. 4 cm. Cast off with knit over knit and purl over purl - read CAST-OFF TIP. Jumper measures approx. 51-53-55-57-59-61 cm from shoulder and down. SLEEVES: Slip the 57-65-73-77-87-95 stitches from stitch holder in one side back on a short circular needle/double pointed needles size 4.5 mm and pick in addition up 1 stitch in each of the 8-8-8-12-12-16 new stitches cast on under sleeve = 65-73-81-89-99-111 stitches. Insert a marker thread in the middle of the new stitches. Move marker thread upwards when working. Use the marker later when decreasing under sleeve. Work pattern in the different sizes as follows: Size XS, S and M: Continue in the round with as many lace pattern as there is room for on round. Work the remaining stitches under sleeve in stocking stitch. When sleeve measures 4 cm, begin decrease under sleeve – read DECREASE TIP. Decrease like this approx. every 0-10-5 cm 1-3-6 times in total = 63-67-69 stitches. Now work as explained below. Size L, XL and XXL: Continue in the round with as many lace pattern as there is room for on round. Work the remaining stitches under sleeve in stocking stitch. At the same time on first round decrease stitches under sleeve - read DECREASE TIP. Decrease like this every other round 2-5-9 times, then every 4-3-2 cm 7-8-9 times in total = 71-73-75 stitches. All sizes: Continue until sleeve measures 38-40-39-37-34-32 cm from division. Knit 1 round while decreasing 23-23-25-23-25-23 stitches evenly = 40-44-44-48-48-52 stitches. Switch to double pointed needles size 3.5 mm. Knit 2/purl 2 in the round. When rib measures 4 cm, cast off with knit over knit and purl over purl - remember CAST-OFF TIP. Sleeve measures 42-44-43-41-38-36 cm in total from division. Work the other sleeve the same way. |
|||||||||||||||||||||||||||||||||||||
Diagram explanations |
|||||||||||||||||||||||||||||||||||||
|
|||||||||||||||||||||||||||||||||||||
 |
|||||||||||||||||||||||||||||||||||||
 |
|||||||||||||||||||||||||||||||||||||
 |
|||||||||||||||||||||||||||||||||||||
 |
|||||||||||||||||||||||||||||||||||||
Have you finished this pattern?Tag your pictures with #dropspattern #goldenmomentssweater or submit them to the #dropsfan gallery. Do you need help with this pattern?You'll find 27 tutorial videos, a Comments/Questions area and more by visiting the pattern on garnstudio.com. © 1982-2026 DROPS Design A/S. We reserve all rights. This document, including all its sub-sections, has copyrights. Read more about what you can do with our patterns at the bottom of each pattern on our site. |
|||||||||||||||||||||||||||||||||||||


With over 40 years in knitting and crochet design, DROPS Design offers one of the most extensive collections of free patterns on the internet - translated to 17 languages. As of today we count 324 catalogues and 12290 patterns translated into English (UK/cm). 12290
We work hard to bring you the best knitting and crochet have to offer, inspiration and advice as well as great quality yarns at incredible prices! Would you like to use our patterns for other than personal use? You can read what you are allowed to do in the Copyright text at the bottom of all our patterns. Happy crafting!
Post a comment to pattern DROPS 213-16
We would love to hear what you have to say about this pattern!
If you want to leave a question, please make sure you select the correct category in the form below, to speed up the answering process. Required fields are marked *.