
Popular categories
Looking for a yarn?


Comments / Questions (103)
![]() DROPS Design wrote:
DROPS Design wrote:
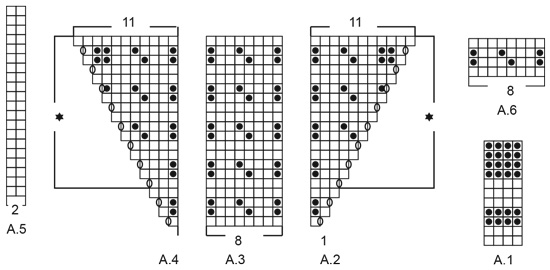
Correction: The pattern has been looked over, the number of stitches on sleeves and body after the first raglan increase has been added. The diagrams A.2, A.3 og A.4 has be divided. And in addition a error when dividing for sleeves/body has been corrected.
Rettelse: Oppskriften er blitt gjennomgått, det er oppgitt antall masker på ermer og bol etter første økning til raglan. Diagrammene A.2, A.3 og A.4 er delt opp. I tillegg er det rettet opp en feil ved deling til bol/ermer.
12.08.2021 - 15:58
![]() Wanja Barkenbom wrote:
Wanja Barkenbom wrote:
Hej jag har stickat flera sådana tröjor till mina barnbarn och barntröjorna stickas ju nerifrån och upp. Kan man göra det med denna tröja också men följa antal maskor som står på de olika tällerna i beskrivningen.
06.08.2021 - 11:14DROPS Design answered:
Hei Wanja. Om du følger tallene og målene (opp ned), så kan du strikke genseren nedenifra og opp. Men fint å lese igjennom oppskriften, slik at du ikke får deg noen overraskelser underveis. mvh DROPS design
12.08.2021 - 08:23
![]() Anna Maria wrote:
Anna Maria wrote:
Jättefint mänster! Ska sticka en tröja till sambon som har ca 93 cm i bystvidd, vad rekommenderar ni för storlek då? Vad rekommenderar ni för rörelsevidd? Förstår att det är individuellt vad man gillar, men skulle uppskatta en liten vägledning :)
14.06.2021 - 11:27DROPS Design answered:
Hej Anna Maria. Det bästa är om du tar mått på en tröja han redan har och som sitter bra och sedan ser du vilken storlek som ligger närmast de måtten i vår måttskiss. Lycka till!
14.06.2021 - 13:54
![]() Kari wrote:
Kari wrote:
Hei, Har nå strikket halskant og økt til 112 masker (str xl). Når jeg kommer til siste delen av omg på bæresrykket har jeg 8 masker til overs..? Altså: kast -strikk 32 masker -kast- strikk 2 (raglan-felling) -kast-strikk 16 -kast -strikk 2-kast- strikk 32-kast- strikk 2-kast strikk 16. da er det igjen 10 masker på pinnen. Har måttet rekke opp og prøve på nytt 3 ganger, og skjønner ikke hva jeg gjør feil. 32+32+16+16+2+2+22=104. 112-104 = 8 Hva er feilen?
22.05.2021 - 01:39DROPS Design answered:
Hej Kari. A.2 = kast+1 maska och A.4 = 1 maska + kast. Det är där du missar totalt 8 maskor. Mvh DROPS Design
24.05.2021 - 08:39
![]() Sofia wrote:
Sofia wrote:
Ser de siste fire maskene er kommentert helt til slutt i teksten om bærestykket. Da er spørsmålet om det fortsatt skal være skeiv fordeling av masker på ermer/bol i forhold til raglandøkningen.
01.05.2021 - 11:45
![]() Sofia wrote:
Sofia wrote:
Hei! Jeg strikker XXXL. Dvs at jeg skal ha 400 masker når økningen er ferdig på bærestykket. Fortsettelsen av oppskriften skriver at jeg skal strikke 116 + 80 + 120 + 80 . Summerer vi disse får vi 396... Hvor ble det av de siste fire maskene? Jeg har på mitt arbeid 110 foran og bak + 86 på ermene og 8 masker i ragland. Indelingen beskrevet i oppskriften virker skeiv for meg.... Ser flere har stilt dette spørsmålet, men jeg syns ikke responsen har hjulpet. Derfor prøver jeg igjen.
01.05.2021 - 11:32DROPS Design answered:
Hei Sofia, På slutten av runden skal du strikke de siste 4 maskene som er en del av bakstykket. Med maskene du legger opp under ermene skal du ha 432 masker på omgangen. God fornøyelse!
03.05.2021 - 07:42
![]() Lisbeth wrote:
Lisbeth wrote:
Jeg strikket 101 m først og 3 m til slutt. Da ble det riktig! Mønsteret stemmer og raglanstripen ble helt symmetrisk!
30.04.2021 - 17:51
![]() Lisbeth wrote:
Lisbeth wrote:
Ser flere har spurt om det samme og lurer på om det kan være feil i mønsteret... Strikker xl og skal dele opp til bol og ermer. Har fra start av omg. : 98 m, raglanlinje 2m, 82m, raglanlinje 2m, 98m, raglanlinje 2m, 82m, raglanlinje 2m. Tilsammen 368m som beskrevet i mønster. Hvis jeg skal dele dette 102,80,104,80,2 blir arbeidet skjevt. Hva er feil?
29.04.2021 - 15:20DROPS Design answered:
Hej Lisbeth, strik 102 masker (bagstykke), slå 8 masker op (under ærmet), strik 104 masker (forstykke), slå 8 masker op (under ærmet) og strik de sidste 2 masker (så du nu også har 104 masker på bagstykket). God fornøjelse!
30.04.2021 - 13:35
![]() Lisbeth wrote:
Lisbeth wrote:
Strikker i xl og er ferdig med halskant og skal starte med forhøyning. Skal sette merketråd midt bak og er usikker på hvor det blir.
20.04.2021 - 14:30DROPS Design answered:
Hei Lisbeth. Midt bak blir der du starter og avslutter omgangen. mvh DROPS design
26.04.2021 - 15:13
![]() Kira wrote:
Kira wrote:
Hei! Vet dere hvor mye garn som trengs for å Strikke armene? Jeg strikker denne genseren i XL - men måtte strikke den litt lenger for at den skulle passe til han som skal ha den. Og da regner jeg med å ende opp med å mangle garn. Skal begynne på armene nå og har nesten 2 hele nøster med hvit - men holder det med ett nøste til hver arm? Er det evt mulig å regne ut hvor mye jeg mangler?
01.04.2021 - 00:23
|
|||||||||||||
Reykjavik#reykjaviksweater |
|||||||||||||
 |
 |
||||||||||||
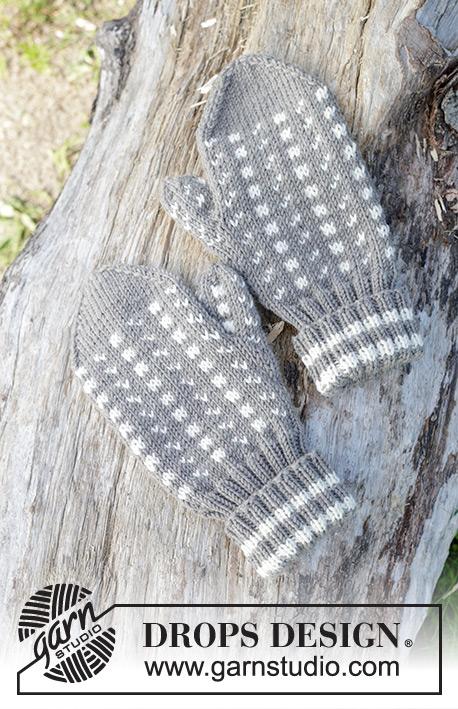
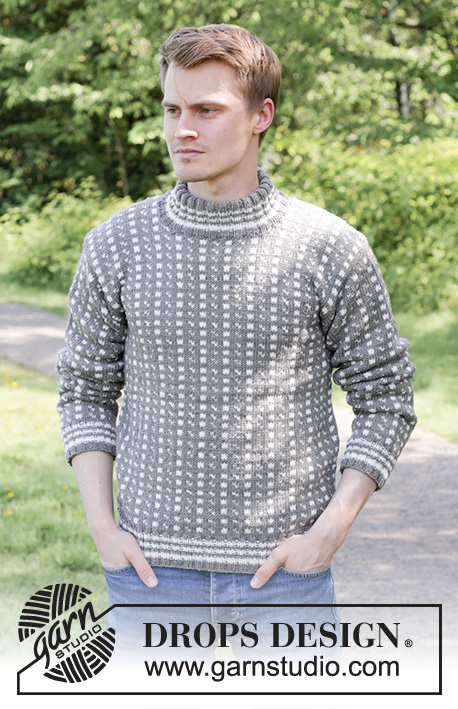
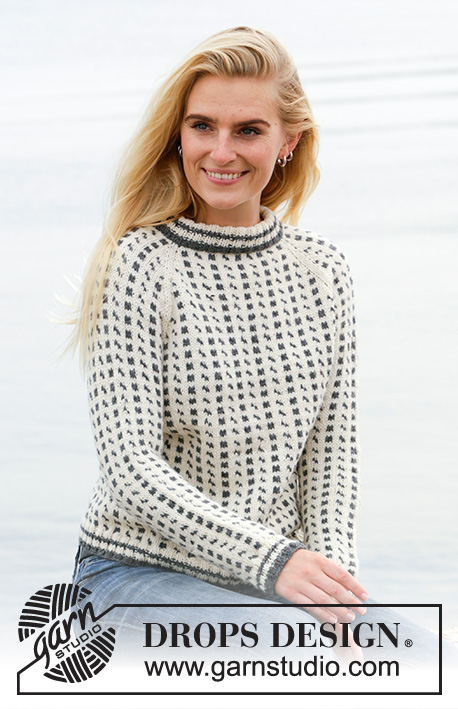
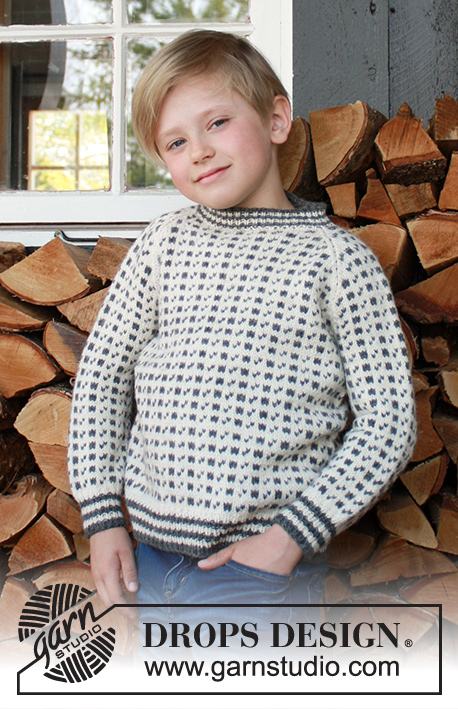
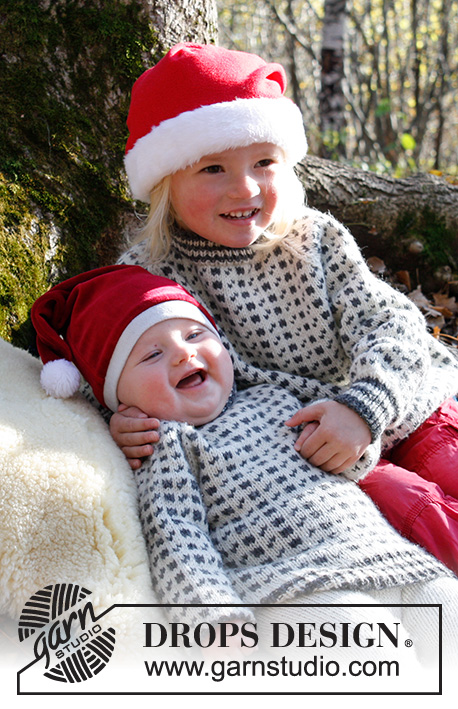
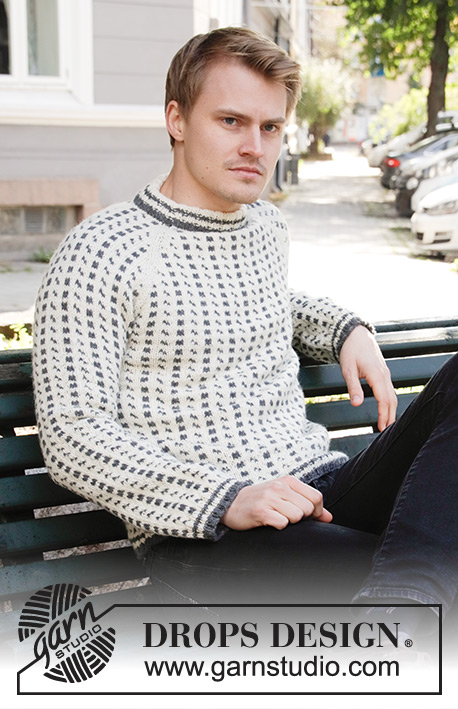
Knitted jumper for men with Nordic Icelandic pattern and raglan in DROPS Lima. The piece is worked top down. Sizes S - XXXL.
DROPS 208-3 |
|||||||||||||
|
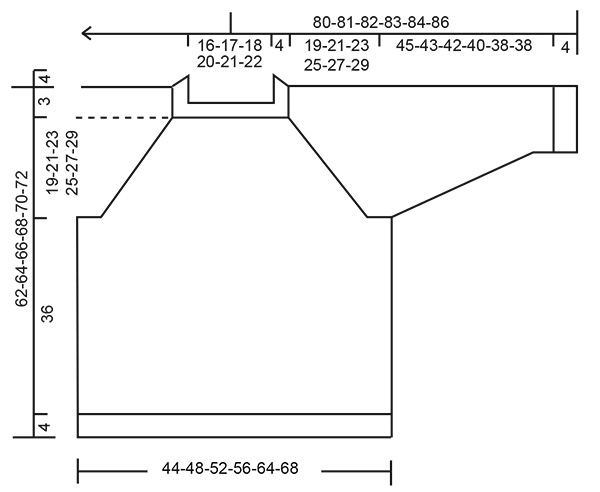
------------------------------------------------------- EXPLANATIONS FOR THE PATTERN: ------------------------------------------------------- PATTERN: See diagrams A.1 to A.6. Pattern A.1 is worked in rib. Patterns A.2 to A.6 are worked in stocking stitch. INCREASE TIP (evenly spaced): To work out how to increase evenly, count the total number of stitches on the needle (e.g. 88 stitches) and divide by the number of increases to be made (e.g. 8) = 11. In this example, increase by making 1 yarn over after each 11th stitch. On the next round knit the yarn overs twisted to avoid holes. KNITTING TIP: To avoid the knitting tension becoming tighter when working pattern with more than 1 colour it is important that the strands at the back are not tight. Use a size larger needle when working pattern if this is a problem. CASTING-OFF TIP: To avoid the cast-off edge being tight you can cast off with a ½-size larger needle; or cast off with knit over knit and purl over purl and make 1 yarn over after approx. each 4th stitch (yarn overs cast off as normal stitches). DECREASE TIP (for sleeves): Decrease 1 stitch on each side of the marker thread as follows: Work until there are 2 stitches left before the marker thread, knit 2 together with off-white (marker thread sits here), slip 1 stitch as if to knit, knit 1 with off-white and pass the slipped stitch over the knitted stitch. ------------------------------------------------------- START THE PIECE HERE: ------------------------------------------------------- JUMPER – SHORT OVERVIEW OF THE PIECE: The neck, yoke and body are worked in the round with circular needle, top down. The sleeves are worked in the round with short circular needle/double pointed needles, top down. NECK: Cast on 88-92-96-104-108-112 stitches with short circular needle size 3.5 mm and dark grey. Change to off white and knit 1 round. Work rib (= knit 2/ purl 2) for 4 cm, then work A.1 in rib. Knit 1 round with off white where you increase 8-4-0-8-20-16 stitches evenly spaced – read INCREASE TIP = 96-96-96-112-128-128 stitches. Change to circular needle size 4.5 mm and insert a marker thread at the beginning of the round. YOKE: The first round is worked as follows: Work A.2 (= 1 stitch), A.3 over the next 32-32-32-32-40-40 stitches (= 4-4-4-4-5-5 repeats of 8 stitches) and A.4 (= 1 stitch) = back piece, work A.5 (= 2 stitches) = raglan-line, A.2 (= 1 stitch), A.3 over the next 8-8-8-16-16-16 stitches (= 1-1-1-2-2-2 repeats of 8 stitches) and A.4 (= 1 stitch) = sleeve, work A.5 (= 2 stitches) = raglan-line, A.2 (= 1 stitch), A.3 over the next 32-32-32-32-40-40 stitches (= 4-4-4-4-5-5 repeats of 8 stitches) and A.4 (= 1 stitch) = front piece, work A.5 (= 2 stitches) = raglan-line, A.2 (= 1 stitch), A.3 over the next 8-8-8-16-16-16 stitches (= 1-1-1-2-2-2 repeats of 8 stitches) and A.4 (= 1 stitch) = sleeve. Finally work A.5 (= 2 stitches) = raglan-line. The first increase for raglan is now finished, and there is 104-104-104-120-136-136 stitches on the needle (there is 36-36-36-36-44-44 stitches for back and for front piece, 12-12-12-20-20-20 stitches for each sleeve and 2 stitches in each of the 4 raglan lines). Continue this pattern onwards; i.e. increase 1 stitch on the side of each A.2 and A.4 (= a total of 8 stitches increased every 2nd round). Read KNITTING TIP and REMEMBER THE KNITTING TENSION! When A.2 to A.4 have been worked 1 time in height there are 176-176-176-192-208-208 stitches on the needle. Continue this pattern onwards; i.e. the pattern repeats itself as shown in A.2/A.4. Diagram A.3 is worked 2 more times in width each time the 16 rows are repeated in height. Continue to increase like this until you have increased a total of 22-26-30-32-32-34 times in height on the side of A.2/A.4. When the last increase is finished there are 272-304-336-368-384-400 stitches on the needle and the piece measures approx. 17-20-23-25-25-26 cm from the neck. Continue with pattern as before, but without further increases, until the piece measures 19-21-23-25-27-29 cm from the neck. The next round is worked as follows, start 1-1-1-3-3-5 stitches befoe the beginning of the round: Work 80-88-96-104-112-120 stitches as before (= back piece), place the next 56-64-72-80-80-80 stitches on 1 thread for sleeve, cast on 8-8-8-8-16-16 new stitches on the needle (= in side under sleeve), work 80-88-96-104-112-120 stitches as before (= front piece), place the next 56-64-72-80-80-80 stitches on 1 thread for sleeve, cast on 8-8-8-8-16-16 new stitches on the needle (= in side under sleeve). Cut the strand. The body and sleeves are finished separately. THE PIECE IS NOW MEASURED FROM HERE! BODY: = 176-192-208-224-256-272 stitches. Insert 1 marker thread in one side of the piece, in the middle of the 8-8-8-8-16-16 stitches cast on under the sleeve. Allow the thread to follow your work onwards; it marks the beginning of the round. Work A.6 in the round (= 22-24-26-28-32-34 repeats of 8 stitches) – start on the right stitch and right round in the diagram so the pattern is repeated as before, both in width and height. Continue working until the piece measures approx. 36 cm from the division – adjust to after a complete repeat in height. Change to circular needle size 3.5 mm and knit 1 round with off white where you increase 36-36-40-44-48-52 stitches evenly spaced = 212-228-248-268-304-324 stitches. Work A.1 in rib (= knit 2/ purl 2). When A.1 is finished, cast off with knit over knit and purl over purl using dark grey – read CASTING-OFF TIP. SLEEVE: Place the 56-64-72-80-80-80 stitches from the thread on the one side of the piece on short circular needle/double pointed needles size 4.5 mm and knit up 1 stitch in each of the 8-8-8-8-16-16 stitches cast on under the sleeve = 64-72-80-88-96-96 stitches. Insert 1 marker thread in the middle of the 8-8-8-8-16-16 stitches under the sleeve and allow it to follow your work onwards; it will be used when decreasing mid under sleeve. Start the round at the marker thread and work A.6 in the round (= 8-9-10-11-12-12 repeats of 8 stitches) – start on the right stitch and right round in the diagram so the pattern is repeated as before both in width and height, but the first and last stitch on the round are always worked with off white (to give neat decreases under the sleeve). When the piece measures 7-5-4-3-2-2,5 cm from the division, decrease 2 stitches mid under the sleeve – read DECREASE TIP. Decrease like this every 7-5-4-3-2-2.5 cm a total of 6-8-10-12-16-14 times = 52-56-60-64-64-68 stitches left on needle. Continue working until the sleeve measures approx. 45-43-42-40-38-38 cm from the division (NOTE: Shorter measurements in larger sizes due to wider neck and longer yoke) – adjust to after a complete repeat in height. Change to double pointed needles size 3.5 mm and knit 1 round with off-white. Work A.1 in rib (= knit 2/ purl 2). When A.1 is finished, cast off with dark grey – read CASTING-OFF TIP. Work the other sleeve in the same way. ASSEMBLY: Fold the neck double towards the wrong side. Sew the cast-on edge down with dark grey – sew with small, neat stitches on the inside of the jumper (make sure the stitches do not show on the outside and that the seam is not tight). |
|||||||||||||
Diagram explanations |
|||||||||||||
|
|||||||||||||
 |
|||||||||||||
 |
|||||||||||||
Have you finished this pattern?Tag your pictures with #dropspattern #reykjaviksweater or submit them to the #dropsfan gallery. Do you need help with this pattern?You'll find 29 tutorial videos, a Comments/Questions area and more by visiting the pattern on garnstudio.com. © 1982-2026 DROPS Design A/S. We reserve all rights. This document, including all its sub-sections, has copyrights. Read more about what you can do with our patterns at the bottom of each pattern on our site. |
|||||||||||||


With over 40 years in knitting and crochet design, DROPS Design offers one of the most extensive collections of free patterns on the internet - translated to 17 languages. As of today we count 324 catalogues and 12290 patterns translated into English (UK/cm). 12290
We work hard to bring you the best knitting and crochet have to offer, inspiration and advice as well as great quality yarns at incredible prices! Would you like to use our patterns for other than personal use? You can read what you are allowed to do in the Copyright text at the bottom of all our patterns. Happy crafting!
Post a comment to pattern DROPS 208-3
We would love to hear what you have to say about this pattern!
If you want to leave a question, please make sure you select the correct category in the form below, to speed up the answering process. Required fields are marked *.