
Popular categories
Looking for a yarn?


Comments / Questions (103)
![]() Guro wrote:
Guro wrote:
Hei. Hvilken str har modellen på bilde i oppskriften på seg?
26.05.2022 - 14:00DROPS Design answered:
Hej Guro. Vanligtvis är det storlek S eller M som är på bilderna. Det bästa för att få riktig storlek är att se på måleskissen och jämföra med ett plagg man har. Mvh DROPS Design
27.05.2022 - 10:00
![]() Hilde wrote:
Hilde wrote:
Hei Stemmer det at det er samme maskeantall på dame og herre? Har lest mønsteret mot hverandre og di er jo like. Trudde en herregenser strikkes med mer masker. Ellers er jeg super fornøyd med oppskriften når jeg klarte å knekke koden:) kunne vert skrevet lettere.
12.03.2022 - 18:02DROPS Design answered:
Hei Hilde Mye er likt, men noe forskjellig på lengder. Sjekk målskissen for å finne den størrelsen som vil passe deg best. mvh DROPS Design
14.03.2022 - 14:04
![]() Elin-Beate Knutsen wrote:
Elin-Beate Knutsen wrote:
Hei 😊 Jeg kan ikke finne målene på genseren i de forskjellige str 🤔 Står de i oppskriften??
05.03.2022 - 15:27
![]() Tone Søbye wrote:
Tone Søbye wrote:
Stemmer det at det skal ØKES før vrangbord på bolen når man strikker ovenfra? Her er det logisk å MINSKE antall masker. Når man strikker nedenfra skal det alltid ØKES etter vrangbord!
16.02.2022 - 12:09DROPS Design answered:
Hej Tone, du øger for at vrangborden ikke skal trække arbejdet for meget sammen, husk at du også skifter til en tyndere pind :)
16.02.2022 - 15:22
![]() Steinar Johansen wrote:
Steinar Johansen wrote:
Hei. Kjøpte en garnpakke fra Strikkia på genser lik deres Reykjavik, som ble strikket med Viking sportsragg. Problemet er at etter vask så siger den ut, mister form og vil ikke gå tibake til "normal". Ser rett og slett sjuskete ut. I tillegg loer den veldig mye. Har strikket flere andre gensrer i forskjellig garn med mye bedre resultat. Ser dere har oppskrifter hvor Drops Lima og Drops Alaska er brukt, Hva vil deres råd være for at jeg ikke skal få samme opplevelse etter bruk?
20.01.2022 - 00:06DROPS Design answered:
Hej Steinar, denne model er strikket i DROPS Lima og den holder garanteret formen hvis du følger vaskeanvisningen!
21.01.2022 - 08:53
![]() Monica Åsbakk wrote:
Monica Åsbakk wrote:
Har nå strikket ferdig denne genseren i str L. Jeg valgte å bare øke halvparten av oppgitt antall masker før vrangbord skulle strikkes. Jeg lurer på om det er flere som har reagert på den store antall masker som skal økes? Selv om jeg bare har økt halvparten må jeg rekke opp igjen fordi den ble så utrolig vid nede.
17.01.2022 - 09:24DROPS Design answered:
Hej Monica, hvis du skifter til rundpind 3,5 inden du strikker ribben, så stemmer antal masker som står i opskriften!
17.01.2022 - 15:13
![]() Sanne wrote:
Sanne wrote:
Menar *var 5:cm maskar man av*
14.01.2022 - 21:03DROPS Design answered:
Hej Sanne, mønsteret vil aldrig kunne stemme midt under ærmet, samtidig som du tager ind. Det som er vigtigt er at det stemmer over alle de andre masker på ærmet :)
17.01.2022 - 14:53
![]() Sanne wrote:
Sanne wrote:
Hej!Har kommit till ärmen och mönstret stämmer in på antal maskor även om dom är jämnt upp. Vid 5:e varvet maskar man av på var sida om markören så blir mönstret delat i mitten. Efter det ett brett fält på 6 maskor vita för att det ska stämma med en vit i början efter markör och sen block med svart. Inte första gången jag kliar mig i huvudet när det kommer till drops beskrivningar. Sanne
14.01.2022 - 21:01
![]() Bettina Wiemer wrote:
Bettina Wiemer wrote:
Hallo, Leider bekomme ich die Diagramme nicht ausgedruckt. Woran kann es liegen? Viele Grüße Bettina
07.12.2021 - 15:02DROPS Design answered:
Liebe Frau Wiemer, beachten Sie in die Druckereinstellungen, daß alle Seiten gedruckt werden, normaleweise sollte es so funktionnieren. Ich habe insgesamt 6 Seiten mit Diagramen A.1-A.5 bei der 4. Seite und Maßskizze bei der 5. Seite. Viel Spaß beim stricken!
07.12.2021 - 15:38
![]() Tove-Lill Duran wrote:
Tove-Lill Duran wrote:
Hei igjen, Jeg tror dere misforsto spørsmålet mitt:-). Det jeg mente er om dere har samme oppskrift eller en annen islenderoppskrift til herre der genseren strikkes nedenfra og opp som jeg kan bruke med samme garn som i denne oppskriften.
22.11.2021 - 10:51DROPS Design answered:
Hej Tove-Lill. Nej det har vi dessvärre inte. De islenderoppskrifter vi har till herre stickas uppifrån och ner. Mvh DROPS Design
23.11.2021 - 08:48
|
|||||||||||||
Reykjavik#reykjaviksweater |
|||||||||||||
 |
 |
||||||||||||
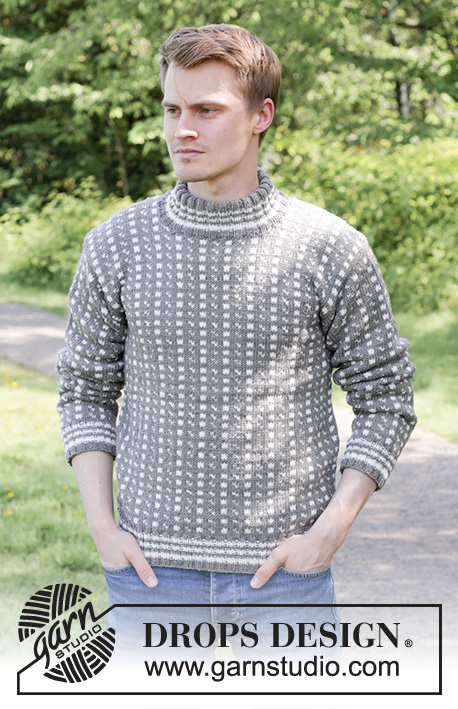
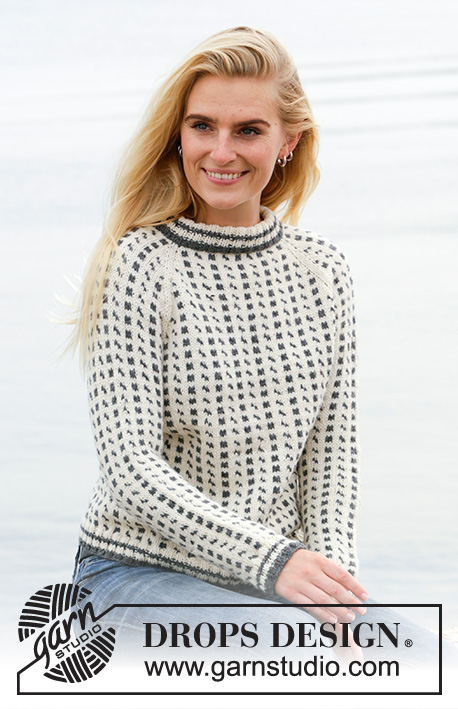
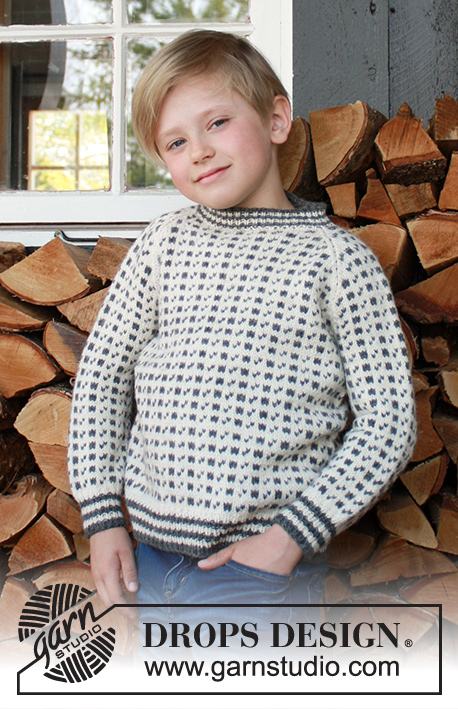
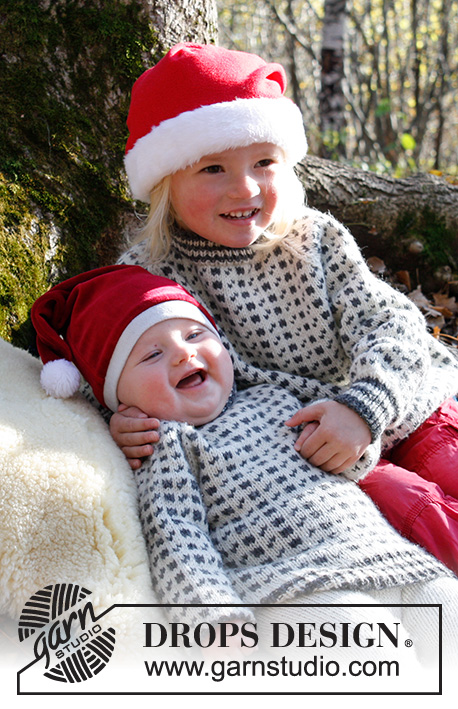
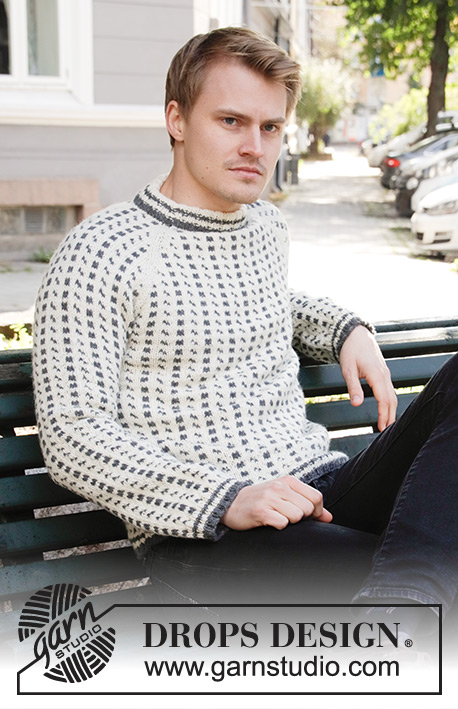
Knitted jumper for men with Nordic Icelandic pattern and raglan in DROPS Lima. The piece is worked top down. Sizes S - XXXL.
DROPS 208-3 |
|||||||||||||
|
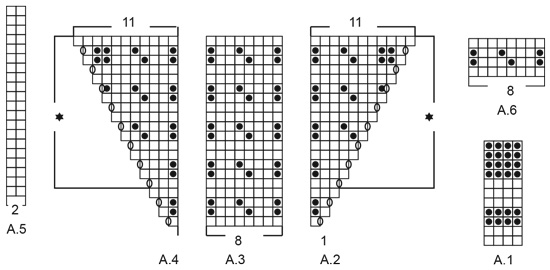
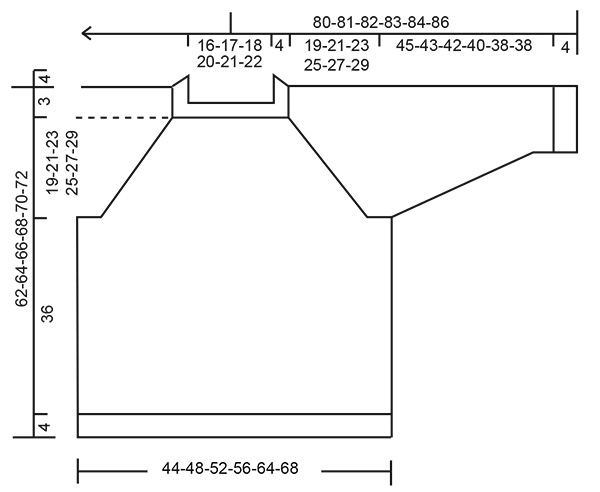
------------------------------------------------------- EXPLANATIONS FOR THE PATTERN: ------------------------------------------------------- PATTERN: See diagrams A.1 to A.6. Pattern A.1 is worked in rib. Patterns A.2 to A.6 are worked in stocking stitch. INCREASE TIP (evenly spaced): To work out how to increase evenly, count the total number of stitches on the needle (e.g. 88 stitches) and divide by the number of increases to be made (e.g. 8) = 11. In this example, increase by making 1 yarn over after each 11th stitch. On the next round knit the yarn overs twisted to avoid holes. KNITTING TIP: To avoid the knitting tension becoming tighter when working pattern with more than 1 colour it is important that the strands at the back are not tight. Use a size larger needle when working pattern if this is a problem. CASTING-OFF TIP: To avoid the cast-off edge being tight you can cast off with a ½-size larger needle; or cast off with knit over knit and purl over purl and make 1 yarn over after approx. each 4th stitch (yarn overs cast off as normal stitches). DECREASE TIP (for sleeves): Decrease 1 stitch on each side of the marker thread as follows: Work until there are 2 stitches left before the marker thread, knit 2 together with off-white (marker thread sits here), slip 1 stitch as if to knit, knit 1 with off-white and pass the slipped stitch over the knitted stitch. ------------------------------------------------------- START THE PIECE HERE: ------------------------------------------------------- JUMPER – SHORT OVERVIEW OF THE PIECE: The neck, yoke and body are worked in the round with circular needle, top down. The sleeves are worked in the round with short circular needle/double pointed needles, top down. NECK: Cast on 88-92-96-104-108-112 stitches with short circular needle size 3.5 mm and dark grey. Change to off white and knit 1 round. Work rib (= knit 2/ purl 2) for 4 cm, then work A.1 in rib. Knit 1 round with off white where you increase 8-4-0-8-20-16 stitches evenly spaced – read INCREASE TIP = 96-96-96-112-128-128 stitches. Change to circular needle size 4.5 mm and insert a marker thread at the beginning of the round. YOKE: The first round is worked as follows: Work A.2 (= 1 stitch), A.3 over the next 32-32-32-32-40-40 stitches (= 4-4-4-4-5-5 repeats of 8 stitches) and A.4 (= 1 stitch) = back piece, work A.5 (= 2 stitches) = raglan-line, A.2 (= 1 stitch), A.3 over the next 8-8-8-16-16-16 stitches (= 1-1-1-2-2-2 repeats of 8 stitches) and A.4 (= 1 stitch) = sleeve, work A.5 (= 2 stitches) = raglan-line, A.2 (= 1 stitch), A.3 over the next 32-32-32-32-40-40 stitches (= 4-4-4-4-5-5 repeats of 8 stitches) and A.4 (= 1 stitch) = front piece, work A.5 (= 2 stitches) = raglan-line, A.2 (= 1 stitch), A.3 over the next 8-8-8-16-16-16 stitches (= 1-1-1-2-2-2 repeats of 8 stitches) and A.4 (= 1 stitch) = sleeve. Finally work A.5 (= 2 stitches) = raglan-line. The first increase for raglan is now finished, and there is 104-104-104-120-136-136 stitches on the needle (there is 36-36-36-36-44-44 stitches for back and for front piece, 12-12-12-20-20-20 stitches for each sleeve and 2 stitches in each of the 4 raglan lines). Continue this pattern onwards; i.e. increase 1 stitch on the side of each A.2 and A.4 (= a total of 8 stitches increased every 2nd round). Read KNITTING TIP and REMEMBER THE KNITTING TENSION! When A.2 to A.4 have been worked 1 time in height there are 176-176-176-192-208-208 stitches on the needle. Continue this pattern onwards; i.e. the pattern repeats itself as shown in A.2/A.4. Diagram A.3 is worked 2 more times in width each time the 16 rows are repeated in height. Continue to increase like this until you have increased a total of 22-26-30-32-32-34 times in height on the side of A.2/A.4. When the last increase is finished there are 272-304-336-368-384-400 stitches on the needle and the piece measures approx. 17-20-23-25-25-26 cm from the neck. Continue with pattern as before, but without further increases, until the piece measures 19-21-23-25-27-29 cm from the neck. The next round is worked as follows, start 1-1-1-3-3-5 stitches befoe the beginning of the round: Work 80-88-96-104-112-120 stitches as before (= back piece), place the next 56-64-72-80-80-80 stitches on 1 thread for sleeve, cast on 8-8-8-8-16-16 new stitches on the needle (= in side under sleeve), work 80-88-96-104-112-120 stitches as before (= front piece), place the next 56-64-72-80-80-80 stitches on 1 thread for sleeve, cast on 8-8-8-8-16-16 new stitches on the needle (= in side under sleeve). Cut the strand. The body and sleeves are finished separately. THE PIECE IS NOW MEASURED FROM HERE! BODY: = 176-192-208-224-256-272 stitches. Insert 1 marker thread in one side of the piece, in the middle of the 8-8-8-8-16-16 stitches cast on under the sleeve. Allow the thread to follow your work onwards; it marks the beginning of the round. Work A.6 in the round (= 22-24-26-28-32-34 repeats of 8 stitches) – start on the right stitch and right round in the diagram so the pattern is repeated as before, both in width and height. Continue working until the piece measures approx. 36 cm from the division – adjust to after a complete repeat in height. Change to circular needle size 3.5 mm and knit 1 round with off white where you increase 36-36-40-44-48-52 stitches evenly spaced = 212-228-248-268-304-324 stitches. Work A.1 in rib (= knit 2/ purl 2). When A.1 is finished, cast off with knit over knit and purl over purl using dark grey – read CASTING-OFF TIP. SLEEVE: Place the 56-64-72-80-80-80 stitches from the thread on the one side of the piece on short circular needle/double pointed needles size 4.5 mm and knit up 1 stitch in each of the 8-8-8-8-16-16 stitches cast on under the sleeve = 64-72-80-88-96-96 stitches. Insert 1 marker thread in the middle of the 8-8-8-8-16-16 stitches under the sleeve and allow it to follow your work onwards; it will be used when decreasing mid under sleeve. Start the round at the marker thread and work A.6 in the round (= 8-9-10-11-12-12 repeats of 8 stitches) – start on the right stitch and right round in the diagram so the pattern is repeated as before both in width and height, but the first and last stitch on the round are always worked with off white (to give neat decreases under the sleeve). When the piece measures 7-5-4-3-2-2,5 cm from the division, decrease 2 stitches mid under the sleeve – read DECREASE TIP. Decrease like this every 7-5-4-3-2-2.5 cm a total of 6-8-10-12-16-14 times = 52-56-60-64-64-68 stitches left on needle. Continue working until the sleeve measures approx. 45-43-42-40-38-38 cm from the division (NOTE: Shorter measurements in larger sizes due to wider neck and longer yoke) – adjust to after a complete repeat in height. Change to double pointed needles size 3.5 mm and knit 1 round with off-white. Work A.1 in rib (= knit 2/ purl 2). When A.1 is finished, cast off with dark grey – read CASTING-OFF TIP. Work the other sleeve in the same way. ASSEMBLY: Fold the neck double towards the wrong side. Sew the cast-on edge down with dark grey – sew with small, neat stitches on the inside of the jumper (make sure the stitches do not show on the outside and that the seam is not tight). |
|||||||||||||
Diagram explanations |
|||||||||||||
|
|||||||||||||
 |
|||||||||||||
 |
|||||||||||||
Have you finished this pattern?Tag your pictures with #dropspattern #reykjaviksweater or submit them to the #dropsfan gallery. Do you need help with this pattern?You'll find 29 tutorial videos, a Comments/Questions area and more by visiting the pattern on garnstudio.com. © 1982-2026 DROPS Design A/S. We reserve all rights. This document, including all its sub-sections, has copyrights. Read more about what you can do with our patterns at the bottom of each pattern on our site. |
|||||||||||||


With over 40 years in knitting and crochet design, DROPS Design offers one of the most extensive collections of free patterns on the internet - translated to 17 languages. As of today we count 324 catalogues and 12290 patterns translated into English (UK/cm). 12290
We work hard to bring you the best knitting and crochet have to offer, inspiration and advice as well as great quality yarns at incredible prices! Would you like to use our patterns for other than personal use? You can read what you are allowed to do in the Copyright text at the bottom of all our patterns. Happy crafting!
Post a comment to pattern DROPS 208-3
We would love to hear what you have to say about this pattern!
If you want to leave a question, please make sure you select the correct category in the form below, to speed up the answering process. Required fields are marked *.