
Popular categories
Looking for a yarn?


Comments / Questions (56)
![]() Avi wrote:
Avi wrote:
Hi need help pls, knitting small size (on last para, Body) Work as before over the first 50-54-58-63-67-72 stitches and increase at the same time 1-6-2-6-2-6 stitches evenly over these stitches (= left front piece), bind off 4-6-6-6-10-12 stitches for armhole, work as before over the next 88-96-104-114-122-132 stitches and..........., work the remaining 49-53-57-62-66-71 stitches), Does this exclude band stitch x 10? the cast off is only for the both ends of back only, at this stage?
09.09.2020 - 15:39DROPS Design answered:
Dear Avi, the description includes all stitches, so in S: work 50 sts as before increasing 1 st (= there are now 51 sts), cast off the next 4 sts (2 sts before + 2 sts after 1st marker), work the next 88 sts as before for back piece inc 2 sts = (there are now 90 sts for back piece), cast off next 4 sts (= 2 sts before + 2 sts after marker), and work last 48 sts inc 1 st (= 49 sts). Happy knitting!
09.09.2020 - 16:26
![]() Marica wrote:
Marica wrote:
Questo modello è stato corretto, come faccio a trovare le correzioni che mi dice che sono online nel 2019 ? Se potete mandarmi la risposta vi sarei grato perché voglio farlo. Grazie.
01.09.2020 - 11:08DROPS Design answered:
Buongiorno Marica, le correzioni sono già integrate nelle spiegazioni del modello. Le istruzioni che trova sono corrette. Buon lavoro!
01.09.2020 - 11:20
![]() Marta Hjelmtveit wrote:
Marta Hjelmtveit wrote:
Jeg strikker Golden Fairy Cardigan(drops 195-23) i størrelse M. Når jeg kommer til mønster A2 øverst på ermet så stemmer ikke mønsteret. På omgang 4 skal det strikkes 9 vrange masker, men disse vil komme rett over de 11 vrange maskene på omgang 2, da vil ikke mønsteret skrå innover. Forstår ikke hva som er feil, har rett maskeantall. Håper å få hjelp.
27.07.2020 - 18:46DROPS Design answered:
Hej Martha, jo det skal stemme nøjagtig som du læser diagrammerne, prøv at sætte et mærke imellem hvert gang du gentager diagrammet. Så er du sikker på at få alle masker med indenfor hvert diagram. God fornøjelse!
04.08.2020 - 13:20
![]() Merje wrote:
Merje wrote:
Tere! Mustri eesti keelde tõlkes on viga: Peale passe tegemist: KÕIK SUURUSED Koo 1 rida parempidi töö paremal pool, SAMAL AJAL kasvata 30-39-49-56-56-61 silmust ühtlaste vahedega – loe KASVATAMISE/KAHANDAMISE NIPPI = 108-112-116-124-124-132 silmust. Korrektne oleks, et SAMAL AJAL kahanda ... silmust ühtlaste vahedega :) Heade soovidega, Merje
06.05.2020 - 09:29
![]() Peggy wrote:
Peggy wrote:
Help! Ik brei patroon 195-23 in maat M en heb nu de mouwen en het lijf af. Nu heb ik alles op een rondbreinald gezet. Mijn vraag is nu hoe moet het met patroon A.3B in de 15de naald? Hoe ga ik van 18 naar 16 steken en daarna na 14? En het aantal is ook niet juist volgens mij. Totaal 371 steken - 22 herhalen en 4 steken minder is 283 steken ipv 319? Help ik kan er niet goed aan uit. Alvast bedankt
26.04.2020 - 16:41DROPS Design answered:
Dag Peggy,
In de 15e naald van patroon A.3b brei je geen omslagen, maar worden er wel 2 steken geminderd. Je hoeft dus geen extra minderingen te maken, je volgt gewoon het patroon en dan heb je automatisch mider steken.
Wat betreft het aantal steken: je breit eerst 5 steken in ribbelsteek voor de bies, herhaal je A.3b (20 keer) tot er 6 steken over zijn op de naald, dan brei je A.3d en tot slot 5 steken in ribbesteek voor de bies. Op die manier kom je precies op 371 in totaal. Je hebt dus 20 herhalingen van A.3b in maat M, en geen 22
29.04.2020 - 09:08
![]() Ranveig Elise Hansen wrote:
Ranveig Elise Hansen wrote:
Hei. Finnes det vidio av mønstret på jakken (195-23)? Jeg forstår ikke mønstret på hele bærestykke.
03.03.2020 - 14:01DROPS Design answered:
Hej Nej vi har dessvärre ingen video på det. Är det något speciellt du har problem med så kanske vi kan försöka hjälpa dig? Mvh DROPS design
06.03.2020 - 14:04
![]() Antonietta Cocola wrote:
Antonietta Cocola wrote:
A Torino c'è un negozio che vende i filati Drops?
19.02.2020 - 08:36DROPS Design answered:
Buongiorno Antonietta. A questa pagina trova l’elenco dei rivenditori Drops in Italia con le indicazioni su come poterli contattare. Buon lavoro!
19.02.2020 - 16:09
![]() Bea Martini wrote:
Bea Martini wrote:
Ik heb het lijf af en ga nu de mouwen breien hoe moet ik de mouwen er tussen zetten.? Eerst de steken van de linkerkant en dan een mouw dan de rugzijde dan een mouw en dan de rechtervoorkant? Is dit juist zoniet graag een uitleg. Alvast bedankt!
15.02.2020 - 23:58DROPS Design answered:
Dag Bea,
Ja, dat klopt zoals je het zegt! Je plaatst de mouwen bij de panden op de plek waar de steken zijn afgekant voor het armgat. In deze video wordt het uitgelegd.
23.02.2020 - 19:42
![]() Антонида Желтякова wrote:
Антонида Желтякова wrote:
Hello! I have a question: what can I do if the sleeves are too long for me? What should I do to reduce the length?
12.02.2020 - 11:06DROPS Design answered:
Dear Mrs Желтякова, you will have to make some adjustements such as calculating when increasing for ex as well as when starting to work diagram - please contact the store where you bought the yarn for any individual assistance. Happy knititng!
12.02.2020 - 11:24
![]() Turid wrote:
Turid wrote:
Strikker i str M og skal ta inn de først 4 maskene i boken, men da stemmer jo ikke mønstret lenger. Skal det kun strikkes rett ved merkene? Stemmer da kast nå to masker samme og flytting av maske ikke blir gjort? Føler meg litt dum nå faktisk.
01.01.2020 - 12:12DROPS Design answered:
Hei Turid. Når du skal ta inn de første 4 maskene er du ferdig med diagram A.1A og A.1B og det strikkes glattstrikk. mvh DROPS design
10.02.2020 - 08:48
|
|||||||||||||||||||
Golden Fairy Cardigan#goldenfairycardigan |
|||||||||||||||||||
 |
 |
||||||||||||||||||
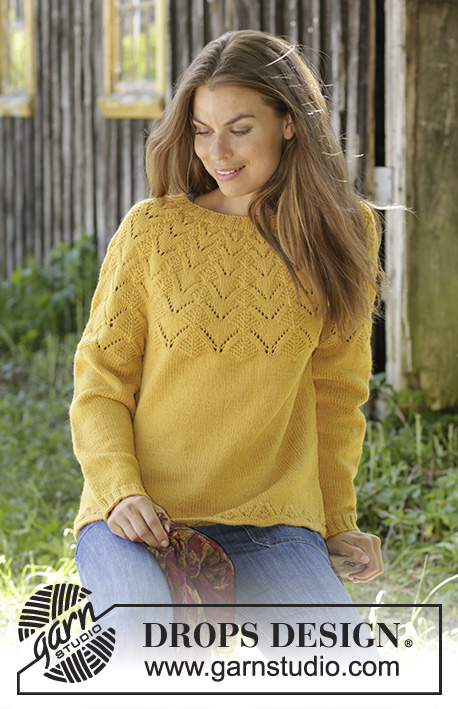
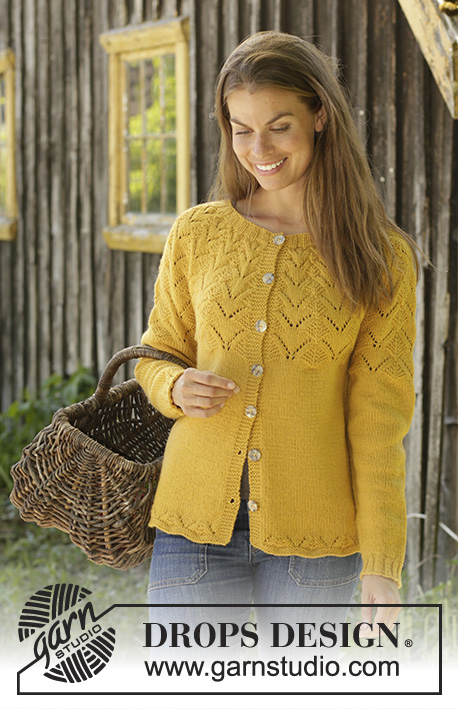
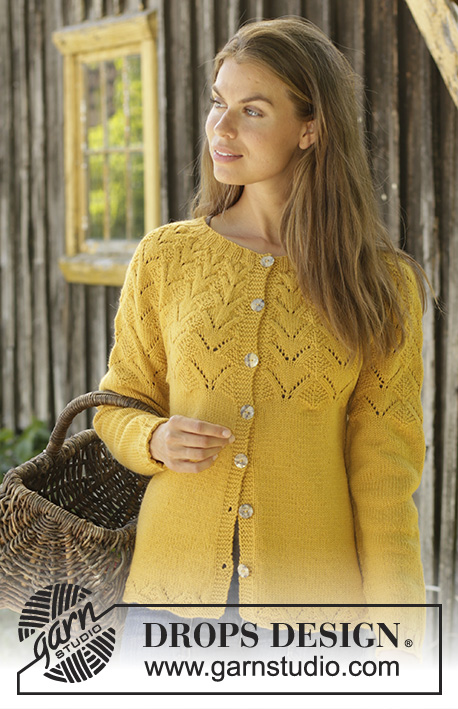
Knitted jacket in DROPS Cotton Merino or DROPS Lima. The piece is worked with round yoke and lace pattern. Sizes S - XXXL.
DROPS 195-23 |
|||||||||||||||||||
|
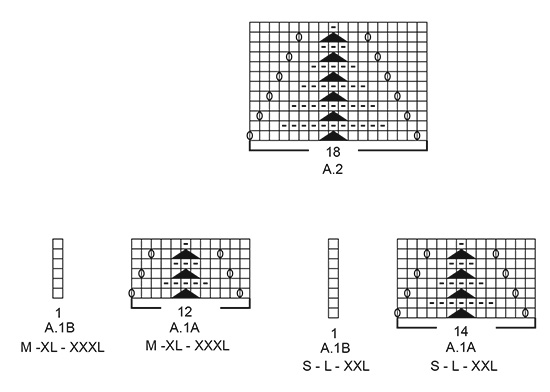
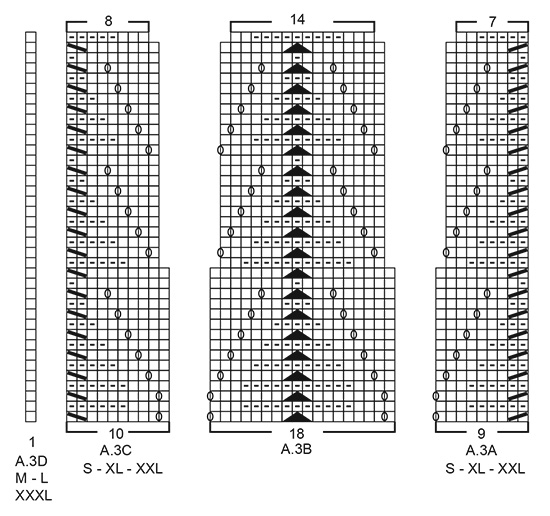
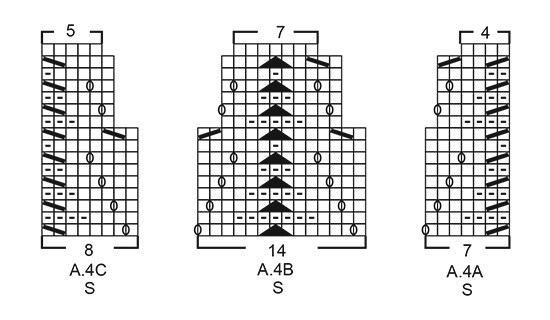
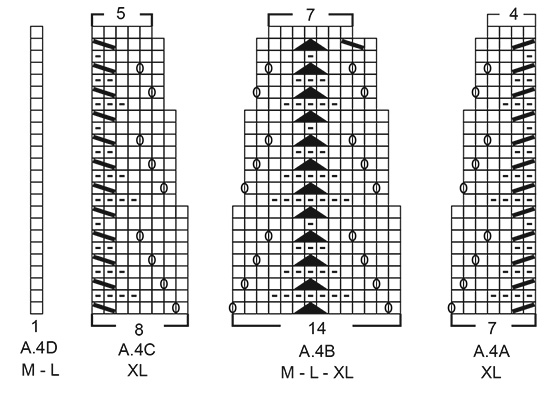
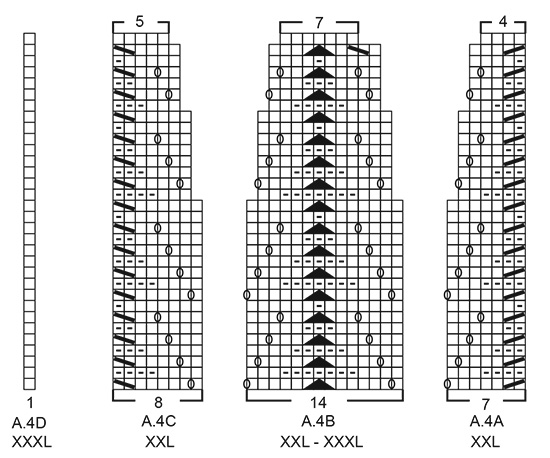
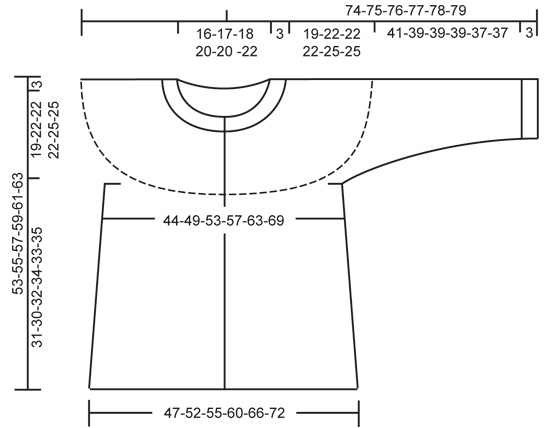
EXPLANATIONS FOR THE PATTERN: ------------------------------------------------------- RIDGE/GARTER STITCH (worked back and forth): 1 ridge = Knit 2 rows. PATTERN: See diagrams A.1 to A.4. Choose diagram for your size (applies to A.1 and A.4). The diagrams show all rows in the pattern seen from the right side. DECREASE/INCREASE TIP (evenly spaced): To work out how to decrease/increase evenly, count the total number of stitches on the needle (e.g. 249 stitches), minus the bands (e.g. 10 stitches) and divide the remaining stitches by the number of decreases/increases to be made (e.g. 6) = 39.8. In this example, decrease by knitting together approx. each 39th and 40th stitch. When increasing make 1 yarn over after approx. every 40th stitch; on the next row/round work the yarn overs twisted to avoid holes. Do not decrease/increase over the bands. DECREASE TIP (for sides of body): All decreases are made from the right side! Start 3 stitches before marker thread in side, knit 2 together, knit 2 (marker thread sits in between these 2 stitches), slip 1 stitch as if to knit, knit 1 and pass the slipped stitch over the knitted stitch (= 2 stitches decreased). INCREASE TIP (for mid under sleeves): Start 1 stitch before the marker thread, make 1 yarn over, knit 2 (marker thread sits between these 2 stitches), make 1 yarn over (= 2 stitches increased). On the next round knit the yarn overs twisted to avoid holes. Then work the increased stitches in stocking stitch. BUTTONHOLES (bottom up): Work buttonholes on right band. 1 BUTTONHOLE = knit second and third stitch from the edge together and make 1 yarn over. On the next row knit the yarn over to leave a hole. Work buttonholes when piece measures: S: 8, 15, 22, 29, 36, 43 and 51 cm M: 8, 15, 23, 30, 38, 45 and 53 cm L: 8, 16, 24, 32, 40, 48 and 55 cm XL: 8, 15, 22, 29, 36, 43, 50 and 57 cm XXL: 10, 17, 24, 31, 38, 45, 52 and 59 cm XXXL: 10, 17, 24, 31, 38, 45, 52 and 61 cm NOTE: The last of these 7-7-7-8-8-8 buttonholes is worked on the neck. ------------------------------------------------------- START THE PIECE HERE: ------------------------------------------------------- JACKET - SHORT OVERVIEW OF THE PIECE: The piece is worked back and forth with circular needle from mid front, bottom up as far as the armholes. The sleeves are worked in the round with double pointed needles/short circular needle bottom up. Body and sleeves are then placed on same circular needle and the yoke is finished working back and forth from mid front. BODY: Cast on 207-227-249-263-291-311 stitches (including 5 band stitches in each side towards mid front) with circular needle size 4 mm and Cotton Merino. Change to circular needle size 3.5 mm and work 2 RIDGES – read description above. Change back to circular needle size 4 mm and work 2 rows stocking stitch with 5 band stitches in garter stitch in each side. The next row is worked as follows from the right side: 5 band stitches in garter stitch, Work A.1A until there are 6 stitches left on row (= 14-18-17-21-20-25 repeats of 14-12-14-12-14-12 stitches), work A.1B (= 1 stitch) and finish with 5 band stitches in garter stitch. Continue this pattern. When A.1 has been completed, continue with stocking stitch and 5 band stitches in garter stitch in each side. AT THE SAME TIME on the first row from the right side decrease 0-0-6-0-4-0 stitches evenly on row = 207-227-243-263-287-311 stitches REMEMBER THE KNITTING TENSION! When the piece measures 8-8-8-8-10-10 cm insert 2 marker threads in the piece as follows from the right side: First marker thread is inserted after the first 54-59-63-68-74-80 stitches on the row (= right front piece when garment is worn), 2nd marker thread after the next 98-108-116-126-138-150 stitches (= back piece). There are 55-60-64-69-75-81 stitches left on row after the 2nd marker thread (= left front piece – NOTE: There is 1 more stitch on the left front piece than the right because of the pattern which will later be worked on sleeves and yoke). On the next row from the right side work BUTTONHOLE on right band – read description above. AT THE SAME TIME decrease 1 stitch on each side of both marker threads - read DECREASE TIP (= 4 stitches decreased). Continue to decrease on each side of both marker threads every 8-8-8-9-9-9 cm a total of 3 times in each side = 195-215-231-251-275-299 stitches. Continue working until the piece measures approx. 31-30-32-34-33-35 cm (measured from bottom of the curve in A.1). The next row is worked as follows from the wrong side: Work as before over the first 50-54-58-63-67-72 stitches and increase at the same time 1-6-2-6-2-6 stitches evenly over these stitches (= left front piece), cast off 4-6-6-6-10-12 stitches for armhole, work as before over the next 88-96-104-114-122-132 stitches and increase 2-12-4-12-4-12 stitches evenly over these stitches (= back piece), cast off 4-6-6-6-10-12 stitches for armhole, work the remaining 49-53-57-62-66-71 stitches as before and increase 1-6-2-6-2-6 stitches evenly over these stitches (= right front piece). There are now 50-59-59-68-68-77 stitches on the right front piece, 90-108-108-126-126-144 stitches on the back piece and 51-60-60-69-69-78 stitches on the left front piece. Lay the piece to one side and work sleeves as described below. SLEEVE: Cast on 48-52-56-56-60-60 stitches with double pointed needles size 3.5 mm and Cotton Merino. Knit 1 round. Then work rib in the round (= knit 2 / purl 2) for 3 cm. Knit 1 round where you decrease 6-8-10-10-10-8 stitches evenly on round = 42-44-46-46-50-52 stitches. Change to double pointed needles size 4 mm and work stocking stitch in the round. When the piece measures 10-8-11-11-9-9 cm insert 1 marker thread at the beginning of the round (= mid under sleeve). On the next round increase 2 stitches mid under sleeve - read INCREASE TIP. Increase like this every 2½-2½-1½-1½-1½-1½ cm a total of 13-13-19-19-19-19 times = 68-70-84-84-88-90 stitches (change to short circular needle when necessary). Continue working until the piece measures 40-38-38-38-36-36 cm (increases mid under sleeve should now be finished and measurements are shorter in larger sizes due to longer yoke). Knit 1 round where you increase 8-8-12-12-12-12 stitches evenly on round = 76-78-96-96-100-102 stitches. The next round is worked as follows: Work 2-3-3-3-5-6 stitches in stocking stitch, work A.2 over the next 72-72-90-90-90-90 stitches (= 4-4-5-5-5-5 repeats of 18 stitches) and finish with 2-3-3-3-5-6 stitches in stocking stitch. Continue this pattern until you just have the last row in A.2 left to work. The last round is worked as follows: Cast off 2-3-3-3-5-6 stitches for armhole, work last row in A.2 over the next 72-72-90-90-90-90 stitches and cast off the remaining 2-3-3-3-5-6 stitches for armhole. The sleeve measures approx. 44-42-42-42-40-40 cm from the top down. Lay the piece to one side and work the other sleeve in the same way. YOKE: Place sleeves on same circular needle size 4 mm as body, where you cast off stitches for armholes (without working the stitches) = 335-371-407-443-443-479 stitches on row. The first row is worked as follows from the right side: SIZES S, XL and XXL: 5 edge stitches in garter stitch, A.3A (= 9 stitches), work A.3B until there are 15 stitches left on row (= 17-23-23 repeats of 18 stitches), A.3C (= 10 stitches) and finish with 5 edge stitches in garter stitch. Continue this pattern (the pattern should match neatly on the sleeves too). When A.3 has been completed there are 263-347-347 stitches on the row. The next row is worked as follows from the right side: 5 edge stitches in garter stitch, work A.4A (= 7 stitches), A.4B until there are 13 stitches left on row (= 17-23-23 repeats of 14 stitches), A.4C (= 8 stitches) and finish with 5 edge stitches in garter stitch. Continue this pattern. When A.4 has been completed there are 138-180-180 stitches on row. Now go to ALL SIZES! SIZES M, L and XXXL: 5 edge stitches in garter stitch, work A.3B until there are 6 stitches left on row (= 20-22-26 repeats of 18 stitches), A.3D (= 1 stitch) and finish with 5 edge stitches in garter stitch. Continue this pattern (the pattern should match neatly on the sleeves too). When A.3 has been completed there are 291-319-375 stitches left on row. The next row is worked as follows from the right side: 5 edge stitches in garter stitch, work A.4B until there are 6 stitches left on row (= 20-22-26 repeats of 14 stitches), A.4D (= 1 stitch) and finish with 5 edge stitches in garter stitch. Continue this pattern. When A.4 has been completed there are 151-165-193 stitches on row. Now go to ALL SIZES! ALL SIZES: Knit 1 row from the right side where you decrease 30-39-49-56-56-61 stitches evenly on row – read DECREASE/INCREASE TIP = 108-112-116-124-124-132 stitches on row. The yoke now measures approx. 19-22-22-22-25-25 cm from where the sleeves and body were worked together. Now work NECK as described below. NECK: Change to circular needle size 3.5 mm and work the next row as follows from the wrong side: 5 band stitches in garter stitch, * purl 2, knit 2 *, work from *-* until there are 7 stitches left on row, purl 2 and finish with 5 band stitches in garter stitch. Continue this rib for 3 cm – remember the last buttonhole on right band. Then cast off loosely with garter stitch over garter stitch, knit over knit and purl over purl; to avoid the cast-off edge being tight you can cast off with circular needle size 4 mm. The whole jacket measures approx. 56-58-60-62-64-66 cm from the shoulder down. ASSEMBLY: Sew openings under sleeves. Sew buttons onto left band. |
|||||||||||||||||||
Diagram explanations |
|||||||||||||||||||
|
|||||||||||||||||||
 |
|||||||||||||||||||
 |
|||||||||||||||||||
 |
|||||||||||||||||||
 |
|||||||||||||||||||
 |
|||||||||||||||||||
 |
|||||||||||||||||||
Have you finished this pattern?Tag your pictures with #dropspattern #goldenfairycardigan or submit them to the #dropsfan gallery. Do you need help with this pattern?You'll find 28 tutorial videos, a Comments/Questions area and more by visiting the pattern on garnstudio.com. © 1982-2026 DROPS Design A/S. We reserve all rights. This document, including all its sub-sections, has copyrights. Read more about what you can do with our patterns at the bottom of each pattern on our site. |
|||||||||||||||||||


With over 40 years in knitting and crochet design, DROPS Design offers one of the most extensive collections of free patterns on the internet - translated to 17 languages. As of today we count 324 catalogues and 12290 patterns translated into English (UK/cm). 12290
We work hard to bring you the best knitting and crochet have to offer, inspiration and advice as well as great quality yarns at incredible prices! Would you like to use our patterns for other than personal use? You can read what you are allowed to do in the Copyright text at the bottom of all our patterns. Happy crafting!
Post a comment to pattern DROPS 195-23
We would love to hear what you have to say about this pattern!
If you want to leave a question, please make sure you select the correct category in the form below, to speed up the answering process. Required fields are marked *.