
Popular categories
Looking for a yarn?


Comments / Questions (48)
![]() Sandra Langer wrote:
Sandra Langer wrote:
Eben ist mir ein Licht aufgegangen. Wenn man auf beiden Seiten zunimmt, sind das schon 2. Insgesamt in der Höhe 5 Zunahmen. Alles gut.
14.06.2022 - 21:00
![]() Sandra Langer wrote:
Sandra Langer wrote:
Das meine ich, alle 4 Reihen sind bei mir 4cm hoch. 10 mal den Rapport zunehmen und das in 27cm Höhe klappt nicht.
14.06.2022 - 20:47
![]() Sandra Langer wrote:
Sandra Langer wrote:
Hallo, das wird knapp 10mal zunehmen und nach 27cm mit A3 beginnen.
14.06.2022 - 09:38DROPS Design answered:
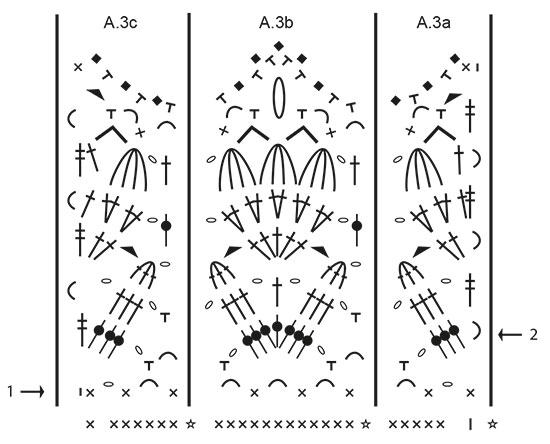
Liebe Frau Langer, nach 3 cm nehmen Sie beidseitig in jeder 4. Reihe zu; und nach 27 cm häkeln Sie die 7. und 8. Reihe in Diagram und dann häkeln Sie A.3. Viel Spaß beim häkeln!
14.06.2022 - 17:06
![]() Sandra Langer wrote:
Sandra Langer wrote:
Leider nicht, wie verbinde ich die 6 LM mit dem Muster, wenn ich 6LM anschlagen soll?
13.06.2022 - 16:44Sandra Langer answered:
Sorry, habe es jetzt selber gehäkelt so wie ich es mal gelernt habe. Geht auch.
13.06.2022 - 20:55
![]() Sandra Langer wrote:
Sandra Langer wrote:
Hallo, danke Ihnen für die Antwort. Mir ist jetzt nicht ganz klar wie ich die 6 LM integrieren soll. Habe das nochmal aufgezogen. Einfacher finde ich es, wenn ich die Lm anschliessend mit festen Maschen anhäkel. Allerdings durchbreche ich damit die 5. und 6. Reihe in der Wiederholung.
13.06.2022 - 12:55DROPS Design answered:
Liebe Frau Langer, A.2 wird über 3 Maschen gehäkelt, dh Sie häkeln 2 Mal A.2 in der Breite über diese 6 LM beiseitig. Reihen beginnen wie unter HÄKELINFORMATION beschrieben. Die 5. Reihe ist eine HinReihe und die 6. Reihe eine Rückreihe, die beginnen beide mit 3 LM und dann lesen Sie Diagramme rechts nach links (Hinreihen) und links nach rechts (Rückreihen) und die Reihen enden mit 1 Stb/1 fM in die 1./3. LM der vorrigen Reihe. Hoffentlich kann es Ihnen weiterhelfen.
13.06.2022 - 16:26
![]() Sandra Langer wrote:
Sandra Langer wrote:
Die Frage bezieht sich auf den Rücken. Es heißt dort wo der Ärmelausschnitt gehäkelt wird, Stäbchen in die LM häkeln. Nach 3cm zunehmen in diesem Muster weiter häkeln. Sind die Stäbchen gemeint oder kommen nach den Stäbchen doch die festen Maschen. Ich bin davon ausgegangen. Es läßt sich mit festen Maschen leichter zunehmen. Nur weiss ich jetzt nicht, ob ich dann mit dem Muster von A2 weiter häkeln kann oder weiter mit Stäbchen fortfahren soll.
11.06.2022 - 20:21
![]() Sandra Langer wrote:
Sandra Langer wrote:
Hallo, erst einmal ein grosses Dankeschön für die fleissige Beantwortung meiner Fragen :). Ich bin bei A2 und habe bereits die 6 Lm für den Armausschnitt zugenommen und eine Reihe Stäbchen gehäkelt. Allerdings habe ich A2 komplett schon mal mit den Stäbchen gehäkelt. Auf dem Bild ist nur eine Reihe zu sehen. Mache ich da was falsch?
11.06.2022 - 18:00DROPS Design answered:
Liebe Frau Langer, wenn Sie A.2 häkeln wiederholen Sie nur die 5. + die 6. Reihe bis die Arbeit 27 cm misst, dann häkeln Sie die 7. und 8. Reihe und danach A.3, dh diese Reihe sehen Sie auf dem Bild ganz unten, vor A.3/der Kante. Viel Spaß beim häkeln!
13.06.2022 - 09:08
![]() Sandra Langer wrote:
Sandra Langer wrote:
Und wie komme ich auf 9 Bögen?
09.06.2022 - 21:13DROPS Design answered:
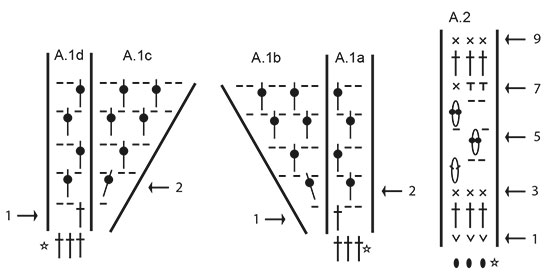
Liebe Frau Langer, es sind 27 Stäbchen (siehe vorrige Antwort), und Sie häkeln A.1d 9 x in der Breite (lesen Sie das Diagram links nach rechts, Reihe beginnt mit 3 Lm); so haben Sie 9 Luftmaschenbögen. Viel Spaß beim häkeln!
10.06.2022 - 08:44
![]() Sandra Langer wrote:
Sandra Langer wrote:
Hallo, ich häkel in Gr. 38. In der 1. Reihe mit 4 Stäbchen und eine LM überspringen für die übersprungene LM eine LM häkeln? Sonst zieht es sich ja zusammen. Wie geht die Rückreihe? 3 Luftm. häkeln und noch 2 Luftm. und 1 Stäbchen? Würde die Reihe so weiter gehäkelt werden? Danke im voraus. Sehr verwirrend das Ganze.
09.06.2022 - 17:55DROPS Design answered:
Liebe Frau Langer, da die Luftmaschenkette am Anfang wird oft eng, häkelt man hier mehr Luftmaschen als man Maschen braucht, dh bei der 1. Reihe überspringen Sie regelmäßig verteilt Luftmaschen, so daß Sie nur 27 Stäbchen (Größe M) über 36 Luftmaschen (Linke Schulter, Rückenteil) haben. Viel Spaß beim häkeln!
10.06.2022 - 08:40
![]() Yasmine wrote:
Yasmine wrote:
Is there a written pattern for it, because it is difficult to follow the diagram. For example, first row (it’s illustration) Second row (it’s illustration) Thanks in advance
30.04.2022 - 16:50DROPS Design answered:
Dear Yasmine, our patterns are only available in the way they are published, as a mixed format between written instructions and diagrams. You can check the following lesson on how to read crochet diagrams here: https://www.garnstudio.com/lesson.php?id=69&cid=19. You can also ask us if you are confused about a specific step or row of the diagram. Happy crochetting!
30.04.2022 - 22:18
|
|||||||||||||||||||||||||||||||||||||||||||||||||||||||||||||
Vintage Summer#vintagesummersweater |
|||||||||||||||||||||||||||||||||||||||||||||||||||||||||||||
|
|
|||||||||||||||||||||||||||||||||||||||||||||||||||||||||||||
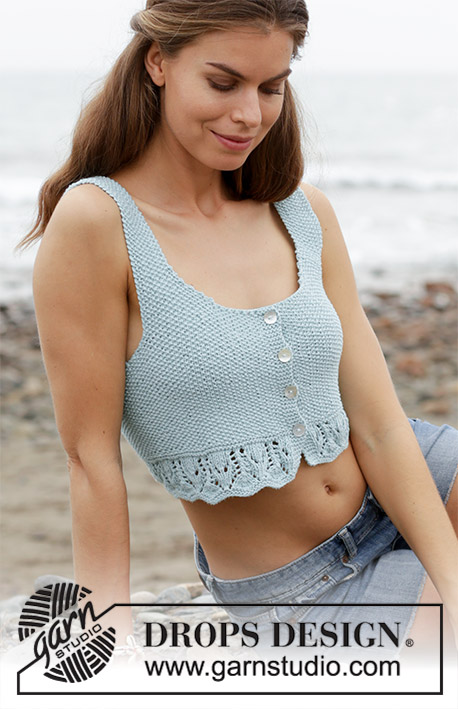
Crocheted jumper with vent and lace pattern. Size: S - XXXL Piece is crocheted in DROPS Cotton Merino.
DROPS 190-3 |
|||||||||||||||||||||||||||||||||||||||||||||||||||||||||||||
|
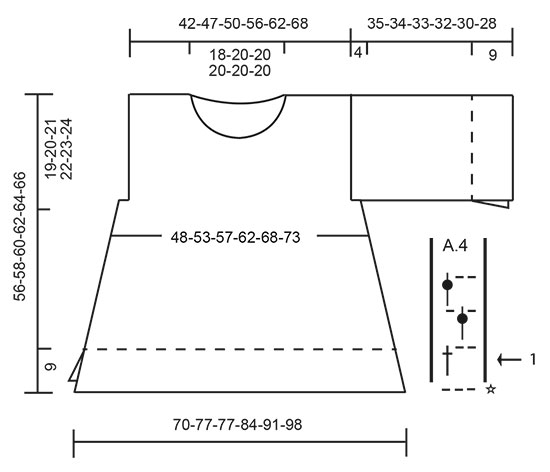
INFORMATION FOR PATTERN: PATTERN: See diagrams A.1 to A.4. CROCHET INFO (applies to everything except A.3): At beginning of every row with treble crochet begin with 3 chain stitch, these do not replace first treble crochet. Finish row with 1 treble crochet in 1st/3rd chain stitch from beginning of previous row. At beginning of every row with double crochet begin with 1 chain stitch, this does not replace first double crochet. Finish row with 1 double crochet in 1st/3rd chain stitch from beginning of previous row. DECREASE TIP: * Insert hook in next stitch, get yarn *, repeat from *-* one more time, make a yarn over and pull yarn through all 3 loops on hook = 1 double crochet decreased. INCREASE TIP-1 (applies to sides on front and back piece): Work A.2 2 times in total around first chain space on row and work A.2 2 times in total around last chain space on row (= 2 repetitions increased). INCREASE TIP-2 (applies to A.2): Increase by working 2 double crochets in same stitch. ---------------------------------------------------------- JUMPER: Work jumper back and forth, top down. Work front and back piece separately. First work each shoulder separately, then work parts together at the neck and continue downwards. Work sleeves back and forth. BACK PIECE: Work each shoulder separately, cast on chain stitches for neck and put piece together. LEFT SHOULDER: Work 32-36-40-47-54-62 chain stitches (including 3 chain stitches to turn with) on hook size 4 mm with Cotton Merino. Turn and work 1 treble crochet in 4th chain stitch from hook, work 1 treble crochet in each of the next 3-2-1-3-5-3 chain stitches, * skip 1 chain stitch, 1 treble crochet in each of the next 4 chain stitches *, work from *-* 5-6-7-8-9-11 times in total = 24-27-30-36-42-48 treble crochets. Work next row as follows (= 1st row in A.1d from wrong side): Work 3 chain stitches - read CROCHET INFO, work A.1d 8-9-10-12-14-16 times in total in width = 8-9-10-12-14-16 chain spaces. Put piece aside and work the other shoulder. RIGHT SHOULDER: Work the same way as left shoulder, then work 36-39-39-39-39-39 chain stitches for neck and fasten with 1 slip stitch in 3rd chain stitch at the beginning of last row on left shoulder. Fasten off. BACK PIECE: Continue on 2nd row in A.1d (= from right side) as follows: Read CROCHET INFO! Work A.1d over the first 8-9-10-12-14-16 chain spaces, work A.1d 12-13-13-13-13-13 times in total over chain stitches for neck (work treble crochets in stitches), work A.1d over the next 8-9-10-12-14-16 chain spaces. Continue like this, i.e. work A.1d 28-31-33-37-41-45 times in total in width. REMEMBER THE CROCHET TENSION! When A.1 has been worked vertically, repeat the last 2 rows until piece measures approx. 16-16-18-18-20-20 cm - adjust according to last row (i.e. row worked from wrong side). WORK A.2 AS FOLLOWS: Work 1st row in A.2 as follows: Work A.2 (= 28-31-33-37-41-45 repetitions) while at the same time decreasing 9-9-9-12-12-15 double crochets evenly - read DECREASE TIP = 75-84-90-99-111-120 double crochets. Then work to and with 6th row (= 25-28-30-33-37-40 repetitions). Repeat 5th and 6th row upwards. When piece measures approx. 19-20-21-22-23-24 cm, work armholes, i.e. cut the yarn. Work 6 loose chain stitches (= armholes), continue on pattern A.2 as before over all stitches and finish with 6 loose chain stitches (= armhole). Insert 1 marker here - NOW MEASURE PIECE FROM HERE! On next row work 2 repetitions of A.2 over each armhole (work treble crochets in chain stitches), i.e. work A.2 29-32-34-37-41-44 times in total in width. Continue this pattern. When piece measures 3 cm from marker, increase 1 repetition in each side - read INCREASE TIP-1. Increase like this every 4th-4th-4th-5th-5th-5th row 10 times in total = 39-42-44-47-51-54 repetitions of A.2 on last row. Continue to work until piece measures 26-27-28-29-30-31 cm, adjust so that next row is from right side. Then work 7th and 8th row = 117-126-132-141-153-162 treble crochets. Work last row while at the same time increasing 3-6-0-3-3-6 double crochets evenly - read INCREASE TIP-2 = 120-132-132-144-156-168 double crochets. Insert 1 marker in each side (= marks vent). WORK A.3 AS FOLLOWS: Work next row as follows (= from wrong side): Work A.3c, A.3b 9-10-10-11-12-13 times in total in width, finish with A.3a. Continue until diagram is done vertically, fasten off. Entire piece measures approx. 56-58-60-62-64-66 cm from shoulder. FRONT PIECE: Work each shoulder separately, increase and cast on chain stitches for neck and put piece together. RIGHT SHOULDER: Work 32-36-40-47-54-62 chain stitches (including 3 chain stitches to turn with) on hook size 4 mm with Cotton Merino. Turn and work 1 treble crochet in 4th chain stitch from hook, work 1 treble crochet in each of the next 3-2-1-3-5-3 chain stitches, * skip 1 chain stitch, 1 treble crochet in each of the next 4 chain stitches *, work from *-* 5-6-7-8-9-11 times in total = 24-27-30-36-42-48 treble crochets. Work next row as follows, begin from wrong side: Remember CROCHET INFO! Work A.1b, A.1a 8-9-10-12-14-16 times in total in width. When A.1 has been worked vertically, put piece aside. LEFT SHOULDER: Work 32-36-40-47-54-62 chain stitches (including 3 chain stitches to turn with) on hook size 4 mm with Cotton Merino. Turn and work 1 treble crochet in 4th chain stitch from hook, work 1 treble crochet in each of the next 3-2-1-3-5-3 chain stitches, * skip 1 chain stitch, 1 treble crochet in each of the next 4 chain stitches *, work from *-* 5-6-7-8-9-11 times in total = 24-27-30-36-42-48 treble crochets. Work next row as follows, begin from wrong side: Work A.1d 8-9-10-12-14-16 times in total in width and A.1c. When A.1 is done vertically, work 20-23-23-23-23-23 chain stitches for neck and fasten with 1 slip stitch in 3rd chain stitch at the beginning of last row on right shoulder. Fasten off. FRONT PIECE: Continue on 2nd row in A.1 (= from right side) as follows: Work A.1a over the first 11-12-13-14-17-19 chain spaces, work A.1a 6-7-7-7-7-7 times in total over chain stitches for neck (work treble crochets in stitches), work A.1a over the next 11-12-13-14-17-19 chain spaces. Continue like this, i.e. work A.1a 28-31-33-37-41-45 times in total in width. When A.1 has been worked vertically, repeat the last 2 rows until piece measures approx. 16-16-18-18-20-20 cm - adjust according to last row (i.e. row worked from wrong side). Then work A.2 and A.3 the same way as on back piece. SLEEVE: Worked back and forth, top down. Work 78-84-87-90-96-99 LOOSE chain stitches (including 3 chain stitches to turn with) on hook size 4 mm with Cotton Merino. Turn - remember CROCHET INFO and work A.4 25-27-28-29-31-32 times in total in width. When A.4 has been worked vertically, repeat the last 2 rows onwards. Continue like this until piece measures approx. 24-23-22-21-19-17 cm - adjust according to row worked from wrong side (shorter measurements in the larger sizes because of wider shoulders). Then work 1st and 2nd row in A.2. Work 3rd row in A.2 while at the same time increasing 9-3-0-9-3-0 double crochets evenly = 84-84-84-96-96-96 double crochets. Insert 1 marker here (= marks vent). Work next row as follows, begin from wrong side: Work A.3c, A.3b 6-6-6-7-7-7 times in total in width, finish with A.3a. Continue until A.3 is done vertically, fasten off. Sleeve measures approx. 35-34-33-32-30-28 cm. Work the other sleeve the same way. ASSEMBLY: Place front piece on top of back piece right side against right side and work shoulder together as follows: Work 1 double crochet through both layers, * 3 chain stitches, skip approx. 2 cm, 1 double crochet through both layers *, work from *-* along the shoulder. Fasten off. Repeat on the other shoulder. NECK EDGE: Work an edge evenly along the neck, begin from one shoulder as follows: Work 1 double crochet around row/treble crochet/chain space, * 3 chain stitches, 1 slip stitch in first chain stitch, 1 double crochet around next row/treble crochet/chain space *, work from *-* along the entire neck, finish with 1 slip stitch in first double crochet. SLEEVE EDGE: Fasten the sleeve to the front/back piece, begin mid under sleeve from right side. Work the pieces together the same way as on neck edge from right side but work through both layers along the entire opening. Fasten the other sleeve the same way. ASSEMBLY: Work together in the sides (place right side against right side and work from wrong side), begin from one marker (= 9 cm for vent in the side) as follows: Work 1 double crochet, * 3 chain stitches, 1 double crochets around next treble crochet row *, work from *-* down to the other marker (= 9 cm for vent on the sleeve). Fasten off. Repeat in the other side. |
|||||||||||||||||||||||||||||||||||||||||||||||||||||||||||||
Diagram explanations |
|||||||||||||||||||||||||||||||||||||||||||||||||||||||||||||
|
|||||||||||||||||||||||||||||||||||||||||||||||||||||||||||||
 |
|||||||||||||||||||||||||||||||||||||||||||||||||||||||||||||
 |
|||||||||||||||||||||||||||||||||||||||||||||||||||||||||||||
 |
|||||||||||||||||||||||||||||||||||||||||||||||||||||||||||||
Have you finished this pattern?Tag your pictures with #dropspattern #vintagesummersweater or submit them to the #dropsfan gallery. Do you need help with this pattern?You'll find 13 tutorial videos, a Comments/Questions area and more by visiting the pattern on garnstudio.com. © 1982-2026 DROPS Design A/S. We reserve all rights. This document, including all its sub-sections, has copyrights. Read more about what you can do with our patterns at the bottom of each pattern on our site. |
|||||||||||||||||||||||||||||||||||||||||||||||||||||||||||||


With over 40 years in knitting and crochet design, DROPS Design offers one of the most extensive collections of free patterns on the internet - translated to 17 languages. As of today we count 324 catalogues and 12290 patterns translated into English (UK/cm). 12290
We work hard to bring you the best knitting and crochet have to offer, inspiration and advice as well as great quality yarns at incredible prices! Would you like to use our patterns for other than personal use? You can read what you are allowed to do in the Copyright text at the bottom of all our patterns. Happy crafting!
Post a comment to pattern DROPS 190-3
We would love to hear what you have to say about this pattern!
If you want to leave a question, please make sure you select the correct category in the form below, to speed up the answering process. Required fields are marked *.