
Popular categories
Looking for a yarn?


Comments / Questions (48)
![]() Yvonne wrote:
Yvonne wrote:
What size is a small
01.07.2025 - 15:11DROPS Design answered:
Hi Yvonne, There is a size chart at the bottom of the page, with all the measurements for the different sizes. Regards, Drops team.
03.07.2025 - 07:41
![]() Fia Älander wrote:
Fia Älander wrote:
Hur ska man egentligen virka bakstycket? För jag får det till att det blir 2 "ränder" istället för en som på bilden.
12.04.2025 - 07:13DROPS Design answered:
Hei Fia. Hvor i oppskriften/ bakstykket er du? Er det stripen midt over brystet du tenker på? Der hekles det 1 rad med fastmasker (i luftmaskebuen) + 1 rad med staver + 1 rad med fastmasker ( i maske) = 3 rader som lager en stripe midt over brystet. mvh DROPS Design
22.04.2025 - 11:16
![]() Fia Älander wrote:
Fia Älander wrote:
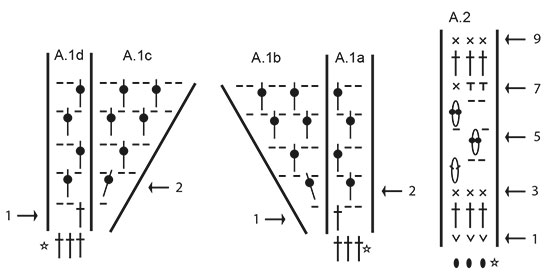
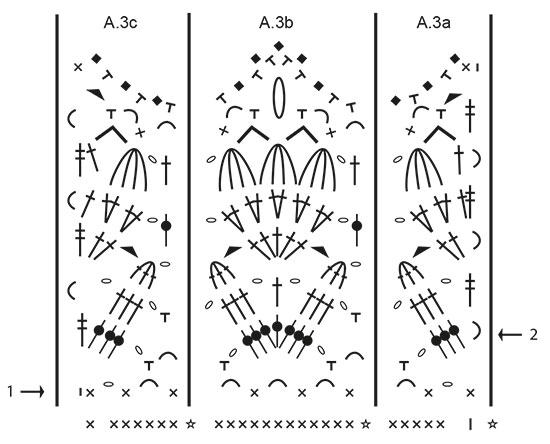
Är "(" och ")" i diagram A.3a till A.3c detsamma som 4 luftmaskor?
09.04.2025 - 20:52DROPS Design answered:
Hej Fia, ja det stemmer, buen kan vende begge veje :)
10.04.2025 - 08:15
![]() Sabine Kossack wrote:
Sabine Kossack wrote:
Hallo, ich habe eine Frage. Habe mit der linken Schulter begonnen, 47 Lm angeschlagen, wie bescheiden weiter, also ich habe jetzt 36 Stäbchen...nun verstehe ich die nächste Runde nicht... (1 Reihe von A.1d, =Rückenreihe):3 Luftmaschen häkeln...stehe irgendwie auf der Schnur... 🤔 vielleicht können Sie mir es für mich verständlich erklären. Viele Grüße 🤗
20.12.2024 - 19:23DROPS Design answered:
Liebe Frau Kossack, die 1. Reihe mit Stäbchen ist eine Hinreihe so ist die 1. Reihe A.1d eine Rückreihe, so beginnen Sie mit 3 Luftmaschen dann wiederholen Sie A.1d (über 3 Maschen) insgesamt 12 Mal (12x3 = 36 M). Diese Reihe (wie alle Rückreihe) lesen Sie wie mit dem Pfeil gezeigt, dh links nach rechts; die Hinreihe lesen Sie dann rechts nach links. Viel Spaß beim Häkeln!
02.01.2025 - 09:23
![]() Miriam Sala wrote:
Miriam Sala wrote:
Buongiorno, La descrizione del davanti è corretta? Non sembrerebbe esistere lo scollo che si vede nella foto e dal diagramma. Il n. Di catenelle per il collo è addirittura minore che per il dietro. Si può avere la descrizione corretta? Grazie
14.04.2024 - 09:55DROPS Design answered:
Buonasera Miriam, non sono riportate correzioni per questo modello. Buon lavoro!
01.05.2024 - 21:54
![]() Femke wrote:
Femke wrote:
Hallo, allereerst: wat een leuk patroon is dit, dank daarvoor. Helaas loop ik bij het haken van de schouders al meteen vast. Bij het achterpand staat A.1d over alle steken haken, moet dat niet A.1d en A.1c zijn?
01.04.2023 - 19:02DROPS Design answered:
Dag Femke,
Je haakt voor beide schouders eerst alleen de eerste toer van A.1 d (A.1d herhaal je dus in de breedte). Bij de rechter schouder haak je lossen aan het eind en dan ga je verder onder 'ACHTERPAND'. Pas voor het voorpand gebruik je A.1a en A.1c.
05.04.2023 - 10:46
![]() Sandra Langer wrote:
Sandra Langer wrote:
Hallo, Sie verwirren mich- ich habe li. und re. Schulter mit 39 LM für den Halsausschnitt verbunden. Häkel also 4 LM am Anfang und fange A1d damit an, die 2. Reihe zu häkeln. ergibt 1. Schulter 9 Lmbögen. Über den Halsausschnitt sind es 13, allerdings etwas versetzt. 2. Schulter komme ich somit auf 10 Lmbögen. Da stimmt was nicht.
20.06.2022 - 08:55DROPS Design answered:
Liebe Frau Langer, oh Sie sind schon bei der Halsausschnitt? Dann häkeln Sie zuerst die 10 x A.1d = 10 Luftmaschenbogen, dann 13 x A.1d über die 39 Luftmaschen zwischen beiden Schultern und Endlich 10 x A.1d über die 2. Schulter. Bei beiden Schulter hatten Sie nur die 1. REihe gehäkelt = Rückreihe; jetzt häkeln Sie die Hinreihe, und das Diagram lesen Sie rechts nach links. Kann das Ihnen helfen?
20.06.2022 - 15:32
![]() Sandra Langer wrote:
Sandra Langer wrote:
Hallo, ich habe das Rückenteil nochmal angefangen und festgestellt, dass sich ab der 2. Reihe über den Halsausschnitt sich das schwer aufzuteilen läßt. 13 habe ich bekommen, allerdings nicht auf dem letzten Abschnitt von der Schulter. Da sollten es 9 sein, sind aber 10. Einen Tipp vielleicht? Danke für Ihre Geduld.
19.06.2022 - 21:44DROPS Design answered:
Liebe Frau Langer, am Anfang häkeln Sie 40 Luftmaschen, dann haben Sie 30 Stäbchen, 1. Reihe A.1d häkeln Sie so: 3 Lm - A.1d (= 2 Lm, 2 Stb überspringen, 1 Stb in das nächste Stb) wiederholen Sie jetzt 10 Mal in der Breite (10 x 3 Maschen), so bekommen Sie 10 Luftmaschenbogen. Viel Spaß beim häkeln!
20.06.2022 - 08:00
![]() Sandra Langer wrote:
Sandra Langer wrote:
Sorry, eine Frage zum Vorderteil. Bin blind, glaub ich, wieviele LM für den Halsausschnitt? Danke Ihnen.
16.06.2022 - 14:43DROPS Design answered:
Liebe Frau Langer, die finden Sie am Ende von LINKE SCHULTER:; dh: Die nächste Rück-Reihe wie folgt häkeln: A.1d insgesamt 8-9-10-12-14-16 x in der Breite, A.1c. Wenn A.1 in der Höhe zu Ende gearbeitet wurde, 20-23-23-23-23-23 Luftmaschen für den Halsausschnitt anschlagen und mit 1 Kettmasche in die 3. Luftmasche des Beginns der letzten Reihe der rechten Schulter befestigen. Viel Spaß beim häkeln!
16.06.2022 - 16:32
![]() Sandra Langer wrote:
Sandra Langer wrote:
Hallo, bei A3c was bedeutet der Strich vor dem x in der 1. Reihe? Danke im voraus.
15.06.2022 - 22:06DROPS Design answered:
Liebe Frau Langer, es ist 1 Luftmasche (Wendemasche) dann häkeln Sie den x = 1 feste Masche in die erste Masche. Viel Spaß beim häkeln!
16.06.2022 - 09:33
|
|||||||||||||||||||||||||||||||||||||||||||||||||||||||||||||
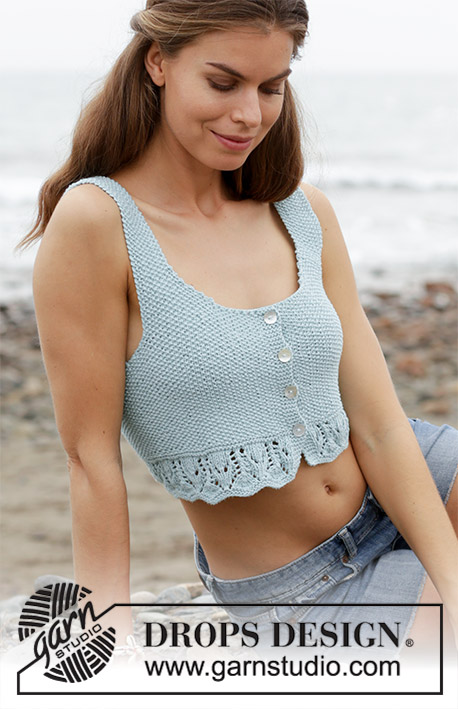
Vintage Summer#vintagesummersweater |
|||||||||||||||||||||||||||||||||||||||||||||||||||||||||||||
|
|
|||||||||||||||||||||||||||||||||||||||||||||||||||||||||||||
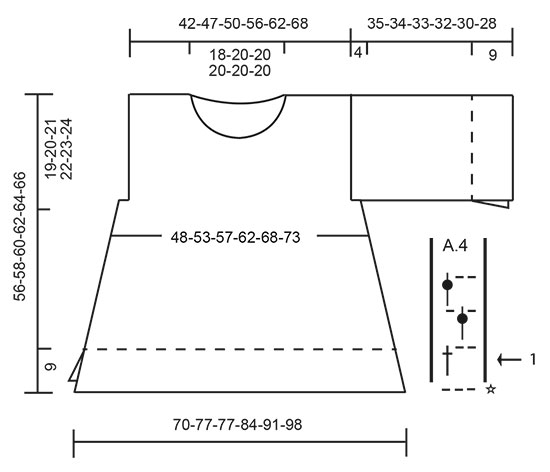
Crocheted jumper with vent and lace pattern. Size: S - XXXL Piece is crocheted in DROPS Cotton Merino.
DROPS 190-3 |
|||||||||||||||||||||||||||||||||||||||||||||||||||||||||||||
|
INFORMATION FOR PATTERN: PATTERN: See diagrams A.1 to A.4. CROCHET INFO (applies to everything except A.3): At beginning of every row with treble crochet begin with 3 chain stitch, these do not replace first treble crochet. Finish row with 1 treble crochet in 1st/3rd chain stitch from beginning of previous row. At beginning of every row with double crochet begin with 1 chain stitch, this does not replace first double crochet. Finish row with 1 double crochet in 1st/3rd chain stitch from beginning of previous row. DECREASE TIP: * Insert hook in next stitch, get yarn *, repeat from *-* one more time, make a yarn over and pull yarn through all 3 loops on hook = 1 double crochet decreased. INCREASE TIP-1 (applies to sides on front and back piece): Work A.2 2 times in total around first chain space on row and work A.2 2 times in total around last chain space on row (= 2 repetitions increased). INCREASE TIP-2 (applies to A.2): Increase by working 2 double crochets in same stitch. ---------------------------------------------------------- JUMPER: Work jumper back and forth, top down. Work front and back piece separately. First work each shoulder separately, then work parts together at the neck and continue downwards. Work sleeves back and forth. BACK PIECE: Work each shoulder separately, cast on chain stitches for neck and put piece together. LEFT SHOULDER: Work 32-36-40-47-54-62 chain stitches (including 3 chain stitches to turn with) on hook size 4 mm with Cotton Merino. Turn and work 1 treble crochet in 4th chain stitch from hook, work 1 treble crochet in each of the next 3-2-1-3-5-3 chain stitches, * skip 1 chain stitch, 1 treble crochet in each of the next 4 chain stitches *, work from *-* 5-6-7-8-9-11 times in total = 24-27-30-36-42-48 treble crochets. Work next row as follows (= 1st row in A.1d from wrong side): Work 3 chain stitches - read CROCHET INFO, work A.1d 8-9-10-12-14-16 times in total in width = 8-9-10-12-14-16 chain spaces. Put piece aside and work the other shoulder. RIGHT SHOULDER: Work the same way as left shoulder, then work 36-39-39-39-39-39 chain stitches for neck and fasten with 1 slip stitch in 3rd chain stitch at the beginning of last row on left shoulder. Fasten off. BACK PIECE: Continue on 2nd row in A.1d (= from right side) as follows: Read CROCHET INFO! Work A.1d over the first 8-9-10-12-14-16 chain spaces, work A.1d 12-13-13-13-13-13 times in total over chain stitches for neck (work treble crochets in stitches), work A.1d over the next 8-9-10-12-14-16 chain spaces. Continue like this, i.e. work A.1d 28-31-33-37-41-45 times in total in width. REMEMBER THE CROCHET TENSION! When A.1 has been worked vertically, repeat the last 2 rows until piece measures approx. 16-16-18-18-20-20 cm - adjust according to last row (i.e. row worked from wrong side). WORK A.2 AS FOLLOWS: Work 1st row in A.2 as follows: Work A.2 (= 28-31-33-37-41-45 repetitions) while at the same time decreasing 9-9-9-12-12-15 double crochets evenly - read DECREASE TIP = 75-84-90-99-111-120 double crochets. Then work to and with 6th row (= 25-28-30-33-37-40 repetitions). Repeat 5th and 6th row upwards. When piece measures approx. 19-20-21-22-23-24 cm, work armholes, i.e. cut the yarn. Work 6 loose chain stitches (= armholes), continue on pattern A.2 as before over all stitches and finish with 6 loose chain stitches (= armhole). Insert 1 marker here - NOW MEASURE PIECE FROM HERE! On next row work 2 repetitions of A.2 over each armhole (work treble crochets in chain stitches), i.e. work A.2 29-32-34-37-41-44 times in total in width. Continue this pattern. When piece measures 3 cm from marker, increase 1 repetition in each side - read INCREASE TIP-1. Increase like this every 4th-4th-4th-5th-5th-5th row 10 times in total = 39-42-44-47-51-54 repetitions of A.2 on last row. Continue to work until piece measures 26-27-28-29-30-31 cm, adjust so that next row is from right side. Then work 7th and 8th row = 117-126-132-141-153-162 treble crochets. Work last row while at the same time increasing 3-6-0-3-3-6 double crochets evenly - read INCREASE TIP-2 = 120-132-132-144-156-168 double crochets. Insert 1 marker in each side (= marks vent). WORK A.3 AS FOLLOWS: Work next row as follows (= from wrong side): Work A.3c, A.3b 9-10-10-11-12-13 times in total in width, finish with A.3a. Continue until diagram is done vertically, fasten off. Entire piece measures approx. 56-58-60-62-64-66 cm from shoulder. FRONT PIECE: Work each shoulder separately, increase and cast on chain stitches for neck and put piece together. RIGHT SHOULDER: Work 32-36-40-47-54-62 chain stitches (including 3 chain stitches to turn with) on hook size 4 mm with Cotton Merino. Turn and work 1 treble crochet in 4th chain stitch from hook, work 1 treble crochet in each of the next 3-2-1-3-5-3 chain stitches, * skip 1 chain stitch, 1 treble crochet in each of the next 4 chain stitches *, work from *-* 5-6-7-8-9-11 times in total = 24-27-30-36-42-48 treble crochets. Work next row as follows, begin from wrong side: Remember CROCHET INFO! Work A.1b, A.1a 8-9-10-12-14-16 times in total in width. When A.1 has been worked vertically, put piece aside. LEFT SHOULDER: Work 32-36-40-47-54-62 chain stitches (including 3 chain stitches to turn with) on hook size 4 mm with Cotton Merino. Turn and work 1 treble crochet in 4th chain stitch from hook, work 1 treble crochet in each of the next 3-2-1-3-5-3 chain stitches, * skip 1 chain stitch, 1 treble crochet in each of the next 4 chain stitches *, work from *-* 5-6-7-8-9-11 times in total = 24-27-30-36-42-48 treble crochets. Work next row as follows, begin from wrong side: Work A.1d 8-9-10-12-14-16 times in total in width and A.1c. When A.1 is done vertically, work 20-23-23-23-23-23 chain stitches for neck and fasten with 1 slip stitch in 3rd chain stitch at the beginning of last row on right shoulder. Fasten off. FRONT PIECE: Continue on 2nd row in A.1 (= from right side) as follows: Work A.1a over the first 11-12-13-14-17-19 chain spaces, work A.1a 6-7-7-7-7-7 times in total over chain stitches for neck (work treble crochets in stitches), work A.1a over the next 11-12-13-14-17-19 chain spaces. Continue like this, i.e. work A.1a 28-31-33-37-41-45 times in total in width. When A.1 has been worked vertically, repeat the last 2 rows until piece measures approx. 16-16-18-18-20-20 cm - adjust according to last row (i.e. row worked from wrong side). Then work A.2 and A.3 the same way as on back piece. SLEEVE: Worked back and forth, top down. Work 78-84-87-90-96-99 LOOSE chain stitches (including 3 chain stitches to turn with) on hook size 4 mm with Cotton Merino. Turn - remember CROCHET INFO and work A.4 25-27-28-29-31-32 times in total in width. When A.4 has been worked vertically, repeat the last 2 rows onwards. Continue like this until piece measures approx. 24-23-22-21-19-17 cm - adjust according to row worked from wrong side (shorter measurements in the larger sizes because of wider shoulders). Then work 1st and 2nd row in A.2. Work 3rd row in A.2 while at the same time increasing 9-3-0-9-3-0 double crochets evenly = 84-84-84-96-96-96 double crochets. Insert 1 marker here (= marks vent). Work next row as follows, begin from wrong side: Work A.3c, A.3b 6-6-6-7-7-7 times in total in width, finish with A.3a. Continue until A.3 is done vertically, fasten off. Sleeve measures approx. 35-34-33-32-30-28 cm. Work the other sleeve the same way. ASSEMBLY: Place front piece on top of back piece right side against right side and work shoulder together as follows: Work 1 double crochet through both layers, * 3 chain stitches, skip approx. 2 cm, 1 double crochet through both layers *, work from *-* along the shoulder. Fasten off. Repeat on the other shoulder. NECK EDGE: Work an edge evenly along the neck, begin from one shoulder as follows: Work 1 double crochet around row/treble crochet/chain space, * 3 chain stitches, 1 slip stitch in first chain stitch, 1 double crochet around next row/treble crochet/chain space *, work from *-* along the entire neck, finish with 1 slip stitch in first double crochet. SLEEVE EDGE: Fasten the sleeve to the front/back piece, begin mid under sleeve from right side. Work the pieces together the same way as on neck edge from right side but work through both layers along the entire opening. Fasten the other sleeve the same way. ASSEMBLY: Work together in the sides (place right side against right side and work from wrong side), begin from one marker (= 9 cm for vent in the side) as follows: Work 1 double crochet, * 3 chain stitches, 1 double crochets around next treble crochet row *, work from *-* down to the other marker (= 9 cm for vent on the sleeve). Fasten off. Repeat in the other side. |
|||||||||||||||||||||||||||||||||||||||||||||||||||||||||||||
Diagram explanations |
|||||||||||||||||||||||||||||||||||||||||||||||||||||||||||||
|
|||||||||||||||||||||||||||||||||||||||||||||||||||||||||||||
 |
|||||||||||||||||||||||||||||||||||||||||||||||||||||||||||||
 |
|||||||||||||||||||||||||||||||||||||||||||||||||||||||||||||
 |
|||||||||||||||||||||||||||||||||||||||||||||||||||||||||||||
Have you finished this pattern?Tag your pictures with #dropspattern #vintagesummersweater or submit them to the #dropsfan gallery. Do you need help with this pattern?You'll find 13 tutorial videos, a Comments/Questions area and more by visiting the pattern on garnstudio.com. © 1982-2026 DROPS Design A/S. We reserve all rights. This document, including all its sub-sections, has copyrights. Read more about what you can do with our patterns at the bottom of each pattern on our site. |
|||||||||||||||||||||||||||||||||||||||||||||||||||||||||||||


With over 40 years in knitting and crochet design, DROPS Design offers one of the most extensive collections of free patterns on the internet - translated to 17 languages. As of today we count 324 catalogues and 12290 patterns translated into English (UK/cm). 12290
We work hard to bring you the best knitting and crochet have to offer, inspiration and advice as well as great quality yarns at incredible prices! Would you like to use our patterns for other than personal use? You can read what you are allowed to do in the Copyright text at the bottom of all our patterns. Happy crafting!
Post a comment to pattern DROPS 190-3
We would love to hear what you have to say about this pattern!
If you want to leave a question, please make sure you select the correct category in the form below, to speed up the answering process. Required fields are marked *.