
Popular categories
Looking for a yarn?


Comments / Questions (23)
![]() Katja wrote:
Katja wrote:
Liebes Drops Team, danke für die Antwort. Aber das Wo hatte ich schon verstanden, die Unklarheit bezieht sich auf das Ende der Runde und den Anfang der neuen Runde. Kommt vor der letzten Kettmasche ein Stäbchen oder nochmal 3 Luftmaschen? Und was kommt nach der Kettmasche? Der Satz \"nach der KM dann weiter KM bis zur Mitte des nächsten LM Bogens\"steht ganz oben in der HÄKELINFO. Kommen dann danach die 6 Luftmaschen? Und kommt das erste Stäbchen dann noch in den ersten LM Bogen? Danke
04.12.2024 - 17:40DROPS Design answered:
Liebe Katja, also ja man soll Luftmaschenbogen mit je 1 Stäbchen und 3 Luftmaschen dazwischen haben, so am Ende der Runde wird man mit 3 Luftmaschen enden dann 1 Kettmasche in die 3. Luftmaschen am Anfang der Runde (da die Runde mit 3 Luftmaschen für das 1. Stäbchen + 3 Luftmaschen für das 1. Luftmaschenbogen beginnt). Viel Spaß beim Stricken!
05.12.2024 - 08:32
![]() Katja wrote:
Katja wrote:
Liebes Drops Team, erstmal Danke für die tolle Anleitung! Ich bin noch nicht sehr häkelerfahren und verstehe das Vorgehen beim Umhäkeln das Randes nicht ganz. Habe ich richtig verstanden, dass nur die erste Reihe mit Luftmaschen endet, ansonsten auf das letzte Stäbchen gleich die beendende Kettmache kommt? Und was ist mit "dann Kettmaschen bis zu Mitte der nächsten LM Bogens gemeint? In welche Maschen? Wieviele? Danke für eine Erklärung! LG
04.12.2024 - 12:41DROPS Design answered:
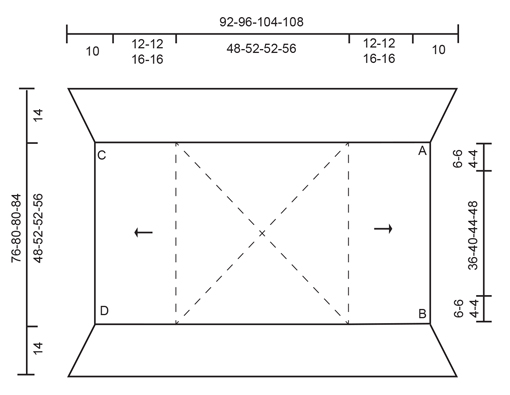
Liebe Katja, beim Rand häkeln Sie die 1. Rounde entweder bei der Ecke A oder B (siehe Maßskizze), dann häkeln Sie (ab A, von der Vorderseite: A bis C dann D bis B (zwischen C/D und A/B sind die Löcher für die Arme); so jeweils 1 Stäbchen (= 3 Luftmaschen am Anfang der Runde) um das Luftmaschenbogen von der vorrigen Reihe + 3 Luftmaschen, und am Ende dieser Runde enden Sie mit 1 Kettmasche in die 3. Luftmasche vom Anfang der Rudne. Der Satz finde ich in der Anleitung nicht. Viel Spaß beim Häkeln!
04.12.2024 - 16:19
![]() Häkeli wrote:
Häkeli wrote:
Hallo zusammen, muss man beim Rand um die Öffnung des Boleros nur einmal die vier Bögen zunehmen oder bei jeder Wiederholung der 2. Runde? Vielen Dank!
24.05.2021 - 15:50DROPS Design answered:
Liebe Häkeli, es wird bie jeder Wiederholung der 2. und 3. Runde dh in jeder 2. Runde zugenonmmen bis der Rand ca 14 cm misst. Viel Spaß beim häkeln!
25.05.2021 - 08:34
![]() Nina wrote:
Nina wrote:
Waarschuwing: de maten van dit patroon kloppen niet.
28.02.2021 - 19:08
![]() Nina wrote:
Nina wrote:
Ik heb de maten voor S/M aangehouden, maar als ik hoek A en B en hoek C en D op elkaar leg ziet het er heel gek uit. Er is aan beide kanten een opening van 33cm. moet daar de mouwen komen? En de opening van 48cm daarvan loopt dus één kant op de hals en één kant op de rug? Dit is veel kleiner dan maat S/M. Het hele vierkant komt zo niet eens netjes op de rug te vallen. Of ik heb helemaal de verkeerder kanten aan elkaar gezet. Hoe zit het?
24.02.2021 - 23:04DROPS Design answered:
Dag Nina,
Je haakt eerst een vierkant en daarna haakje aan beide zijden van het vierkant naar buiten toe. Vervolgens vouw je het werk dubbel. De openingen aan de korte einden vormen de armsgaten. Je haakt hier ook nog een rand omheen De opening aan de lange kant is de opening langs beide voorpanden, de onderkant van de rug en langs de hals achter. Hier wordt ook een rand omheen gehaakt.
26.02.2021 - 11:49
![]() Wendy wrote:
Wendy wrote:
Voor hoek A naar hoek b te vouwen Hoe moet het werk liggen Met patroon a b boven ennonder of links en rechts En waar moet ik dan precies haken
29.12.2020 - 14:19DROPS Design answered:
Dag Wendy,
Je hebt eerst het vierkant gehaakt (gestreepte lijntjes in de tekening en daarna naar beide zijkanten toe gehaakt (pijltjes). Je hebt dan dus een rechthoek die je in de lengte dubbel vouwt. De kort uiteinden worden de mouwen, waar je eerst en rand lang haakt. Daarna haak je een rand rondom de opening, dus lans de voorpanden, de hals achter en de onderkant achter.
17.01.2021 - 14:48
![]() Constance wrote:
Constance wrote:
Constance barcelona tröja messi barn,usa tröja,neimar brasilien,man u sverige ore,fotbollskläder tjej Matchtröjor-Fotboll. Andyr
25.03.2020 - 18:45
![]() Libellule wrote:
Libellule wrote:
Bonjour, quand j'ai cousu A-B et C-D qui deviennent donc des manches...qu'est ce que je fais des pointes de chaque cotés?
22.01.2020 - 03:18DROPS Design answered:
Bonjour Libellule, les manches sont la longueur entre A et B d'un côté et C et D de l'autre. L'assemblage se fait le long des 12-16 cm crochetés en haut et en bas (14 cm indiqués dans le schéma, y compris la bordure finale), en remontant sur 4-6 cm le long du côté A-B (ou C-D), pour que l'emmanchure fasse bien 36-40-44-48 cm de circonférence comme indiqué dans le schéma. Bonne continuation!
22.01.2020 - 09:48
![]() Chanvi wrote:
Chanvi wrote:
Bonjour combien de pelotes big delight dois je acheter pour une taille L, du modèle chauffe épaule, garden paradise, merci beaucoup. 😊
25.05.2019 - 08:40DROPS Design answered:
Bonjour Chanvi. Vous avez besoin de 3 pelotes (= 300 g) de Big Delight. Bon tricot!
25.05.2019 - 22:26
![]() Penny wrote:
Penny wrote:
Is this just a big granny square because the instructions are hard to follow
25.01.2019 - 21:10DROPS Design answered:
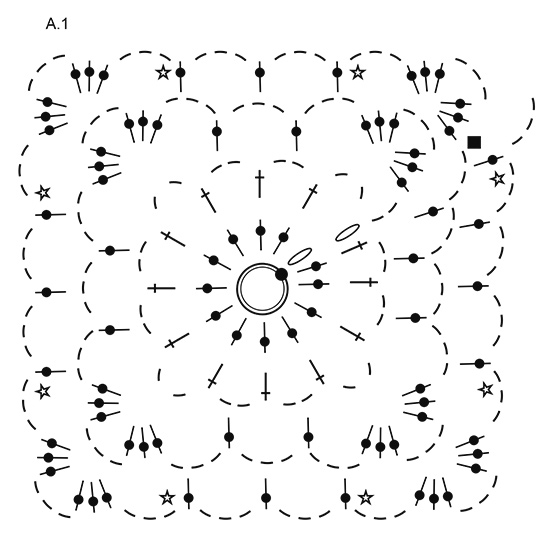
Dear Penny, the square is not the traditional granny square and should look as in the diagram. Each symbol in diagram represent 1 stitch/group of sts. Start in the middle with the ring of chains, then beg of round is the black dot on the circle and read every round from the right towards the left joining at the end of every round. Happy crocheting!
28.01.2019 - 09:24
|
|||||||||||||||||||||||||||||||
Garden Paradise#gardenparadisecardigan |
|||||||||||||||||||||||||||||||
 |
 |
||||||||||||||||||||||||||||||
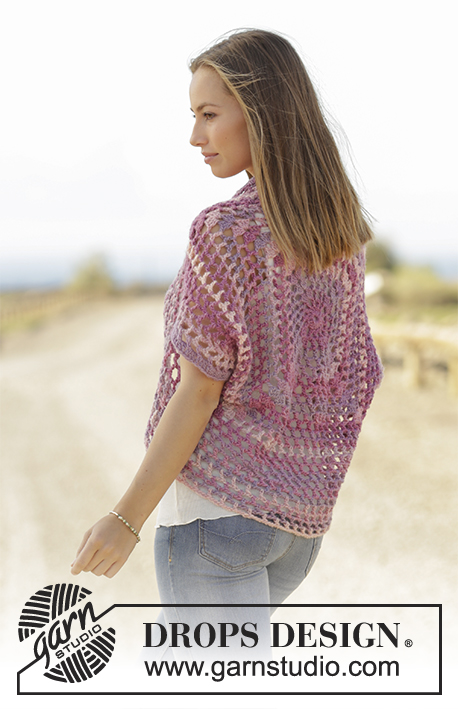
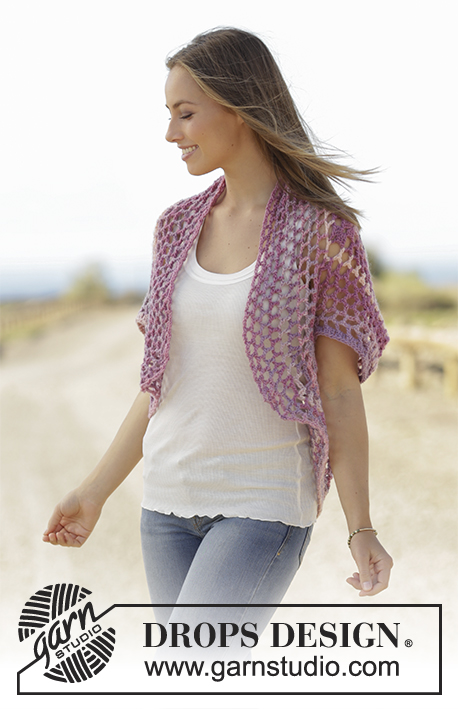
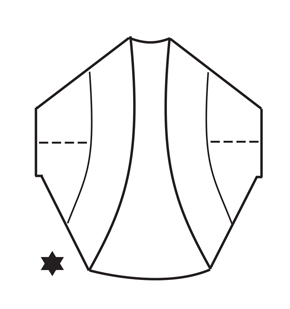
Shoulder piece with crochet square, crochet in DROPS Big Delight. Size S-XXXL.
DROPS 178-11 |
|||||||||||||||||||||||||||||||
|
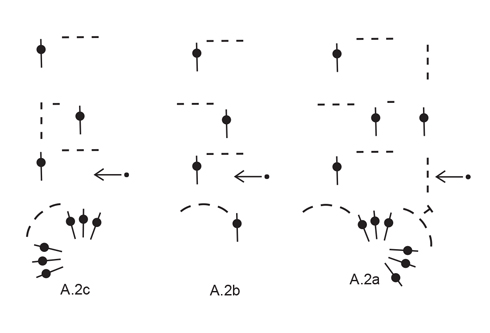
CROCHET INFO (applies to edge around opening on shoulder piece): At beginning of every round with trebles replace first treble with 3 chain stitches. Finish round with 1 slip stitch in 3rd chain stitch, then work slip stitches until middle of next chain space. PATTERN: See diagrams A.1 to A.2. INCREASE TIP (applies to edge around opening on shoulder piece): Increase 4 chain spaces on round by working 1 extra chain space (= 1 treble crochet + 3 chain stitches) around chain space before and after chain spaces with markers. ---------------------------------------------------------- SHOULDER PIECE: First work a square (worked in the round) from mid back, then work back and forth in two of the sides to make sleeves. Finish with an edge around the opening for shoulder piece. CROCHET SQUARE: Begin with Big Delight on hook size 6 mm and work pattern in the round according to diagram A.1. REMEMBER THE CROCHET TENSION! When A.1 has been worked vertically, repeat last round. For every new round there are 4 chain spaces more. AT THE SAME TIME on every 6th round increase 8 chain spaces extra - see stars in diagram (= 8 extra increases every 6th round). Continue like this until piece measures approx. 48-52-52-56 x 48-52-52-56 cm. Work back and forth in each side as follows: Work as before until first corner, work 1 double crochet around chain space in corner. INSERT A MARKER HERE. NOW MEASURE THE PIECE FROM HERE. Work from 2nd row in diagram (= row marked with arrow) as follows: Work A.2a, work A.2b until next corner, work A.2c. When A.2a to A.2c has been worked vertically, repeat the last 2 rows in diagrams until piece measures 12-12-16-16 cm, but adjust to finish after last row in diagrams. Cut the yarn. Work the same way in opposite side of crochet square. Fold piece along so that corner A and B meet and corner C and D meet - see chart. Work a short sleeve seam along short side of piece and work through both layers as follows: Work 1 double crochet around the outermost chain space in corners A and B. Work * 2 chain stitches, skip approx. 1 cm, 1 double crochet around both layers *, repeat from *-* for 6-6-4-4 cm. Do not cut the yarn. Armhole is now approx. 36-40-44-48 cm in circumference. Then work an edge around the armhole as follows: Work 3 chain stitches (= 1 treble crochet). Work 3 treble crochet around each of the chain spaces around armhole. Finish round with 1 slip stitch in 3rd chain stitch on round. Repeat in the other side where corner C and D meet. EDGE AROUND OPENING ON SHOULDER PIECE: Now work an edge around the entire opening on shoulder piece as follows: ROUND 1: Fasten strand with 1 double crochet around first chain space after corner A/B has been worked together. Work 6 chain stitches (= 1 treble crochet + 3 chain stitches) – READ CROCHET INFO! Work * 1 treble crochet around next chain space, 3 chain stitches *, repeat from *-* around the entire round. Insert a marker in chain space where corner A/B was worked together and a marker where C/D was worked together = 2 markers. ROUND 2: Work 1 treble crochet, * 3 chain stiches, 1 treble crochet around next chain space *, repeat from *-* the entire round and increase 1 chain space on each side of chain spaces with markers – READ INCREASE TIP = 4 chain spaces increased. ROUND 3: Work 1 treble crochet, * 3 chain stitches, 1 treble crochet around next chain space *, repeat from *-* the entire round. Repeat 2nd and 3rd round until edge measures approx. 14 cm. Fasten off. |
|||||||||||||||||||||||||||||||
Diagram explanations |
|||||||||||||||||||||||||||||||
|
|||||||||||||||||||||||||||||||
 |
|||||||||||||||||||||||||||||||
 |
|||||||||||||||||||||||||||||||
 |
|||||||||||||||||||||||||||||||
 |
|||||||||||||||||||||||||||||||
Have you finished this pattern?Tag your pictures with #dropspattern #gardenparadisecardigan or submit them to the #dropsfan gallery. Do you need help with this pattern?You'll find 5 tutorial videos, a Comments/Questions area and more by visiting the pattern on garnstudio.com. © 1982-2026 DROPS Design A/S. We reserve all rights. This document, including all its sub-sections, has copyrights. Read more about what you can do with our patterns at the bottom of each pattern on our site. |
|||||||||||||||||||||||||||||||


With over 40 years in knitting and crochet design, DROPS Design offers one of the most extensive collections of free patterns on the internet - translated to 17 languages. As of today we count 324 catalogues and 12290 patterns translated into English (UK/cm). 12290
We work hard to bring you the best knitting and crochet have to offer, inspiration and advice as well as great quality yarns at incredible prices! Would you like to use our patterns for other than personal use? You can read what you are allowed to do in the Copyright text at the bottom of all our patterns. Happy crafting!
Post a comment to pattern DROPS 178-11
We would love to hear what you have to say about this pattern!
If you want to leave a question, please make sure you select the correct category in the form below, to speed up the answering process. Required fields are marked *.