
Popular categories
Looking for a yarn?


Comments / Questions (88)
![]() Susanne wrote:
Susanne wrote:
Jeg forstår ikke hvordan det kan bli 155 st etter A1/A2/A3 er ferdig... Altså 10 buer det hekles 9 st i. Det er jo to ekstra buer pga venstre- og høyre skulder er heklet sammen. Det vil jo derfor bli flere enn 155 st på siste rad. Hjelp meg
28.05.2016 - 21:19DROPS Design answered:
Hej Susanne. Opskriften er korrigeret for nylig. Det burde vaere korrekt nu. Undskyld ventetiden.
17.11.2016 - 15:30
![]() Miranda wrote:
Miranda wrote:
Merie: na het opzetten van de lossen begin je met de stokjes. Na iedere 4 stokjes sla je een losse over. Als je begint met 78 lossen, sla je er 18 over op iedere schouder. Je volgt het patroon en haakt de 15 lossen bij de hals. Je komt dan volgens mij wel uit op de 155 steken. Drops Design: fijn dat het patroon nagekeken wordt! Het is zonde dat mensen hierdoor afhaken. Hij is zo schitterend als hij af is! Bedankt voor het patroon!
19.05.2016 - 21:54
![]() DROPS Design wrote:
DROPS Design wrote:
Beste dames. Ik ben met jullie eens dat er iets verkeerd is bij dit patroon. Ik heb de vraag neergelegd bij ons design team en wacht op een reactie. Ik kan helaas niet zeggen hoelang het duurt. Maar zodra ik meer weet, zal ik ook reageren op de vragen.
18.05.2016 - 16:20
![]() Merie wrote:
Merie wrote:
Hoe ik ook tel en haak. Ik kom niet uit! Zoals er eerder word voorgesteld lukt ook niet, je komt met het patroon niet uit. Ik haak maat S/M. Linker en rechterschouder moeten elk 78 steken zijn. = 156 steken. Maar dan moeten er ook nog steken voor de hals tussen. De 155 steken zijn bij voorbaat al niet haalbaar.
17.05.2016 - 09:17
![]() Miranda wrote:
Miranda wrote:
Zoals al meer is opgemerkt, kloppen het aantal lossen bij het opzetten van de rechter- en linkerpanden niet. Als je start met 98 lossen en het patroon precies volgt, kom je bij het samenhaken van de panden op 185 stokjes. Je start dus met maat S/M en eindigt met maat L/XL. Volgens mij kun je dit oplossen door voor maat S/M te beginnen met 98-19= 79 lossen. Volg je dan het patroon dan kom je volgens mij uit op de 155 stokjes.
14.05.2016 - 21:50
![]() Petra Van Wingerden wrote:
Petra Van Wingerden wrote:
Ik heb ondertussen het voorpand af, maar hoewel de breedte aardig klopt.... is de lengte 10 cm te kort. Vooral het stuk van a6 tm a10 is erg ineengekrompen vergeleken met de foto. Toch heb ik de herhalingen goed gedaan. Zijn er niet toevallig dubbele stokjes gebruikt? Verder lijkt de hals met 15 cm erg smal. Ik ga wel verder met de achterkant, al denk ik erover om een tussenstuk in te voegen boven.
02.05.2016 - 09:47DROPS Design answered:
Hoi Petra. Wij hebben het patroon bekeken en het moet stk zijn en de halsopening is ook correct. Bekijk eventueel of je stekenverhouding klopt in de hoogte.
01.09.2016 - 12:43
![]() Petra Van Wingerden wrote:
Petra Van Wingerden wrote:
Hier nog iemand die na al, a2 en a3 ook 185 steken heeft in plaats van 155. Ben best benieuwd of er dan allemaal op dezelfde plek de fout in gaan of dat het wellicht toch niet klopt. Ik heb al vaak gekeken maar zie het echt niet.....
30.04.2016 - 12:52
![]() Shannon wrote:
Shannon wrote:
Ik haak de maat s/m en ben nu bij dit aangekomen. Haak dan A.X 2-2-3-3 keer in totaal in de hoogte. Haak dan A.Y 1-1-0-0 keer in totaal in de hoogte. Houdt dit in dat ik voor mijne 2 keer a.x haak en 1 keer à.y of begrijp ik dit verkeerd🙈
27.04.2016 - 00:42DROPS Design answered:
Hoi Shannon. Ja, dat is correct.
27.04.2016 - 13:25
![]() Jeannette wrote:
Jeannette wrote:
Excuses! Heb kennelijk over jullie reactie heen gelezen... Om de vraag te beantwoorden: ik tel alleen de stokjes (de laatste toer heeft alleen maar stokjes). Ik ben benieuwd naar de uitkomst, ik wacht het rustig af. Vast bedankt!
18.04.2016 - 21:20
![]() Jeannette wrote:
Jeannette wrote:
Zo jammer dat er niet gereageerd wordt... :-/
11.04.2016 - 19:03DROPS Design answered:
Hoi Jeanette. Je ziet mijn reactie onder je vraag. Ik had je eerste vraag beantwoord met een vraag. Verder had ik overlegd met een collega, wij kijken nu het patroon na, en dat kan even duren ;-) Dus graag geduld. Fijn weekend!
15.04.2016 - 10:25
|
|||||||||||||||||||||||||||||||||||||||||||||||||||||||||||||||||||
Graceful Mermaid#gracefulmermaidponcho |
|||||||||||||||||||||||||||||||||||||||||||||||||||||||||||||||||||
|
|
|||||||||||||||||||||||||||||||||||||||||||||||||||||||||||||||||||
Crochet DROPS poncho with lace pattern, worked top down in ”Cotton Merino”. Size: S - XXXL.
DROPS 168-29 |
|||||||||||||||||||||||||||||||||||||||||||||||||||||||||||||||||||
|
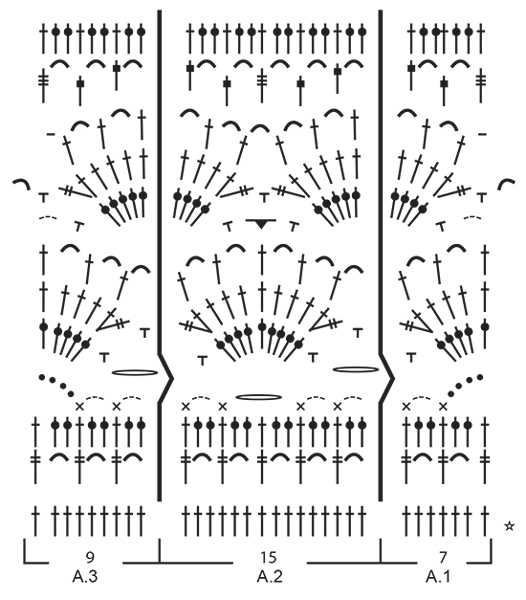
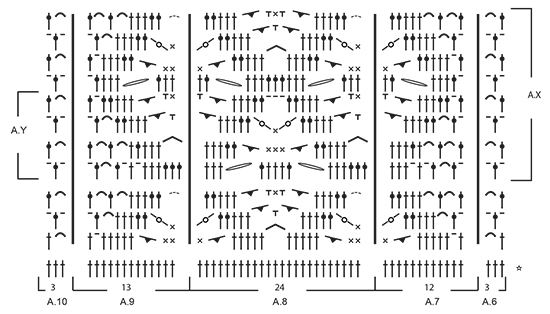
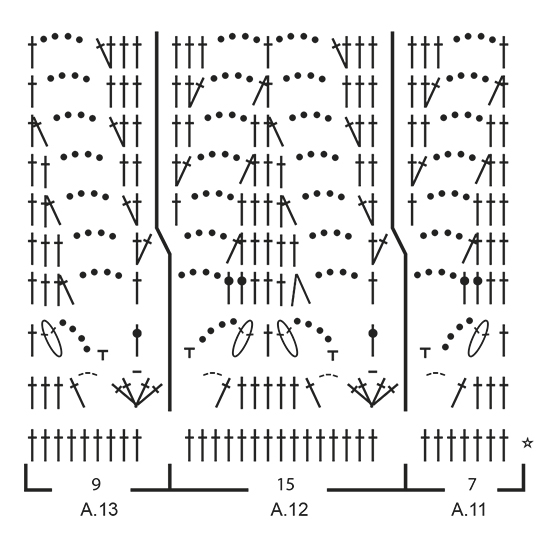
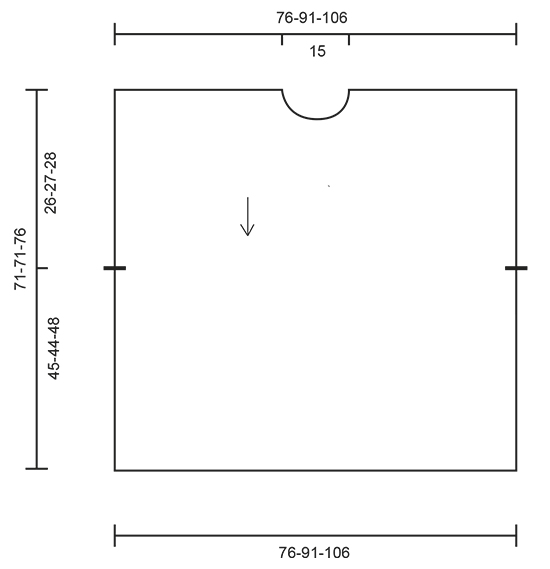
PATTERN: See diagrams A.1 to A.16. CROCHET INFO: Replace first tr at beg of every tr row with 3 ch. Replace first dtr at beg of every dtr row with 4 ch. Replace first dc at beg of every dc row with 1 ch. ---------------------------------------------------------- PONCHO: The poncho is the same at the front and back with opening in the sides. Work back and forth, top down. RIGHT SHOULDER - FRONT PIECE: Work 80-98-117 ch on hook size 3.5 mm with Cotton Merino. Turn and work 1 tr in 4th ch from hook (= 2 tr), 1 tr in each of the next 1-4-3 ch, * skip 1 ch, 1 tr in each of the next 4 ch *, repeat from *-* the entire row = 63-78-93 tr (incl 2 edge sts in the side). Work next row (= from RS) as follows: READ CROCHET INFO! 1 tr in each of the first 2 tr (= edge sts), A.1 over the next 7 tr, A.2 over the next 45-60-75 tr (=3-4-5 times), finish with A.4 over the next 9 tr. Work to and with 6th row. Put piece aside and work left shoulder. REMEMBER THE CROCHET TENSION! LEFT SHOULDER - FRONT PIECE: Work first row as on right shoulder - front piece = 63-78-93 tr. Work next row (= from RS) as follows: A.5 over the first 7 tr, A.2 over the next 45-60-75 tr (=3-4-5 times), A.3 over the next 9 tr, finish with 1 tr in each of the next 2 tr (= edge sts). Work to and with 6th row - NOTE: Fasten sl st at the end of A.5 in right shoulder so that the shoulder are fastened tog. Cut the yarn and beg to work from RS over both shoulders. FRONT PIECE: Continue on diagram (= 7th row), i.e. work next row (= from RS) as follows: 1 dc in each of the first 2 tr (= edge sts), A.1 over the next 7 tr, A.2 over the next 135-165-195 tr/ch (= 9-11-13 times) - NOTE: See last row in A.4/A.5 on how 7th row is worked over the middle 2 repetitions, A.3 over the next 9 tr, finish with 1 dc in each of the next 2 tr (= edge st). Work diagram A.1/A.2/A.3 1 time in total vertically (NOTE! You also begin and finish with 1 dc in first and last 2 dc's on row 8 and hereafter you work 1 tr in first 2 and last st on remaining rows)= 155-185-215 tr on last row. Work next row (= from WS) as follows: 1 tr in each of the first 2 tr, A.10 over the next 51-66-69 tr (= 17-22-23 times), A.9 over the next 13 tr, A.8 over the next 24-24-48 tr (= 1-1-2 times), A.7 over the next 12 tr, A.6 over the next 51-66-69 tr (= 17-22-23 times), finish with 1 tr in each of the next 2 tr. Work to and with 3rd row. Then work A.X 2-2-3 times in total vertically. Then work A.Y 1-1-0 times in total vertically. Work next row (= from RS) as follows: Work 1 tr in every tr/dc, 1 tr around every ch, 2 tr around every ch-space with 2 ch, 3 tr around every ch-space with 3 ch and 4 tr around every ch-space with 5 ch = 155-185-215 tr. Work next row (= from WS) as follows: Work 1 tr in each of the first 2 tr, A.3 over the next 9 tr, A.2 over the next 135-165-195 tr (= 9-11-13 times), A.1 over the next 7 tr, finish with 1 tr in each of the next 2 tr. Work A.3/A.2/A.1 1 time in total vertically = 155-185-215 tr on last row. Work next row (= from RS) as follows: Work 1 tr in each of the first 2 tr, A.11 over the next 7 tr, A.12 over the next 135-165-195 tr (= 9-11-13 times), A.13 over the next 7 tr, finish with 1 tr in each of the next 2 tr. Work A.11/A.12/A.13 1 time in total vertically. Work next row (= from WS) as follows: Work 1 tr in each of the first 2 tr, A.16 over A.13, A.15 over A.12 and A.14 over A.11. Then work 4th and 5th row in A.1/A.2/A.3, i.e. work next row (= from RS) as follows: Work 1 tr in each of the first 2 tr, A.1 over A.14, A.2 over A.15, A.3 over A.16, finish with 1 tr in each of the next 2 tr. Fasten off. LEFT SHOULDER - BACK PIECE: Work in left shoulder on front piece but in opposite direction, beg from WS. Instead of working ch and first tr-row work as follows: Work 1 dc in each of the 78-93-108 tr. Then work as right shoulder - front piece. RIGHT SHOULDER - BACK PIECE: Work in right shoulder on front piece but in opposite direction, beg from WS. Instead of working ch and first tr-row work as follows: Work 1 dc in each of the 78-93-108 tr. Then work as left shoulder - front piece. BACK PIECE: Continue as on front piece. NECK EDGE: Beg on one shoulder, work as follows along the entire neck from RS: 2 dc around every tr-row, 1 ch, 3 dc around every dtr row/ch-space, 1 ch etc. Finish with 1 sl st in first dc. Fasten off. TWINED STRING: Cut 2 lengths Cotton Merino yarn of 6 metres each. Twine the strands tog until they resist, fold the string double so that it twines again. Tie a knot in each end and thread it through a hole in the side on front and back piece, approx. 26-27-28 cm down from shoulder, tie a bow. Make another string and fasten it to the other side of poncho. |
|||||||||||||||||||||||||||||||||||||||||||||||||||||||||||||||||||
Diagram explanations |
|||||||||||||||||||||||||||||||||||||||||||||||||||||||||||||||||||
|
|||||||||||||||||||||||||||||||||||||||||||||||||||||||||||||||||||
 |
|||||||||||||||||||||||||||||||||||||||||||||||||||||||||||||||||||
 |
|||||||||||||||||||||||||||||||||||||||||||||||||||||||||||||||||||
 |
|||||||||||||||||||||||||||||||||||||||||||||||||||||||||||||||||||
 |
|||||||||||||||||||||||||||||||||||||||||||||||||||||||||||||||||||
 |
|||||||||||||||||||||||||||||||||||||||||||||||||||||||||||||||||||
Have you finished this pattern?Tag your pictures with #dropspattern #gracefulmermaidponcho or submit them to the #dropsfan gallery. Do you need help with this pattern?You'll find 9 tutorial videos, a Comments/Questions area and more by visiting the pattern on garnstudio.com. © 1982-2026 DROPS Design A/S. We reserve all rights. This document, including all its sub-sections, has copyrights. Read more about what you can do with our patterns at the bottom of each pattern on our site. |
|||||||||||||||||||||||||||||||||||||||||||||||||||||||||||||||||||


With over 40 years in knitting and crochet design, DROPS Design offers one of the most extensive collections of free patterns on the internet - translated to 17 languages. As of today we count 324 catalogues and 12245 patterns translated into English (UK/cm). 12245
We work hard to bring you the best knitting and crochet have to offer, inspiration and advice as well as great quality yarns at incredible prices! Would you like to use our patterns for other than personal use? You can read what you are allowed to do in the Copyright text at the bottom of all our patterns. Happy crafting!
Post a comment to pattern DROPS 168-29
We would love to hear what you have to say about this pattern!
If you want to leave a question, please make sure you select the correct category in the form below, to speed up the answering process. Required fields are marked *.