
Popular categories
Looking for a yarn?


Comments / Questions (14)
![]() Mary wrote:
Mary wrote:
I cannot understand how the pattern works as I struggle with these diagram things. If I have increased to 22 stitches how come I am only knitting 9 two rows later? What happened to the rest? What am I supposed to be doing in the 'blank' spaces of the diagram? How I hate those things.
01.11.2025 - 14:39
![]() Sara wrote:
Sara wrote:
Hej, jag förstår inte Tips rutan. Det står "de extra maskorna läggs till I början och slutet av v" Menas det, om jag tex lagt till 8 maskor då lägger till 4m i början och 4m. Vad innebär det sen i nästa instruktion, i slutet av varv 5= "sticka tills det återstår 11m + de extra du lagt till" betyder att jag ska tänka 11+4 eftersom det är i slutet av varvet eller betyder det ALLA maskor jag lagt till dvs 11+8m? Vänligen, Sara
04.10.2025 - 15:52
![]() Veronique wrote:
Veronique wrote:
Bonjour’ je ne comprends pas le diagramme à partir du 4 ème rang. Le dessin signifie qu'il faut tout tricoter à, endroit mais en explications vous dites que seu,es les jetées doivent être tricotée à, endroit.? Ensuite on en fait quoi au 5 ème rang des mailles en plus.? Merci à vous
23.09.2025 - 11:17DROPS Design answered:
Bonjour Véronique, dans cette vidéo, nous montrons comment tricoter la citrouille, notez que les ronds noirs se tricotent à l'endroit sur l'envers, les jetés du 3ème rang seront tricotés torse pour éviter un trou; au rang suivant, on ne tricote pas toutes les mailles = rangs raccourcis pour donner forme à la citrouille, la vidéo devrait vous aider à bien comprendre comment on doit procéder. Bon tricot!
24.09.2025 - 16:45
![]() Finnie wrote:
Finnie wrote:
Sehr gut beschriebene Anleitung und das Video war mir auch sehr hilfreich, da ich solche Ab- und Zunahmen noch nie gestrickt habe. Ich habe den Kürbis auch noch ein klein wenig abgebunden nach dem zusammennähen. Sieht wirklich total toll aus! Danke für die Anleitung! Ich habe schon viele von euch gehäkelt oder gestrickt.
18.11.2024 - 07:24
![]() Judith wrote:
Judith wrote:
Once again lovely pattern spoiled by inserts of 'advice/suggests' - useful but please put at end
05.10.2019 - 15:36
![]() Gaynor wrote:
Gaynor wrote:
Looks lovely can’t wait to make some
05.10.2019 - 10:04
![]() Melissa wrote:
Melissa wrote:
Wha do you mean when you say remember the knitting gauge bind off?
23.08.2019 - 21:26DROPS Design answered:
Dear Melissa, you've to pain attention to maintain the same gauge as indicated when working the diagrams. Happy knitting!
25.08.2019 - 16:32
![]() Evelyn Ullås wrote:
Evelyn Ullås wrote:
Jeg forstår ikke oppskriften, forstår ikke det der med snu midt i å strikke tilbake, er det slik at du må strikke mønster diagrammet flere ganger???
22.10.2018 - 21:01DROPS Design answered:
Hei Evelyn. Jeg regner med du mener etter at du har plukket opp masker langs høyre side (sett fra retten). Når du har plukket opp masker skal du strikke en omgang fra vrangen, du må derfor snu arbeidet ditt ettersom du har plukket opp maskene fra retten og har alle masker på høyre pinne. Du har allerede strikket diagrammet 6 ganger i høyden, og skal ikke strikke diagrammet flere ganger. Høyre siden av arbeidet ditt = toppen av gresskaret, og det er her du plukker opp masker til stilken. God fornøyelse
23.10.2018 - 08:48
![]() Doris wrote:
Doris wrote:
Hallo, ich habe die Kürbisse gerade nachgearbeitet und bin wirklich begeistert. Die Videoanleitung hat mir sehr gut geholfen. Dankeschön für diese schöne Anleitung.
20.10.2018 - 17:03
![]() Hanne wrote:
Hanne wrote:
Hejsa. Jeg vil spørge om I mon kunne lave en mini-udgave af græskarrene? De bliver rigtig flotte og jeg hækler til familien lidt hver aften, men de tager lang tid for mig. Et lille - sådan ca 5 cm - ville være dejligt og jeg kan ikke selv finde ud af at ændre opskriften. På forhånd tak - Hanne
05.10.2018 - 08:11DROPS Design answered:
Hej Hanne, det mindste er kun ca 5,5 cm, det finder du nederst i opskriften. God fornøjelse!
09.10.2018 - 09:10
|
|||||||||||||
The Patch#dropsthepatch |
|||||||||||||
 |
 |
||||||||||||
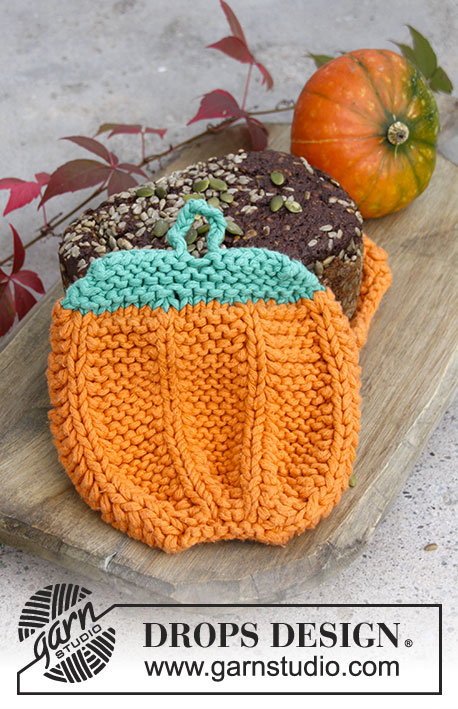
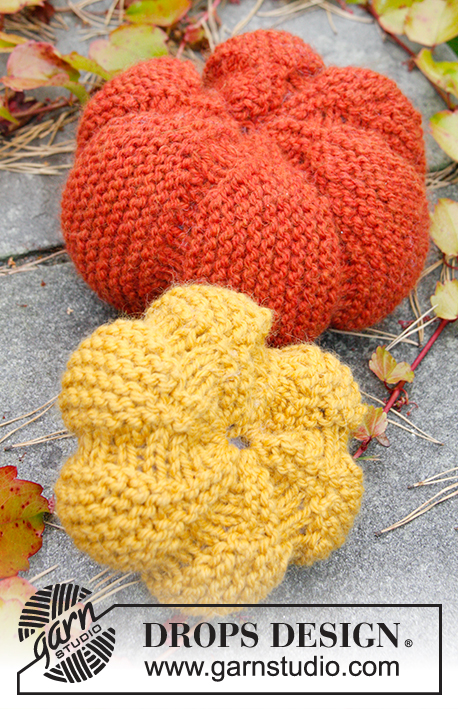
DROPS Halloween: Knitted DROPS pumpkin in "Nepal".
DROPS Extra 0-1170 |
|||||||||||||
|
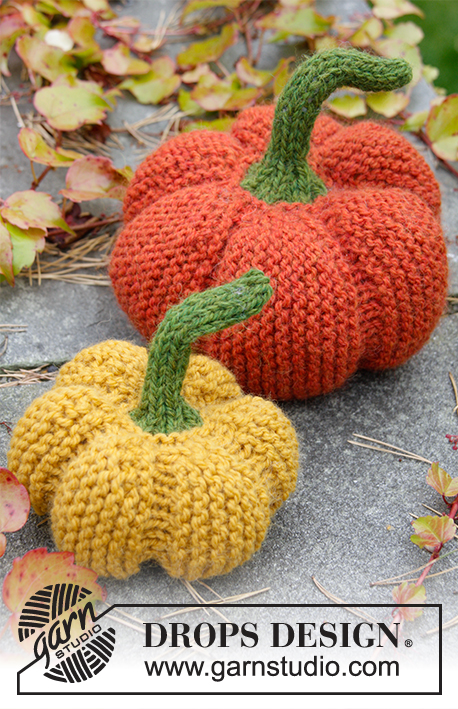
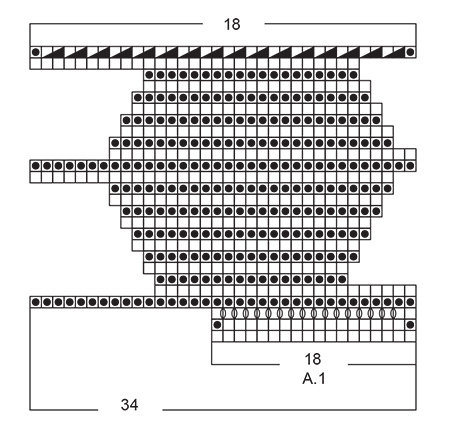
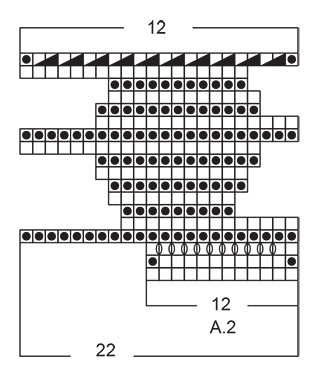
TIP: If you want a larger pumpkin cast on more sts and work more row vertically by doing as follows: Cast on half the no of sts on desired height of pumpkin (must be divisible by 2) + 1 edge st in each side (= 1st row in diagram). Cast on the extra sts at the beg and end of row. I.e. on first row with short rows from RS (= 5th row in diagram A.1) work until 11 sts remain + the extra sts you cast on, before working back from WS (= 6th row in diagram) until 6 sts remain + the extra sts you cast on. Work back and forth the same way as in diagram, but continue short rows until 7 sts remain from RS and 2 sts from WS before working over all sts (= 15th row in diagram). Follow the same procedure until dec row (= last row in diagram). PATTERN: See diagrams A.1 and A.2. Diagrams show pattern seen from RS, 1st row = RS. ---------------------------------------------------------- LARGE PUMPKIN: Worked back and forth on needle. Cast on 18 sts on needle size 5 mm with orange - READ TIP. Work A.1 6 times in total vertically. REMEMBER THE KNITTING TENSION Cast off. STEM: Work back and forth from the side of pumpkin (along first st from edge from RS). Pick up 26 sts evenly with orange along right edge (seen from RS in knitting direction), beg from RS, turn and K 1 row from WS. Switch to olive and work in stocking st with 1 edge st in each side - AT THE SAME TIME on every row from RS dec 6 sts evenly until there are 8 sts on row. On next row from WS, dec 1 edge st in each side by P 2 tog = 6 sts. Now only work from RS without cutting the yarn: K over these 6 sts until stem measures approx. 11 cm (measured from beg with olive). Cut the yarn and pull it through all the sts, tighten tog and fasten. ASSEMBLY: Sew tog stem inside 1 edge st with olive. Fill the stem with some cotton wool. Sew tog pumpkin in the side by sewing cast-on and cast-off edge tog in outer loops of edge sts with orange. Fill the pumpkin with some cotton wool - NOTE: Do not overstuff it, but fill a little amount in each arch and a little amount in the middle of the pumpkin. Baste in edge sts around the entire bottom, tighten tog and then baste up and down around opening. Fasten off. ---------------------------------------------------------- SMALL PUMPKIN: Worked back and forth on needle. Cast on 12 sts on needle size 5 mm with goldenrod. Work A.2 6 times in total vertically. REMEMBER THE KNITTING TENSION Cast off. STEM: Work back and forth from the side of pumpkin (along first st from edge from RS). Pick up 20 sts evenly with goldenrod along right edge (seen from RS in knitting direction), beg from RS, turn and K 1 row from WS. Switch to olive and work in stocking st with 1 edge st in each side - AT THE SAME TIME on every row from RS dec 6 sts evenly until there are 8 sts on row. On next row from WS, dec 1 edge st in each side by P 2 tog = 6 sts. Now only work from RS without cutting the yarn: K over these 6 sts until stem measures approx. 9 cm (measured from beg with olive). Cut the yarn and pull it through all the sts, tighten tog and fasten. ASSEMBLY: Sew tog stem inside 1 edge st with olive. Fill the stem with some cotton wool. Sew tog pumpkin in the side by sewing cast-on and cast-off edge tog in outer loops of edge sts with goldenrod. Fill the pumpkin with some cotton wool - NOTE: Do not overstuff it, but fill a little amount in each arch and a little amount in the middle of the pumpkin.. Baste in edge sts around the entire bottom, tighten tog and then baste up and down around opening. Fasten off. |
|||||||||||||
Diagram explanations |
|||||||||||||
|
|||||||||||||
 |
|||||||||||||
 |
|||||||||||||
Have you finished this pattern?Tag your pictures with #dropspattern #dropsthepatch or submit them to the #dropsfan gallery. Do you need help with this pattern?You'll find 18 tutorial videos, a Comments/Questions area and more by visiting the pattern on garnstudio.com. © 1982-2026 DROPS Design A/S. We reserve all rights. This document, including all its sub-sections, has copyrights. Read more about what you can do with our patterns at the bottom of each pattern on our site. |
|||||||||||||


With over 40 years in knitting and crochet design, DROPS Design offers one of the most extensive collections of free patterns on the internet - translated to 17 languages. As of today we count 324 catalogues and 12290 patterns translated into English (UK/cm). 12290
We work hard to bring you the best knitting and crochet have to offer, inspiration and advice as well as great quality yarns at incredible prices! Would you like to use our patterns for other than personal use? You can read what you are allowed to do in the Copyright text at the bottom of all our patterns. Happy crafting!
Post a comment to pattern DROPS Extra 0-1170
We would love to hear what you have to say about this pattern!
If you want to leave a question, please make sure you select the correct category in the form below, to speed up the answering process. Required fields are marked *.