
Popular categories
Looking for a yarn?


Comments / Questions (59)
![]() Judith Andersen wrote:
Judith Andersen wrote:
Har jeg ret i at et mønster strikkes fra Højre mod Venstre blev lige pludselig i tvivl Med venlig hilsen Judithe Andersen
07.02.2019 - 00:18DROPS Design answered:
Hej Judith, ja det stemmer, du strikker fra nederst i højre hjørne af diagrammet fra retsiden og næste pind strikkes fra vrangen ifølge 2.pind fra venstre i diagrammet (dvs i vrang da diagrammet ses fra retsiden). God fornøjelse!
07.02.2019 - 15:54
![]() Pascale wrote:
Pascale wrote:
Désolée, je viens de m'en apercevoir. L'avantage, ayant du défaire une dizaine de fois mon ouvrage, cette laine se tient bien !
05.09.2018 - 19:47
![]() Pascale wrote:
Pascale wrote:
Bonjour En lisant le commentaire de Geoffroy, du 16.05.2016 - 22:28: Je suis d\'accord. Je n\'ai tricoté que quelques rangs, mais ça ne correspond pas à la photo. Par exemple, à la pointe, c\'est à dire, en début d\'ouvrage, je vois sur la photo 7 jeté successifs, entre des mailles ensembles (ou surjet), alors qu\'il est indiqué de tricoté 3 mailles au point mousse dans les explications....
31.08.2018 - 23:33DROPS Design answered:
Bonjour Pascale, le châle se tricote de haut en bas, c'est-à-dire que l'on commence par 9 mailles seulement et on va augmenter 4 m tous les 2 rangs sur l'endroit pour former le triangle. La pointe sera formée par la maille centrale (= avec 1 augm de chaque côté de cette maille jersey). Bon tricot!
04.09.2018 - 11:33
![]() M Madeleine wrote:
M Madeleine wrote:
Merci pour votre aide. Je rabats donc sur l'envers à l'envers mais les explications précisent "tricoter le 1er jeté à l'end et le 2ème jeté torse à l'end" Donc les mailles à l'envers sauf les jetés à l'endroit?
13.04.2018 - 15:21DROPS Design answered:
Bonjour M Madeleine et oups, vous avez raison, on rabat à l'endroit sur l'envers (les mailles et les jetés). Bon tricot!
13.04.2018 - 16:00
![]() M Madeleine wrote:
M Madeleine wrote:
Bonjour, Est ce que je dois rabattre sur l'endroit (donc tricoter un rang envers d'abord) ou sur l'envers? merci de votre réponse Cordialement
13.04.2018 - 15:03DROPS Design answered:
Bonjour M Madeleine, rabattez au rang suivant après les diagrammes, c'est-à-dire à l'envers sur l'envers. Bon tricot!
13.04.2018 - 15:09
![]() Cinzia Pierobon wrote:
Cinzia Pierobon wrote:
Scusate se vi importano ancora, ma ho appena finito il modello, e, pur avendo seguito alla lettera le istruzioni riguardanti il nr di ferri ed il filato lace, io non ho consumato completamente neanche il primo gomitolo e il modello, dopo il bloccaggio, mi è venuto molto più piccolo delle misure da voi date. Non riesco a capire quale errore possa aver commesso. Spero di avere da voi dei chiarimenti. Grazie ancora della vostra disponibilità.
12.10.2017 - 17:31DROPS Design answered:
Buongiorno Cinzia, ci dispiace per l'accaduto: in questo modello la tensione non è fondamentale, ma ha provato a fare un campione e verificare che 24 maglie x 32 ferri corrispondano a 10 x 10 cm lavorati a maglia rasata con i ferri n° 3 mm? Buon lavoro!
12.10.2017 - 17:57
![]() Cinzia Pierobon wrote:
Cinzia Pierobon wrote:
Buongiorno vorrei sapere se il filato Drops lace va usato doppio, in quanto non mi sembra ci sia scritto nelle istruzioni, e, usandolo singolo,lo scialle viene molto piccolo.Grazie della vostra disponibilità.
10.10.2017 - 10:13DROPS Design answered:
Buongiorno Cinzia. Il filato va usato singolo, non doppio. Una volta terminato lo scialle deve essere bloccato e portato alle misure finali. Buon lavoro!
10.10.2017 - 15:41
![]() Astrid Margrethe Stabæk wrote:
Astrid Margrethe Stabæk wrote:
Er det mulig og bygge på mer, ved å for eksempel ta A.2 - A.4 enda flere ganger ? (A.3 gjentas nå 3 ganger) Og når jeg skal avslutte da så blir det bare flere av de midterste (A.6, A.9, A12 osv)? Eller kommer jeg bare til å rote det til da?
08.03.2017 - 13:57DROPS Design answered:
Hej Astrid. Jeg tror det er muligt at lave det laengere. Jeg ville ogsaa strikke A.2-A.4 flere gange og eventuelt ogsaa A.5 til A.10 mere, men det er vigtigt at du regner ud hvor meget mere, saa efterfölgende diagrammer ogsaa kommer til at passe. Held og lykke med det :)
08.03.2017 - 14:02
![]() Marina Vreugdenhil wrote:
Marina Vreugdenhil wrote:
Is het ook mogelijk de omslagdoek groter te maken, bijvoorbeeld door het middelste gedeelte te verlengen of extra randen met bladeren aan de onderkant?
14.01.2017 - 00:18DROPS Design answered:
Hoi Marina. Ik zou dan het middelste stuk verlengen (dus blijven bij 1 rand van bladeren)
16.01.2017 - 12:42
![]() Lucia wrote:
Lucia wrote:
Vorrei sapere se per fare questo modello servono 350 g di BABYALPACA SILK n. 3609 rosso.... a me sembra troppo... siete sicuri del peso? sono 7 gomitoli da 50 g penso che avete sbagliato!!! grazie aspetto risposta.
08.08.2016 - 20:01DROPS Design answered:
Buongiorno Lucia. Non sono stati segnalati errori nella quantità di filato indicata, da chi ha già eseguito il modello. Possiamo chiedere una verifica alla casa madre. Nel caso, la correzione verrà inserita online. Buon lavoro!
08.08.2016 - 20:14
|
|||||||||||||||||||
Autumn Leaf#autumnleafshawl |
|||||||||||||||||||
|
|
|||||||||||||||||||
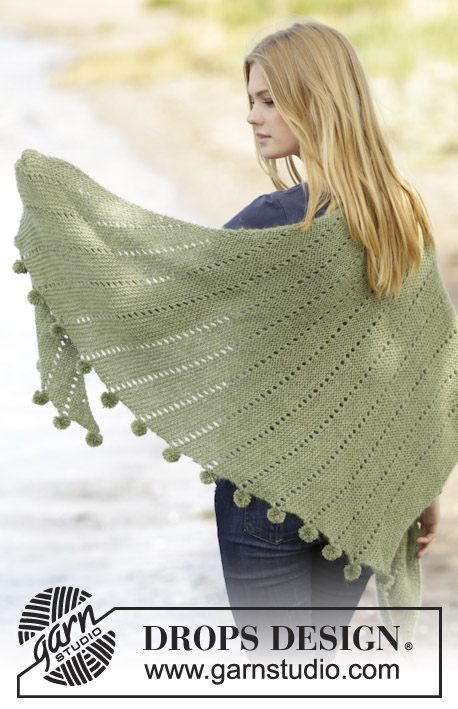
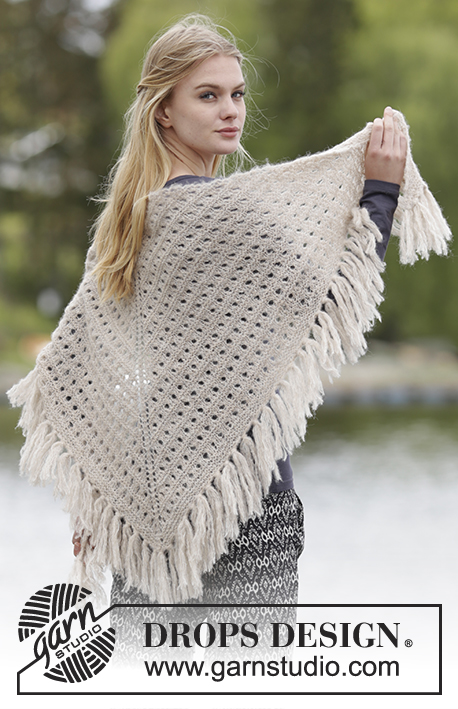
Knitted DROPS shawl with lace pattern and leaves in "Lace" or "BabyAlpaca Silk".
DROPS 164-41 |
|||||||||||||||||||
|
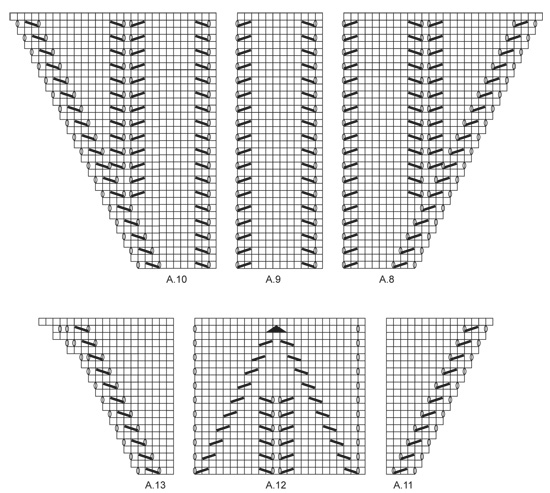
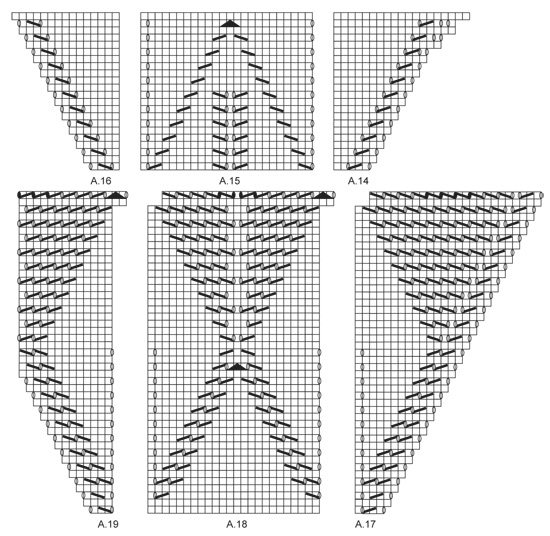
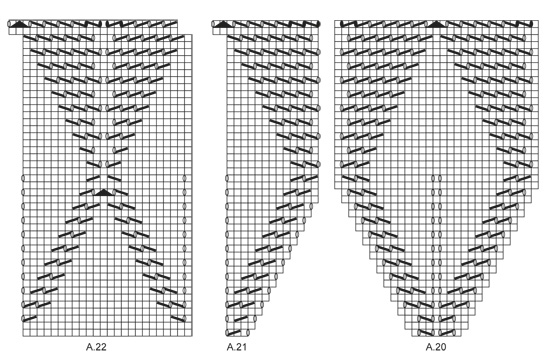
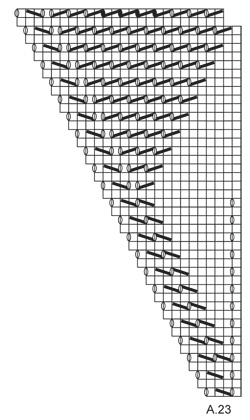
GARTER ST (back and forth): K all rows. 1 ridge = 2 rows K. PATTERN: See diagrams A.1 to A.23. The diagrams show all rows in pattern seen from RS. KNITTING TIP: The shawl can be knitted with other needle sizes than those given here. Use smaller needles for a smaller shawl and larger needles for a larger shawl. Stretch the shawl to side at the end and even out possible uneven places. SHAPING: When using another yarn than Lace from yarn group A, there is no need to stretch to measurements, but place it gently out in shape. Leave to dry. Repeat the process when the garment has been washed. ---------------------------------------------------------- SHAWL: Worked back and forth on circular needle to make room for all the sts. READ KNITTING TIP! Cast on 9 sts with Lace or BabyAlpaca Silk on circular needle size 3 mm and K 1 row from WS. Work in GARTER ST - see explanation above as follows (= RS): K 3, 1 YO, K 1, 1 YO, K 1, 1 YO, K 1, 1 YO, K 3 = 13 sts. Insert 1 marker in the middle st and move it upwards when working. Then inc 4 sts on every row from RS as follows: Inc 1 st inside 3 edge sts in each side and 1 st on each side of mid st. Inc like this 5 times in total, there are 33 sts on the needle. Now work according to diagram A.1 as follows: 3 edge sts in garter st, A.1 over the next 13 sts, 1 st in stocking st (= mid st, always worked in stocking st), A.1 over 13 sts and 3 edge sts in garter st. Work A.1 1 time vertically = 61 sts on needle (i.e. 30 sts on each side of mid st). Work according to diagram A.2-A.4 as follows: 3 edge sts in garter st, A.2 over 7 sts, A.3 over 14 sts, A.4 over 6 sts, 1 mid st, A.2 over 7 sts, A.3 over 14 sts, A.4 over 6 sts and 3 edge sts in garter st. When A.2-A.4 have been worked 1 time vertically, there is room for 1 more repetition of A.3 between A.2 and A.4. Continue to work according to diagram until diagram A.2-A.4 have been worked 3 times in total vertically = 145 sts on needle (i.e. 72 sts on each side of mid st). Work according to diagram A.5-A.10 as follows: 3 edge sts in garter st, A.5 over 11 sts, repeat A.6 until 10 sts remain before mid st, A.7 over 10 sts, 1 mid st, A.8 over 10 sts, repeat A.9 until 14 sts remain, A.10 over 11 sts and 3 edge sts in garter st. Work A.5-A.10 1 time vertically = 217 sts on needle (i.e. 108 sts on each side of mid st). Work diagram A.11-A.16 as follows: 3 edge sts in garter st, A.11 over 4 sts, repeat A.12 until 5 sts remain before mid st, A.13 over 5 sts, 1 mid st, A.14 over 5 sts, repeat A.15 until 7 sts remain, A.16 over 4 sts and 3 edge sts in garter st. Work diagram A.11-A.16 1 time vertically = 267 sts on needle (i.e. 133 sts on each side of mid st). Work diagram A.17-A.23 as follows: 3 edge sts in garter st, A.17 over 4 sts, repeat A.18 until 6 sts remain before mid st, A.19 over 3 st, A.20 over 7 sts (mid st is in the middle of these sts), A.21 over 3 st, repeat A.22 until 7 sts remain, A.23 over 4 sts and 3 edge sts in garter st. When diagrams have been worked 1 time vertically, loosely cast off. NOTE: Work double YOs on last row in diagram as follows when casting off: K 1st YO, K 2nd YO twisted. BLOCKING: Place the shawl in lukewarm water until it is soaking wet. Carefully squeeze the water out of the shawl - do not twist the shawl - then roll the shawl in a towel and squeeze to remove more water - the shawl will now only be moist. When using BabyAlpaca Silk – READ SHAPING! Place the shawl on a carpet or mattress - carefully stretch it out to size and fasten it with pins, pull in the tips of leaves along the cast-off edge. Leave to dry. Repeat the process when the shawl has been washed. |
|||||||||||||||||||
Diagram explanations |
|||||||||||||||||||
|
|||||||||||||||||||
 |
|||||||||||||||||||
 |
|||||||||||||||||||
 |
|||||||||||||||||||
 |
|||||||||||||||||||
 |
|||||||||||||||||||
Have you finished this pattern?Tag your pictures with #dropspattern #autumnleafshawl or submit them to the #dropsfan gallery. Do you need help with this pattern?You'll find 16 tutorial videos, a Comments/Questions area and more by visiting the pattern on garnstudio.com. © 1982-2026 DROPS Design A/S. We reserve all rights. This document, including all its sub-sections, has copyrights. Read more about what you can do with our patterns at the bottom of each pattern on our site. |
|||||||||||||||||||


With over 40 years in knitting and crochet design, DROPS Design offers one of the most extensive collections of free patterns on the internet - translated to 17 languages. As of today we count 324 catalogues and 12290 patterns translated into English (UK/cm). 12290
We work hard to bring you the best knitting and crochet have to offer, inspiration and advice as well as great quality yarns at incredible prices! Would you like to use our patterns for other than personal use? You can read what you are allowed to do in the Copyright text at the bottom of all our patterns. Happy crafting!
Post a comment to pattern DROPS 164-41
We would love to hear what you have to say about this pattern!
If you want to leave a question, please make sure you select the correct category in the form below, to speed up the answering process. Required fields are marked *.