
Popular categories
Looking for a yarn?


Comments / Questions (60)
![]() Marie-Odile WROBEL wrote:
Marie-Odile WROBEL wrote:
Il semblerait qu'il y a un problème avec le 1er rang A1. Sur 33 m 3 points mousse et ensuite le diagramme. Mais en suivant le diagramme ça ne fait pas 13 ma mais 12. Ou faut il ne pas faire de maille endroit entre les deux mailles ensemble. J'avoue que je suis un peu perdue et je ne suis pas débutante. Merci beaucoup pour votre réponse
16.03.2025 - 06:56DROPS Design answered:
Bonjour Mme Wrobel, A.1 se tricote bien sur 13 mailles en augmentant 2 mailles au 1er rang, ainsi: 1 jeté, 1 m end, 1 diminution, 1 jeté, 1 m end, 1 diminution, 1 jeté, 1 m end, 1 jeté, 1 diminution, 1 m end, 1 jeté, 1 diminution, 1 m end, 1 jeté = 15 m à la fin de ce rang. Bon tricot!
17.03.2025 - 08:44
![]() WROBEL wrote:
WROBEL wrote:
Sur ce modèle il y a possibilité de le tricoter avec 2 laines. Si je convertie en métrage drops lace =2 pelotes =800 mètres et baby alpaca 7 pelotes =1169 mètres. Il doit y avoir un petit problème beaucoup de différence entre les métrages. Merci d'avoir la gentillesse de me répondre
10.03.2025 - 08:27DROPS Design answered:
Bonjour Mme Wrobel, cette différence est due aux caractéristiques différentes des deux laines, pour plus de sûreté, prenez la quantité Baby Alpaca Silk en référence car nous n'avons plus de laine type Lace actuellement. Bon tricot!
10.03.2025 - 10:12
![]() Marie-Odile WROBEL wrote:
Marie-Odile WROBEL wrote:
Pour une laine lace 800gr et l'autre laine 1168 gris c'est la le problème. Est-ce que 800gr suffit ou est ce qu'il faut 1168 gros ?
04.03.2025 - 11:55DROPS Design answered:
Bonjour Mme Wrobel, le "m" est resté au bout de mes doigts... 1 écheveau DROPS Lace pesait 100 g pour 800 mètres de fil - Tricoté en Baby Alpaca Silk, il fallait environ 350 g (soit 7 pelotes de 50 g/167 m la pelote), utilisez le convertisseur pour voir les alternatives possibles, ce sera ensuite plus simple pour vous de vous décider. Notez que votre magasin saura vous conseiller et vous guider, même par mail ou téléphone. Bon tricot!
04.03.2025 - 17:28
![]() Marie-Odile WROBEL wrote:
Marie-Odile WROBEL wrote:
Beaucoup de différence pour la quantité de laine. Je ne sais pas quelle est le métrage nécessaire pour ce châle. Merci beaucoup de me répondre
04.03.2025 - 06:28DROPS Design answered:
Bonjour Mme Wrobel, la différence de poids pour chacune de ses laines dépend de leur métrage, Lace faisait environ 800 pour un écheveau de 100 g, Baby Alpaca Silk se présentait en pelotes de 50 g/167 m. Notez qu'aucune de ces 2 laines n'est encore disponible, vous pouvez ainsi essayer notre convertisseur qui vous indiquera la quantité nécessaire dans la laine choisie. Bon tricot!
04.03.2025 - 09:27
![]() Renate Heesakkers wrote:
Renate Heesakkers wrote:
\"Als A.2-A.4 1 keer in de hoogte is gebreid, is er ruimte voor nog 1 herhaling van A.3 tussen A.2 en A.4. \"\r\nIk begrijp deze instructie niet.\r\nBrei ik over de hele lijn patroon A3 of alleen tussen A2-A4, zodat ik 2 afzonderlijke delen heb ?
02.08.2024 - 14:47DROPS Design answered:
Dag Renate,
Je breit A.3 tussen A.2 en A.4, maar als je de patronen 1 keer in de hoogte hebt gebreid, dan heb je meer steken op de naald en kun je A.3 2 keer tussen A.2 en A.4 breien.
03.08.2024 - 10:59
![]() Kassalia Maria wrote:
Kassalia Maria wrote:
Liebes Team wenn ich die ersten 13M gestrickt habe bei A1 bleiben noch 7M übrig wie komme ich weiter vielen dank
01.03.2023 - 09:51DROPS Design answered:
Liebe Frau Kassalia, wenn Sie so stricken: 3 M kraus rechts, A.1 (= 13 M), 1 M glatt rechts (Mittel-M), A.1 (=13M) und 3 M kraus rechts stricken Sie: 3+13+1+13+3=33 Maschen (nach der 1. Reihe haben Sie 4 Maschen zugenommen). Schauen Sie mal ob 1. Reihe in A.1 richtig über 13 M gestrickt wurde. Viel Spaß beim stricken!
01.03.2023 - 10:07
![]() Kassalia Maria wrote:
Kassalia Maria wrote:
Hallo liebes Team ich versuche zum ersten mal ein solches tuch zu stricken Frage wird es von oben nach unten gestrickt ? Ich komme nicht klar bei A1 muß ich es doppelt stricken . VIELEN DANK
28.02.2023 - 17:21DROPS Design answered:
Liebe Frau Kassalia, ja genau, das Tuch wird von oben nach unten gestrickt. Zuerst sollen Sie krausrechts stricken und 4 Maschen bei jeder Hinreihe zunehmen bis 33 M sind. Dann stricken Sie so: 3 M kraus rechts, A.1 (= 13 M), 1 M glatt rechts (Mittel-M), A.1 (=13M) und 3 M kraus rechts. A.1 wird so beidseitig von der Mittel-M gestrickt. Viel Spaß beim stricken!
28.02.2023 - 17:59
![]() Fontaine wrote:
Fontaine wrote:
Bonjour, Les photos du modèle le montre en jersey endroit et les explications le donnent en point mousse. Je viens de le commencer, il ne correspond pas aux photos.... je suis seule dans ce cas ?
13.04.2022 - 23:53DROPS Design answered:
Bonjour Mme Fontaine, les tous premiers rangs du châle se tricotent au point mousse, puis lorsque l'on tricote les diagrammes, il est bien indiqué de tricoter: 1 m end sur l'endroit, env sur l'envers autrement dit jersey endroit. Ou bien ai-je mal compris votre question?
19.04.2022 - 14:22
![]() Milalala wrote:
Milalala wrote:
Oh, das hilft mir leider gar nicht: A2 beginnt eben nicht mit einem Umschlag, sondern mit einer (glatt) rechtsgestrickten Masche, d. h. am Anfang: drei kraus rechts gestrickte Maschen, dann eine glatt rechtsgestrickte Masche aus A2, dann der Umschlag. Ebenso bei der Mittelmasche: Mittelmasche, dann eine dann eine glatt rechtsgestrickte Masche aus A2, dann der Umschlag. So sieht es die Anleitung vor, was jedoch falsch aussieht.
15.12.2021 - 11:20DROPS Design answered:
Liebe Milalala, A.2 beginnt doch mit einem Umschlag und wird so über 7 Maschen gestrickt (Hinreihen liest man rechts nach links): 1 Umschlag, 1 re, 2 M re zs, 1 Umschlag, 1 re, 2 M re zs, 1 Umschlag, 1 re = es sind jetzt 8 M. Die MittelMasche wird nach dem Umschlag A.4 gestrickt, dann nach dieser Masche stricken Sie A.2 und damit immer bei Hinreihen mit 1 Umschlag anfangen. Kann das Ihnen helfen?
15.12.2021 - 11:55
![]() Milalala wrote:
Milalala wrote:
Im Anleitungsteil, in dem man 3 + A2 + A3 + A4 + 1 + A2 + A3 + A4 + 3 stricken soll, habe ich folgende Fragen: 1. Stimmt das so, dass es nicht symmetrisch ist? Soll es wirklich nicht 3 + A2 + A3 + A4 + 1 + A4 + A3 + A2 + 3 sein? 2. In diesem Teil schließt die Mittelmasche zum ersten Mal nicht an einen Umschlag an, was ich nicht verstehe: Aus A4 kommend gibt es einen Umschlag, dann die Mittelmasche, aber mit A2 fortfahrend kommt wieder eine rechte Masche. Kann das stimmen? Hilfe!
14.12.2021 - 20:59DROPS Design answered:
Liebe Milalala, so stimmt es, die beiden Seiten sind beidseitig von der Mittelmasche gleich: A.2-A.3-A.4. So stricken Sie weiter über A.1. Am Anfang der Reihe gibt es 1 Umschlag (vor der 1. Masche in A.2), am Ende A.4 vor der Mittelmasche, am Anfang A.2 nach der Mittelmasche und am Ende der Reihe am Ende A.4. Kann das Ihnen helfen?
15.12.2021 - 08:00
|
|||||||||||||||||||
Autumn Leaf#autumnleafshawl |
|||||||||||||||||||
|
|
|||||||||||||||||||
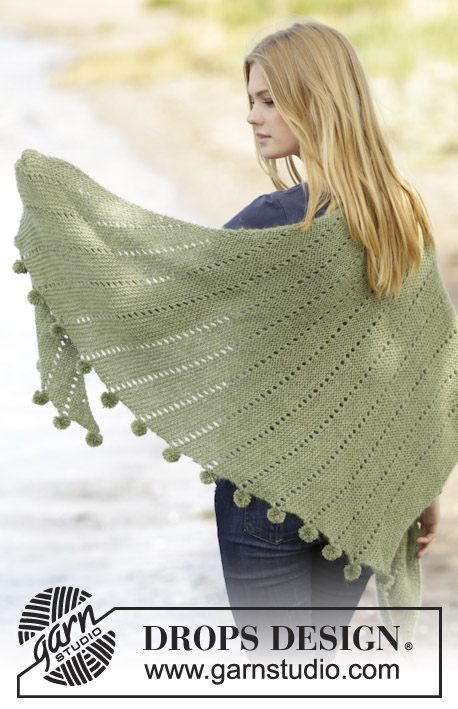
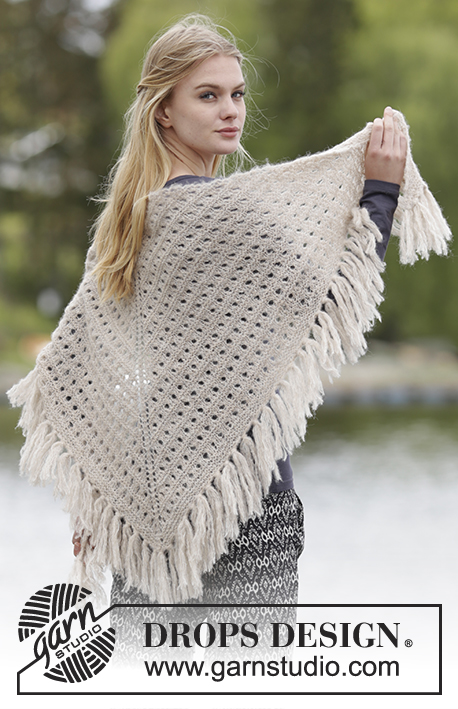
Knitted DROPS shawl with lace pattern and leaves in "Lace" or "BabyAlpaca Silk".
DROPS 164-41 |
|||||||||||||||||||
|
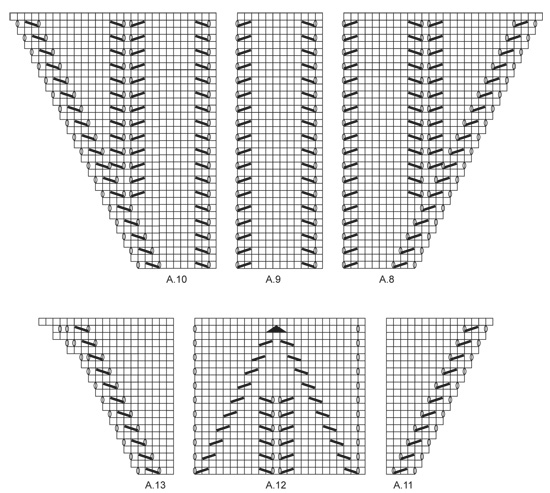
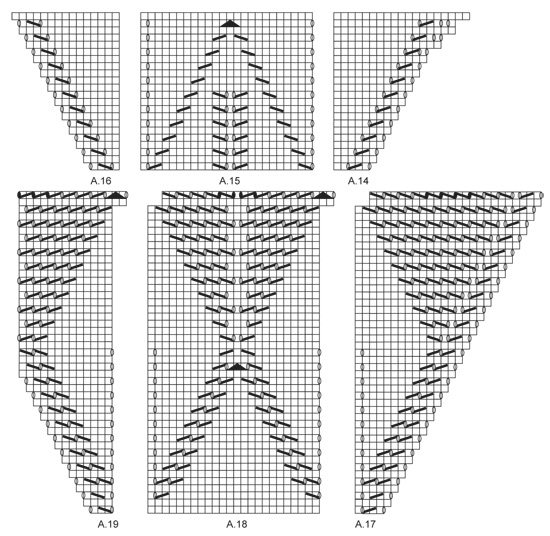
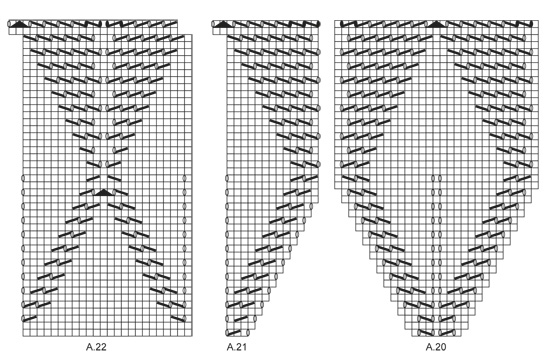
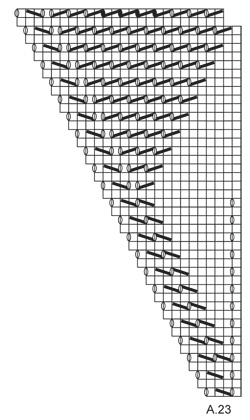
GARTER ST (back and forth): K all rows. 1 ridge = 2 rows K. PATTERN: See diagrams A.1 to A.23. The diagrams show all rows in pattern seen from RS. KNITTING TIP: The shawl can be knitted with other needle sizes than those given here. Use smaller needles for a smaller shawl and larger needles for a larger shawl. Stretch the shawl to side at the end and even out possible uneven places. SHAPING: When using another yarn than Lace from yarn group A, there is no need to stretch to measurements, but place it gently out in shape. Leave to dry. Repeat the process when the garment has been washed. ---------------------------------------------------------- SHAWL: Worked back and forth on circular needle to make room for all the sts. READ KNITTING TIP! Cast on 9 sts with Lace or BabyAlpaca Silk on circular needle size 3 mm and K 1 row from WS. Work in GARTER ST - see explanation above as follows (= RS): K 3, 1 YO, K 1, 1 YO, K 1, 1 YO, K 1, 1 YO, K 3 = 13 sts. Insert 1 marker in the middle st and move it upwards when working. Then inc 4 sts on every row from RS as follows: Inc 1 st inside 3 edge sts in each side and 1 st on each side of mid st. Inc like this 5 times in total, there are 33 sts on the needle. Now work according to diagram A.1 as follows: 3 edge sts in garter st, A.1 over the next 13 sts, 1 st in stocking st (= mid st, always worked in stocking st), A.1 over 13 sts and 3 edge sts in garter st. Work A.1 1 time vertically = 61 sts on needle (i.e. 30 sts on each side of mid st). Work according to diagram A.2-A.4 as follows: 3 edge sts in garter st, A.2 over 7 sts, A.3 over 14 sts, A.4 over 6 sts, 1 mid st, A.2 over 7 sts, A.3 over 14 sts, A.4 over 6 sts and 3 edge sts in garter st. When A.2-A.4 have been worked 1 time vertically, there is room for 1 more repetition of A.3 between A.2 and A.4. Continue to work according to diagram until diagram A.2-A.4 have been worked 3 times in total vertically = 145 sts on needle (i.e. 72 sts on each side of mid st). Work according to diagram A.5-A.10 as follows: 3 edge sts in garter st, A.5 over 11 sts, repeat A.6 until 10 sts remain before mid st, A.7 over 10 sts, 1 mid st, A.8 over 10 sts, repeat A.9 until 14 sts remain, A.10 over 11 sts and 3 edge sts in garter st. Work A.5-A.10 1 time vertically = 217 sts on needle (i.e. 108 sts on each side of mid st). Work diagram A.11-A.16 as follows: 3 edge sts in garter st, A.11 over 4 sts, repeat A.12 until 5 sts remain before mid st, A.13 over 5 sts, 1 mid st, A.14 over 5 sts, repeat A.15 until 7 sts remain, A.16 over 4 sts and 3 edge sts in garter st. Work diagram A.11-A.16 1 time vertically = 267 sts on needle (i.e. 133 sts on each side of mid st). Work diagram A.17-A.23 as follows: 3 edge sts in garter st, A.17 over 4 sts, repeat A.18 until 6 sts remain before mid st, A.19 over 3 st, A.20 over 7 sts (mid st is in the middle of these sts), A.21 over 3 st, repeat A.22 until 7 sts remain, A.23 over 4 sts and 3 edge sts in garter st. When diagrams have been worked 1 time vertically, loosely cast off. NOTE: Work double YOs on last row in diagram as follows when casting off: K 1st YO, K 2nd YO twisted. BLOCKING: Place the shawl in lukewarm water until it is soaking wet. Carefully squeeze the water out of the shawl - do not twist the shawl - then roll the shawl in a towel and squeeze to remove more water - the shawl will now only be moist. When using BabyAlpaca Silk – READ SHAPING! Place the shawl on a carpet or mattress - carefully stretch it out to size and fasten it with pins, pull in the tips of leaves along the cast-off edge. Leave to dry. Repeat the process when the shawl has been washed. |
|||||||||||||||||||
Diagram explanations |
|||||||||||||||||||
|
|||||||||||||||||||

|
|||||||||||||||||||
|
|||||||||||||||||||
|
|||||||||||||||||||
|
|||||||||||||||||||
|
|||||||||||||||||||
Have you finished this pattern?Tag your pictures with #dropspattern #autumnleafshawl or submit them to the #dropsfan gallery. Do you need help with this pattern?You'll find 16 tutorial videos, a Comments/Questions area and more by visiting the pattern on garnstudio.com. © 1982-2025 DROPS Design A/S. We reserve all rights. This document, including all its sub-sections, has copyrights. Read more about what you can do with our patterns at the bottom of each pattern on our site. |
|||||||||||||||||||


With over 40 years in knitting and crochet design, DROPS Design offers one of the most extensive collections of free patterns on the internet - translated to 17 languages. As of today we count 314 catalogues and 11822 patterns translated into English (UK/cm).
We work hard to bring you the best knitting and crochet have to offer, inspiration and advice as well as great quality yarns at incredible prices! Would you like to use our patterns for other than personal use? You can read what you are allowed to do in the Copyright text at the bottom of all our patterns. Happy crafting!
Post a comment to pattern DROPS 164-41
We would love to hear what you have to say about this pattern!
If you want to leave a question, please make sure you select the correct category in the form below, to speed up the answering process. Required fields are marked *.