
Popular categories
Looking for a yarn?
































Comments / Questions (75)
 Cecile wrote:
Bonjour, je voudrais savoir combien de cm je dois coudre pour la manche, étant donné que j'ai fait une taillée XXL ? Elle fait 36cm depuis le début du diagramme A2. Merci de votre réponse.
20.07.2026 - 14:34DROPS Design answered:
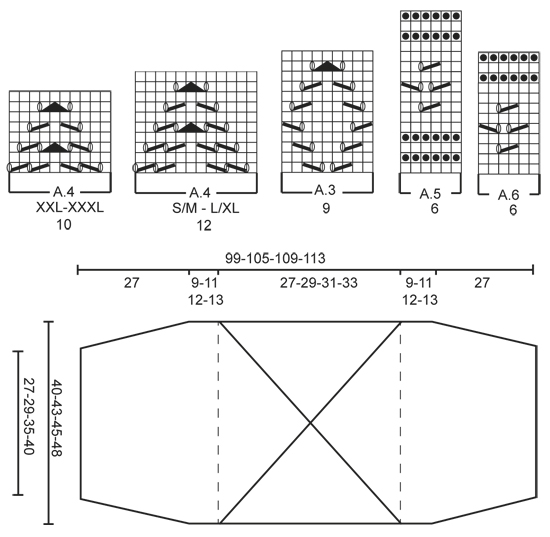
Bonjour Cécile, la couture des manches est de 27 cm pour toutes les tailles (cf explications et schéma), la longueur des manches varie en fonction de chaque taille car la partie avant la couture sera plus ou moins longue, mais la longueur de la couture est la même pour toutes les tailles. Bon tricot!
04.08.2026 - 09:11
Cecile wrote:
Bonne idée pour le marqueur , merci ! Par contre , je m’aperçois que j’ai tricoté tous les jetés torses dans le carré . Peut être devriez vous le préciser à nouveau dans l’explication au moment de commencer le dos car j’avais compris que c’était pour les jetés plus les augmentations. :( donc je n’ai pas les trous dans le carré, même on voit le dessin .
04.07.2026 - 14:38
Cecile wrote:
Bonjoir merci pour votre réponse. Donc si je comprends bien, après le 1er rang, on augmente 1 maille 5 fois. Ce qui fait au début des 1er rangs, 6/7/8/9/10 mailles a tricoter avant les 61 mailles de A2 ? Parce que mon premier dessin est décalé :(
03.07.2026 - 10:43DROPS Design answered:
Bonjour Cécile, tout à fait, vous allez augmenter 1 m de chaque côté tous les 2 rangs; mais en même temps, vous tricotez A.2 comme avant, les 61 m de A.2 doivent continuer et ne pas être "perturbées", les nouvelles mailles vont être tricotées en jersey. Mettez un marqueur si besoin avant et après les 61 m de A.2 pour bien continuer le motif. Bon tricot!
03.07.2026 - 16:54
Cecile wrote:
J'ai une autre question sur les mailles sur l'envers, doit on aussi tricoter les jetés torses ?
02.07.2026 - 13:09DROPS Design answered:
Bonjour Cécile, les jetés des diagrammes se tricotent normalement pour qu'ils créent les trous du point ajourés, les jetés des augmentations se tricotent torse pour éviter un trou. Bon tricot!
02.07.2026 - 15:33
Cecile wrote:
Bonjour, quand on commence A2 en taille XXL, dois je commencer CHAQUE rang endroit par 1 maille double + 4 mailles endroit ( 5 x si j'ai bien compris) avant de commencer le diagramme ? Car je me retrouve avec plus de mailles APRÈS le diagramme à la fin du rang qu'au début. Est ce exact ? Merci de votre retour.
02.07.2026 - 12:55DROPS Design answered:
Bonjour Cécile, par maille double vous entendez l'augmentation du 1er rang? Alors non on n'augmente qu'une seule fois, au début et à la fin du tout premier rang pour les mailles lisières, vous tricotez ensuite: 1 m lisière, 5 m jersey, A.2, 5 m jersey et 1 m lisière au point mousse. Le nombre de mailles de A.2 ne change pas, vous allez bien garder: 1+5+61+5+1=73 m + les augmentations que vous allez faire de chaque côté: 5 fois au total tous les 2 rangs = 73+(2x5)=83 m (ces augmentations s'ajoutent aux 5 m jersey de chaque côté de A.2) - après A.2 vous tricoterez A.3 au milieu du rang (les autres mailles en jersey) puis vous tricoterez A.4 et enfin A.5 sur toutes les mailles. Bon tricot!
02.07.2026 - 15:27
Cecile wrote:
Bonjour, j'ai beaucoup de mal pour commencer à tricoter avec 4 aiguilles doubles pointes. Est il possible de commencer en Magic loop ce pull, et est ce que les marqueurs sont répartis pareillement alors que j'aurais sur deux aiguilles, reparties les 12 mailles ? Merci à vous.
21.06.2026 - 18:14DROPS Design answered:
Bonjour Cécile, vous pouvez tout à fait tricoter en magic loop, mettez les marqueurs exactement de la même façon et suivez les indications tout pareil, vos mailles seront juste réparties sur les 2 moitiés de l'aiguille au lieu d'être sur les 4 aiguilles, mais les explication seront exactement les mêmes. bon tricot!
22.06.2026 - 15:06
 Rohna wrote:
I have a question about the A2 section. It says to work back and forth with 1 edge in garter, 3 in stockinette (I’m following L/XL), A2, 3 in stockinette and 1 garter . Then it says to work edge sts in garter st until finished measurements. What are the finished measurements? Thanks!
14.05.2026 - 23:19DROPS Design answered:
Hi Rohna, the measurement chart is at the bottom, under the pattern. The sleeve part should have approx. 27 cm. Happy knitting!
15.05.2026 - 08:28
Carol Whitman wrote:
How do you keep from having a hole at the center back where the cast-on is?
28.05.2025 - 18:01DROPS Design answered:
Dear Mrs Whitman, you can use the technique shown in this video or cast on as usual and baste the strand into the cast on edge stitches at the end, tighten and fasten. Happy knitting!
30.05.2025 - 08:16
 Karola wrote:
Habe jetzt Muster 1fertig jetzt meine frage muß ich von makierer 4und von makierer 1jeweils die Hälfte der maschen nehmen fürs muster 2
05.05.2025 - 20:57
Hélène wrote:
Est-ce que entre le 2e et 3e marqueur se tricote ensemble ou séparément. J’ai jamais eu autant de misère à suivre un tricot je m’en excuse. Je sais pas si c’est à cause de tricoter circulaire. Merci
15.04.2025 - 20:58DROPS Design answered:
Bonjour Hélène, lorsque vous avez tricoté A.1, vous terminez chaque côté séparément: vous tricotez d'abord les mailles entre le 4ème marqueur et le 1er marqueur - vous glissez celles entre le 1er et le 2ème marqueur en attente sur un fil (elles seront reprises pour la bordure), celles entre le 2ème et le 3ème marqueur aussi = elles seront tricotées ensuite pour l'autre manche et glissez également les mailles entre le 3ème et le 4ème marqueur en attente (elles seront également reprises pour la bordure). Vous tricotez maintenant les mailles sur l'aiguille (d'abord celles entre le 4ème et le 1er marqueur) en allers et retours. Bon tricot!
22.04.2025 - 10:00
|
|||||||||||||||||||
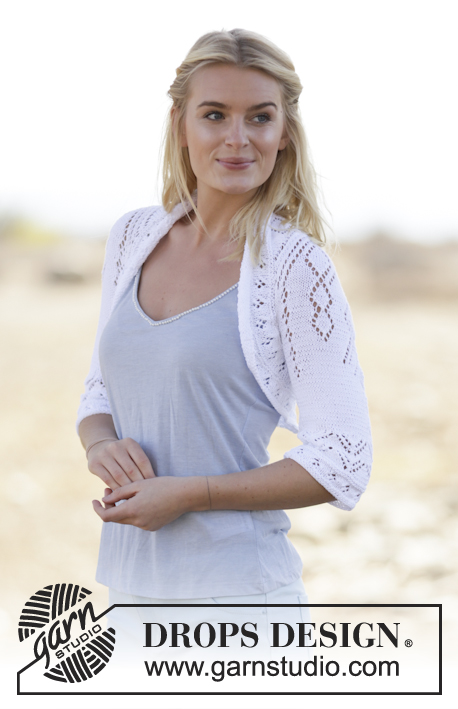
Kamelia#kameliashoulderpiece |
|||||||||||||||||||
 |
 |
||||||||||||||||||
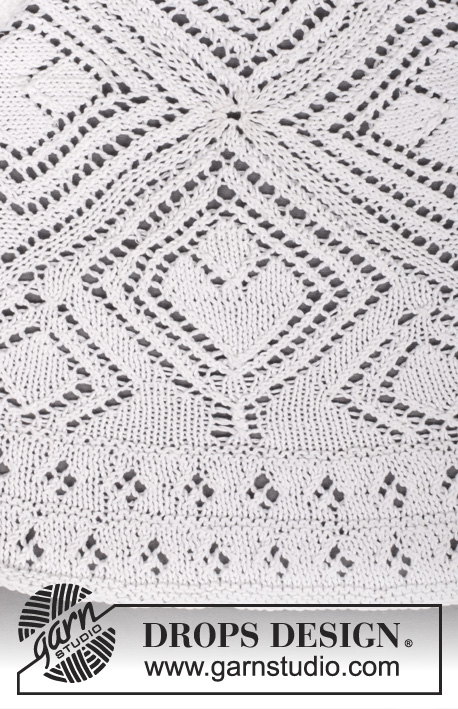
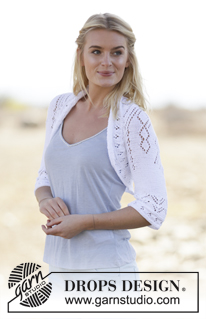
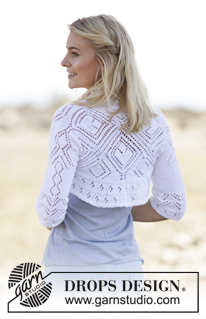
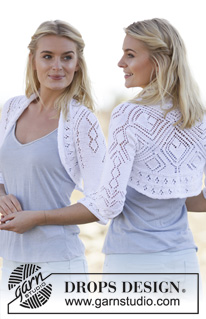
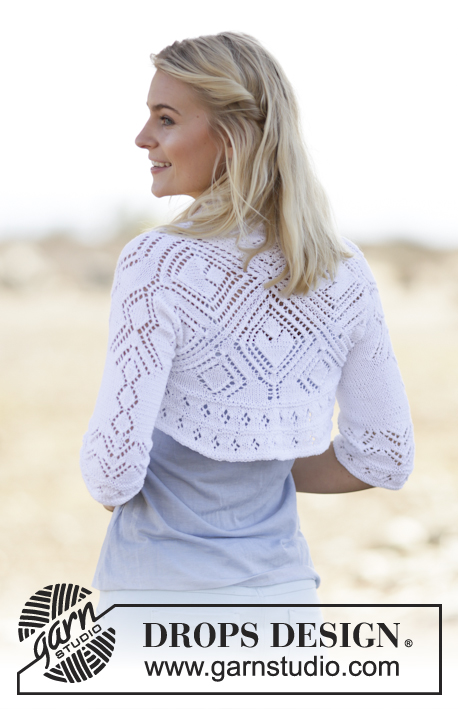
DROPS square knitted bolero with lace pattern in ”Safran”. Size: S - XXXL.
DROPS 160-25 |
|||||||||||||||||||
|
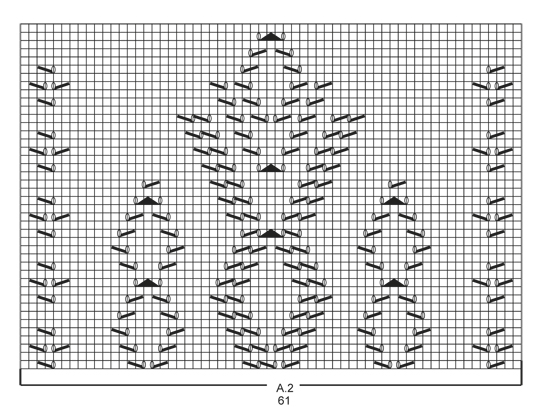
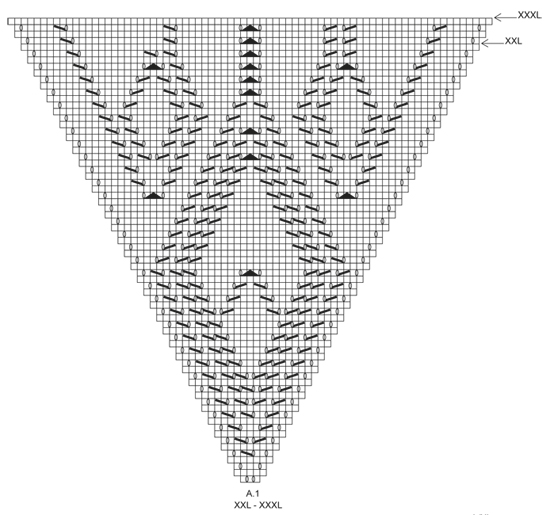
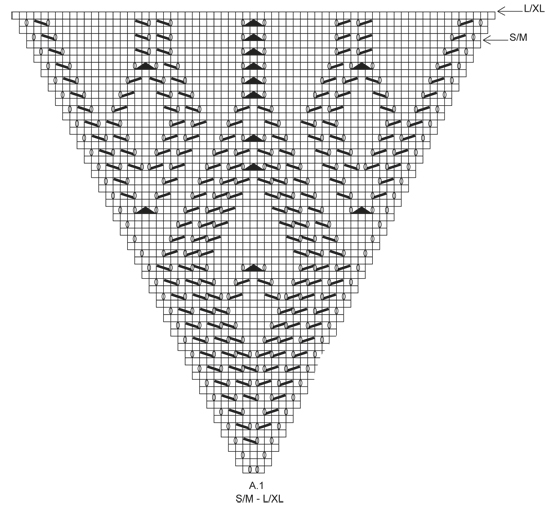
GARTER ST (back and forth): K all rows. 1 ridge = 2 rows K. INCREASE TIP: Inc 1 st by making 1 YO, on next row P YO twisted (i.e. work in back loop of st instead front) to avoid holes. PATTERN: See diagrams A.1 to A.6. The diagrams show all rows in pattern seen from RS. ---------------------------------------------------------- BOLERO: Work first a square in the round, then work out to each sleeve back and forth. BACK PIECE: Work in the round on double pointed needles, switch to circular needle when needed. Cast on 12 sts with Safran and distribute sts on 4 double pointed needles size 3.5 mm (= 3 sts on each needle). Then insert 4 markers in the piece as follows: Insert 1st marker between 3rd and 4th st, 2nd marker between 6th and 7th st, 3rd marker between 9th and 10th st and 4th marker between 12th and 1st st. Then work according to A.1 – choose diagram for correct size (= 4 times). Sts with markers are corner sts, let the markers follow when working outwards. REMEMBER THE KNITTING TENSION When A.1 has been worked 1 time vertically (see arrow for your size) each side will be worked seperatly = 63-67-71-75 sts along each side and 252-268-284-300 sts in total on needle. Then work only over the first 63-67-71-75 sts (= one side, sts between 4th and 1st marker), slip the other sides on stitch holders, work over sts between 2nd and 3rd marker later. Now work piece back and forth. On next row from RS work as follows: Work 2 sts in first st, K 0-2-4-6, A.2 (= 61 sts), K 0-2-4-6, work 2 sts in last st on row = 65-69-73-77 sts. Then work as follows: 1 edge st in GARTER ST - see explanation above, 1-3-5-7 sts in stocking st, A.2, 1-3-5-7 sts in stocking st, 1 edge st in garter st. Work edge sts in garter st until finished measurements. SIZE L/XL-XXL-XXXL: On next row from RS inc 1 st in each side of piece inside 1 edge st – READ INCREASE TIP, repeat inc on every row from RS 2-4-8 more times = 75-83-95 sts. Work inc sts in stocking st. ALL SIZES: = 65-75-83-95 sts. When A.2 has been worked 1 time vertically, work as follows from RS: 1 edge st in garter st, 27-32-36-42 sts in stocking st, A.3 (= 9 sts), 27-32-36-42 sts in stocking st, 1 edge st in garter st. Work A.3 2 times in total vertically. Work 0-6-0-4 rows in stocking st. On next row from RS, dec 3-1-1-3 sts evenly = 62-74-82-92 sts. P 1 row from WS. Work A.4 – see diagram for correct size (= 12-12-10-10 sts) 5-6-8-9 times in width. Work A.4 2-2-3-3 times in total vertically. Then work A.5 (= 6 sts) 10-12-13-15 times, AT THE SAME TIME on first row dec 0-0-2-0 sts evenly = 62-74-80-92 sts. Cast off when A.5 has been worked 1 time vertically. Work sts between 2nd and 3rd marker the same way. ASSEMBLY: Sew tog the side inside 1 edge st, 27 cm up from bottom of sleeve and up. Do same in the other side. EDGE: Worked in the round on circular needle. Beg at one sleeve seam and work with circular needle 3.5 mm with Safran from RS as follows: Pick up 20-25-28-30 sts inside 1 edge st in garter st, K the 63-67-71-75 sts from stitch holder, pick up 40-50-56-60 sts inside 1 edge st, K the 63-67-71-75 sts from stitch holder, pick up 20-25-28-30 sts = 206-234-254-270 sts. P 1 round - AT THE SAME TIME insert 4 markers in the piece as follows: P 40-47-52-56, insert 1st marker, P 23, insert 2nd marker, P 80-94-104-112, insert 3rd marker, P 23, insert 4th marker, work the rest of round (= P 40-47-52-56). When inc sts, do not inc sts between 1st and 2nd marker (marks the neck) and between 3rd and 4th marker (marks mid back on the back). K 1 round while AT THE SAME TIME inc 14-15-18-22 sts evenly = 220-249-272-292 sts. P 1 round. Then work A.6 (= 6 sts) AT THE SAME TIME on first round inc 14-15-16-20 sts evenly = 234-264-288-312 sts. A.6 is now worked 39-44-48-52 times in width. Repeat A.6 1 more time vertically AT THE SAME TIME on first round inc 24-30-36-36 sts evenly = 258-294-324-348 sts. A.6 is now worked 43-49-54-58 times in the round. When A.6 is done, loosely cast off. |
|||||||||||||||||||
Diagram explanations |
|||||||||||||||||||
|
|||||||||||||||||||
 |
|||||||||||||||||||
 |
|||||||||||||||||||
 |
|||||||||||||||||||
 |
|||||||||||||||||||
Have you finished this pattern?Tag your pictures with #dropspattern #kameliashoulderpiece or submit them to the #dropsfan gallery. Do you need help with this pattern?You'll find 17 tutorial videos, a Comments/Questions area and more by visiting the pattern on garnstudio.com. © 1982-2026 DROPS Design A/S. We reserve all rights. This document, including all its sub-sections, has copyrights. Read more about what you can do with our patterns at the bottom of each pattern on our site. |
|||||||||||||||||||






With over 40 years in knitting and crochet design, DROPS Design offers one of the most extensive collections of free patterns on the internet - translated to 17 languages. As of today we count 333 catalogues and 12532 patterns translated into English (UK/cm). 12532
We work hard to bring you the best knitting and crochet have to offer, inspiration and advice as well as great quality yarns at incredible prices! Would you like to use our patterns for other than personal use? You can read what you are allowed to do in the Copyright text at the bottom of all our patterns. Happy crafting!
Post a comment to pattern DROPS 160-25
We would love to hear what you have to say about this pattern!
If you want to leave a question, please make sure you select the correct category in the form below, to speed up the answering process. Required fields are marked *.